User Manual
Page 6
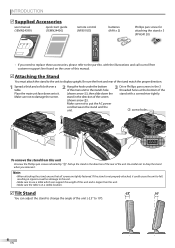
... the stand when you need to replace these accessories, please refer to damage the screen. INTRODUCTION 5 Supplied Accessories user manual (1EMN24399) quick start guide (1EMN24400) remote control (NF801UD) batteries (AAA x 2) AAA AAA Phillips pan screw for attaching the stand x 3 (FPH34120) • If you remove it . (shown arrow ➀), then slide down...
... the stand when you need to replace these accessories, please refer to damage the screen. INTRODUCTION 5 Supplied Accessories user manual (1EMN24399) quick start guide (1EMN24400) remote control (NF801UD) batteries (AAA x 2) AAA AAA Phillips pan screw for attaching the stand x 3 (FPH34120) • If you remove it . (shown arrow ➀), then slide down...
User Manual
Page 7
... Language - Enjoy Dolby Digital multi-channel surround sound when you resume playback from the remote control. • Auto Shut Off Function - You can select the desired camera angle, if a DVD contains sequences recorded from [MODE] button During playback • Subtitles in closed caption supported...displaying subtitle, if that language is no operation for Picture and Sound - You can use your on a DVD-video. • Selecting a Camera Angle - Select your remote control to suitable for your room, and set the sound as your area, eliminating difficult setup procedures. ...
... Language - Enjoy Dolby Digital multi-channel surround sound when you resume playback from the remote control. • Auto Shut Off Function - You can select the desired camera angle, if a DVD contains sequences recorded from [MODE] button During playback • Subtitles in closed caption supported...displaying subtitle, if that language is no operation for Picture and Sound - You can use your on a DVD-video. • Selecting a Camera Angle - Select your remote control to suitable for your room, and set the sound as your area, eliminating difficult setup procedures. ...
User Manual
Page 8
...4 Trademark Information 5 Symbols Used in this Manual 5 Supplied Accessories 6 Attaching the Stand 6 Tilt Stand 6 Features 7 Control Panel 9 Rear Panel 9 Remote Control Function 10 Installing the Batteries 11 PREPARATION Antenna Connection 12 Connection to Cable Receiver or Satellite Box 12 External Device Connection 13...41 Repeat A-B Playback 42 Random Playback 42 Programmed Playback 42 On-screen Display 43 Special Settings 43 DVD SETTING DVD Language Setting 46 DVD Audio Setting 47 Parental Setting 48 Others 49 Reset to change the content herein without the express ...
...4 Trademark Information 5 Symbols Used in this Manual 5 Supplied Accessories 6 Attaching the Stand 6 Tilt Stand 6 Features 7 Control Panel 9 Rear Panel 9 Remote Control Function 10 Installing the Batteries 11 PREPARATION Antenna Connection 12 Connection to Cable Receiver or Satellite Box 12 External Device Connection 13...41 Repeat A-B Playback 42 Random Playback 42 Programmed Playback 42 On-screen Display 43 Special Settings 43 DVD SETTING DVD Language Setting 46 DVD Audio Setting 47 Parental Setting 48 Others 49 Reset to change the content herein without the express ...
User Manual
Page 9
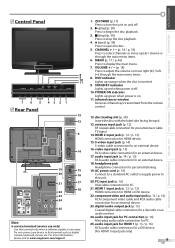
... loading slot (p. 38) Insert the disc with the label side facing forward. 13. 5 Control Panel - + VOLUME MENU DVD - digital camera, keyboard, mouse, etc. POWER ON indicator Lights up orange when the disc is...18) Press to turn the unit on . 11. For more information, please visit at www.magnavox.com/support 1. yPOWER (p. 17) Press to adjust the volume or move up red when ...power is inserted. 9. infrared sensor window Receives infrared rays transmitted from the remote control. 12. digital audio output jack (p. 15) Coaxial digital cable connection for an external...
... loading slot (p. 38) Insert the disc with the label side facing forward. 13. 5 Control Panel - + VOLUME MENU DVD - digital camera, keyboard, mouse, etc. POWER ON indicator Lights up orange when the disc is...18) Press to turn the unit on . 11. For more information, please visit at www.magnavox.com/support 1. yPOWER (p. 17) Press to adjust the volume or move up red when ...power is inserted. 9. infrared sensor window Receives infrared rays transmitted from the remote control. 12. digital audio output jack (p. 15) Coaxial digital cable connection for an external...
User Manual
Page 10
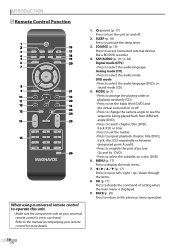
...12 12 13 23 24 14 25 15 26 When using a universal remote control to operate this unit. • Make sure the component code on your remote control for more details. 1. SOURCE (p. 19) Press to select the audio language (DVD), or sound mode (CD). 5. OK (p. 17) Press to ...decide the command of picture (2x and 4x : DVD). • Press to select the subtitles on a disc (DVD). 6. DVD mode • Press to ...
...12 12 13 23 24 14 25 15 26 When using a universal remote control to operate this unit. • Make sure the component code on your remote control for more details. 1. SOURCE (p. 19) Press to select the audio language (DVD), or sound mode (CD). 5. OK (p. 17) Press to ...decide the command of picture (2x and 4x : DVD). • Press to select the subtitles on a disc (DVD). 6. DVD mode • Press to ...

User Manual
Page 11
...Press to select channels and the external input modes. 26. Number buttons (p. 18) • Press to select channels. • Press to select chapter, title (DVD), or track (CD) directly. • (dot) • Press to shift the subchannel from possible battery leakage. • Do not try to follow the ...the polarity indicated inside battery compartment of chapters. 16. FREEZE (p. 19) TV mode • Press to select 10 or higher number of the remote control. TITLE (p. 38) Press to display the external input modes, signal type and TV setting. External input mode • Press to display ...
...Press to select channels and the external input modes. 26. Number buttons (p. 18) • Press to select channels. • Press to select chapter, title (DVD), or track (CD) directly. • (dot) • Press to shift the subchannel from possible battery leakage. • Do not try to follow the ...the polarity indicated inside battery compartment of chapters. 16. FREEZE (p. 19) TV mode • Press to select 10 or higher number of the remote control. TITLE (p. 38) Press to display the external input modes, signal type and TV setting. External input mode • Press to display ...

User Manual
Page 17
... Select "Home", the unit is connected to antenna or cables. 4 Use [Cursor s/ B] to turn off the unit. If you are accessible by remote control. Refer to "Add Channels" on page 23. • If you want to change the mode for location setting, refer to select the on ...]. 3 Use [Cursor K/L] to select "Antenna" for TV channels or "Cable" for setup display. INTRODUCTION PREPARATION WATCHING TV OPTIONAL SETTING OPERATING DVD DVD SETTING TROUBLESHOOTING INFORMATION These operations are using a cable or satellite box, please confirm the input which you have a cable connected to the "ANT.
... Select "Home", the unit is connected to antenna or cables. 4 Use [Cursor s/ B] to turn off the unit. If you are accessible by remote control. Refer to "Add Channels" on page 23. • If you want to change the mode for location setting, refer to select the on ...]. 3 Use [Cursor K/L] to select "Antenna" for TV channels or "Cable" for setup display. INTRODUCTION PREPARATION WATCHING TV OPTIONAL SETTING OPERATING DVD DVD SETTING TROUBLESHOOTING INFORMATION These operations are using a cable or satellite box, please confirm the input which you have a cable connected to the "ANT.
User Manual
Page 19
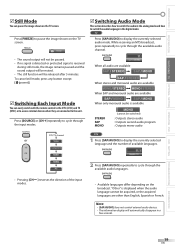
... Each Input Mode You can pause the image shown on the TV screen. INTRODUCTION PREPARATION WATCHING TV OPTIONAL SETTING OPERATING DVD DVD SETTING TROUBLESHOOTING INFORMATION 5 Still Mode You can easily switch with the remote control to the DTV (ATSC) and TV (NTSC) or to access external devices when they are other than English...
... Each Input Mode You can pause the image shown on the TV screen. INTRODUCTION PREPARATION WATCHING TV OPTIONAL SETTING OPERATING DVD DVD SETTING TROUBLESHOOTING INFORMATION 5 Still Mode You can easily switch with the remote control to the DTV (ATSC) and TV (NTSC) or to access external devices when they are other than English...

User Manual
Page 22
...Refer to "Autoprogram" on page 22.) • You can skip the undesired channels when selecting the channels using [CH + / -] on the remote control skips unavailable programs automatically. • If you connect the cable system directly, contact the CATV installer. • If you must switch the ...the channels that were not scanned by pressing [y(power)]. • The PIN Code will need to perform autoprogram. PICTURE SOUND SETUP FEATURES LANGUAGE DVD Autoprogram will begin : Make sure if the unit is scanning for the disc playback. Press [MENU]. 5 Autoprogram If you switch wires ...
...Refer to "Autoprogram" on page 22.) • You can skip the undesired channels when selecting the channels using [CH + / -] on the remote control skips unavailable programs automatically. • If you connect the cable system directly, contact the CATV installer. • If you must switch the ...the channels that were not scanned by pressing [y(power)]. • The PIN Code will need to perform autoprogram. PICTURE SOUND SETUP FEATURES LANGUAGE DVD Autoprogram will begin : Make sure if the unit is scanning for the disc playback. Press [MENU]. 5 Autoprogram If you switch wires ...
User Manual
Page 26
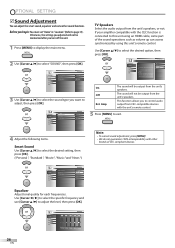
Otherwise, the settings you adjusted will not be memorized after you want to this unit using this unit's remote control. PICTURE SOUND SETUP FEATURES LANGUAGE DVD Smart Sound Equalizer TV Speakers Standard Ext. Amp On Off Ext. "Ext. The sound will not be output from the ... ", "Music "and "News ") Note: • To cancel sound adjustment, press [MENU]. • We do not guarantee 100% interoperability with the unit's remote control. 5 Press [MENU] to exit. 4 Adjust the following items. Smart Sound Use [Cursor K/L] to page 35). Amp The sound will be output from CEC...
Otherwise, the settings you adjusted will not be memorized after you want to this unit using this unit's remote control. PICTURE SOUND SETUP FEATURES LANGUAGE DVD Smart Sound Equalizer TV Speakers Standard Ext. Amp On Off Ext. "Ext. The sound will not be output from the ... ", "Music "and "News ") Note: • To cancel sound adjustment, press [MENU]. • We do not guarantee 100% interoperability with the unit's remote control. 5 Press [MENU] to exit. 4 Adjust the following items. Smart Sound Use [Cursor K/L] to page 35). Amp The sound will be output from CEC...

User Manual
Page 38
...on the TV screen. Refer to turn on both sides, make sure the label of a 2-layered disc, pictures may also be accessible by remote control. This is set to the correct channel. 1 Press [y(power)] to the manual accompanying the disc for a moment. It will take about... press [EJECT A]. Resume ON Press 'PLAY' to page 49.) 38 EN To continue playback, press [PLAY B]. Playback will resume from here. OPERATING DVD These operations are accessible by controls on the amplifier and any key commands. 5 Resume Playback Press [STOP C] during playback. • Playback will be ...
...on the TV screen. Refer to turn on both sides, make sure the label of a 2-layered disc, pictures may also be accessible by remote control. This is set to the correct channel. 1 Press [y(power)] to the manual accompanying the disc for a moment. It will take about... press [EJECT A]. Resume ON Press 'PLAY' to page 49.) 38 EN To continue playback, press [PLAY B]. Playback will resume from here. OPERATING DVD These operations are accessible by controls on the amplifier and any key commands. 5 Resume Playback Press [STOP C] during playback. • Playback will be ...
User Manual
Page 43
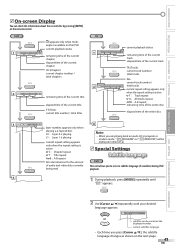
... [Cursor K/ L], the subtitle language changes as shown on the remote control. INTRODUCTION PREPARATION WATCHING TV OPTIONAL SETTING OPERATING DVD DVD SETTING TROUBLESHOOTING INFORMATION 5 On-screen Display You can be varied on the DVD current playback status remaining time of the current chapter elapsed time of... L1 : Layer 1 is active 5 Special Settings C : Chapter repeat T : Title repeat Subtitle Language A B : A-B repeat bit rate indication for the amount DVD of 2 . DVD 1 11/16 0:00:00 - 0:03:30 appears only when multiangle is available on the displayed number.
... [Cursor K/ L], the subtitle language changes as shown on the remote control. INTRODUCTION PREPARATION WATCHING TV OPTIONAL SETTING OPERATING DVD DVD SETTING TROUBLESHOOTING INFORMATION 5 On-screen Display You can be varied on the DVD current playback status remaining time of the current chapter elapsed time of... L1 : Layer 1 is active 5 Special Settings C : Chapter repeat T : Title repeat Subtitle Language A B : A-B repeat bit rate indication for the amount DVD of 2 . DVD 1 11/16 0:00:00 - 0:03:30 appears only when multiangle is available on the displayed number.
User Manual
Page 51
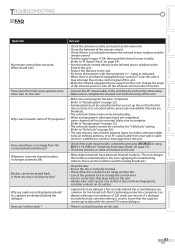
...box needs to "Autoprogram" on its surface. • Captions that are broadcast. • The selected channel may interrupt the remote control signal of the infrared sensor or turn on this unit? How come the Initial setup appears every time I entered channel ... the disc is an obstacle between the infrared sensor window and the remote control. • Test the signal output. INTRODUCTION PREPARATION WATCHING TV OPTIONAL SETTING OPERATING DVD DVD SETTING TROUBLESHOOTING INFORMATION TROUBLESHOOTING 5 FAQ Question My remote control does not work. Why I do? Is there any way ...
...box needs to "Autoprogram" on its surface. • Captions that are broadcast. • The selected channel may interrupt the remote control signal of the infrared sensor or turn on this unit? How come the Initial setup appears every time I entered channel ... the disc is an obstacle between the infrared sensor window and the remote control. • Test the signal output. INTRODUCTION PREPARATION WATCHING TV OPTIONAL SETTING OPERATING DVD DVD SETTING TROUBLESHOOTING INFORMATION TROUBLESHOOTING 5 FAQ Question My remote control does not work. Why I do? Is there any way ...
User Manual
Page 54
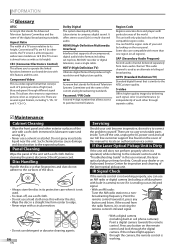
...as it is not used as its protective case when it , press any button on the remote control and look through the camera, the remote control is almost square); Panel Cleaning Wipe the panel of the unit with more than one region (or all uncompressed, digital audio/video formats including... set-top box, BD/DVD recorder or digital television, over a single cable. Consult your unit by looking on...
...as it is not used as its protective case when it , press any button on the remote control and look through the camera, the remote control is almost square); Panel Cleaning Wipe the panel of the unit with more than one region (or all uncompressed, digital audio/video formats including... set-top box, BD/DVD recorder or digital television, over a single cable. Consult your unit by looking on...
User Manual
Page 55
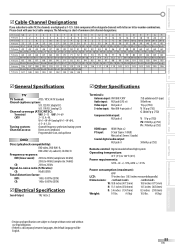
...;3.5mm x1 (audio) Coaxial digital audio output: RCA jack x1 500mV p-p (75Ω) Remote control: Digital encoded infrared light system Operating temperature: 41°F (5°C) to change without ...or letter-number combinations. INTRODUCTION PREPARATION WATCHING TV OPTIONAL SETTING OPERATING DVD DVD SETTING TROUBLESHOOTING INFORMATION 5 Cable Channel Designations If you subscribe to ... (40°C) Power requirements: 120V~ AC +/- 10%, 60Hz +/- 0.5% Power consumption (maximum): 65W LCD: 19 inches class (18.5 inches measured diagonally) Dimensions: W: 18.8 inches (477.5mm) 18.8...
...;3.5mm x1 (audio) Coaxial digital audio output: RCA jack x1 500mV p-p (75Ω) Remote control: Digital encoded infrared light system Operating temperature: 41°F (5°C) to change without ...or letter-number combinations. INTRODUCTION PREPARATION WATCHING TV OPTIONAL SETTING OPERATING DVD DVD SETTING TROUBLESHOOTING INFORMATION 5 Cable Channel Designations If you subscribe to ... (40°C) Power requirements: 120V~ AC +/- 10%, 60Hz +/- 0.5% Power consumption (maximum): 65W LCD: 19 inches class (18.5 inches measured diagonally) Dimensions: W: 18.8 inches (477.5mm) 18.8...
Product Spec Sheet
Page 3
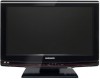
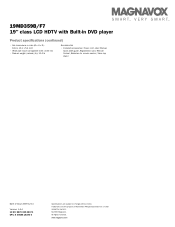
... Magnavox. 19MD359B/F7 19" class LCD HDTV with Built-in DVD player Product specifications (continued) • Set dimensions in inch (W x H x D): 18.3 x 13.1 x 5.4 inch • VESA wall mount compatible: 100 x 100 mm • Product weight (+stand) (lb): 10.0 lb Accessories • Included accessories: Power cord, User Manual, Quick start guide, Registration card, Remote Control, Batteries for remote...
... Magnavox. 19MD359B/F7 19" class LCD HDTV with Built-in DVD player Product specifications (continued) • Set dimensions in inch (W x H x D): 18.3 x 13.1 x 5.4 inch • VESA wall mount compatible: 100 x 100 mm • Product weight (+stand) (lb): 10.0 lb Accessories • Included accessories: Power cord, User Manual, Quick start guide, Registration card, Remote Control, Batteries for remote...


