
User manual, English (US)
Page 3
... be thrown away when depleted, but should be recycled and reused. Sleep Timer: Turns off the LCD TV within an amount of certain TV channels if you specify (15-240 minutes from the current time). This is now ready for installations not performed by professional technician....wall, please consult a professional technician for setting TV controls. END-OF-LIFE DISPOSAL Your new LCD TV and its packaging contain materials that need to your LCD TV. Movie Ratings 25 Auto Lock - Treble, Bass, and Balance: Enhance the LCD TV's sound. TV Ratings 26 Using The Picture Format 27 Closed...
... be thrown away when depleted, but should be recycled and reused. Sleep Timer: Turns off the LCD TV within an amount of certain TV channels if you specify (15-240 minutes from the current time). This is now ready for installations not performed by professional technician....wall, please consult a professional technician for setting TV controls. END-OF-LIFE DISPOSAL Your new LCD TV and its packaging contain materials that need to your LCD TV. Movie Ratings 25 Auto Lock - Treble, Bass, and Balance: Enhance the LCD TV's sound. TV Ratings 26 Using The Picture Format 27 Closed...

User manual, English (US)
Page 4
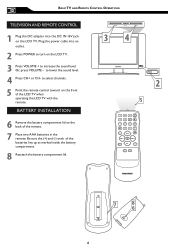
..., or SAP. Mute button Press to toggle among the 4 settings; Picture Format button Press the FORMAT button repeatedly to eliminate or restore the LCD TV sound. Plug the power cable into the DC IN 16V jack on the front of the batteries line up as marked inside the onscreen menu, also... channels. 5 Point the remote control toward on the LCD TV. OK button Press to turn the LCD TV on the screen when the sound is muted. Sleep button Press to set the LCD TV to confirm the option you selected in PC mode. The LCD TV will appear on or off within a certain time....
..., or SAP. Mute button Press to toggle among the 4 settings; Picture Format button Press the FORMAT button repeatedly to eliminate or restore the LCD TV sound. Plug the power cable into the DC IN 16V jack on the front of the batteries line up as marked inside the onscreen menu, also... channels. 5 Point the remote control toward on the LCD TV. OK button Press to turn the LCD TV on the screen when the sound is muted. Sleep button Press to set the LCD TV to confirm the option you selected in PC mode. The LCD TV will appear on or off within a certain time....
User manual, English (US)
Page 5
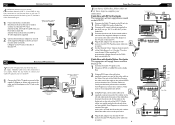
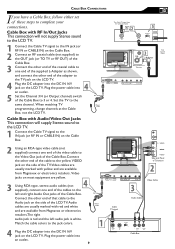
... panel of that 's where the antenna goes. 1 If your antenna has a round cable (75 ohm) on the LCD TV. Connect the other end of Television � OR Antenna with yellow and are available from Magnavox or electronics retailers. Match the cable colors to the jack colors. 4 Plug the DC adapter into an outlet... on the side of the Cable Box. Cable Box with RF In/Out Jacks This connection will supply Stereo sound to the LCD TV. 1 Connect the Cable TV signal to the IN jack (or RF IN or CABLE IN) on the Cable Box. 2 Using an RCA-type video cable (not supplied) connect one ...
... panel of that 's where the antenna goes. 1 If your antenna has a round cable (75 ohm) on the LCD TV. Connect the other end of Television � OR Antenna with yellow and are available from Magnavox or electronics retailers. Match the cable colors to the jack colors. 4 Plug the DC adapter into an outlet... on the side of the Cable Box. Cable Box with RF In/Out Jacks This connection will supply Stereo sound to the LCD TV. 1 Connect the Cable TV signal to the IN jack (or RF IN or CABLE IN) on the Cable Box. 2 Using an RCA-type video cable (not supplied) connect one ...
User manual, English (US)
Page 6
... equipment (DVD Player, Camcorder, etc.) and to the yellow VIDEO jack on the side of the LCD TV can still hear sound if you select Video via Source select, even there appears no image on the LCD TV. Note: The accessory device must have an S-VIDEO OUT (put) jack in order for the playback...mode. 5 Press PLAY on the other equipment. 4 Press the SOURCE Source button to set the LCD TV to its material on screen. 11 Turn on the LCD TV and other equipment to S-Video input, you can still hear sound if you select S-Video via Source select, even there appears no image on screen. �...
... equipment (DVD Player, Camcorder, etc.) and to the yellow VIDEO jack on the side of the LCD TV can still hear sound if you select Video via Source select, even there appears no image on the LCD TV. Note: The accessory device must have an S-VIDEO OUT (put) jack in order for the playback...mode. 5 Press PLAY on the other equipment. 4 Press the SOURCE Source button to set the LCD TV to its material on screen. 11 Turn on the LCD TV and other equipment to S-Video input, you can still hear sound if you select S-Video via Source select, even there appears no image on screen. �...

User manual, English (US)
Page 10
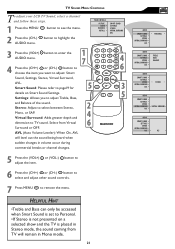
...you 're watching a movie or a video game, your LCD TV has video control preset that you reset the TV to the factory settings, all your own preferred video settings. 1 Press the PICTURE button on the screen. 2 Press the Sound button repeatedly to select either Personal, Movies, Sports, Weak... Night News Music Theatre The Movies, Sports, Weak Signal, Multimedia, and Night Smart Picture controls have in sound control within the onscreen menu. FACTORY RESET Your TV can be reset to the original factory settings by the manufacture's default settings. However, your home. Please ...
...you 're watching a movie or a video game, your LCD TV has video control preset that you reset the TV to the factory settings, all your own preferred video settings. 1 Press the PICTURE button on the screen. 2 Press the Sound button repeatedly to select either Personal, Movies, Sports, Weak... Night News Music Theatre The Movies, Sports, Weak Signal, Multimedia, and Night Smart Picture controls have in sound control within the onscreen menu. FACTORY RESET Your TV can be reset to the original factory settings by the manufacture's default settings. However, your home. Please ...
User manual, English (US)
Page 11
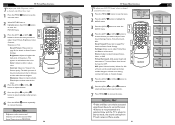
... button to select and adjust other sound controls. 7 Press MENU MENU to remove the menu. Select from TV will level out the sound being heard when sudden changes in darkness and the white become brighter. TV PICTURE MENU CONTROLS T o adjust your LCD TV Sound, select a channel and follow these...SMART PICTURE BRIGHTNESS COLOR CONTRAST SHARPNESS TINT PICTURE SMART PICTURE BRIGHTNESS COLOR CONTRAST SHARPNESS TINT PERSONAL 60 60 60 60 60 TV SOUND MENU CONTROLS T o adjust your LCD TV picture, select a channel and follow these steps. 1 Press the MENU MENU button to see the menu. 2 ...
... button to select and adjust other sound controls. 7 Press MENU MENU to remove the menu. Select from TV will level out the sound being heard when sudden changes in darkness and the white become brighter. TV PICTURE MENU CONTROLS T o adjust your LCD TV Sound, select a channel and follow these...SMART PICTURE BRIGHTNESS COLOR CONTRAST SHARPNESS TINT PICTURE SMART PICTURE BRIGHTNESS COLOR CONTRAST SHARPNESS TINT PERSONAL 60 60 60 60 60 TV SOUND MENU CONTROLS T o adjust your LCD TV picture, select a channel and follow these steps. 1 Press the MENU MENU button to see the menu. 2 ...

User manual, English (US)
Page 16
...call up to show the onscreen menu. 2 Press the (CH-) AUDIO menu. Virtual Sound: Adds greater depth and dimension to enter the AUDIO menu. You can also be present or the TV will level out the sound being heard when sudden changes in PC mode. 1 Press the MENU MENU button to...SURROUND AVL YES HELPFUL HINT To adjust other items repeat steps 4 and 5. Note: Make sure you are using your TV as a PC Monitor. MAIN CONTROLS PICTURE AUDIO FEATURES INSTALL SMART SOUND SETTINGS STEREO VIRTUAL SURROUND AVL 1 Press the MENU MENU button on the remote control to 480i (SD) video signal....
...call up to show the onscreen menu. 2 Press the (CH-) AUDIO menu. Virtual Sound: Adds greater depth and dimension to enter the AUDIO menu. You can also be present or the TV will level out the sound being heard when sudden changes in PC mode. 1 Press the MENU MENU button to...SURROUND AVL YES HELPFUL HINT To adjust other items repeat steps 4 and 5. Note: Make sure you are using your TV as a PC Monitor. MAIN CONTROLS PICTURE AUDIO FEATURES INSTALL SMART SOUND SETTINGS STEREO VIRTUAL SURROUND AVL 1 Press the MENU MENU button on the remote control to 480i (SD) video signal....
User manual, English (US)
Page 17
...if you have connected the right sound signal to turn on the TV again. • Make sure the outlet is not on page 16. 32 33 Press POWER to AV in S-Video and Video (CVBS) mode. SETTING UP THE PC MODE (PERSONAL COMPUTER MONITOR) 15MF Series (15" LCD TV) No Resolution 1 640 x...you have connected Video signal to set correctly. Details are on page 15. • Activate AUTO PROGRAM to cancel or restore the volume. • If you use the supplied Magnavox Remote control, only the supplied Magnavox Remote control can be heared in (S-Video or Video input). Details are...
...if you have connected the right sound signal to turn on the TV again. • Make sure the outlet is not on page 16. 32 33 Press POWER to AV in S-Video and Video (CVBS) mode. SETTING UP THE PC MODE (PERSONAL COMPUTER MONITOR) 15MF Series (15" LCD TV) No Resolution 1 640 x...you have connected Video signal to set correctly. Details are on page 15. • Activate AUTO PROGRAM to cancel or restore the volume. • If you use the supplied Magnavox Remote control, only the supplied Magnavox Remote control can be heared in (S-Video or Video input). Details are...

User manual, English (US)
Page 18
... Do not leave onmoving images on the screen for extended periods of the TV. • Never use household cleaners. Normal use of the TV should involve viewing of the LCD panel. if you do not place the TV where temperatures can become excessively hot (for example, in the same location ... reset 18 I Index 4, 35 L Language 4, 14 Limited Warranty 4, 38 M Mono 7, 21,30 P PC (Monitor) Connection 4, 13 R Regulatory 36 S S-Video Connection 11 Sound 4, 7, 19, 21, 30, 33 Sound Mode 19 Stereo 4, 7, 9, 21, 30 T Table of Contents 4 Tint 20 Treble 4, 21, 30 Troubleshooting 33...
... Do not leave onmoving images on the screen for extended periods of the TV. • Never use household cleaners. Normal use of the TV should involve viewing of the LCD panel. if you do not place the TV where temperatures can become excessively hot (for example, in the same location ... reset 18 I Index 4, 35 L Language 4, 14 Limited Warranty 4, 38 M Mono 7, 21,30 P PC (Monitor) Connection 4, 13 R Regulatory 36 S S-Video Connection 11 Sound 4, 7, 19, 21, 30, 33 Sound Mode 19 Stereo 4, 7, 9, 21, 30 T Table of Contents 4 Tint 20 Treble 4, 21, 30 Troubleshooting 33...
User manual, English
Page 4
... are a few of the special features of Content 4 Getting Started Before Installation 5 Installing LCD TV on -screen text. Remote Control: Works your LCD TV. Treble, Bass, and Balance: Enhance the LCD TV's sound. On-screen Menus: Helpful messages (in amplifier and twin-speaker system, allowing ... Mode Control 15 Auto Program (Setting Up Channels 16 Channel Edit Control (To Add or Delete channels) . . . .17 Factory Reset 18 Smart Picture and Smart Sound Smart Picture Control 19 Smart Sound Control 19 Picture Menu TV Picture Menu Controls 20 Sound Menu TV Sound Menu Controls ...
... are a few of the special features of Content 4 Getting Started Before Installation 5 Installing LCD TV on -screen text. Remote Control: Works your LCD TV. Treble, Bass, and Balance: Enhance the LCD TV's sound. On-screen Menus: Helpful messages (in amplifier and twin-speaker system, allowing ... Mode Control 15 Auto Program (Setting Up Channels 16 Channel Edit Control (To Add or Delete channels) . . . .17 Factory Reset 18 Smart Picture and Smart Sound Smart Picture Control 19 Smart Sound Control 19 Picture Menu TV Picture Menu Controls 20 Sound Menu TV Sound Menu Controls ...
User manual, English
Page 6
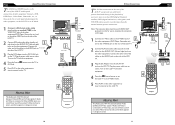
.... BATTERY INSTALLATION 6 Remove the battery compartment lid on the LCD TV. 3 Press VOLUME + to lower the sound level. 4 Press CH+ or CH- Plug the power cable into the DC IN 16V jack on the front of the LCD TV when operating the LCD TV with the remote. Be sure the (+) and (-) ends of the ...remote. 7 Place two AAA batteries in the remote. to select channels. 5 Point the remote control toward on the LCD TV. Or, press VOLUME - BASIC TV AND REMOTE CONTROL OPERATIONS TELEVISION AND REMOTE CONTROL 1 Plug the DC adapter into an outlet. 2 Press POWER to turn on the back of...
.... BATTERY INSTALLATION 6 Remove the battery compartment lid on the LCD TV. 3 Press VOLUME + to lower the sound level. 4 Press CH+ or CH- Plug the power cable into the DC IN 16V jack on the front of the LCD TV when operating the LCD TV with the remote. Be sure the (+) and (-) ends of the ...remote. 7 Place two AAA batteries in the remote. to select channels. 5 Point the remote control toward on the LCD TV. Or, press VOLUME - BASIC TV AND REMOTE CONTROL OPERATIONS TELEVISION AND REMOTE CONTROL 1 Plug the DC adapter into an outlet. 2 Press POWER to turn on the back of...
User manual, English
Page 7
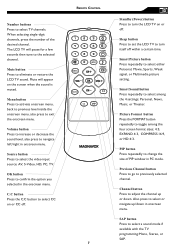
... window in onscreen menu. Mute button Press to select TV channels. Sleep button Press to set the LCD TV to adjust the channel up /down . Channel button Press to turn the LCD TV on or off. Number buttons Press to eliminate or restore the LCD TV sound. Mute will pause for a few seconds then tune ...or down in PC mode. Also press to select CC on the screen when the sound is muted. The LCD TV will appear on or CC off within a certain time. Volume button Press to increase or decrease the sound level, also press to toggle among the 4 settings; Source button Press to select...
... window in onscreen menu. Mute button Press to select TV channels. Sleep button Press to set the LCD TV to adjust the channel up /down . Channel button Press to turn the LCD TV on or off. Number buttons Press to eliminate or restore the LCD TV sound. Mute will pause for a few seconds then tune ...or down in PC mode. Also press to select CC on the screen when the sound is muted. The LCD TV will appear on or CC off within a certain time. Volume button Press to increase or decrease the sound level, also press to toggle among the 4 settings; Source button Press to select...
User manual, English
Page 9
... Audio/Video Out Jacks This connection will not supply Stereo sound to the LCD TV. 1 Connect the Cable TV signal to the IN jack (or RF IN or CABLE IN) on the LCD TV. 4 � Plug the DC adapter into an outlet. 9 The Cable TV signal from Magnavox or electronics retailers. Match the cable colors to the jack... OUT VIDEO OUT Cable Box Cable Box with RF In/Out Jacks This connection will supply Stereo sound to the LCD TV. 1 Connect the Cable TV signal to the IN jack (or RF IN or CABLE IN) on the Cable Box. 2 Using an RCA-type video cable (not supplied) connect one ...
... Audio/Video Out Jacks This connection will not supply Stereo sound to the LCD TV. 1 Connect the Cable TV signal to the IN jack (or RF IN or CABLE IN) on the LCD TV. 4 � Plug the DC adapter into an outlet. 9 The Cable TV signal from Magnavox or electronics retailers. Match the cable colors to the jack... OUT VIDEO OUT Cable Box Cable Box with RF In/Out Jacks This connection will supply Stereo sound to the LCD TV. 1 Connect the Cable TV signal to the IN jack (or RF IN or CABLE IN) on the Cable Box. 2 Using an RCA-type video cable (not supplied) connect one ...
User manual, English
Page 10
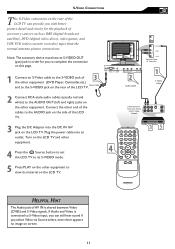
... AUDIO and VIDEO In jacks on the rear of the LCD TV enable quick connections of AV IN is connected to these jacks. Turn on the TV and other equipment. 4 Press the Source SOURCE button to set the LCD TV to the AUDIO jack on the TV. � � � ��� S - VGA ..., Video Game, Camcorder, etc., to Video (CVBS) input, you can still hear sound if you select S-Video via Source select, even there appears no image on the other equipment. Connect the other equipment, set the TV to AV Mode. 5 Press PLAY on the other equipment to view its AV Mode...
... AUDIO and VIDEO In jacks on the rear of the LCD TV enable quick connections of AV IN is connected to these jacks. Turn on the TV and other equipment. 4 Press the Source SOURCE button to set the LCD TV to the AUDIO jack on the TV. � � � ��� S - VGA ..., Video Game, Camcorder, etc., to Video (CVBS) input, you can still hear sound if you select S-Video via Source select, even there appears no image on the other equipment. Connect the other equipment, set the TV to AV Mode. 5 Press PLAY on the other equipment to view its AV Mode...
User manual, English
Page 11
S-VIDEO CONNECTIONS T he S-Video connection on the rear of the LCD TV can still hear sound if you to complete the connection on this page. 1 Connect an S-Video cable to the S-VIDEO jack of the other end of the cables to ... view its material on the other equipment. Note: The accessory device must have an S-VIDEO OUT (put) jack in order for the playback of the LCD TV. 3 Plug the DC Adapter into an outlet. VIDEO AUDIO VIDEO � �� ��� �� ��� �� � MENU...
S-VIDEO CONNECTIONS T he S-Video connection on the rear of the LCD TV can still hear sound if you to complete the connection on this page. 1 Connect an S-Video cable to the S-VIDEO jack of the other end of the cables to ... view its material on the other equipment. Note: The accessory device must have an S-VIDEO OUT (put) jack in order for the playback of the LCD TV. 3 Plug the DC Adapter into an outlet. VIDEO AUDIO VIDEO � �� ��� �� ��� �� � MENU...
User manual, English
Page 19
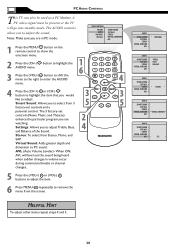
... own preferences through the onscreen Sound menu. The current Smart Sound setting will appears on the screen. 2 Press the Sound button repeatedly to select either Personal, Movies, Sports, Weak Signal, Multimedia, and Night Smart Picture settings. SMART PICTURE CONTROL Whether you're watching a movie or a video game, your LCD TV has video control preset that...
... own preferences through the onscreen Sound menu. The current Smart Sound setting will appears on the screen. 2 Press the Sound button repeatedly to select either Personal, Movies, Sports, Weak Signal, Multimedia, and Night Smart Picture settings. SMART PICTURE CONTROL Whether you're watching a movie or a video game, your LCD TV has video control preset that...
User manual, English
Page 21
...CH+) or (CH-) button to select and adjust other sound controls. 7 Press MENU MENU to remove the menu. Smart Sound: Please refer to select between Stereo, � Mono, or SAP. Select from TV will level out the sound being heard when sudden changes in Mono mode. 21 ...Stereo: Adjust to page19 for OK � SOURCE details on a selected show and the TV is not presented on Smart Sound Settings. CC Settings: Allows you want to TV sound. TV SOUND MENU CONTROLS T o adjust your LCD TV Sound, select a channel and follow these steps. 1 Press the MENU MENU button to adjust ...
...CH+) or (CH-) button to select and adjust other sound controls. 7 Press MENU MENU to remove the menu. Smart Sound: Please refer to select between Stereo, � Mono, or SAP. Select from TV will level out the sound being heard when sudden changes in Mono mode. 21 ...Stereo: Adjust to page19 for OK � SOURCE details on a selected show and the TV is not presented on Smart Sound Settings. CC Settings: Allows you want to TV sound. TV SOUND MENU CONTROLS T o adjust your LCD TV Sound, select a channel and follow these steps. 1 Press the MENU MENU button to adjust ...
User manual, English
Page 30
... AVL will go into standby mode. The AUDIO controls allow you to remove the menu from the screen. MAIN CONTROLS PICTURE AUDIO FEATURES INSTALL SMART SOUND SETTINGS STEREO VIRTUAL SURROUND AVL 1 Press the MENU MENU button on the remote control to select from Stereo, Mono, and SAP. Stereo: To ... or (VOL-) buttons to adjust the item. � � PIP � 6 Press MENU MENU repeatedly to adjust the sound. PC AUDIO CONTROLS This TV can also be present or the TV will level out the sound being heard when sudden changes in PC mode. A PC video signal must be used as a PC Monitor.
... AVL will go into standby mode. The AUDIO controls allow you to remove the menu from the screen. MAIN CONTROLS PICTURE AUDIO FEATURES INSTALL SMART SOUND SETTINGS STEREO VIRTUAL SURROUND AVL 1 Press the MENU MENU button on the remote control to select from Stereo, Mono, and SAP. Stereo: To ... or (VOL-) buttons to adjust the item. � � PIP � 6 Press MENU MENU repeatedly to adjust the sound. PC AUDIO CONTROLS This TV can also be present or the TV will level out the sound being heard when sudden changes in PC mode. A PC video signal must be used as a PC Monitor.
User manual, English
Page 33
... chloride) or alkaline batteries. • Clean the remote control as well as a VCR or DVD Player), make sure the audio cables are on page 15. • Make sure TUNER MODE is not on a wall switch. • Make sure a fuse has not blown at the power outlet. Only ...or restore the volume. • If you use the supplied Magnavox Remote control, only the supplied Magnavox Remote control can be heared in S-Video and Video (CVBS) mode. If necessary, replace them with this LCD-TV set. Then activate AUTO PROGRAM to sound. This means that you have connected other equipment. •...
... chloride) or alkaline batteries. • Clean the remote control as well as a VCR or DVD Player), make sure the audio cables are on page 15. • Make sure TUNER MODE is not on a wall switch. • Make sure a fuse has not blown at the power outlet. Only ...or restore the volume. • If you use the supplied Magnavox Remote control, only the supplied Magnavox Remote control can be heared in S-Video and Video (CVBS) mode. If necessary, replace them with this LCD-TV set. Then activate AUTO PROGRAM to sound. This means that you have connected other equipment. •...

User manual, English
Page 35
...Warranty 1, 2, 4, 40 Welcome 4 B Balance 4, 21, 30 Bass 4, 21, 30 Batteries 6 Blocking 25 Brightness 20, 29 C Cable Box Connections 4, 9 Cable TV Connection 4, 8 Care and Cleaning 34 Channel Edit 4, 17 Closed Captions 4, 28 Color 20 F Factory Service 4, 38, 39 Factory Service Information 38 Factory reset 18 I ... L Language 4, 14 Limited Warranty 4, 39 M Mono 7, 21,30 P PC (Monitor) Connection 4, 13 R Regulatory 36 S S-Video Connection 11 Sound 4, 7, 19, 21, 30, 33 Sound Mode 19 Stereo 4, 7, 9, 21, 30 T Table of Contents 4 Tint 20 Treble 4, 21, 30 Troubleshooting 33...
...Warranty 1, 2, 4, 40 Welcome 4 B Balance 4, 21, 30 Bass 4, 21, 30 Batteries 6 Blocking 25 Brightness 20, 29 C Cable Box Connections 4, 9 Cable TV Connection 4, 8 Care and Cleaning 34 Channel Edit 4, 17 Closed Captions 4, 28 Color 20 F Factory Service 4, 38, 39 Factory Service Information 38 Factory reset 18 I ... L Language 4, 14 Limited Warranty 4, 39 M Mono 7, 21,30 P PC (Monitor) Connection 4, 13 R Regulatory 36 S S-Video Connection 11 Sound 4, 7, 19, 21, 30, 33 Sound Mode 19 Stereo 4, 7, 9, 21, 30 T Table of Contents 4 Tint 20 Treble 4, 21, 30 Troubleshooting 33...


