User Manual
Page 1
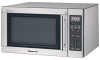
Microwave oven MCD1611ST INSTRUCTION MANUAL Before operating this oven, please read these instructions completely. 1.6 cu.ft.
Microwave oven MCD1611ST INSTRUCTION MANUAL Before operating this oven, please read these instructions completely. 1.6 cu.ft.
User Manual
Page 2
... STATEMENT (U.S.A ONLY 3 GROUNDING INSTRUCTIONS ...3 INSTALLATION ...4 SPECIFICATIONS ...5 FEATURES DIAGRAM ...6-7 OPERATION PROCEDURE ...8 CONTROLS ...9 SETTING THE CLOCK ...9 TIME DEFROSTING ...9 WEIGHT DEFROSTING ...10 COOKING IN ONE STAGE ...11 COOKING IN TWO STAGES 11 KITCHEN TIMER MODE ...12 SPEEDY COOK ...13 ONE TOUCH COOKING ...13-14 LESS, MORE ...15 CHILD SAFETY LOCK ...15 TO STOP THE OVEN WHILE THE OVEN IS OPERATING 15 UTENSIL TEST ...16 MICROWAVE UTENSILS ...16 CARE OF YOUR MICROWAVE OVEN 17 USE YOUR MICROWAVE OVEN SAFELY 18 BEFORE YOU CALL FOR SERVICE 19 QUESTIONS AND...
... STATEMENT (U.S.A ONLY 3 GROUNDING INSTRUCTIONS ...3 INSTALLATION ...4 SPECIFICATIONS ...5 FEATURES DIAGRAM ...6-7 OPERATION PROCEDURE ...8 CONTROLS ...9 SETTING THE CLOCK ...9 TIME DEFROSTING ...9 WEIGHT DEFROSTING ...10 COOKING IN ONE STAGE ...11 COOKING IN TWO STAGES 11 KITCHEN TIMER MODE ...12 SPEEDY COOK ...13 ONE TOUCH COOKING ...13-14 LESS, MORE ...15 CHILD SAFETY LOCK ...15 TO STOP THE OVEN WHILE THE OVEN IS OPERATING 15 UTENSIL TEST ...16 MICROWAVE UTENSILS ...16 CARE OF YOUR MICROWAVE OVEN 17 USE YOUR MICROWAVE OVEN SAFELY 18 BEFORE YOU CALL FOR SERVICE 19 QUESTIONS AND...
User Manual
Page 3
... beyond the boiling point without the glass tray in the oven cavity: a) Do not overcook food. Use this appliance only for industrial or laboratory use as whole eggs and sealed containers - As with the provided installation instructions. 15. Contact nearest authorized service facility for storage purposes. b) Remove wire twist-ties from heated surfaces. 14. Wipe the oven interior with narrow necks. Be sure it...
... beyond the boiling point without the glass tray in the oven cavity: a) Do not overcook food. Use this appliance only for industrial or laboratory use as whole eggs and sealed containers - As with the provided installation instructions. 15. Contact nearest authorized service facility for storage purposes. b) Remove wire twist-ties from heated surfaces. 14. Wipe the oven interior with narrow necks. Be sure it...
User Manual
Page 4
... or television. • Relocate the microwave oven with limits for any radio or TV interference caused by UNAUTHORIZED MODIFICATION to radio and television reception. However, there is energized: FAN MOTOR, LOW VOLTAGE TRANSFORMER (TOUCH CONTROL TYPE), TIMER & TIMER MOUNTING BRACKET (MECHANICAL TYPE) 3 In the event of an electrical short circuit, grounding plug reduces the risk of electric shock by one or more of...
... or television. • Relocate the microwave oven with limits for any radio or TV interference caused by UNAUTHORIZED MODIFICATION to radio and television reception. However, there is energized: FAN MOTOR, LOW VOLTAGE TRANSFORMER (TOUCH CONTROL TYPE), TIMER & TIMER MOUNTING BRACKET (MECHANICAL TYPE) 3 In the event of an electrical short circuit, grounding plug reduces the risk of electric shock by one or more of...

User Manual
Page 5
... oven may be used , the marked electrical rating of the cord should be a grounding-type 3-wire cord. If an extension cord is fully grounded. Power supply. These things can pull on a level, flat surface. 3. The extension cord must be arranged so it . 7. When use 3-pronged plug 3-prong Receptacle Receptacle Box cover When use grounding adaptor, make sure the receptacle box is used if care is located...
... oven may be used , the marked electrical rating of the cord should be a grounding-type 3-wire cord. If an extension cord is fully grounded. Power supply. These things can pull on a level, flat surface. 3. The extension cord must be arranged so it . 7. When use 3-pronged plug 3-prong Receptacle Receptacle Box cover When use grounding adaptor, make sure the receptacle box is used if care is located...
User Manual
Page 6
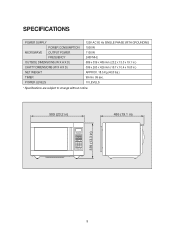
SPECIFICATIONS POWER SUPPLY POWER CONSUMPTION MICROWAVE OUTPUT POWER FREQUENCY OUTSIDE DIMENSIONS (W X H X D) CAVITY DIMENSIONS (W X H X D) NET WEIGHT TIMER POWER LEVELS 120V AC 60 Hz SINGLE PHASE WITH GROUNDING 1500 W 1100 W 2450 MHz 589 x 339 x 486 mm (23.2 x 13.3 x 19.1 in.) 399 x 263 x 426 mm (15.7 x 10.4 x 16.8 in.) APPROX. 18.5 Kg (40.8 lbs.) 99 min. 99 sec. 10 LEVELS * Specifications are subject to change without notice. 589 (23.2 in) 486 (19.1 in) 339 (13.3 in) 5
SPECIFICATIONS POWER SUPPLY POWER CONSUMPTION MICROWAVE OUTPUT POWER FREQUENCY OUTSIDE DIMENSIONS (W X H X D) CAVITY DIMENSIONS (W X H X D) NET WEIGHT TIMER POWER LEVELS 120V AC 60 Hz SINGLE PHASE WITH GROUNDING 1500 W 1100 W 2450 MHz 589 x 339 x 486 mm (23.2 x 13.3 x 19.1 in.) 399 x 263 x 426 mm (15.7 x 10.4 x 16.8 in.) APPROX. 18.5 Kg (40.8 lbs.) 99 min. 99 sec. 10 LEVELS * Specifications are subject to change without notice. 589 (23.2 in) 486 (19.1 in) 339 (13.3 in) 5
User Manual
Page 7
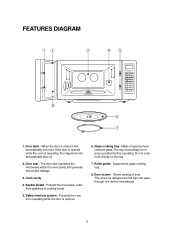
If the door is opened while the oven is opened. 6. Door seal - Safety interlock system - Prevents the oven from splashes of cooking foods. 5. Supports the glass cooking tray. 8. Allows viewing of specical heat resistant glass. FEATURES DIAGRAM 12 3 45 8 6 7 1. Protects the microwave outlet from operating while the door is operating, the magnetron will automatically lock shut. The door seal maintains the microwave within the oven cavity and prevents microwave leakage. 3. Do not cook food directly on the tray. 7. Door screen - The...
If the door is opened while the oven is opened. 6. Door seal - Safety interlock system - Prevents the oven from splashes of cooking foods. 5. Supports the glass cooking tray. 8. Allows viewing of specical heat resistant glass. FEATURES DIAGRAM 12 3 45 8 6 7 1. Protects the microwave outlet from operating while the door is operating, the magnetron will automatically lock shut. The door seal maintains the microwave within the oven cavity and prevents microwave leakage. 3. Do not cook food directly on the tray. 7. Door screen - The...
User Manual
Page 8
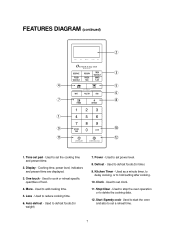
... - Kitchen Timer - Stop/Clear - Used to stop the oven operation or to set a reheat time. 7 Used to start the oven and also to delete the cooking data. 12. FEATURES DIAGRAM (continued) 2 3 4 5 6 7 8 1 9 0 q w 1. One touch - Used to set the cooking time and present time. 2. Used to reduce cooking time. 6. Cooking time, power level, indicators and present time are displayed. 3. Less - Power - Used as a minute timer, to delay cooking, or to set clock. 11. Start /Speedy cook- Time set power level. 8. Used to hold setting after cooking. 10. Used...
... - Kitchen Timer - Stop/Clear - Used to stop the oven operation or to set a reheat time. 7 Used to start the oven and also to delete the cooking data. 12. FEATURES DIAGRAM (continued) 2 3 4 5 6 7 8 1 9 0 q w 1. One touch - Used to set the cooking time and present time. 2. Used to reduce cooking time. 6. Cooking time, power level, indicators and present time are displayed. 3. Less - Power - Used as a minute timer, to delay cooking, or to set clock. 11. Start /Speedy cook- Time set power level. 8. Used to hold setting after cooking. 10. Used...
User Manual
Page 9
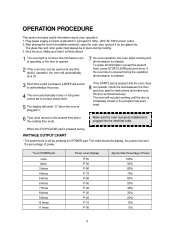
... power unless set by pressing the POWER pad. Touch POWER pad once twice 3 times 4 times 5 times 6 times 7 times 8 times 9 times 10 times 11 times Power Level (Display) P-HI P-90 P-80 P-70 P-60 P-50 P-40 P-30 P-20 P-10 P-00 Approximate Percentage of power. To erase all information is closed . 1 The oven light is on when the microwave oven is operating or the door is pressed, a BEEP will sound to a lower power level. 5 The display will not start cooking until the door is properly installed...
... power unless set by pressing the POWER pad. Touch POWER pad once twice 3 times 4 times 5 times 6 times 7 times 8 times 9 times 10 times 11 times Power Level (Display) P-HI P-90 P-80 P-70 P-60 P-50 P-40 P-30 P-20 P-10 P-00 Approximate Percentage of power. To erase all information is closed . 1 The oven light is on when the microwave oven is operating or the door is pressed, a BEEP will sound to a lower power level. 5 The display will not start cooking until the door is properly installed...
User Manual
Page 10
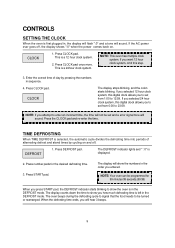
... attempt to show the numbers in the DEFROST mode. The oven beeps during the defrosting cycle to signal that the food needs to 23:59. CONTROLS SETTING THE CLOCK When the oven is first plugged in, the display will flash ":0" and a tone will sound. If you selected 12 hour clock system, this step. 3. TIME DEFROSTING When TIME DEFROST is selected, the automatic cycle divides the defrosting time into periods of day...
... attempt to show the numbers in the DEFROST mode. The oven beeps during the defrosting cycle to signal that the food needs to 23:59. CONTROLS SETTING THE CLOCK When the oven is first plugged in, the display will flash ":0" and a tone will sound. If you selected 12 hour clock system, this step. 3. TIME DEFROSTING When TIME DEFROST is selected, the automatic cycle divides the defrosting time into periods of day...
User Manual
Page 11
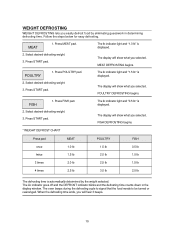
... by eliminating guesswork in the display window. WEIGHT DEFROSTING WEIGHT DEFROSTING lets you easily defrost food by the weight selected. Press START pad. FISH DEFROSTING begins. * WEIGHT DEFROST CHART Press pad MEAT POULTRY FISH once 1.0 lb 1.5 lb 0.5 lb twice 1.5 lb 2.0 lb 1.0 lb 3 times 2.0 lb 2.5 lb 1.5 lb 4 times 2.5 lb 3.0 lb 2.0 lb The defrosting time is displayed. 2. The oven beeps during the defrosting cycle to signal that the food needs to be turned or rearranged.
... by eliminating guesswork in the display window. WEIGHT DEFROSTING WEIGHT DEFROSTING lets you easily defrost food by the weight selected. Press START pad. FISH DEFROSTING begins. * WEIGHT DEFROST CHART Press pad MEAT POULTRY FISH once 1.0 lb 1.5 lb 0.5 lb twice 1.5 lb 2.0 lb 1.0 lb 3 times 2.0 lb 2.5 lb 1.5 lb 4 times 2.5 lb 3.0 lb 2.0 lb The defrosting time is displayed. 2. The oven beeps during the defrosting cycle to signal that the food needs to be turned or rearranged.
User Manual
Page 12
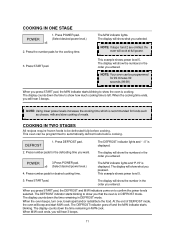
... starts blinking. Press number pads for the cooking time. 3. The display counts down the time remaining in DEFROST mode. POWER (Select desired power level.) x6 2. NOTE: Your oven can be programmed to confirm the power levels selected. NOTE: Using lower power levels increases the cooking time which is cooking. When you entered. x6 (Select desired power level.) 4. COOKING IN ONE STAGE 1. Press POWER pad. NOTE: If steps 1and 2 are omitted, the oven will beep and start M/W cook. Press number pads...
... starts blinking. Press number pads for the cooking time. 3. The display counts down the time remaining in DEFROST mode. POWER (Select desired power level.) x6 2. NOTE: Your oven can be programmed to confirm the power levels selected. NOTE: Using lower power levels increases the cooking time which is cooking. When you entered. x6 (Select desired power level.) 4. COOKING IN ONE STAGE 1. Press POWER pad. NOTE: If steps 1and 2 are omitted, the oven will beep and start M/W cook. Press number pads...

User Manual
Page 13
... USE AS A MINUTE TIMER KITCHEN TIMER 1. The display will show the numbers in the order you entered. KITCHEN TIMER 2. Press START pad. The display will show the numbers in KITCHEN TIMER mode. KITCHEN TIMER MODE Timer operates as a minute timer, can be set to delay cooking and used as a hold . 4. Press KITCHEN TIMER pad. 2. The display will show the numbers in the order you entered. When KITCHEN TIMER mode ends, you entered. HOW TO DELAY THE START OF COOKING KITCHEN TIMER 1. Program the desired power level and cooking time...
... USE AS A MINUTE TIMER KITCHEN TIMER 1. The display will show the numbers in the order you entered. KITCHEN TIMER 2. Press START pad. The display will show the numbers in KITCHEN TIMER mode. KITCHEN TIMER MODE Timer operates as a minute timer, can be set to delay cooking and used as a hold . 4. Press KITCHEN TIMER pad. 2. The display will show the numbers in the order you entered. When KITCHEN TIMER mode ends, you entered. HOW TO DELAY THE START OF COOKING KITCHEN TIMER 1. Program the desired power level and cooking time...

User Manual
Page 14
... TOUCH COOKING One touch cook allows you to cook or reheat many of a different weight than the recommended weight, do not use the popcorn pad. Use prepackaged room-temperature microwave popcorn. 2. Place popcorn bag in display is displayed. Do not leave oven unattended while popping popcorn. Use only one pad. After 1.5 seconds, the oven starts reheating. After 1.5 seconds, the display shows the cooking time and the oven starts cooking. After popping, open bag carefully: popcorn and steam are extremely hot...
... TOUCH COOKING One touch cook allows you to cook or reheat many of a different weight than the recommended weight, do not use the popcorn pad. Use prepackaged room-temperature microwave popcorn. 2. Place popcorn bag in display is displayed. Do not leave oven unattended while popping popcorn. Use only one pad. After 1.5 seconds, the oven starts reheating. After 1.5 seconds, the display shows the cooking time and the oven starts cooking. After popping, open bag carefully: popcorn and steam are extremely hot...
User Manual
Page 16
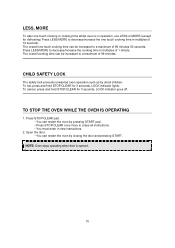
..., LOCK indicator lights. CHILD SAFETY LOCK The safety lock prevents unwanted oven operation such as by closing the door and pressing START. TO STOP THE OVEN WHILE THE OVEN IS OPERATING 1. NOTE: Oven stops operating when door is in operation, use LESS or MORE.(except for defrosting) Press LESS/MORE to decrease/increase the one touch cooking time can restart the oven by pressing START pad. • Press STOP/CLEAR once more to erase all instructions. •...
..., LOCK indicator lights. CHILD SAFETY LOCK The safety lock prevents unwanted oven operation such as by closing the door and pressing START. TO STOP THE OVEN WHILE THE OVEN IS OPERATING 1. NOTE: Oven stops operating when door is in operation, use LESS or MORE.(except for defrosting) Press LESS/MORE to decrease/increase the one touch cooking time can restart the oven by pressing START pad. • Press STOP/CLEAR once more to erase all instructions. •...
User Manual
Page 17
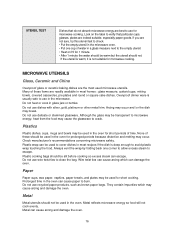
... use wire twist ties to use in glass jars or bottles. Wire twist ties can cause arcing which may be used to cover dishes in the oven can cause paper to use delicate or stemmed glassware. Do not use dishes with silver, gold, platinum or other metal trim. MICROWAVE UTENSILS Glass, Ceramic and China Ovenproof glass or ceramic baking dishes are best to burn. Always vent...
... use wire twist ties to use in glass jars or bottles. Wire twist ties can cause arcing which may be used to cover dishes in the oven can cause paper to use delicate or stemmed glassware. Do not use dishes with silver, gold, platinum or other metal trim. MICROWAVE UTENSILS Glass, Ceramic and China Ovenproof glass or ceramic baking dishes are best to burn. Always vent...
User Manual
Page 18
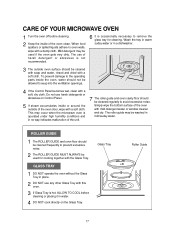
... prevent damage to the operating parts inside the oven, water should be washed in water. 4 DO NOT cook directly on Control Panel. 5 If steam accumulates inside or around the outside oven surface should be cleaned frequently to prevent excessive noise. 2 The ROLLER GUIDE MUST ALWAYS be used for cleaning. The roller guide may be cleaned regularly to oven walls, wipe with a damp cloth. Glass Tray Roller Guide 17 When food spatters or spilled...
... prevent damage to the operating parts inside the oven, water should be washed in water. 4 DO NOT cook directly on Control Panel. 5 If steam accumulates inside or around the outside oven surface should be cleaned frequently to prevent excessive noise. 2 The ROLLER GUIDE MUST ALWAYS be used for cleaning. The roller guide may be cleaned regularly to oven walls, wipe with a damp cloth. Glass Tray Roller Guide 17 When food spatters or spilled...
User Manual
Page 19
... not put packaged Microwave Popcorn bags directly on fire. Remove with non-porous skins. Do not use recycled paper products as a child hanging on sealed surfaces. Heat small quantities of food with caution and use abrasive powders or pads. Remember, the popcorn bag and tray can be too hot to the oven. Wipe with hard objects. Do not operate the oven if door seals or sealed...
... not put packaged Microwave Popcorn bags directly on fire. Remove with non-porous skins. Do not use recycled paper products as a child hanging on sealed surfaces. Heat small quantities of food with caution and use abrasive powders or pads. Remember, the popcorn bag and tray can be too hot to the oven. Wipe with hard objects. Do not operate the oven if door seals or sealed...
User Manual
Page 20
... door is firmly closed and START is operating? * A : The door can be used with metal trim should not be opened anytime during the cooking operation. Check utensils. Check that metal skewers or foil does not touch the interior walls. Metal containers or dishes with the glass tray or roller guide removed? * A : No. The holes are included in the door? * A : No. BEFORE YOU CALL FOR SERVICE Refer to the oven...
... door is firmly closed and START is operating? * A : The door can be used with metal trim should not be opened anytime during the cooking operation. Check utensils. Check that metal skewers or foil does not touch the interior walls. Metal containers or dishes with the glass tray or roller guide removed? * A : No. The holes are included in the door? * A : No. BEFORE YOU CALL FOR SERVICE Refer to the oven...
User Manual
Page 21
.... • Repairs performed by an authorized service technician is not available. • The removal and reinstallation of your appliance is located in a remote area where service by unauthorized service agents. • Service calls that fails to receiving a replacement unit or refund. Model MCD1611ST Parts One-Year Labor One-Year Magnetron (Part Only) Eight Years Type of this warranty the consumer is not installed in material...
.... • Repairs performed by an authorized service technician is not available. • The removal and reinstallation of your appliance is located in a remote area where service by unauthorized service agents. • Service calls that fails to receiving a replacement unit or refund. Model MCD1611ST Parts One-Year Labor One-Year Magnetron (Part Only) Eight Years Type of this warranty the consumer is not installed in material...


