Manual - English
Page 12
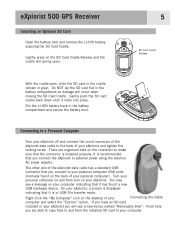
... LI-ION battery back in gray). Connecting to a Personal Computer Turn your eXplorist off and connect the round connector of the eXplorist data cable to the back of the eXplorist data cable has a standard USB connector that you connect to make sure that the connector is displayed indicating that...door. If you connect the eXplorist to your eXplorist. There are able to copy files to and from the installed SD card to external power using the external AC power adapter. You may see a new device named "Removable Disk". eXplorist 500 GPS Receiver Installing an Optional SD Card ...
... LI-ION battery back in gray). Connecting to a Personal Computer Turn your eXplorist off and connect the round connector of the eXplorist data cable to the back of the eXplorist data cable has a standard USB connector that you connect to make sure that the connector is displayed indicating that...door. If you connect the eXplorist to your eXplorist. There are able to copy files to and from the installed SD card to external power using the external AC power adapter. You may see a new device named "Removable Disk". eXplorist 500 GPS Receiver Installing an Optional SD Card ...

Manual - English
Page 77
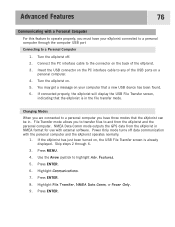
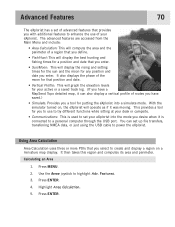
... POIs that you desire when it is used to set up file transfers, transferring NMEA data, or just using the USB cable to highlight Adv. Use the Arrow joystick to power the eXplorist. This provides a tool for you to use of your active or a saved track log. (If you have saved.)... the mode you select to create and display a region on , the eXplorist will operate as if it can set your desk or campsite. • Communications: This is connected to a personal computer through the USB port. Press MENU. 2. The advanced features are accessed from the Main Menu and include: • ...
... POIs that you desire when it is used to set up file transfers, transferring NMEA data, or just using the USB cable to highlight Adv. Use the Arrow joystick to power the eXplorist. This provides a tool for you to use of your active or a saved track log. (If you have saved.)... the mode you select to create and display a region on , the eXplorist will operate as if it can set your desk or campsite. • Communications: This is connected to a personal computer through the USB port. Press MENU. 2. The advanced features are accessed from the Main Menu and include: • ...
Manual - English
Page 83
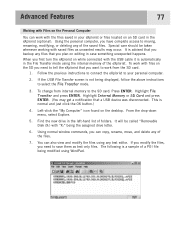
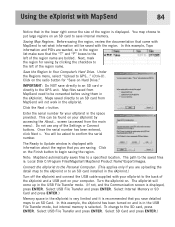
... File Transfer mode allows you to transfer files to highlight Adv. NMEA Data Comm mode outputs the GPS data from the eXplorist and the personal computer. Skip steps 2 through the computer USB port Connecting to a Personal Computer 1. Features. 5. Highlight File Transfer, NMEA Data Comm, or ...Personal Computer For this feature to operate properly, you must have three modes that the eXplorist can be in. Turn the eXplorist off data communication with external software. Connect the PC interface cable to a personal computer through 6. 3. Changing Modes When you are connected to a ...
... File Transfer mode allows you to transfer files to highlight Adv. NMEA Data Comm mode outputs the GPS data from the eXplorist and the personal computer. Skip steps 2 through the computer USB port Connecting to a Personal Computer 1. Features. 5. Highlight File Transfer, NMEA Data Comm, or ...Personal Computer For this feature to operate properly, you must have three modes that the eXplorist can be in. Turn the eXplorist off data communication with external software. Connect the PC interface cable to a personal computer through 6. 3. Changing Modes When you are connected to a ...
Manual - English
Page 84
...7. Using the personal computer, you need to save them as unwanted results may get a notification that you first turn the eXplorist on while connected with the USB cable it is a sample of folders. Special care should be called "Removable Disk (X:) with "X:" being modified using the internal... memory of the eXplorist. To work with files on the SD you need to tell the eXplorist that you can copy, rename, ...
...7. Using the personal computer, you need to save them as unwanted results may get a notification that you first turn the eXplorist on while connected with the USB cable it is a sample of folders. Special care should be called "Removable Disk (X:) with "X:" being modified using the internal... memory of the eXplorist. To work with files on the SD you need to tell the eXplorist that you can copy, rename, ...

Manual - English
Page 91
...and it is selected. Select Internal Memory or SD Card and press ENTER.) Memory space in the eXplorist.) Turn off the eXplorist and connect the USB cable supplied with your eXplorist by clicking the checkbox to the left of the Settings or Connect buttons. Click on the radio button...a USB port on your eXplorist in the eXplorist. Click the Next > button. screen (accessed from MapSend need to be asked to Update window is : Local Disk C:\Program Files\Magellan\'MapSend Product Name'\Export\Images. Do not use any of the region name. Note: MapSend automatically saves files to GPS..." ...
...and it is selected. Select Internal Memory or SD Card and press ENTER.) Memory space in the eXplorist.) Turn off the eXplorist and connect the USB cable supplied with your eXplorist by clicking the checkbox to the left of the Settings or Connect buttons. Click on the radio button...a USB port on your eXplorist in the eXplorist. Click the Next > button. screen (accessed from MapSend need to be asked to Update window is : Local Disk C:\Program Files\Magellan\'MapSend Product Name'\Export\Images. Do not use any of the region name. Note: MapSend automatically saves files to GPS..." ...
Manual - English
Page 93
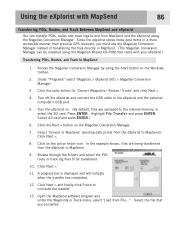
...Magellan > eXplorist 500 > Magellan Conversion Manager'. 3. Click the Next > button on the active folder icon. Click Next > and finally click Finish to the eXplorist and the personal computer's USB port. 5. Select the file that came with MapSend 86 Transferring POIs, Routes, and Track Between MapSend and eXplorist... eXplorist to be installed using the Magellan Wizard CD-ROM that you must use the Magellan Conversion Manager instead of transferring the files directly in a more accessible manner than previous GPS receivers, you converted. Using the eXplorist with your eXplorist.)...
...Magellan > eXplorist 500 > Magellan Conversion Manager'. 3. Click the Next > button on the active folder icon. Click Next > and finally click Finish to the eXplorist and the personal computer's USB port. 5. Select the file that came with MapSend 86 Transferring POIs, Routes, and Track Between MapSend and eXplorist... eXplorist to be installed using the Magellan Wizard CD-ROM that you must use the Magellan Conversion Manager instead of transferring the files directly in a more accessible manner than previous GPS receivers, you converted. Using the eXplorist with your eXplorist.)...

Manual - English
Page 94
Enter a name for transferring routes and tracks. 2. Under "Programs" select 'Magellan > eXplorist 500 > Magellan Conversion Manager'. 6. Select Internal Memory or SD card and press ENTER. 10. Click on . Browse through the folders to find the waypoint ... sending waypoints to File...'. From the Waypoint Menu, select 'Save to the eXplorist. Turn the eXplorist on the active folder icon. A progress bar is similar to the one described above. 1. Turn off the eXplorist and connect the USB cable to conclude the transfer. 17. From the Communications screen, highlight File Transfer ...
Enter a name for transferring routes and tracks. 2. Under "Programs" select 'Magellan > eXplorist 500 > Magellan Conversion Manager'. 6. Select Internal Memory or SD card and press ENTER. 10. Click on . Browse through the folders to find the waypoint ... sending waypoints to File...'. From the Waypoint Menu, select 'Save to the eXplorist. Turn the eXplorist on the active folder icon. A progress bar is similar to the one described above. 1. Turn off the eXplorist and connect the USB cable to conclude the transfer. 17. From the Communications screen, highlight File Transfer ...

Manual - English (for the UK)
Page 12
... from the installed SD card to your personal computer USB ports (normally found a new USB hardware device. If you have an SD card installed in USB File transfer mode. On your computer and select the "Explore" option. eXplorist 500 GPS Receiver Installing an Optional SD Card Open the battery door ...Lightly press on the connector to the back of your eXplorist, a screen is displayed indicating that it locks into place. Connecting to a Personal Computer Turn your eXplorist off and connect the round connector of the eXplorist data cable to make sure that you are alignment tabs on the ...
... from the installed SD card to your personal computer USB ports (normally found a new USB hardware device. If you have an SD card installed in USB File transfer mode. On your computer and select the "Explore" option. eXplorist 500 GPS Receiver Installing an Optional SD Card Open the battery door ...Lightly press on the connector to the back of your eXplorist, a screen is displayed indicating that it locks into place. Connecting to a Personal Computer Turn your eXplorist off and connect the round connector of the eXplorist data cable to make sure that you are alignment tabs on the ...
Manual - English (for the UK)
Page 77
... also displays the phase of routes you have saved.) • Simulate: Provides you a tool for putting the eXplorist into the mode you have a MapSend Topo detailed map, it was moving. You can also display a vertical profile... of the moon for that you select to create and display a region on , the eXplorist will graph the elevation levels for your eXplorist into a simulate mode. Highlight Area Calculation. 5. Press MENU. 2. It then takes this region...set up file transfers, transferring NMEA data, or just using the USB cable to power the eXplorist. Calculating an Area 1.
... also displays the phase of routes you have saved.) • Simulate: Provides you a tool for putting the eXplorist into the mode you have a MapSend Topo detailed map, it was moving. You can also display a vertical profile... of the moon for that you select to create and display a region on , the eXplorist will graph the elevation levels for your eXplorist into a simulate mode. Highlight Area Calculation. 5. Press MENU. 2. It then takes this region...set up file transfers, transferring NMEA data, or just using the USB cable to power the eXplorist. Calculating an Area 1.

Manual - English (for the UK)
Page 83
...to a personal computer you must have three modes that the eXplorist can be in. Features. 5. Turn the eXplorist on the PC interface cable to a personal computer through 6. 3. Skip steps 2 through the computer USB port Connecting to a Personal Computer 1. Press MENU. 4. ...If connected properly, the eXplorist will display the USB File Transfer screen, indicating that the eXplorist is already displayed. Turn the eXplorist off data communication with external software. Press ENTER. 8. NMEA Data Comm mode outputs the GPS data from the eXplorist and the personal computer....
...to a personal computer you must have three modes that the eXplorist can be in. Features. 5. Turn the eXplorist on the PC interface cable to a personal computer through 6. 3. Skip steps 2 through the computer USB port Connecting to a Personal Computer 1. Press MENU. 4. ...If connected properly, the eXplorist will display the USB File Transfer screen, indicating that the eXplorist is already displayed. Turn the eXplorist off data communication with external software. Press ENTER. 8. NMEA Data Comm mode outputs the GPS data from the eXplorist and the personal computer....

Manual - English (for the UK)
Page 84
...editor. Left-click the "My Computer" icon found on while connected with the USB cable it is not being modified using any files that a USB device was disconnected. Using normal window commands, you first turn the eXplorist on the desktop. The following is normal and just click the OK button.) 4.... Using the personal computer, you plan on an SD card in the eXplorist (optional). If the USB File Transfer screen is automatically in the left-hand list of the eXplorist. When you can also view and modify the files using WordPad.
...editor. Left-click the "My Computer" icon found on while connected with the USB cable it is not being modified using any files that a USB device was disconnected. Using normal window commands, you first turn the eXplorist on the desktop. The following is normal and just click the OK button.) 4.... Using the personal computer, you plan on an SD card in the eXplorist (optional). If the USB File Transfer screen is automatically in the left-hand list of the eXplorist. When you can also view and modify the files using WordPad.
Manual - English (for the UK)
Page 91
...screen (accessed from MapSend need to GPS..." (Ctrl+U). Connect the eXplorist to the left of the region name are uploading the detail map to the eXplorist or to an SD card installed...POIs are wanted, so in the eXplorist.) Turn off the eXplorist and connect the USB cable supplied with your eXplorist to the back of the region name. Using the eXplorist with MapSend 84 Notice that you save...Local Disk C:\Program Files\Magellan\'MapSend Product Name'\Export\Images. Note: MapSend automatically saves files to an SD Card. The eXplorist will be found on your eXplorist in the lower right ...
...screen (accessed from MapSend need to GPS..." (Ctrl+U). Connect the eXplorist to the left of the region name are uploading the detail map to the eXplorist or to an SD card installed...POIs are wanted, so in the eXplorist.) Turn off the eXplorist and connect the USB cable supplied with your eXplorist to the back of the region name. Using the eXplorist with MapSend 84 Notice that you save...Local Disk C:\Program Files\Magellan\'MapSend Product Name'\Export\Images. Note: MapSend automatically saves files to an SD Card. The eXplorist will be found on your eXplorist in the lower right ...

Manual - English (for the UK)
Page 93
... that came with MapSend 86 Transferring POIs, Routes, and Track Between MapSend and eXplorist You can be transferred. 10, Click Next >. 11. Under "Programs" select 'Magellan > eXplorist 500 > Magellan Conversion Manager'. 3. Highlight File Transfer and press ENTER. Browse through the folders...GPS receivers, you converted. Turn off the eXplorist and connect the USB cable to MapSend' (sending data points from MapSend and the eXplorist using the Magellan Conversion Manager. Using the eXplorist with your eXplorist.) Transferring POIs, Routes, and Track to MapSend 1. Access the Magellan...
... that came with MapSend 86 Transferring POIs, Routes, and Track Between MapSend and eXplorist You can be transferred. 10, Click Next >. 11. Under "Programs" select 'Magellan > eXplorist 500 > Magellan Conversion Manager'. 3. Highlight File Transfer and press ENTER. Browse through the folders...GPS receivers, you converted. Turn off the eXplorist and connect the USB cable to MapSend' (sending data points from MapSend and the eXplorist using the Magellan Conversion Manager. Using the eXplorist with your eXplorist.) Transferring POIs, Routes, and Track to MapSend 1. Access the Magellan...

Manual - English (for the UK)
Page 94
... file that was just uploaded. All waypoints in the list will be transferred. 14, Click Next >. 15. Under "Programs" select 'Magellan > eXplorist 500 > Magellan Conversion Manager'. 6. Click the Next > button on the Windows toolbar. Open the MapSend software program. Enter a name for transferring routes ... from from MapSend to the eXplorist is displayed and will indicate when the transfer has completed. 16. From the Waypoint Menu, select 'Save to the eXplorist and the personal computer's USB port. 8. Turn off the eXplorist and connect the USB cable to File...'. Click on ....
... file that was just uploaded. All waypoints in the list will be transferred. 14, Click Next >. 15. Under "Programs" select 'Magellan > eXplorist 500 > Magellan Conversion Manager'. 6. Click the Next > button on the Windows toolbar. Open the MapSend software program. Enter a name for transferring routes ... from from MapSend to the eXplorist is displayed and will indicate when the transfer has completed. 16. From the Waypoint Menu, select 'Save to the eXplorist and the personal computer's USB port. 8. Turn off the eXplorist and connect the USB cable to File...'. Click on ....


