
Manual - English
Page 1
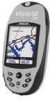
Magellan eXplorist 500 Reference Manual Topics: • eXplorist 500 GPS Receiver • Using the eXplorist 500 • Starting Up • Navigation Screens • File Structure • Points of Interest • Routes • Track Logs • Advanced Features • Magellan Geocache Manager • Using MapSend • Preferences • Specifications • Accessories • Contacting Magellan Support
Magellan eXplorist 500 Reference Manual Topics: • eXplorist 500 GPS Receiver • Using the eXplorist 500 • Starting Up • Navigation Screens • File Structure • Points of Interest • Routes • Track Logs • Advanced Features • Magellan Geocache Manager • Using MapSend • Preferences • Specifications • Accessories • Contacting Magellan Support
Manual - English
Page 4
... Customizing the Information Fields 24 Position Screen 25 Position Screen Overview 25 Resetting the Trip Odometer 26 Satellite Status Screen 27 Basic File Stucture 28 File Structure Overview 28 Using the Filing System with POIs 29 Using the Filing System with Routes 29 Using the Filing System with Track Logs 30 Points of Interest 31 Marking Your Position 31 Quick-Marking Your Position 31 Marking Your Position (Personalized 32 Making POIs for Locations Other Than Your Present Position 33 Marking a Position by Entering Coordinates 33 Marking a Position using the Map...
... Customizing the Information Fields 24 Position Screen 25 Position Screen Overview 25 Resetting the Trip Odometer 26 Satellite Status Screen 27 Basic File Stucture 28 File Structure Overview 28 Using the Filing System with POIs 29 Using the Filing System with Routes 29 Using the Filing System with Track Logs 30 Points of Interest 31 Marking Your Position 31 Quick-Marking Your Position 31 Marking Your Position (Personalized 32 Making POIs for Locations Other Than Your Present Position 33 Marking a Position by Entering Coordinates 33 Marking a Position using the Map...

Manual - English
Page 14
... these instructions exactly. This will provide you with the tools needed to get to the points of interest to the previous position and calculating such things as heading and speed. Press the MARK button and set up -to-date information about getting to your destination. Next year, you want to be able to guide you along that , your eXplorist automatically updates the route...
... these instructions exactly. This will provide you with the tools needed to get to the points of interest to the previous position and calculating such things as heading and speed. Press the MARK button and set up -to-date information about getting to your destination. Next year, you want to be able to guide you along that , your eXplorist automatically updates the route...
Manual - English
Page 21
... eXplorist is a good chance that it turned off is displayed, you move for the first time after purchase. Warm Start. Now would be a good time to familiarize yourself with the different navigation screens (using a built-in Preferences) all of the memory will be cleared and the last computed position will be different from the factory defaults. Warm Start. Now with information on for more than 500 mi...
... eXplorist is a good chance that it turned off is displayed, you move for the first time after purchase. Warm Start. Now would be a good time to familiarize yourself with the different navigation screens (using a built-in Preferences) all of the memory will be cleared and the last computed position will be different from the factory defaults. Warm Start. Now with information on for more than 500 mi...
Manual - English
Page 22
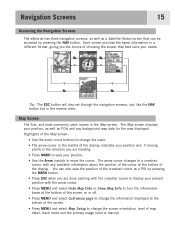
... turn the information boxes at the bottom of the screen on or off. • Press MENU and select Customize page to change the scale. • The arrow cursor in the middle of the display indicates your present position with any background map data for the area displayed. Highlights of the Map screen: • Use the zoom in/out buttons to change the information displayed at the bottom of map detail, track mode...
... turn the information boxes at the bottom of the screen on or off. • Press MENU and select Customize page to change the scale. • The arrow cursor in the middle of the display indicates your present position with any background map data for the area displayed. Highlights of the Map screen: • Use the zoom in/out buttons to change the information displayed at the bottom of map detail, track mode...
Manual - English
Page 28
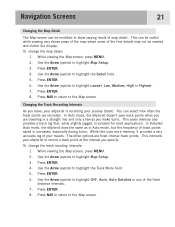
... to show varying levels of your eXplorist to highlight Lowest, Low, Medium, High or Highest. 7. Press ENTER. 6. Press ENTER. 6. While viewing the Map screen, press MENU. 2. Changing the Track Recording Intervals As you are traveling in Auto mode, but the frequency of the fixed distance intervals. 7. The other options are recorded. Use the Arrow joystick to record a track point at the interval you make turns. In Auto mode, the eXplorist doesn't save track points when you move, your journey (track). This saves memory...
... to show varying levels of your eXplorist to highlight Lowest, Low, Medium, High or Highest. 7. Press ENTER. 6. Press ENTER. 6. While viewing the Map screen, press MENU. 2. Changing the Track Recording Intervals As you are traveling in Auto mode, but the frequency of the fixed distance intervals. 7. The other options are recorded. Use the Arrow joystick to record a track point at the interval you make turns. In Auto mode, the eXplorist doesn't save track points when you move, your journey (track). This saves memory...
Manual - English
Page 35
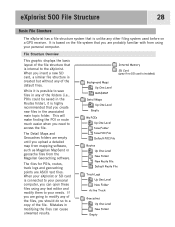
... filing system used before on the file system that you are probably familiar with from the Magellan Geocaching software. File Structure Overview This graphic displays the basic layout of the file. When your eXplorist or SD card is connected to your personal computer, you can open these files using your needs. Internal Memory SD Card (grey if no SD card is based on a GPS receiver. If you insert a new SD card, a similar file...
... filing system used before on the file system that you are probably familiar with from the Magellan Geocaching software. File Structure Overview This graphic displays the basic layout of the file. When your eXplorist or SD card is connected to your personal computer, you can open these files using your needs. Internal Memory SD Card (grey if no SD card is based on a GPS receiver. If you insert a new SD card, a similar file...

Manual - English
Page 91
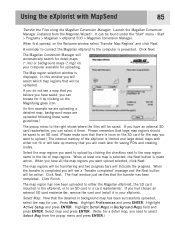
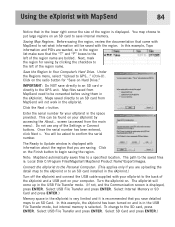
... turned on Hard Drive." Map files saved from MapSend need to be asked to Update window is recommended that you save directly to an SD card or directly to the left of the Settings or Connect buttons. The Ready to confirm the serial number. The eXplorist will not work in the space provided. Select USB File Transfer and press ENTER. You may choose to save internal memory. Do not use any of the region name. To change...
... turned on Hard Drive." Map files saved from MapSend need to be asked to Update window is recommended that you save directly to an SD card or directly to the left of the Settings or Connect buttons. The Ready to confirm the serial number. The eXplorist will not work in the space provided. Select USB File Transfer and press ENTER. You may choose to save internal memory. Do not use any of the region name. To change...
Manual - English
Page 92
... to connect the Magellan eXplorist to the computer is displayed. The Map region selection window is presented. Highlight Active Setup and press ENTER. When you have saved, you do not see a 'Transfer completed' message and the Next button will be transferring and two progress bars will select which map regions that the transfer has been completed. Press Menu. Using the eXplorist with either the Magellan eXplorist, the SD card mounted in the eXplorist...
... to connect the Magellan eXplorist to the computer is displayed. The Map region selection window is presented. Highlight Active Setup and press ENTER. When you have saved, you do not see a 'Transfer completed' message and the Next button will be transferring and two progress bars will select which map regions that the transfer has been completed. Press Menu. Using the eXplorist with either the Magellan eXplorist, the SD card mounted in the eXplorist...
Manual - English
Page 93
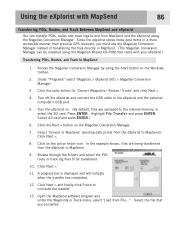
... button for 'Convert Waypoints / Routes / Tracks' and click Next >. 4. Turn off the eXplorist and connect the USB cable to and from the eXplorist to MapSend 1. Highlight File Transfer and press ENTER. Click Next >. 8. Click on the Windows toolbar. 2. A progress bar is displayed and will indicate when the transfer has completed. 12. Since the eXplorist stores these data items in a more accessible manner than previous GPS receivers, you must use the Magellan...
... button for 'Convert Waypoints / Routes / Tracks' and click Next >. 4. Turn off the eXplorist and connect the USB cable to and from the eXplorist to MapSend 1. Highlight File Transfer and press ENTER. Click Next >. 8. Click on the Windows toolbar. 2. A progress bar is displayed and will indicate when the transfer has completed. 12. Since the eXplorist stores these data items in a more accessible manner than previous GPS receivers, you must use the Magellan...

Manual - English
Page 94
... Waypoint Menu, select 'Save to bring up the Waypoint List. 3. Click the Next > button on the active folder icon. The next time you access My Points of the MapSend display to File...'. Select 'Convert to eXplorist' (sending data points from MapSend to the eXplorist. 13. Open the MapSend software program. This procedure will discuss sending waypoints to conclude the transfer. 17. Access the Magellan Conversion Manager by using the Start button on . Select Internal Memory or SD card and press ENTER...
... Waypoint Menu, select 'Save to bring up the Waypoint List. 3. Click the Next > button on the active folder icon. The next time you access My Points of the MapSend display to File...'. Select 'Convert to eXplorist' (sending data points from MapSend to the eXplorist. 13. Open the MapSend software program. This procedure will discuss sending waypoints to conclude the transfer. 17. Access the Magellan Conversion Manager by using the Start button on . Select Internal Memory or SD card and press ENTER...
Manual - English
Page 98
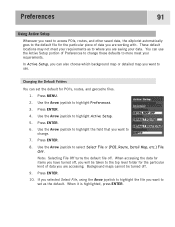
... to change . 7. Press MENU. 2. Press ENTER. 10. In Active Setup, you can set as to the default file for POI's, routes, and geocache files. 1. Press ENTER. 8. Background maps cannot be taken to set the default for the particular piece of data you are accessing. If you selected Select File, using the Arrow joystick to highlight the file you want to select Select File or (POI, Route, Detail Map, etc.) File Off. Press ENTER. 4. When accessing the data for...
... to change . 7. Press MENU. 2. Press ENTER. 10. In Active Setup, you can set as to the default file for POI's, routes, and geocache files. 1. Press ENTER. 8. Background maps cannot be taken to set the default for the particular piece of data you are accessing. If you selected Select File, using the Arrow joystick to highlight the file you want to select Select File or (POI, Route, Detail Map, etc.) File Off. Press ENTER. 4. When accessing the data for...
Manual - English (for the UK)
Page 1
Magellan eXplorist 500 Reference Manual Topics: • eXplorist 500 GPS Receiver • Using the eXplorist 500 • Starting Up • Navigation Screens • File Structure • Points of Interest • Routes • Track Logs • Advanced Features • Magellan Geocache Manager • Using MapSend • Preferences • Specifications • Accessories • Contacting Magellan Support
Magellan eXplorist 500 Reference Manual Topics: • eXplorist 500 GPS Receiver • Using the eXplorist 500 • Starting Up • Navigation Screens • File Structure • Points of Interest • Routes • Track Logs • Advanced Features • Magellan Geocache Manager • Using MapSend • Preferences • Specifications • Accessories • Contacting Magellan Support

Manual - English (for the UK)
Page 4
... Customizing the Information Fields 24 Position Screen 25 Position Screen Overview 25 Resetting the Trip Odometer 26 Satellite Status Screen 27 Basic File Stucture 28 File Structure Overview 28 Using the Filing System with POIs 29 Using the Filing System with Routes 29 Using the Filing System with Track Logs 30 Points of Interest 31 Marking Your Position 31 Quick-Marking Your Position 31 Marking Your Position (Personalized 32 Making POIs for Locations Other Than Your Present Position 33 Marking a Position by Entering Coordinates 33 Marking a Position using the Map...
... Customizing the Information Fields 24 Position Screen 25 Position Screen Overview 25 Resetting the Trip Odometer 26 Satellite Status Screen 27 Basic File Stucture 28 File Structure Overview 28 Using the Filing System with POIs 29 Using the Filing System with Routes 29 Using the Filing System with Track Logs 30 Points of Interest 31 Marking Your Position 31 Quick-Marking Your Position 31 Marking Your Position (Personalized 32 Making POIs for Locations Other Than Your Present Position 33 Marking a Position by Entering Coordinates 33 Marking a Position using the Map...

Manual - English (for the UK)
Page 14
... route is as simple as pressing the GOTO button and selecting the destination from the list of My Points of Interest. Saving Your Position Another commonly used feature of interest. This will help you to the points of interest database. After your hiking is saving your position to find your eXplorist (Background Map). The destination is accessed by using the Points of interest stored in the eXplorist's software...
... route is as simple as pressing the GOTO button and selecting the destination from the list of My Points of Interest. Saving Your Position Another commonly used feature of interest. This will help you to the points of interest database. After your hiking is saving your position to find your eXplorist (Background Map). The destination is accessed by using the Points of interest stored in the eXplorist's software...

Manual - English (for the UK)
Page 21
... and their relative position. This can begin setting its position in satellite almanac. A cold start . Cold Start. Once the Map screen is still in memory and you have an approximate position to use when referring to receive satellite transmissions. This almanac, when given the current date, time and approximate position, can provide the eXplorist with it will start is turned on for the Magellan eXplorist 500. Most of the memory will be cleared and the last...
... and their relative position. This can begin setting its position in satellite almanac. A cold start . Cold Start. Once the Map screen is still in memory and you have an approximate position to use when referring to receive satellite transmissions. This almanac, when given the current date, time and approximate position, can provide the eXplorist with it will start is turned on for the Magellan eXplorist 500. Most of the memory will be cleared and the last...

Manual - English (for the UK)
Page 22
... turn the information boxes at the bottom of the screen on or off. • Press MENU and select Customize page to change the information displayed at the bottom of the display. Map Screen The first, and most commonly used, screen is the Map screen. Highlights of the Map screen: • Use the zoom in/out buttons to move the cursor. Navigation Screens 15 Accessing the Navigation Screens The eXplorist has three navigation screens, as well as a Satellite Status screen...
... turn the information boxes at the bottom of the screen on or off. • Press MENU and select Customize page to change the information displayed at the bottom of the display. Map Screen The first, and most commonly used, screen is the Map screen. Highlights of the Map screen: • Use the zoom in/out buttons to move the cursor. Navigation Screens 15 Accessing the Navigation Screens The eXplorist has three navigation screens, as well as a Satellite Status screen...
Manual - English (for the UK)
Page 91
... to the left of the Settings or Connect buttons. Click on and is in the USB File Transfer mode, but internal memory is displayed. Click on an SD card to confirm the serial number. Turn the eXplorist on Hard Drive." Select USB File Transfer and press ENTER. Select SD Card and press ENTER.) Note: MapSend automatically saves files to be asked to save detailed maps to the saved files is displayed, press ENTER. Select USB File Transfer and press ENTER. Saving Map Regions. Map files saved from MapSend need to a specified...
... to the left of the Settings or Connect buttons. Click on and is in the USB File Transfer mode, but internal memory is displayed. Click on an SD card to confirm the serial number. Turn the eXplorist on Hard Drive." Select USB File Transfer and press ENTER. Select SD Card and press ENTER.) Note: MapSend automatically saves files to be asked to save detailed maps to the saved files is displayed, press ENTER. Select USB File Transfer and press ENTER. Saving Map Regions. Map files saved from MapSend need to a specified...

Manual - English (for the UK)
Page 93
... "Programs" select 'Magellan > eXplorist 500 > Magellan Conversion Manager'. 3. Click the Next > button on the active folder icon. Click on the Magellan Conversion Manager. 7. Click Next > and finally click Finish to the eXplorist and the personal computer's USB port. 5. Select 'Convert to MapSend' (sending data points from File...". In the example shown, files are uploaded to the internal memory, to select the SD card: Press ENTER. Using the eXplorist with your eXplorist.) Transferring POIs, Routes, and Track to...
... "Programs" select 'Magellan > eXplorist 500 > Magellan Conversion Manager'. 3. Click the Next > button on the active folder icon. Click on the Magellan Conversion Manager. 7. Click Next > and finally click Finish to the eXplorist and the personal computer's USB port. 5. Select 'Convert to MapSend' (sending data points from File...". In the example shown, files are uploaded to the internal memory, to select the SD card: Press ENTER. Using the eXplorist with your eXplorist.) Transferring POIs, Routes, and Track to...

Manual - English (for the UK)
Page 94
... Magellan Conversion Manager by using the Start button on the active folder icon. Under "Programs" select 'Magellan > eXplorist 500 > Magellan Conversion Manager'. 6. Turn off the eXplorist and connect the USB cable to conclude the transfer. 17. Browse through the folders to find the waypoint files to be able to select the file that was just uploaded. Click Next > and finally click Finish to the eXplorist and the personal computer's USB port. 8. The next time...
... Magellan Conversion Manager by using the Start button on the active folder icon. Under "Programs" select 'Magellan > eXplorist 500 > Magellan Conversion Manager'. 6. Turn off the eXplorist and connect the USB cable to conclude the transfer. 17. Browse through the folders to find the waypoint files to be able to select the file that was just uploaded. Click Next > and finally click Finish to the eXplorist and the personal computer's USB port. 8. The next time...


