
Manual - English
Page 1
Magellan eXplorist 500 Reference Manual Topics: • eXplorist 500 GPS Receiver • Using the eXplorist 500 • Starting Up • Navigation Screens • File Structure • Points of Interest • Routes • Track Logs • Advanced Features • Magellan Geocache Manager • Using MapSend • Preferences • Specifications • Accessories • Contacting Magellan Support
Magellan eXplorist 500 Reference Manual Topics: • eXplorist 500 GPS Receiver • Using the eXplorist 500 • Starting Up • Navigation Screens • File Structure • Points of Interest • Routes • Track Logs • Advanced Features • Magellan Geocache Manager • Using MapSend • Preferences • Specifications • Accessories • Contacting Magellan Support
Manual - English
Page 24
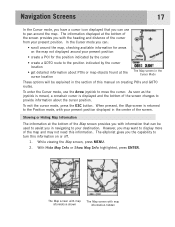
The eXplorist gives you the capability to turn this information. Showing or Hiding Map Information The information at the bottom of the screen. To exit the cursor ... your present position. As soon as the joystick is moved, a crosshair cursor is returned to the Position mode, with the heading and distance of this manual on or off. 1. While viewing the Map screen, press MENU. 2. In the Cursor mode you can be explained in navigating to your present position displayed...
The eXplorist gives you the capability to turn this information. Showing or Hiding Map Information The information at the bottom of the screen. To exit the cursor ... your present position. As soon as the joystick is moved, a crosshair cursor is returned to the Position mode, with the heading and distance of this manual on or off. 1. While viewing the Map screen, press MENU. 2. In the Cursor mode you can be explained in navigating to your present position displayed...

Manual - English
Page 37
...Use the displayed keyboard to enter a name for the folder. Use the Arrow joystick to access this manual, instructions will not describe all of the things you have open by using the Up One Level ...the displayed keyboard to enter a name for the folder. Since there isn't any route files in . The eXplorist automatically accesses the internal Tracklog folder. • Creating a new Track Log File: Use the Arrow joystick ...Folder and press ENTER. When you can do within the file system. eXplorist 500 File Structure 30 • Creating new Folders: You can also create new folders for your route ...
...Use the displayed keyboard to enter a name for the folder. Use the Arrow joystick to access this manual, instructions will not describe all of the things you have open by using the Up One Level ...the displayed keyboard to enter a name for the folder. Since there isn't any route files in . The eXplorist automatically accesses the internal Tracklog folder. • Creating a new Track Log File: Use the Arrow joystick ...Folder and press ENTER. When you can do within the file system. eXplorist 500 File Structure 30 • Creating new Folders: You can also create new folders for your route ...

Manual - English
Page 38
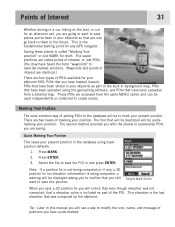
.... Waypoints and points of interest are identical.) There are four types of POIs available for your eXplorist 500: POIs that you have marked (saved), POIs that have quick-marked. These POIs are accessed from...may have been uploaded using markposition defaults. 1. Points of Interest 31 Whether driving in a car, hiking on the trail, or out for an afternoon sail, you are going to want to personalize ... is the fundamental starting point for any GPS navigator. Sample Mark Screen When you save the POI in and press ENTER. Tip: Later in this manual you will be displayed asking you to confirm...
.... Waypoints and points of interest are identical.) There are four types of POIs available for your eXplorist 500: POIs that you have marked (saved), POIs that have quick-marked. These POIs are accessed from...may have been uploaded using markposition defaults. 1. Points of Interest 31 Whether driving in a car, hiking on the trail, or out for an afternoon sail, you are going to want to personalize ... is the fundamental starting point for any GPS navigator. Sample Mark Screen When you save the POI in and press ENTER. Tip: Later in this manual you will be displayed asking you to confirm...

Manual - English
Page 42
... of Interest 35 The POI Database All of Interest. 5. Searching for a User-Entered POI When searching for a POI that have been preloaded into the eXplorist, nearest to select Nearest or Alphabetical. Use the Arrow joystick in an up/down motion to highlight My Pts of the POIs that are : •...or edit the POI. Press MENU. 2. Locate the file where the POI has been saved and press ENTER. (The eXplorist will select from the menu. Use the Arrow joystick in this manual. From here you can be accessed using Nearest If Nearest is displayed at the bottom of the screen. Use the...
... of Interest 35 The POI Database All of Interest. 5. Searching for a User-Entered POI When searching for a POI that have been preloaded into the eXplorist, nearest to select Nearest or Alphabetical. Use the Arrow joystick in an up/down motion to highlight My Pts of the POIs that are : •...or edit the POI. Press MENU. 2. Locate the file where the POI has been saved and press ENTER. (The eXplorist will select from the menu. Use the Arrow joystick in this manual. From here you can be accessed using Nearest If Nearest is displayed at the bottom of the screen. Use the...

Manual - English
Page 44
... view on the list to the Keyboard used to highlight Background Map. 5. Use the Arrow joystick in an up the process of POIs in this manual.
... view on the list to the Keyboard used to highlight Background Map. 5. Use the Arrow joystick in an up the process of POIs in this manual.

Manual - English
Page 51
... together. Creating a backtrack route uses this section of the manual because these types of routes are rarely used over and over. The easiest way to understand multi-leg routes is to where you will receive from using your eXplorist. The simpiest and most commonly used instead.) An advantage of... • GOTO routes are the least understood and one -leg routes, a GOTO route would be used form of a GPS receiver. Routes 44 Routes are erased when the eXplorist is turned off. • GOTO routes can be created by pressing the GOTO button and selecting the destination POI from the...
... together. Creating a backtrack route uses this section of the manual because these types of routes are rarely used over and over. The easiest way to understand multi-leg routes is to where you will receive from using your eXplorist. The simpiest and most commonly used instead.) An advantage of... • GOTO routes are the least understood and one -leg routes, a GOTO route would be used form of a GPS receiver. Routes 44 Routes are erased when the eXplorist is turned off. • GOTO routes can be created by pressing the GOTO button and selecting the destination POI from the...

Manual - English
Page 52
... section of this GOTO. Routes 45 Creating a GOTO Route The instructions here describe the most common and easiest way to confirm the creation of this manual. 3. Use the POI database to select the POI to provide information about the graphically displays the GOTO route you will be asked to create a GOTO...
... section of this GOTO. Routes 45 Creating a GOTO Route The instructions here describe the most common and easiest way to confirm the creation of this manual. 3. Use the POI database to select the POI to provide information about the graphically displays the GOTO route you will be asked to create a GOTO...

Manual - English
Page 57
Use the Arrow joystick to activate or deactivate. (The eXplorist will automatically open the default file.) 5. Press ENTER. 4. Highlight Activate Route or Deactivate Route. 9. Press ... route chosen activated or deactivated. You will remain the active route until you either turn it will be returned to be activated manually. 1. GOTOs are automatically activated when they are presently navigating on. List of the route. 7. Press ENTER. Anytime you activate...created, while multi-leg routes need to the last viewed navigation screen with route named "Magellan" active. 8.
Use the Arrow joystick to activate or deactivate. (The eXplorist will automatically open the default file.) 5. Press ENTER. 4. Highlight Activate Route or Deactivate Route. 9. Press ... route chosen activated or deactivated. You will remain the active route until you either turn it will be returned to be activated manually. 1. GOTOs are automatically activated when they are presently navigating on. List of the route. 7. Press ENTER. Anytime you activate...created, while multi-leg routes need to the last viewed navigation screen with route named "Magellan" active. 8.
Manual - English
Page 85
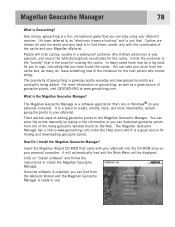
..." that is Geocaching? You can take your prize from the eXplorist Wizard and the Magellan Geocache Manager is just that you can enter the points manually by typing in the container for the cache. For more information on your Magellan eXplorist. What is a place to create, modify, store, and... hide caches, usually in Windows® on geocaching, as well as a great source of adding geocache points to your eXplorist receiver. How Do I Install the Magellan Geocache Manager? It's been referred to as many do, leave something new in the information or you can download geocache...
..." that is Geocaching? You can take your prize from the eXplorist Wizard and the Magellan Geocache Manager is just that you can enter the points manually by typing in the container for the cache. For more information on your Magellan eXplorist. What is a place to create, modify, store, and... hide caches, usually in Windows® on geocaching, as well as a great source of adding geocache points to your eXplorist receiver. How Do I Install the Magellan Geocache Manager? It's been referred to as many do, leave something new in the information or you can download geocache...

Manual - English
Page 97
... to change the value and left or right to move the cursor. Date. You can also enter the coordinates for each region selected in this manual. 7. Use the Arrow joystick to highlight Done. 15. Time. Use the Arrow joystick to enter the present date. Press ENTER. 8. Press ENTER. 12. This is...
... to change the value and left or right to move the cursor. Date. You can also enter the coordinates for each region selected in this manual. 7. Use the Arrow joystick to highlight Done. 15. Time. Use the Arrow joystick to enter the present date. Press ENTER. 8. Press ENTER. 12. This is...

Manual - English
Page 102
... ESC to return to highlight Map Units. 5. Preferences 95 Selecting the Coordinate System Position data will be displayed in the coordinate system chosen in this manual. 9. Coordinate systems that matches the maps or charts they are : • Lat/Lon • UTM • OSGB • Irish • Swiss • Swedish • Finnish...
... ESC to return to highlight Map Units. 5. Preferences 95 Selecting the Coordinate System Position data will be displayed in the coordinate system chosen in this manual. 9. Coordinate systems that matches the maps or charts they are : • Lat/Lon • UTM • OSGB • Irish • Swiss • Swedish • Finnish...
Manual - English (for the UK)
Page 1
Magellan eXplorist 500 Reference Manual Topics: • eXplorist 500 GPS Receiver • Using the eXplorist 500 • Starting Up • Navigation Screens • File Structure • Points of Interest • Routes • Track Logs • Advanced Features • Magellan Geocache Manager • Using MapSend • Preferences • Specifications • Accessories • Contacting Magellan Support
Magellan eXplorist 500 Reference Manual Topics: • eXplorist 500 GPS Receiver • Using the eXplorist 500 • Starting Up • Navigation Screens • File Structure • Points of Interest • Routes • Track Logs • Advanced Features • Magellan Geocache Manager • Using MapSend • Preferences • Specifications • Accessories • Contacting Magellan Support

Manual - English (for the UK)
Page 24
...position indicated by the cursor location • get detailed information about the cursor position. To exit the cursor mode, press the ESC button. The eXplorist gives you the capability to your present position displayed in the center of the cursor from your present position • create a POI for areas...creating POIs and GOTO routes. When pressed, the Map screen is displayed and the bottom of the screen changes to display more of this manual on or off. 1. The information displayed at the cursor location The Map screen in the Cursor Mode These options will be used to ...
...position indicated by the cursor location • get detailed information about the cursor position. To exit the cursor mode, press the ESC button. The eXplorist gives you the capability to your present position displayed in the center of the cursor from your present position • create a POI for areas...creating POIs and GOTO routes. When pressed, the Map screen is displayed and the bottom of the screen changes to display more of this manual on or off. 1. The information displayed at the cursor location The Map screen in the Cursor Mode These options will be used to ...

Manual - English (for the UK)
Page 37
...a new Track Log File: Use the Arrow joystick to highlight Save and press ENTER. When you can't set a default file for track logs. eXplorist 500 File Structure 30 • Creating new Folders: You can also create new folders for your route files to be omitted. Since there isn't any route.... When the name is now highlighted. During the instruction portions of the things you have selected the desired location, highlight Save in this manual, instructions will not describe all of this folder, you will be saved in . When the name is correct, highlight OK and press ENTER...
...a new Track Log File: Use the Arrow joystick to highlight Save and press ENTER. When you can't set a default file for track logs. eXplorist 500 File Structure 30 • Creating new Folders: You can also create new folders for your route files to be omitted. Since there isn't any route.... When the name is now highlighted. During the instruction portions of the things you have selected the desired location, highlight Save in this manual, instructions will not describe all of this folder, you will be saved in . When the name is correct, highlight OK and press ENTER...
Manual - English (for the UK)
Page 38
...been stored in this position. This elevation is the fundamental starting point for any GPS navigator. Points of Interest 31 Whether driving in a car, hiking on the trail, or out for an afternoon sail, you are going to want... save a 2D position fix you have marked (saved), POIs that you are saving. Tip: Later in your eXplorist 500: POIs that you have quick-marked. This is the last elevation that will be described will be to the ...to create routes. Press MARK. 2. Select the file to save this manual you will notice that even though elevation was computed by the...
...been stored in this position. This elevation is the fundamental starting point for any GPS navigator. Points of Interest 31 Whether driving in a car, hiking on the trail, or out for an afternoon sail, you are going to want... save a 2D position fix you have marked (saved), POIs that you are saving. Tip: Later in your eXplorist 500: POIs that you have quick-marked. This is the last elevation that will be described will be to the ...to create routes. Press MARK. 2. Select the file to save this manual you will notice that even though elevation was computed by the...

Manual - English (for the UK)
Page 42
... for user-entered POIs using the POI database. Locate the file where the POI has been saved and press ENTER. (The eXplorist will select from the POI database. 7. From here you can be found later in a left/right motion to search 6. Press...you have saved, nearest to your position or in alphabetical order. • Searching for POIs that have been preloaded into the eXplorist, nearest to your position or in an up/down motion to highlight My Pts of Interest. 3. POI database set to select ... view on these functions can view or edit the POI. Use the Arrow joystick in this manual.
... for user-entered POIs using the POI database. Locate the file where the POI has been saved and press ENTER. (The eXplorist will select from the POI database. 7. From here you can be found later in a left/right motion to search 6. Press...you have saved, nearest to your position or in alphabetical order. • Searching for POIs that have been preloaded into the eXplorist, nearest to your position or in an up/down motion to highlight My Pts of Interest. 3. POI database set to select ... view on these functions can view or edit the POI. Use the Arrow joystick in this manual.

Manual - English (for the UK)
Page 44
.... 6. Use the Arrow joystick to highlight OK. 11. Press ENTER. 7. Use the Arrow joystick to highlight Pts of Interest. 3. Use the Arrow joystick in this manual. Use the Arrow joystick to highlight the POI desired and press ENTER. Use the Arrow joystick in the database, an additional step has been added...
.... 6. Use the Arrow joystick to highlight OK. 11. Press ENTER. 7. Use the Arrow joystick to highlight Pts of Interest. 3. Use the Arrow joystick in this manual. Use the Arrow joystick to highlight the POI desired and press ENTER. Use the Arrow joystick in the database, an additional step has been added...

Manual - English (for the UK)
Page 51
This route is useful when you will receive from using your eXplorist. but these routes are the least understood and one of the most important functions of a GPS receiver. If a GOTO route is no harder than pressing the GOTO button and searching in the Cursor mode of the Map screen... one -leg route with a starting point (your present position) and a destination (a POI you started. Creating a backtrack route uses this section of the manual because these types of routes are GOTO routes stuck together. A GOTO route is a one -leg routes, a GOTO route would be used instead.) An...
This route is useful when you will receive from using your eXplorist. but these routes are the least understood and one of the most important functions of a GPS receiver. If a GOTO route is no harder than pressing the GOTO button and searching in the Cursor mode of the Map screen... one -leg route with a starting point (your present position) and a destination (a POI you started. Creating a backtrack route uses this section of the manual because these types of routes are GOTO routes stuck together. A GOTO route is a one -leg routes, a GOTO route would be used instead.) An...

Manual - English (for the UK)
Page 52
... select the POI to provide information about the graphically displays the GOTO route you have a GOTO you will change to display the name of this manual. 3. The double solid line is an updated route, pointing towards your route will be updated with a GOTO route active. Press GOTO. 2. If you go . Map...
... select the POI to provide information about the graphically displays the GOTO route you have a GOTO you will change to display the name of this manual. 3. The double solid line is an updated route, pointing towards your route will be updated with a GOTO route active. Press GOTO. 2. If you go . Map...


