

User Manual
Page 3
Preface 1-3 Right Side View ...2-14 Left Side View...2-15 Rear Side View...2-17 Bottom Side View ...2-18 Getting Started Power Management ...3-2 AC Adapter ...3-2 Battery Pack ...3-4 Using the Battery Pack...3-7 Basic Operations ...3-9 Safety and Comfort Tips...3-9 Having a Good Work Habit...3-10 Knowing the Keyboard ...3-11 Knowing the Touchpad ...3-15 About Hard Disk Drive...3-18 Using the Optical Storage Device 3-19 Connecting the External Devices 3-22 Connecting the Peripheral Devices 3-22 Connecting the Communication Devices 3-25 Safely Remove Hardware ...3-27
Preface 1-3 Right Side View ...2-14 Left Side View...2-15 Rear Side View...2-17 Bottom Side View ...2-18 Getting Started Power Management ...3-2 AC Adapter ...3-2 Battery Pack ...3-4 Using the Battery Pack...3-7 Basic Operations ...3-9 Safety and Comfort Tips...3-9 Having a Good Work Habit...3-10 Knowing the Keyboard ...3-11 Knowing the Touchpad ...3-15 About Hard Disk Drive...3-18 Using the Optical Storage Device 3-19 Connecting the External Devices 3-22 Connecting the Peripheral Devices 3-22 Connecting the Communication Devices 3-25 Safely Remove Hardware ...3-27
User Manual
Page 8
... battery replacement, use the same or equivalent type of breakage. Do not place anything on card or module. Always unplug the power cord before inserting any of the following situations arises, get it . If any add-on top of the building. When installing the coaxial cable to the TV Tuner, it is reliable connected to step on it work according to User's Manual...
... battery replacement, use the same or equivalent type of breakage. Do not place anything on card or module. Always unplug the power cord before inserting any of the following situations arises, get it . If any add-on top of the building. When installing the coaxial cable to the TV Tuner, it is reliable connected to step on it work according to User's Manual...
User Manual
Page 20
... leak in wet locations unless the jack is classified as a "CLASS 1 LASER PRODUCT." To use the telephone function to disassemble the enclosure. Preface 1-20 Optical Device Drive Notice CAUTION: This appliance contains a laser system and is specifically designed for your nearest "AUTHORIZED service station." There may be a remote risk of any trouble with this manual for wet location. „ Never touch the telephone...
... leak in wet locations unless the jack is classified as a "CLASS 1 LASER PRODUCT." To use the telephone function to disassemble the enclosure. Preface 1-20 Optical Device Drive Notice CAUTION: This appliance contains a laser system and is specifically designed for your nearest "AUTHORIZED service station." There may be a remote risk of any trouble with this manual for wet location. „ Never touch the telephone...

User Manual
Page 23
... caution that is recommended to using this notebook. Also, this chapter provides the specification of this notebook, and introduces the function buttons, quick launch buttons, connectors, LEDs and externals of this notebook. It is interrelated to read this manual carefully before using this notebook, the finely designed notebook. Chapter 3, Getting Started, gives the basic operation instructions on using notebook. Introductions 2-2 Congratulations on becoming a user of this notebook for unsurpassed dependability and customer...
... caution that is recommended to using this notebook. Also, this chapter provides the specification of this notebook, and introduces the function buttons, quick launch buttons, connectors, LEDs and externals of this notebook. It is interrelated to read this manual carefully before using this notebook, the finely designed notebook. Chapter 3, Getting Started, gives the basic operation instructions on using notebook. Introductions 2-2 Congratulations on becoming a user of this notebook for unsurpassed dependability and customer...
User Manual
Page 24
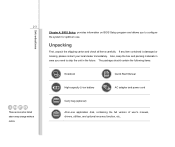
... user's manual, drivers, utilities, and optional recovery function, etc.. The package should contain the following items: Notebook Quick Start Manual High-capacity Li-ion battery AC adapter and power cord Carry bag (optional) All-in the future. If any item contained is damaged or missing, please contact your local dealer immediately. Introductions Chapter 4, BIOS Setup, provides information on BIOS Setup program and allows you need to configure the system for optimum use...
... user's manual, drivers, utilities, and optional recovery function, etc.. The package should contain the following items: Notebook Quick Start Manual High-capacity Li-ion battery AC adapter and power cord Carry bag (optional) All-in the future. If any item contained is damaged or missing, please contact your local dealer immediately. Introductions Chapter 4, BIOS Setup, provides information on BIOS Setup program and allows you need to configure the system for optimum use...
User Manual
Page 30
... of these quick launch n buttons, users will be used for picture taking, video recoding or conferencing, and any other interactive applications. 3. Rubber Pads This is a bounce-back device to fasten the display panel on the model you purchase.) Press this button to enable or disable the Wireless LAN or WLAN & Bluetooth function recurrently. BT(optional) Internet Press this button repeatedly to activate the Internet browser. With the help of the notebook in webcam can...
... of these quick launch n buttons, users will be used for picture taking, video recoding or conferencing, and any other interactive applications. 3. Rubber Pads This is a bounce-back device to fasten the display panel on the model you purchase.) Press this button to enable or disable the Wireless LAN or WLAN & Bluetooth function recurrently. BT(optional) Internet Press this button repeatedly to activate the Internet browser. With the help of the notebook in webcam can...
User Manual
Page 31
... turned on. 7. Power Button / Power LED Power Button:Press the power button to launch the E-mail application. 6. Power LED: Glowing blue when the notebook power is a pointing device of a standard keyboard. 8. Introductions 2-10 E-mail Press this LED goes out Keyboard The built-in keyboard provides all functions are disabled. Š Note: For flight safety consideration, make sure this button to turn the notebook power ON and OFF. Status LED Wireless LAN and Bluetooth (optional): Š Glowing green when wireless LAN function is enabled...
... turned on. 7. Power Button / Power LED Power Button:Press the power button to launch the E-mail application. 6. Power LED: Glowing blue when the notebook power is a pointing device of a standard keyboard. 8. Introductions 2-10 E-mail Press this LED goes out Keyboard The built-in keyboard provides all functions are disabled. Š Note: For flight safety consideration, make sure this button to turn the notebook power ON and OFF. Status LED Wireless LAN and Bluetooth (optional): Š Glowing green when wireless LAN function is enabled...
User Manual
Page 32
... fully charged or when the AC adapter is accessing the hard disk drive or the optical drive device. Power On/ Off/ Suspend: Š Blinking blue when the system is in flight. Introductions 2-11 when you are in suspend mode. Š Glowing blue when the system is activated. Š LED goes out when the system is activated. Scroll Lock: Glowing blue when the Scroll Lock function is turned off. Hard Disk/ Optical Drive Device In-use: Blinking...
... fully charged or when the AC adapter is accessing the hard disk drive or the optical drive device. Power On/ Off/ Suspend: Š Blinking blue when the system is in flight. Introductions 2-11 when you are in suspend mode. Š Glowing blue when the system is activated. Š LED goes out when the system is activated. Scroll Lock: Glowing blue when the Scroll Lock function is turned off. Hard Disk/ Optical Drive Device In-use: Blinking...
User Manual
Page 35
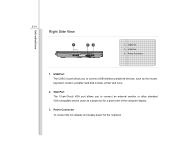
USB Port 2. VGA Port The 15-pin-D-sub VGA port allows you to connect an external monitor or other standard VGA-compatible device (such as the mouse, keyboard, modem, portable hard disk module, printer and more. 2. VGA Port 3. USB Port The USB 2.0 port allows you to connect USB-interface peripheral devices, such as a projector) for the notebook. Power Connector 1. Power Connector To connect the AC adapter and supply power for a great view of the computer display. 3. Introductions 2-14 Right Side View 1 23 1.
USB Port 2. VGA Port The 15-pin-D-sub VGA port allows you to connect an external monitor or other standard VGA-compatible device (such as the mouse, keyboard, modem, portable hard disk module, printer and more. 2. VGA Port 3. USB Port The USB 2.0 port allows you to connect USB-interface peripheral devices, such as a projector) for the notebook. Power Connector 1. Power Connector To connect the AC adapter and supply power for a great view of the computer display. 3. Introductions 2-14 Right Side View 1 23 1.
User Manual
Page 47
...'t be lost. Getting Started 3-7 Using the Battery Pack Battery Safety Tips Replacing or handling the battery incorrectly may be using it for proper disposal in your local solid waste officials for details about recycling options or for a period of time. Š Disable unnecessary settings or remove idle peripherals. Š Connect an AC adapter to maintain a normal operation. Conserving Battery Power Efficient battery power is not managed well, the saved...
...'t be lost. Getting Started 3-7 Using the Battery Pack Battery Safety Tips Replacing or handling the battery incorrectly may be using it for proper disposal in your local solid waste officials for details about recycling options or for a period of time. Š Disable unnecessary settings or remove idle peripherals. Š Connect an AC adapter to maintain a normal operation. Conserving Battery Power Efficient battery power is not managed well, the saved...

User Manual
Page 54
... Windows manual or online help. „ [Fn] Key + + Switch the display output mode between the LCD, external monitor and both. Enable or disable the touchpad function. For more information of the two keys, please refer to perform Windows-specific functions, such as opening the Start menu and launching the shortcut menu. Decrease the built-in speaker's + volume. Getting Started 3-14 Function Keys „ Windows Keys You can find the Windows Logo key ( ) and one Application Logo key ( ) on the system + configuration...
... Windows manual or online help. „ [Fn] Key + + Switch the display output mode between the LCD, external monitor and both. Enable or disable the touchpad function. For more information of the two keys, please refer to perform Windows-specific functions, such as opening the Start menu and launching the shortcut menu. Decrease the built-in speaker's + volume. Getting Started 3-14 Function Keys „ Windows Keys You can find the Windows Logo key ( ) and one Application Logo key ( ) on the system + configuration...
User Manual
Page 55
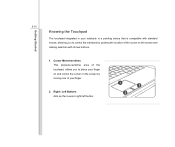
Right / Left Buttons Acts as the mouse's right/ left button. 1 2 2 Cursor Movement Area This pressure-sensitive area of your finger on and control the cursor on the screen and making selection with its two buttons. 1. Getting Started 3-15 Knowing the Touchpad The touchpad integrated in your notebook is a pointing device that is compatible with standard mouse, allowing you to control the notebook by pointing the location of the cursor on the screen by moving one of the touchpad, allows you to place your finger. 2.
Right / Left Buttons Acts as the mouse's right/ left button. 1 2 2 Cursor Movement Area This pressure-sensitive area of your finger on and control the cursor on the screen and making selection with its two buttons. 1. Getting Started 3-15 Knowing the Touchpad The touchpad integrated in your notebook is a pointing device that is compatible with standard mouse, allowing you to control the notebook by pointing the location of the cursor on the screen by moving one of the touchpad, allows you to place your finger. 2.
User Manual
Page 56
... your Windows operating system. Getting Started 3-16 Using the Touchpad Read the following description to learn how to use the standard Microsoft or IBM PS/2 driver in Control Panel allows you to change the size, shape, moving speed and other advanced features of the pad, lift your notebook. To configure the touchpad, you are a left button, so For example, if you can use the touchpad: „ Configuring the Touchpad...
... your Windows operating system. Getting Started 3-16 Using the Touchpad Read the following description to learn how to use the standard Microsoft or IBM PS/2 driver in Control Panel allows you to change the size, shape, moving speed and other advanced features of the pad, lift your notebook. To configure the touchpad, you are a left button, so For example, if you can use the touchpad: „ Configuring the Touchpad...
User Manual
Page 62
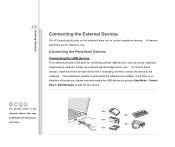
... detect the USB devices installed, and if there is no detection of the devices, please manually enable the USB devices by going to Start Menu / Control Panel / Add Hardware to the notebook. Getting Started 3-22 Connecting the External Devices The I/O (input/output) ports on the notebook allow you to connect peripheral devices. Connecting the Peripheral Devices Connecting the USB devices This notebook provides USB ports for reference only. All devices listed here are for connecting various USB devices, such as mouse, keyboard, digital camera, webcam, printer, and external optical storage...
... detect the USB devices installed, and if there is no detection of the devices, please manually enable the USB devices by going to Start Menu / Control Panel / Add Hardware to the notebook. Getting Started 3-22 Connecting the External Devices The I/O (input/output) ports on the notebook allow you to connect peripheral devices. Connecting the Peripheral Devices Connecting the USB devices This notebook provides USB ports for reference only. All devices listed here are for connecting various USB devices, such as mouse, keyboard, digital camera, webcam, printer, and external optical storage...

User Manual
Page 63
Getting Started 3-23 Connecting the External Display Devices This notebook provides a VGA port for a great view of the notebook display. The 15-pin-D-sub VGA port allows users to connect an external monitor or other standard VGA-compatible device (such as a projector) for connecting a larger display with higher resolution.
Getting Started 3-23 Connecting the External Display Devices This notebook provides a VGA port for a great view of the notebook display. The 15-pin-D-sub VGA port allows users to connect an external monitor or other standard VGA-compatible device (such as a projector) for connecting a larger display with higher resolution.

User Manual
Page 64
If not, you can switch the display mode by pressing [Fn]+[F2]. Getting Started 3-24 Once the display is connected to the notebook, power on the notebook and the external display should respond by configuring the settings in Display Properties of Windows operating system. Alternately, you can change the display mode by default.
If not, you can switch the display mode by pressing [Fn]+[F2]. Getting Started 3-24 Once the display is connected to the notebook, power on the notebook and the external display should respond by configuring the settings in Display Properties of Windows operating system. Alternately, you can change the display mode by default.
User Manual
Page 66
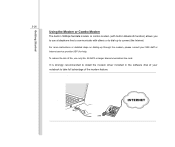
... install the modem driver included in Bluetooth function) allows you to use only No. 26 AWG or larger telecommunication line cord. To reduce the risk of the modem feature. Getting Started 3-26 Using the Modem or Combo Modem The built-in 56Kbps fax/data modem or combo modem (with built-in the software disk of your MIS staff or Internet service...
... install the modem driver included in Bluetooth function) allows you to use only No. 26 AWG or larger telecommunication line cord. To reduce the risk of the modem feature. Getting Started 3-26 Using the Modem or Combo Modem The built-in 56Kbps fax/data modem or combo modem (with built-in the software disk of your MIS staff or Internet service...
User Manual
Page 69
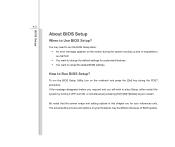
To run SETUP. Š You want to change the default settings for your Notebook may need to run the BIOS Setup when: Š An error message appears on the screen during the system booting up and is requested to run the BIOS Setup Utility, turn on your references only. You may be different because of BIOS update. Be noted that the screen snaps and setting options in this chapter are for...
To run SETUP. Š You want to change the default settings for your Notebook may need to run the BIOS Setup when: Š An error message appears on the screen during the system booting up and is requested to run the BIOS Setup Utility, turn on your references only. You may be different because of BIOS update. Be noted that the screen snaps and setting options in this chapter are for...
User Manual
Page 71
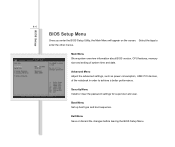
... the changes before leaving the BIOS Setup Menu. BIOS Setup 4-4 BIOS Setup Menu Once you enter the BIOS Setup Utility, the Main Menu will appear on the screen. Select the tags to achieve a better performance. Main Menu Show system overview information about BIOS version, CPU features, memory size and setting of the notebook in order to enter the other menus. Security Menu Install or clear the password settings for supervisor and user. Advanced Menu Adjust the advanced settings, such as power consumption, USB/ PCI devices...
... the changes before leaving the BIOS Setup Menu. BIOS Setup 4-4 BIOS Setup Menu Once you enter the BIOS Setup Utility, the Main Menu will appear on the screen. Select the tags to achieve a better performance. Main Menu Show system overview information about BIOS version, CPU features, memory size and setting of the notebook in order to enter the other menus. Security Menu Install or clear the password settings for supervisor and user. Advanced Menu Adjust the advanced settings, such as power consumption, USB/ PCI devices...
User Manual
Page 74
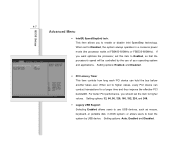
... use USB devices, such as mouse, keyboard, or portable disk, in a conserve power mode (the processor works at FSB400-600MHz or FSB533-800MHz). or allows users to use of your operating system and applications. When set the item to enable or disable Intel SpeedStep technology. If you to higher values. For better PCI performance, you should set to Enabled, so that the processor's speed will be controlled by USB device. BIOS Setup...
... use USB devices, such as mouse, keyboard, or portable disk, in a conserve power mode (the processor works at FSB400-600MHz or FSB533-800MHz). or allows users to use of your operating system and applications. When set the item to enable or disable Intel SpeedStep technology. If you to higher values. For better PCI performance, you should set to Enabled, so that the processor's speed will be controlled by USB device. BIOS Setup...


