MSI P7NGM DIGITAL - P7NGM-Digital Motherboard - Micro ATX Support and Manuals
Get Help and Manuals for this MSI item

View All Support Options Below
Free MSI P7NGM DIGITAL manuals!
Problems with MSI P7NGM DIGITAL?
Ask a Question
Free MSI P7NGM DIGITAL manuals!
Problems with MSI P7NGM DIGITAL?
Ask a Question
Popular MSI P7NGM DIGITAL Manual Pages
User Guide - Page 2
... every care in the preparation of this document is a registered trademark of its contents.
func=service Contact our technical staff at: http://ocss.msi.com.tw
ii Alternatively, please try the following help resources for FAQ, technical guide, BIOS updates, driver updates, and other countries. AMI® is the intellectual property of International Business Machines Corporation. PS...
User Guide - Page 3
... setting it . CAUT ION: Danger of the following situations arises, get it work well or you can not step on card or module. 9.
If any liquid into the opening that people can not get the equipment checked by the m an uf ac t ur er. Safety Instructions
1. fore connecting the equipment to
User's Manual...
User Guide - Page 8
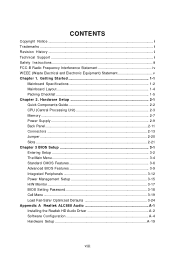
... Setup 2-1 Quick Components Guide 2-2 CPU (Central Processing Unit 2-3 Memory ...2-7 Power Supply ...2-9 Back Panel ...2-11 Connectors ...2-13 Jumper ...2-20 Slots ...2-21 Chapter 3 BIOS Setup 3-1 Entering Setup ...3-2 The Main Menu ...3-4 Standard CMOS Features 3-6 Advanced BIOS Features 3-9 Integrated Peripherals 3-12 Power Management Setup 3-15 H/W Monitor ...3-17 BIOS Setting Password...
User Guide - Page 10
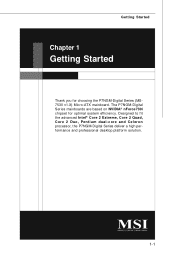
... Series mainboards are based on NVIDIA® nForce730i chipset for choosing the P7NGM-Digital Series (MS7530 v1.X) Micro-ATX mainboard. Designed to fit the advanced Intel® Core 2 Extreme, Core 2 Quad, Core 2 Duo, Pentium dual-core and Celeron processor, the P7NGM-Digital Series deliver a high performance and professional desktop platform solution.
1-1 Getting Started
Chapter 1
Getting...
User Guide - Page 13
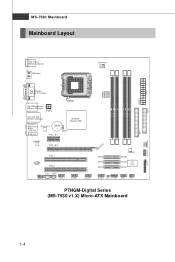
...: USB ports
NVIDIA nForce 730i
T: Li ne-I n M:L in e-Out B : Mi c T: R S -O ut M:CS -Out B:SS-Out
RTL8111C
BATT +
JBAT1
PCI _E1
JMB381
PCI _E2
AL C8 88
PCI 1 PCI 2
JCD1 JSP1
JAUD1
J1394_1 (op tional)
JUSB1
JUSB2
SATA6 SATA4 SATA2
JMB368
SATA5
SATA3 SATA1
I/O Ch ip
JUSB3 JCI1 JTPM1 JFP1 JFP2
P7NGM-Digital Series...
User Guide - Page 17
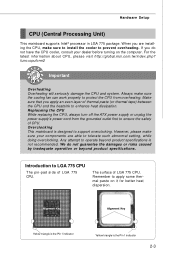
... or risks caused by inadequate operation or beyond product specifications is the Pin 1 indicator
2-3 Replaceing the CPU While replacing the CPU, always turn off the ATX power supply or unplug.... Hardware Setup
CPU (Central Processing Unit)
This mainboard supports Intel® processor in LGA 775 package. We do not have the CPU cooler, consult your components are installing the CPU, make ...
User Guide - Page 20
... of the mainboard.
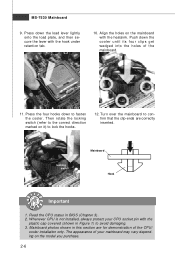
11. Whenever CPU is not installed, always protect your mainboard may vary depending on the mainboard with the hook under retention tab.
10. Mainboard photos shown in this section are correctly inserted. Turn over the mainboard to avoid damaging. 3. Align the holes on the model you purchase.
2-6
Press the four...
User Guide - Page 25
Hardware Setup
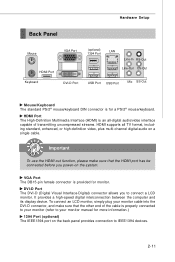
Back Panel
Mouse
HDMI Port Keyboard
VGA Port DVI-D Port
(optional) 1394 Port
LAN Line-In ...connector, and make sure that the other end of transmitting uncompressed streams. HDMI supports all -digital audio/video interface capable of the cable is properly connected to your monitor (refer to your monitor manual for a PS/2® mouse/keyboard.
Important
To use the HDMI-out ...
User Guide - Page 47
...Memory The system shares memory to the system.
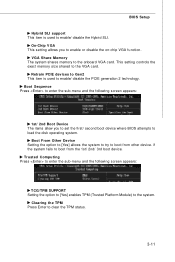
Trusted Computing Press to enter the sub-menu and the following screen appears:
1st/ 2nd Boot Device The items allow you to enable/ disable the PCIE generation 2 technology. On-Chip VGA This setting allows you to set the first/ second boot device where BIOS...following screen appears:
TCG/TPM SUPPORT Setting the option to [Yes] enables TPM...
User Guide - Page 51
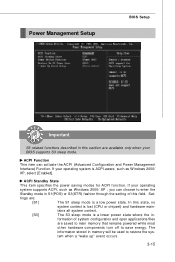
... only when your BIOS supports S3 sleep mode. tains all system context.
[S3]
The S3 sleep mode is a lower power state where the in memory will be used to...setting of system configuration and open applications/files
are :
[S1]
The S1 sleep mode is a low power state.
Power Management Setup
BIOS Setup
Important
S3-related functions described in this state, no
system context is lost (CPU...
User Guide - Page 55
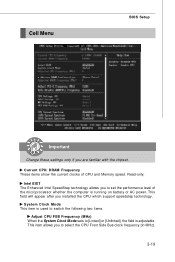
Cell Menu
BIOS Setup
Important
Change these settings only if you installed the CPU which support speedstep technology. Current CPU/ DRAM Frequency These items show the current clocks of the ...you are familiar with the chipset. This item allows you to set the performance level of CPU and Memory speed. System Clock Mode This item is used to switch the following two items.
Adjust...
User Guide - Page 57
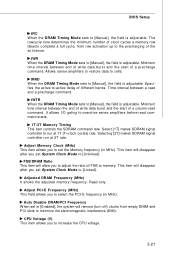
.... tWR When the DRAM Timing Mode sets to increase the CPU voltage.
3-21 Allows sense amplifiers to restore data to memory. FSB/DRAM Ratio This item will remove...Manual], the field is adjustable.
Auto Disable DRAM /PCI Frequency W hen set the Memory frequency (in MHz). This item will disappear after you set System Clock Mode to [Unlinked]. BIOS Setup
tRC W hen the DRAM Timing M ode sets...
User Guide - Page 59
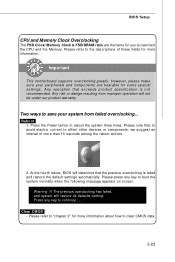
... will determine that exceeds product specification is failed and restore the default settings automatically. Two ways to save your peripherals and components are the items for you to continue....... At the fourth reboot, BIOS will not be under our product warranty.
Clear CMOS - BIOS Setup
CPU and Memory Clock Overclocking
The FSB Clock/ Memory Clock & FSB/DRAM ratio...
User Guide - Page 89
... drive until the blue screen portion of W indows setup.
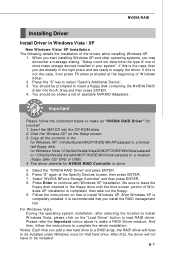
2. NVIDIA RAID
Installing Driver
Install Driver in your system". Press the "S" key to load RAID driver. You should be installed.
Be sure to a formatted floppy disk.
Press "S" again at the beginning of W indows XP installation is done.
5. Follow the instructions on the Setup screen. 3. Notice: Each time you...
User Guide - Page 90
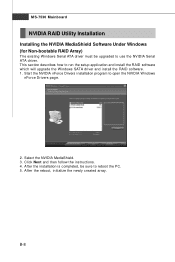
... Windows (for Non-bootable RAID Array)
The existing W indows Serial ATA driver must be sure to run the setup application and install the RAID software which will upgrade the W indows SATA driver and install the RAID software. 1. B-8 Select the NVIDIA MediaShield. 3. Click Next and then follow the instructions. 4. This section describes how to reboot the PC. 5. After the...
MSI P7NGM DIGITAL Reviews
We have not received any reviews for MSI yet.