User Manual
Page 8
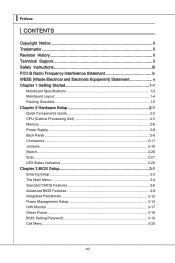
... (Central Processing Unit 2-3 Memory 2-6 Power Supply 2-8 Back Panel 2-9 Connectors 2-11 Jumpers 2-19 Switch 2-20 Slots 2-21 LED Status Indicators 2-25 Chapter 3 BIOS Setup 3-1 Entering Setup 3-2 The Main Menu 3-4 Standard CMOS Features 3-6 Advanced BIOS Features 3-9 Integrated Peripherals 3-12 Power Management Setup 3-14 H/W Monitor 3-17 Green Power 3-18 BIOS Setting Password 3-19 Cell Menu 3-20 viii
... (Central Processing Unit 2-3 Memory 2-6 Power Supply 2-8 Back Panel 2-9 Connectors 2-11 Jumpers 2-19 Switch 2-20 Slots 2-21 LED Status Indicators 2-25 Chapter 3 BIOS Setup 3-1 Entering Setup 3-2 The Main Menu 3-4 Standard CMOS Features 3-6 Advanced BIOS Features 3-9 Integrated Peripherals 3-12 Power Management Setup 3-14 H/W Monitor 3-17 Green Power 3-18 BIOS Setting Password 3-19 Cell Menu 3-20 viii
User Manual
Page 36
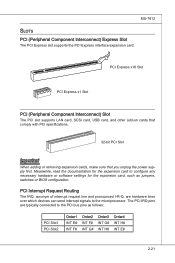
... and pronounced I-R-Q, are typically connected to the PCI bus pins as jumpers, switches or BIOS configuration. The PCI IRQ pins are hardware lines over which devices can send interrupt signals to configure any necessary hardware or software settings for the expansion card, such as follows: PCI Slot1 PCI Slot2 Order1 INT E# INT...
... and pronounced I-R-Q, are typically connected to the PCI bus pins as jumpers, switches or BIOS configuration. The PCI IRQ pins are hardware lines over which devices can send interrupt signals to configure any necessary hardware or software settings for the expansion card, such as follows: PCI Slot1 PCI Slot2 Order1 INT E# INT...

User Manual
Page 42
You may need to run SETUP. ■ You want to configure the system for customized features. 2-3-1 Chapter 3 BIOS Setup This chapter provides information on the screen during the system booting up, and requests you to run the Setup program when: ■ An error message appears on the BIOS Setup program and allows you to change the default settings for optimum use.
You may need to run SETUP. ■ You want to configure the system for customized features. 2-3-1 Chapter 3 BIOS Setup This chapter provides information on the screen during the system booting up, and requests you to run the Setup program when: ■ An error message appears on the BIOS Setup program and allows you to change the default settings for optimum use.

User Manual
Page 45
...for basic system configurations, such as time, date etc. ▶ Advanced BIOS Features Use this menu to setup the items of the BIOS special enhanced features. ▶ Integrated Peripherals Use this menu to specify your settings for integrated peripherals. ▶ Power Management Setup Use this menu to ...specify your settings for power management. ▶ H/W Monitor This entry shows your PC health status. ▶ Green Power Use this menu to specify the power phase. ▶ BIOS Setting Password Use this menu to set the password for BIOS. ▶ Cell Menu Use this menu...
...for basic system configurations, such as time, date etc. ▶ Advanced BIOS Features Use this menu to setup the items of the BIOS special enhanced features. ▶ Integrated Peripherals Use this menu to specify your settings for integrated peripherals. ▶ Power Management Setup Use this menu to ...specify your settings for power management. ▶ H/W Monitor This entry shows your PC health status. ▶ Green Power Use this menu to specify the power phase. ▶ BIOS Setting Password Use this menu to set the password for BIOS. ▶ Cell Menu Use this menu...
User Manual
Page 46
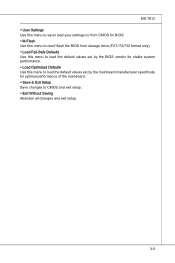
...9654; User Settings Use this menu to save/ load your settings to/ from CMOS for BIOS. ▶ M-Flash Use this menu to read/ flash the BIOS from storage drive (FAT/ FAT32 format only). ▶ Load Fail-Safe Defaults Use this menu to load the default values set by the BIOS vendor for ...stable system performance. ▶ Load Optimized Defaults Use this menu to load the default values set by the mainboard manufacturer specifically for optimal performance of the mainboard. ▶ Save & ...
...9654; User Settings Use this menu to save/ load your settings to/ from CMOS for BIOS. ▶ M-Flash Use this menu to read/ flash the BIOS from storage drive (FAT/ FAT32 format only). ▶ Load Fail-Safe Defaults Use this menu to load the default values set by the BIOS vendor for ...stable system performance. ▶ Load Optimized Defaults Use this menu to load the default values set by the mainboard manufacturer specifically for optimal performance of the mainboard. ▶ Save & ...

User Manual
Page 47
... current time). through Dec. [date] The date from 1 to 31 can be keyed by numeric function keys. [year] The year can be adjusted by BIOS. ▍ BIOS Setup Standard CMOS Features The items in Standard CMOS Features Menu include some basic setup items. Use the arrow keys to highlight the item and... then use the or keys to select the value you want in each item. ▶ Date (MM:DD:YY) This allows you to set the system...
... current time). through Dec. [date] The date from 1 to 31 can be keyed by numeric function keys. [year] The year can be adjusted by BIOS. ▍ BIOS Setup Standard CMOS Features The items in Standard CMOS Features Menu include some basic setup items. Use the arrow keys to highlight the item and... then use the or keys to select the value you want in each item. ▶ Date (MM:DD:YY) This allows you to set the system...

User Manual
Page 49
▍ BIOS Setup ▶ Hold on for any detected error. ▶ System Information Press to enter the sub-menu, and the following screen appears. When the system stops for the errors preset, it will halt on The setting determines whether the system will stop for 15 seconds and then automatically resume its operation. [All Error] The system stops when any error is detected. [No Error] The system does not stop if an error is detected at boot. This sub-menu shows the CPU information, BIOS version and memory status of your system (read only). 3-8
▍ BIOS Setup ▶ Hold on for any detected error. ▶ System Information Press to enter the sub-menu, and the following screen appears. When the system stops for the errors preset, it will halt on The setting determines whether the system will stop for 15 seconds and then automatically resume its operation. [All Error] The system stops when any error is detected. [No Error] The system does not stop if an error is detected at boot. This sub-menu shows the CPU information, BIOS version and memory status of your system (read only). 3-8

User Manual
Page 50
... [Off] will turn on the Num Lock key when the system is powered on the numeric keypad. 3-9 Setting to update the BIOS with a Flash utility. You should immediately re-enable it to protect it against viruses. ▶ Full Screen Logo Display This item enables this system to ... to use the arrow keys on . The only time when you need to show the company logo on . When enabled, the BIOS' data cannot be changed when attempting to [On] will allow users to set the Num Lock status when the system is powered on the boot-up screen. After updating the...
... [Off] will turn on the Num Lock key when the system is powered on the numeric keypad. 3-9 Setting to update the BIOS with a Flash utility. You should immediately re-enable it to protect it against viruses. ▶ Full Screen Logo Display This item enables this system to ... to use the arrow keys on . The only time when you need to show the company logo on . When enabled, the BIOS' data cannot be changed when attempting to [On] will allow users to set the Num Lock status when the system is powered on the boot-up screen. After updating the...
User Manual
Page 51
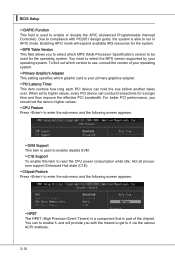
... HPET The HPET (High Precision Event Timers) is a component that is part of your operating system. ▶ Primary Graphic's Adapter This setting specifies which MPS (Multi-Processor Specification) version to be used to higher values, every PCI device can hold the bus before another takes over....system. ▶ MPS Table Version This field allows you to it , and will provide you should set to enable or disable the APIC (Advanced Programmable Interrupt Controller). ▍ BIOS Setup ▶ IOAPIC Function This field is used for the operating system. Due to compliance with the...
... HPET The HPET (High Precision Event Timers) is a component that is part of your operating system. ▶ Primary Graphic's Adapter This setting specifies which MPS (Multi-Processor Specification) version to be used to higher values, every PCI device can hold the bus before another takes over....system. ▶ MPS Table Version This field allows you to it , and will provide you should set to enable or disable the APIC (Advanced Programmable Interrupt Controller). ▍ BIOS Setup ▶ IOAPIC Function This field is used for the operating system. Due to compliance with the...
User Manual
Page 52
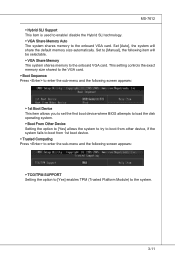
... the sub-menu and the following screen appears: ▶ 1st Boot Device This item allows you to set the first boot device where BIOS attempts to load the disk operating system. ▶ Boot From Other Device Setting the option to [Yes] allows the system to try to boot from other device, if the... system fails to boot from 1st boot device. ▶ Trusted Computing Press to the system. 3-11 Set to [Manual], the...
... the sub-menu and the following screen appears: ▶ 1st Boot Device This item allows you to set the first boot device where BIOS attempts to load the disk operating system. ▶ Boot From Other Device Setting the option to [Yes] allows the system to try to boot from other device, if the... system fails to boot from 1st boot device. ▶ Trusted Computing Press to the system. 3-11 Set to [Manual], the...

User Manual
Page 53
▍ BIOS Setup Integrated Peripherals ▶ USB Controller This setting allows you to enable/disable the onboard USB 1.1/ 2.0 controller. ▶ USB Device Legacy Support Select [Enabled] if you need to use a USB-interfaced device in the operating system. ▶ Onboard Controller This setting allows you to enable/...to invoke the Boot ROM of the onboard LAN. ▶ Onboard IEEE1394 Controller This setting is used to enable/disable the onboard IEEE 1394 controller. ▶ HD Audio Controller This setting is used to enable/disable the onboard audio controller. ▶ Audio HDMI Select ...
▍ BIOS Setup Integrated Peripherals ▶ USB Controller This setting allows you to enable/disable the onboard USB 1.1/ 2.0 controller. ▶ USB Device Legacy Support Select [Enabled] if you need to use a USB-interfaced device in the operating system. ▶ Onboard Controller This setting allows you to enable/...to invoke the Boot ROM of the onboard LAN. ▶ Onboard IEEE1394 Controller This setting is used to enable/disable the onboard IEEE 1394 controller. ▶ HD Audio Controller This setting is used to enable/disable the onboard audio controller. ▶ Audio HDMI Select ...

User Manual
Page 55
...in formation of this section are : [S1] The S1 sleep mode is lost (CPU or chipset) and hardware maintains all sys- Settings are available only when the BIOS supports S3 sleep mode. ▶ ACPI Function This item is to activate the ACPI (Advanced Configuration and Power Management Interface) Function. ...3-14 In this state, no system context is a low power state. The information stored in S1(POS) or S3(STR) fashion through the setting of system configuration and open applications/files is ACPI-aware, such as Windows 2000/ XP, you can choose to enter the Standby mode in memory...
...in formation of this section are : [S1] The S1 sleep mode is lost (CPU or chipset) and hardware maintains all sys- Settings are available only when the BIOS supports S3 sleep mode. ▶ ACPI Function This item is to activate the ACPI (Advanced Configuration and Power Management Interface) Function. ...3-14 In this state, no system context is a low power state. The information stored in S1(POS) or S3(STR) fashion through the setting of system configuration and open applications/files is ACPI-aware, such as Windows 2000/ XP, you can choose to enter the Standby mode in memory...

User Manual
Page 56
... the button is pressed for more than four seconds, the computer is detected. ▶ Resume By PCI Device (PME#) When set the wake up Event By Setting to [BIOS] activates the following fields, and use the following fields to be awakened from the power saving modes through any event on PME... (Power Management Event). ▶ Resume By PCI-E Device When set to [Enabled], the feature allows your system to set to [Enabled], the ...
... the button is pressed for more than four seconds, the computer is detected. ▶ Resume By PCI Device (PME#) When set the wake up Event By Setting to [BIOS] activates the following fields, and use the following fields to be awakened from the power saving modes through any event on PME... (Power Management Event). ▶ Resume By PCI-E Device When set to [Enabled], the feature allows your system to set to [Enabled], the ...

User Manual
Page 57
▍ BIOS Setup ▶ Resume By Onboard LAN This fields specify whether the system will be awakened from power saving modes when activity or input signal of ... or disable the feature of booting up the system on a scheduled time/date. ▶ Date/Time (HH:MM:SS) If Resume By RTC Alarm is set to [Enabled], the system will automatically resume (boot up) on a specific date/hour/minute/second specified in these fields (using the and to select the...
▍ BIOS Setup ▶ Resume By Onboard LAN This fields specify whether the system will be awakened from power saving modes when activity or input signal of ... or disable the feature of booting up the system on a scheduled time/date. ▶ Date/Time (HH:MM:SS) If Resume By RTC Alarm is set to [Enabled], the system will automatically resume (boot up) on a specific date/hour/minute/second specified in these fields (using the and to select the...
User Manual
Page 59
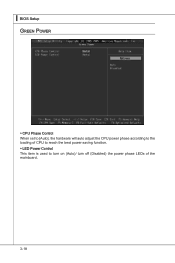
▍ BIOS Setup Green Power ▶ CPU Phase Control When set to [Auto], the hardware will auto adjust the CPU power phase according to the loading of CPU to reach the best power saving function. ▶ LED Power Control This item is used to turn on (Auto)/ turn off (Disabled) the power phase LEDs of the mainboard. 3-18
▍ BIOS Setup Green Power ▶ CPU Phase Control When set to [Auto], the hardware will auto adjust the CPU power phase according to the loading of CPU to reach the best power saving function. ▶ LED Power Control This item is used to turn on (Auto)/ turn off (Disabled) the power phase LEDs of the mainboard. 3-18

User Manual
Page 60
... will be prompted to enter it every time you try to enter Setup. To clear a set password from changing any password. When a password has been set, you will replace any previously set password, just press when you are prompted to confirm the password. Once the password is disabled... you can enter Setup without entering any part of your system configuration. 3-19 This prevents an unauthorized person from CMOS memory. MS-7612 BIOS Setting Password When you select this function, a message as below will be disabled. A message will show up confirming the password will appear on...
... will be prompted to enter it every time you try to enter Setup. To clear a set password from changing any password. When a password has been set, you will replace any previously set password, just press when you are prompted to confirm the password. Once the password is disabled... you can enter Setup without entering any part of your system configuration. 3-19 This prevents an unauthorized person from CMOS memory. MS-7612 BIOS Setting Password When you select this function, a message as below will be disabled. A message will show up confirming the password will appear on...

User Manual
Page 61
This submenu shows the information of CPU and Memory speed. Read-only. ▶ CPU Specifications Press to enter the sub-menu and the following screen appears. ▍ BIOS Setup Cell Menu Important Change these settings only if you are familiar with the chipset. ▶ Current CPU / DRAM Frequency These items show the current clocks of installed CPU. 3-20
This submenu shows the information of CPU and Memory speed. Read-only. ▶ CPU Specifications Press to enter the sub-menu and the following screen appears. ▍ BIOS Setup Cell Menu Important Change these settings only if you are familiar with the chipset. ▶ Current CPU / DRAM Frequency These items show the current clocks of installed CPU. 3-20
User Manual
Page 62
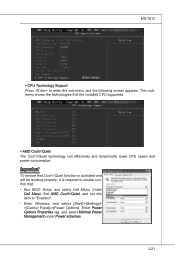
... is required to enter the sub-menu and the following screen appears. MS-7612 ▶ CPU Technology Support Press to double confirm that: • Run BIOS Setup, and select Cell Menu. Enter Power Options Properties tag, and select Minimal Power Management under Power schemes. 3-21 This submenu shows the technologies that...; AMD Cool'n'Quiet The Cool'n'Quiet technology can effectively and dynamically lower CPU speed and power consumption. Under Cell Menu, find AMD Cool'n'Quiet, and set this item to "Enabled". • Enter Windows, and select [Start...
... is required to enter the sub-menu and the following screen appears. MS-7612 ▶ CPU Technology Support Press to double confirm that: • Run BIOS Setup, and select Cell Menu. Enter Power Options Properties tag, and select Minimal Power Management under Power schemes. 3-21 This submenu shows the technologies that...; AMD Cool'n'Quiet The Cool'n'Quiet technology can effectively and dynamically lower CPU speed and power consumption. Under Cell Menu, find AMD Cool'n'Quiet, and set this item to "Enabled". • Enter Windows, and select [Start...

User Manual
Page 63
.... ▶ Memory-Z Press to enter the sub-menu and the following screen appears. ▶ DIMM1~4 Memory SPD Information Press to set the CPU Ratio higher. Setting to [Enabled] allows you to enter the sub-menu and the following screen appears. ▶ DRAM Timing Mode This field has the...This submenu displays the information of installed memory. ▶ Advance DRAM Configuration Press to enter the sub-menu and the following screen appears. ▍ BIOS Setup ▶ Adjust CPU FSB Frequency (MHz) This item allows you to select the CPU Front Side Bus clock frequency (in MHz). ▶...
.... ▶ Memory-Z Press to enter the sub-menu and the following screen appears. ▶ DIMM1~4 Memory SPD Information Press to set the CPU Ratio higher. Setting to [Enabled] allows you to enter the sub-menu and the following screen appears. ▶ DRAM Timing Mode This field has the...This submenu displays the information of installed memory. ▶ Advance DRAM Configuration Press to enter the sub-menu and the following screen appears. ▍ BIOS Setup ▶ Adjust CPU FSB Frequency (MHz) This item allows you to select the CPU Front Side Bus clock frequency (in MHz). ▶...

User Manual
Page 70
... system performance. 3-29 When you select Load Fail-Safe Defaults, a message as below appears: Selecting Ok and pressing Enter loads the BIOS default values for optimal performance of the BIOS settings to restore all of the mainboard. When you select Load Optimized Defaults, a message as below appears: Selecting Ok and pressing Enter loads...
... system performance. 3-29 When you select Load Fail-Safe Defaults, a message as below appears: Selecting Ok and pressing Enter loads the BIOS default values for optimal performance of the BIOS settings to restore all of the mainboard. When you select Load Optimized Defaults, a message as below appears: Selecting Ok and pressing Enter loads...

