

User Manual
Page 1
Chapter 1 Chapter 2 Chapter 3 Chapter 4 Preface General Introductions Getting Started Customizing this Notebook BIOS setup G52-16321X1
Chapter 1 Chapter 2 Chapter 3 Chapter 4 Preface General Introductions Getting Started Customizing this Notebook BIOS setup G52-16321X1

User Manual
Page 14
Preface Customizing this Notebook Connecting the External Devices 3-2 Connecting the Peripheral Devices 3-3 Connecting the Communication Devices 3-6 Express Card Installation 3-7 Installing the Express card 3-7 Removing the Express card 3-8 Safely Remove Hardware 3-9 BIOS Setup About BIOS Setup 4-2 When to Use BIOS Setup 4-2 How to Run BIOS Setup 4-2 Control Keys 4-3 BIOS Setup Menu 4-4 Main menu 4-5 Advanced menu 4-7 Boot menu 4-8 Security menu 4-9 Exit menu 4-11 XIV
Preface Customizing this Notebook Connecting the External Devices 3-2 Connecting the Peripheral Devices 3-3 Connecting the Communication Devices 3-6 Express Card Installation 3-7 Installing the Express card 3-7 Removing the Express card 3-8 Safely Remove Hardware 3-9 BIOS Setup About BIOS Setup 4-2 When to Use BIOS Setup 4-2 How to Run BIOS Setup 4-2 Control Keys 4-3 BIOS Setup Menu 4-4 Main menu 4-5 Advanced menu 4-7 Boot menu 4-8 Security menu 4-9 Exit menu 4-11 XIV

User Manual
Page 15
Chapter 1 Chapter 2 Chapter 3 Chapter 4 Preface General Introductions Getting Started Customizing this Notebook BIOS setup
Chapter 1 Chapter 2 Chapter 3 Chapter 4 Preface General Introductions Getting Started Customizing this Notebook BIOS setup

User Manual
Page 16
...descriptions of all the accessories included when you purchased this notebook. Chapter 2, Getting Started, provides the specification of this notebook, and introduces the function buttons, quick launch buttons, connectors, LEDs and externals of this notebook. How to Use This Manual This User's Manual provides... instructions and illustrations on how to use this notebook. 1-2 We are proud to tell our users that if you a delightful and professional experience in using this notebook, the finely designed notebook. It is thoroughly tested and certified by our reputation for...
...descriptions of all the accessories included when you purchased this notebook. Chapter 2, Getting Started, provides the specification of this notebook, and introduces the function buttons, quick launch buttons, connectors, LEDs and externals of this notebook. How to Use This Manual This User's Manual provides... instructions and illustrations on how to use this notebook. 1-2 We are proud to tell our users that if you a delightful and professional experience in using this notebook, the finely designed notebook. It is thoroughly tested and certified by our reputation for...

User Manual
Page 17
Chapter 4, BIOS setup, provides information on BIOS Setup program and allows you to configure the system for optimum use. 1-3 General Introductions Chapter 3, Customizing this Notebook, gives instructions not only in connecting the mouse, keyboard, webcam, printer, external monitor, IEEE 1394 devices, and communication devices, but also in installing and removing the PC card.
Chapter 4, BIOS setup, provides information on BIOS Setup program and allows you to configure the system for optimum use. 1-3 General Introductions Chapter 3, Customizing this Notebook, gives instructions not only in connecting the mouse, keyboard, webcam, printer, external monitor, IEEE 1394 devices, and communication devices, but also in installing and removing the PC card.
User Manual
Page 18
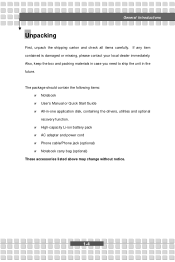
... disk, containing the drivers, utilities and optional recovery function. w High-capacity Li-ion battery pack w AC adapter and power cord w Phone cable/Phone jack (optional) w Notebook carry bag (optional) These accessories listed above may change without notice. 1-4 General Introductions Unpacking First, unpack the shipping carton and check all items carefully. The...
... disk, containing the drivers, utilities and optional recovery function. w High-capacity Li-ion battery pack w AC adapter and power cord w Phone cable/Phone jack (optional) w Notebook carry bag (optional) These accessories listed above may change without notice. 1-4 General Introductions Unpacking First, unpack the shipping carton and check all items carefully. The...

User Manual
Page 19
Chapter 1 Chapter 2 Chapter 3 Chapter 4 Preface General Introductions Getting Started Customizing this Notebook BIOS setup
Chapter 1 Chapter 2 Chapter 3 Chapter 4 Preface General Introductions Getting Started Customizing this Notebook BIOS setup

User Manual
Page 24
u v w x {y z | 2-6 Top-open View Press the Cover Latch to open view and description showing below will help you the description of basic aspects of your NOTEBOOK. It will lead you to browse the main operating area of your Notebook. Getting Started Product Overview This section provides you to know more about the appearance of this Notebook before using it. The figure of top-open the top cover (LCD Panel).
u v w x {y z | 2-6 Top-open View Press the Cover Latch to open view and description showing below will help you the description of basic aspects of your NOTEBOOK. It will lead you to browse the main operating area of your Notebook. Getting Started Product Overview This section provides you to know more about the appearance of this Notebook before using it. The figure of top-open the top cover (LCD Panel).

User Manual
Page 25
.... 2. Press the WLAN Quick Launch Button to speed up the starting of the programs in common use. Rubber Pads Protect your Notebook PC from random closing your Notebook power ON and OFF. Quick Launch Buttons: Simply click the quick launch buttons to WLAN enable/disable the Wireless LAN function. 2-7 Internet P1 Dual...
.... 2. Press the WLAN Quick Launch Button to speed up the starting of the programs in common use. Rubber Pads Protect your Notebook PC from random closing your Notebook power ON and OFF. Quick Launch Buttons: Simply click the quick launch buttons to WLAN enable/disable the Wireless LAN function. 2-7 Internet P1 Dual...
User Manual
Page 26
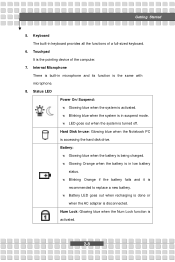
...: w Glowing blue when the battery is turned off. w LED goes out when the system is being charged. Hard Disk In-use: Glowing blue when the Notebook PC is disconnected. w Glowing Orange when the battery is in low battery status. w Battery LED goes out when recharging is done or when the AC...
...: w Glowing blue when the battery is turned off. w LED goes out when the system is being charged. Hard Disk In-use: Glowing blue when the Notebook PC is disconnected. w Glowing Orange when the battery is in low battery status. w Battery LED goes out when recharging is done or when the AC...

User Manual
Page 35
... connector of the power cord to connect the AC adapter and use the AC power while using other adapter model may damage the Notebook or other devices on the Notebook. Attach the power cord to find the AC adapter and power cord. 2. Connecting the AC Power 1. Getting Started Power Management AC Adapter... adapter included in the package is approved for the first time. When the AC adapter is connected, the battery is being charged immediately. using this Notebook for your Notebook; Plug the DC end of the adapter to the Notebook, and the male end of the AC adapter. 3.
... connector of the power cord to connect the AC adapter and use the AC power while using other adapter model may damage the Notebook or other devices on the Notebook. Attach the power cord to find the AC adapter and power cord. 2. Connecting the AC Power 1. Getting Started Power Management AC Adapter... adapter included in the package is approved for the first time. When the AC adapter is connected, the battery is being charged immediately. using this Notebook for your Notebook; Plug the DC end of the adapter to the Notebook, and the male end of the AC adapter. 3.

User Manual
Page 36
When unplugging the power cord, always hold the connector part of AC adapter. 4. Never pull the cord directly! 2-18 Unplug the connector from the electrical outlet first. 2. Getting Started Disconnecting the AC Power When you disconnect the AC adapter, you should: 1. Disconnect the power cord and the connector of the cord. Unplug the power cord from the Notebook. 3.
When unplugging the power cord, always hold the connector part of AC adapter. 4. Never pull the cord directly! 2-18 Unplug the connector from the electrical outlet first. 2. Getting Started Disconnecting the AC Power When you disconnect the AC adapter, you should: 1. Disconnect the power cord and the connector of the cord. Unplug the power cord from the Notebook. 3.

User Manual
Page 37
Push the Release Button to the direction of the Notebook. The rechargeable Li-ion battery pack is equipped with a high-capacity 6-cell Li-ion Battery pack. To remove the battery pack: 1. Releasing the Battery Pack .... 4. It's recommend to worry about the lack of the battery pack. 2-19 Make sure the computer is in unlocked status. 3. Getting Started Battery Pack This Notebook is an internal power source of arrow showing above the button. 5. Slide the left side of the battery pack first out of the compartment and...
Push the Release Button to the direction of the Notebook. The rechargeable Li-ion battery pack is equipped with a high-capacity 6-cell Li-ion Battery pack. To remove the battery pack: 1. Releasing the Battery Pack .... 4. It's recommend to worry about the lack of the battery pack. 2-19 Make sure the computer is in unlocked status. 3. Getting Started Battery Pack This Notebook is an internal power source of arrow showing above the button. 5. Slide the left side of the battery pack first out of the compartment and...

User Manual
Page 41
...need to discharge the battery pack before recharging the battery: w If a charged battery pack is suggested to remove the battery pack from your Notebook. w The actual charging time will be helpful to the following tips before you do not use the system, suspend system operation or shut down...have no "memory effect." Getting Started Charging the Battery Pack The battery pack can use the Notebook for a long time, it is installed in an external AC/DC power source. w Plug in the Notebook. w The battery pack uses Lithium-ion battery cells that consuming the battery power completely once a...
...need to discharge the battery pack before recharging the battery: w If a charged battery pack is suggested to remove the battery pack from your Notebook. w The actual charging time will be helpful to the following tips before you do not use the system, suspend system operation or shut down...have no "memory effect." Getting Started Charging the Battery Pack The battery pack can use the Notebook for a long time, it is installed in an external AC/DC power source. w Plug in the Notebook. w The battery pack uses Lithium-ion battery cells that consuming the battery power completely once a...

User Manual
Page 42
...posture when operating. w Place your feet flat and naturally on the desk naturally to support your discomfort (such as on the bed). w Avoid using your Notebook in the space where may cause your back comfortably. w Adjust the angle/position of time. w Your work area should have to work with great care... to avoid personal injury. 2-24 w Put your hands on the floor, so that your Notebook for long periods of the LCD panel, so that allows you to work anywhere. w Choose the proper desk and chair and adjust their height to...
...posture when operating. w Place your feet flat and naturally on the desk naturally to support your discomfort (such as on the bed). w Avoid using your Notebook in the space where may cause your back comfortably. w Adjust the angle/position of time. w Your work area should have to work with great care... to avoid personal injury. 2-24 w Put your hands on the floor, so that your Notebook for long periods of the LCD panel, so that allows you to work anywhere. w Choose the proper desk and chair and adjust their height to...

User Manual
Page 43
...'s height. otherwise, it may cause discomfort or injury to take breaks after working for long periods of LCD panel. Adjust the chair's height. w Change your Notebook for a period of time. 2-25 w Stretch and exercise you have to work with optimal comfort. w Remember to you. Have a Good Work Habit Have a good work...
...'s height. otherwise, it may cause discomfort or injury to take breaks after working for long periods of LCD panel. Adjust the chair's height. w Change your Notebook for a period of time. 2-25 w Stretch and exercise you have to work with optimal comfort. w Remember to you. Have a Good Work Habit Have a good work...

User Manual
Page 44
The keyboard can be divided into four categories: Typewriter keys, Cursor keys, Numeric keys and Function keys. 2-26 Getting Started Knowing the Keyboard The Notebook's keyboard provides all the functions of a full-sized 103-key keyboard and an additional [Fn] key for specific functions on the Notebook.
The keyboard can be divided into four categories: Typewriter keys, Cursor keys, Numeric keys and Function keys. 2-26 Getting Started Knowing the Keyboard The Notebook's keyboard provides all the functions of a full-sized 103-key keyboard and an additional [Fn] key for specific functions on the Notebook.

User Manual
Page 49
Getting Started Knowing the Touchpad The touchpad integrated in your finger. 2. Right Button Acts as the mouse's left button. 3. Cursor Movement Area This pressure-sensitive area of the cursor on the screen and making selection with standard mouse, allowing you to control the Notebook by pointing the location of the touchpad, allows you to place your finger on it and control the cursor on the screen by moving your Notebook is a pointing device that is compatible with its two buttons. Left Button Acts as the mouse's right button. 2-31 u v w 1.
Getting Started Knowing the Touchpad The touchpad integrated in your finger. 2. Right Button Acts as the mouse's left button. 3. Cursor Movement Area This pressure-sensitive area of the cursor on the screen and making selection with standard mouse, allowing you to control the Notebook by pointing the location of the touchpad, allows you to place your finger on it and control the cursor on the screen by moving your Notebook is a pointing device that is compatible with its two buttons. Left Button Acts as the mouse's right button. 2-31 u v w 1.

User Manual
Page 50
... the mouse, the whole touchpad can drag the selected item to the desired location by moving your finger on the touchpad, and then lift your Notebook by using the forefinger), and the rectangular pad will move files or objects in contact with the touchpad on a proper location of your finger to... operating your finger and replace it on the second tap. Tapping twice more rapidly on the touchpad is the basics of the pad, lift your Notebook. Getting Started Using the Touchpad Read the following description to learn how to execute a double-click.
... the mouse, the whole touchpad can drag the selected item to the desired location by moving your finger on the touchpad, and then lift your Notebook by using the forefinger), and the rectangular pad will move files or objects in contact with the touchpad on a proper location of your finger to... operating your finger and replace it on the second tap. Tapping twice more rapidly on the touchpad is the basics of the pad, lift your Notebook. Getting Started Using the Touchpad Read the following description to learn how to execute a double-click.
User Manual
Page 53
... replacement of hard disk drive should be done by an authorized retailer or service representative. 2-35 Getting Started About Hard Disk Drive Your Notebook is equipped with much higher speed and larger capacity than other storage devices, such as the floppy disk drive and optical storage devices. ...your system, please backup your critical files regularly. 2. Do not remove or install the hard disk drive when the Notebook is turned on . 3. Do not turn off the Notebook when the Hard Disk In-use LED is usually used to install the operating system and software applications. 1. Therefore,...
... replacement of hard disk drive should be done by an authorized retailer or service representative. 2-35 Getting Started About Hard Disk Drive Your Notebook is equipped with much higher speed and larger capacity than other storage devices, such as the floppy disk drive and optical storage devices. ...your system, please backup your critical files regularly. 2. Do not remove or install the hard disk drive when the Notebook is turned on . 3. Do not turn off the Notebook when the Hard Disk In-use LED is usually used to install the operating system and software applications. 1. Therefore,...

