
User Manual
Page 23
... 1, Preface, gives users the basic safety information and caution that is recommended to read this manual carefully before using this notebook. Chapter 2, Introductions, includes the descriptions of all the accessories included when you a delightful and professional experience in using keyboard... of these information or caution when using this notebook. It is interrelated to tell our users that if you purchased this notebook, the finely designed notebook. Also, this chapter provides the specification of this notebook, and introduces the function buttons, quick launch ...
... 1, Preface, gives users the basic safety information and caution that is recommended to read this manual carefully before using this notebook. Chapter 2, Introductions, includes the descriptions of all the accessories included when you a delightful and professional experience in using keyboard... of these information or caution when using this notebook. It is interrelated to tell our users that if you purchased this notebook, the finely designed notebook. Also, this chapter provides the specification of this notebook, and introduces the function buttons, quick launch ...
User Manual
Page 24
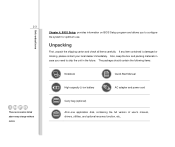
The package should contain the following items: Notebook Quick Start Manual High-capacity Li-ion battery AC adapter and power cord Carry bag (optional) All-in the future. Unpacking First, unpack the shipping ...
The package should contain the following items: Notebook Quick Start Manual High-capacity Li-ion battery AC adapter and power cord Carry bag (optional) All-in the future. Unpacking First, unpack the shipping ...

User Manual
Page 29
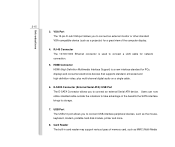
...Introductions Product Overview This section provides the description of basic aspects of this section may vary from the actual one that the notebook shown in this notebook before using it. Please be aware that users purchased. 2-8 The figures show here are for reference only. Stereo Speaker ...Sensors 6 7. Finger Print Reader 9 8 Digital Microphone 4. Keyboard 7 8. It will lead you to browse the main operating area of your notebook. 1 1. Rubber Pads 2. Touch Pad 9. Top-open View The figure of top-open view and description shown below will help you to ...
...Introductions Product Overview This section provides the description of basic aspects of this section may vary from the actual one that the notebook shown in this notebook before using it. Please be aware that users purchased. 2-8 The figures show here are for reference only. Stereo Speaker ...Sensors 6 7. Finger Print Reader 9 8 Digital Microphone 4. Keyboard 7 8. It will lead you to browse the main operating area of your notebook. 1 1. Rubber Pads 2. Touch Pad 9. Top-open View The figure of top-open view and description shown below will help you to ...

User Manual
Page 30
... built-in Webcam can be combined into a single, higher-quality source. 4. Power Button / Power LED Power Button:Press the power button to protect your notebook from random closing. 2. Stereo Speakers Give high quality sound blaster with stereo system and Hi-Fi function supported. 5. Webcam/ Webcam LED (optional) Š This built... recoding or conferencing, and any other interactive applications. Š Webcam LED indicator, next to the webcam, grows blue when webcam function is to turn the notebook power ON and OFF. Rubber Pads This is activated;
... built-in Webcam can be combined into a single, higher-quality source. 4. Power Button / Power LED Power Button:Press the power button to protect your notebook from random closing. 2. Stereo Speakers Give high quality sound blaster with stereo system and Hi-Fi function supported. 5. Webcam/ Webcam LED (optional) Š This built... recoding or conferencing, and any other interactive applications. Š Webcam LED indicator, next to the webcam, grows blue when webcam function is to turn the notebook power ON and OFF. Rubber Pads This is activated;
User Manual
Page 32
Finger Print Reader This is a pointing device of a standard keyboard. 8. Touchpad This is the security protection device for the notebook. 2-11 Introductions Š Press this sensor to turn on or off sub-woofer and increase LCD Cinema Pro brightness & volume. Š This notebook provides multimedia play touch sensors Multimedia Play Function (optional) allowing users to control the multimedia applications. 7. Use these convenient touch sensors to use various media playing functions. Keyboard The built-in keyboard provides all the functions of the notebook. 9.
Finger Print Reader This is a pointing device of a standard keyboard. 8. Touchpad This is the security protection device for the notebook. 2-11 Introductions Š Press this sensor to turn on or off sub-woofer and increase LCD Cinema Pro brightness & volume. Š This notebook provides multimedia play touch sensors Multimedia Play Function (optional) allowing users to control the multimedia applications. 7. Use these convenient touch sensors to use various media playing functions. Keyboard The built-in keyboard provides all the functions of the notebook. 9.

User Manual
Page 35
USB Port 8. Notebook with Analog TV tuner - Introductions 2-14 Right Side View 9 87 6 5 4 3 21 1. E-SATA Connector/ USB Port 7. plug the supplied TV-Tuner adaptor into the connector. 2. simply ... the connector first, and then screw the TV cable at the other end of adaptor. Express Card Slot 1. HDMI Connector 6. TV-Tuner Antenna Connector (Optional) Notebook with Digital TV tuner - RJ-45 Connector 5. Card Reader 9. Power Connector 3. TV Tuner Antenna Connector (optional) 2. Power Connector To connect the AC adapter and supply...
USB Port 8. Notebook with Analog TV tuner - Introductions 2-14 Right Side View 9 87 6 5 4 3 21 1. E-SATA Connector/ USB Port 7. plug the supplied TV-Tuner adaptor into the connector. 2. simply ... the connector first, and then screw the TV cable at the other end of adaptor. Express Card Slot 1. HDMI Connector 6. TV-Tuner Antenna Connector (Optional) Notebook with Digital TV tuner - RJ-45 Connector 5. Card Reader 9. Power Connector 3. TV Tuner Antenna Connector (optional) 2. Power Connector To connect the AC adapter and supply...
User Manual
Page 36
... (External Serial ATA)/ USB Port The E-SATA Connector allows you to take advantage of the computer display. 4. Users can now utilize shielded cable outside the notebook to connect an external monitor or other standard VGA-compatible device (such as a projector) for network connection. 5.
... (External Serial ATA)/ USB Port The E-SATA Connector allows you to take advantage of the computer display. 4. Users can now utilize shielded cable outside the notebook to connect an external monitor or other standard VGA-compatible device (such as a projector) for network connection. 5.

User Manual
Page 37
Express Card Slot The notebook provides an Express Card slot. The Express Card technology takes advantage of the scalable, high-bandwidth serial PCI Express and USB 2.0 interfaces. Introductions 2-16 Card), XD (eXtreme Digital), SD (Secure Digital), SDHC (SD High Capacity), MS (Memory Stick) or MS Pro (Memory Stick Pro) cards. The new Express Card interface is smaller and faster than PC Card interface. Contact the local dealer for further and correct information and be noted that the supported memory cards may vary without notice. 9.
Express Card Slot The notebook provides an Express Card slot. The Express Card technology takes advantage of the scalable, high-bandwidth serial PCI Express and USB 2.0 interfaces. Introductions 2-16 Card), XD (eXtreme Digital), SD (Secure Digital), SDHC (SD High Capacity), MS (Memory Stick) or MS Pro (Memory Stick Pro) cards. The new Express Card interface is smaller and faster than PC Card interface. Contact the local dealer for further and correct information and be noted that the supported memory cards may vary without notice. 9.

User Manual
Page 39
... Drive The optical device allows you to connect an RJ-11 telephone line through this connector. Connect the Surround speakers here. 3. RJ-11 Connector This notebook provides a built-in modem that allows you can make a dial-up connection. Line In: Used for an external microphone. Connect the Rear speakers here. Introductions...
... Drive The optical device allows you to connect an RJ-11 telephone line through this connector. Connect the Surround speakers here. 3. RJ-11 Connector This notebook provides a built-in modem that allows you can make a dial-up connection. Line In: Used for an external microphone. Connect the Rear speakers here. Introductions...
User Manual
Page 40
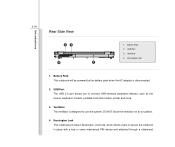
... with a key or some mechanical PIN device and attached through a rubberised Kensington Lock 1. Ventilator The ventilator is disconnected. 2. Kensington Lock This notebook provides a Kensington Lock hole, which allows users to connect USB-interface peripheral devices, such as the mouse, keyboard, modem, portable hard disk...Ventilator 4. Battery Pack 2. DO NOT block the ventilator for air circulation. 4. USB Port 3. Introductions 2-19 Rear Side View 32 4 1 1. Battery Pack This notebook will be powered by the battery pack when the AC adapter is designed to cool the system.
... with a key or some mechanical PIN device and attached through a rubberised Kensington Lock 1. Ventilator The ventilator is disconnected. 2. Kensington Lock This notebook provides a Kensington Lock hole, which allows users to connect USB-interface peripheral devices, such as the mouse, keyboard, modem, portable hard disk...Ventilator 4. Battery Pack 2. DO NOT block the ventilator for air circulation. 4. USB Port 3. Introductions 2-19 Rear Side View 32 4 1 1. Battery Pack This notebook will be powered by the battery pack when the AC adapter is designed to cool the system.

User Manual
Page 41
Introductions 2-20 metal cable. The end of the cable has a small loop which allows the whole cable to be looped around a permanent object, such as a heavy table or other similar equipment, thus securing the notebook in place.
Introductions 2-20 metal cable. The end of the cable has a small loop which allows the whole cable to be looped around a permanent object, such as a heavy table or other similar equipment, thus securing the notebook in place.

User Manual
Page 42
Battery Lock/Unlock Button 1. Battery Release Button It is removable. Once the button is slid to unlock position, the battery is a bounce-back device as a preparation for releasing the battery pack. Introductions 2-21 Bottom Side View 3 2 1 1. Battery Lock/ Unlock Button Battery cannot be powered by the battery pack when the AC adapter is positioned on lock status. Slide it with one hand and pull the battery pack carefully with the other. 2. Battery Pack 3. Battery Pack This notebook will be moved when the button is disconnected. 3. Battery Release Button 2.
Battery Lock/Unlock Button 1. Battery Release Button It is removable. Once the button is slid to unlock position, the battery is a bounce-back device as a preparation for releasing the battery pack. Introductions 2-21 Bottom Side View 3 2 1 1. Battery Lock/ Unlock Button Battery cannot be powered by the battery pack when the AC adapter is positioned on lock status. Slide it with one hand and pull the battery pack carefully with the other. 2. Battery Pack 3. Battery Pack This notebook will be moved when the button is disconnected. 3. Battery Release Button 2.

User Manual
Page 44
... behalf of each mode appearing on the display when selected. Gaming mode, Movie mode, Presentation mode, Office mode, and Turbo Battery mode, to turn this notebook. Press the ECO quick launch button repeatedly to switch among these 5 different modes or to extend the battery running time while performing different tasks with...
... behalf of each mode appearing on the display when selected. Gaming mode, Movie mode, Presentation mode, Office mode, and Turbo Battery mode, to turn this notebook. Press the ECO quick launch button repeatedly to switch among these 5 different modes or to extend the battery running time while performing different tasks with...
User Manual
Page 46
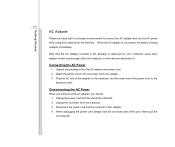
Connecting the AC Power 1. Plug the DC end of the adapter to the notebook, and the male end of the cord. Unplug the power cord from the notebook. 3. Getting Started 3-4 AC Adapter Please be noted that the AC adapter included in the package is approved for the first time. Unplug the...connected, the battery is strongly recommended to connect the AC adapter and use the AC power while using other adapter model may damage either the notebook or other devices attached to the electrical outlet. Attach the power cord to find the AC adapter and power cord. 2. Disconnect the power ...
Connecting the AC Power 1. Plug the DC end of the adapter to the notebook, and the male end of the cord. Unplug the power cord from the notebook. 3. Getting Started 3-4 AC Adapter Please be noted that the AC adapter included in the package is approved for the first time. Unplug the...connected, the battery is strongly recommended to connect the AC adapter and use the AC power while using other adapter model may damage either the notebook or other devices attached to the electrical outlet. Attach the power cord to find the AC adapter and power cord. 2. Disconnect the power ...

User Manual
Page 48
... its efficacy when this battery pack may be damaged if users try to disassemble the battery pack on their own. Getting Started 3-6 Battery Pack This notebook is an internal power source of that the figures show here are for reference only. Be noted that this battery pack is disassembled not by...
... its efficacy when this battery pack may be damaged if users try to disassemble the battery pack on their own. Getting Started 3-6 Battery Pack This notebook is an internal power source of that the figures show here are for reference only. Be noted that this battery pack is disassembled not by...
User Manual
Page 49
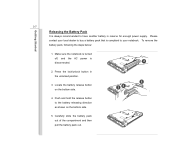
... on the bottom side. 5 34 4. Carefully slide the battery pack out of the compartment and then pull the battery pack out. Please contact your notebook. Make sure the notebook is turned off, and the AC power is compliant to your local dealer to buy a battery pack that is disconnected. 2 2. Press the lock...
... on the bottom side. 5 34 4. Carefully slide the battery pack out of the compartment and then pull the battery pack out. Please contact your notebook. Make sure the notebook is turned off, and the AC power is compliant to your local dealer to buy a battery pack that is disconnected. 2 2. Press the lock...
User Manual
Page 52
Please pay attention to the following tips before recharging the battery: Š If a charged battery pack is not available, save your notebook. It is unnecessary to -Disk. Š Plug in an external AC/DC power source. Š You can be recharged while it is installed in use. ...; The battery pack uses Lithium-ion battery cells that consuming the battery power completely once a month is necessary. Š If you do not use the notebook for a long time, it is suggested to extend your battery life. Š The actual charging time will be helpful to remove the battery pack from...
Please pay attention to the following tips before recharging the battery: Š If a charged battery pack is not available, save your notebook. It is unnecessary to -Disk. Š Plug in an external AC/DC power source. Š You can be recharged while it is installed in use. ...; The battery pack uses Lithium-ion battery cells that consuming the battery power completely once a month is necessary. Š If you do not use the notebook for a long time, it is suggested to extend your battery life. Š The actual charging time will be helpful to remove the battery pack from...

User Manual
Page 53
...using your own safety, and make yourself comfortable during the operations. However, choosing a good workspace is important if you have to work with your notebook for a long period of the LCD panel to have enough illumination. Š Choose the proper desk and chair and adjust their height to fit ...adjust the chair's back (if available) to support your back comfortably. Š Place you feet flat and naturally on the bed). Š The notebook is an electrical device, please treat it with great care to avoid personal injury Getting Started 3-11 Basic Operations If you are a beginner to the...
...using your own safety, and make yourself comfortable during the operations. However, choosing a good workspace is important if you have to work with your notebook for a long period of the LCD panel to have enough illumination. Š Choose the proper desk and chair and adjust their height to fit ...adjust the chair's back (if available) to support your back comfortably. Š Place you feet flat and naturally on the bed). Š The notebook is an electrical device, please treat it with great care to avoid personal injury Getting Started 3-11 Basic Operations If you are a beginner to the...

User Manual
Page 54
Adjust the desk's height. 4. Adjust the angle and position of time; Sit straight and keep the following tips in mind when operating. Š Change your notebook for a period of time. otherwise, it may cause discomfort or injury to you have to take a break after working for long periods of LCD panel. 3. ...
Adjust the desk's height. 4. Adjust the angle and position of time; Sit straight and keep the following tips in mind when operating. Š Change your notebook for a period of time. otherwise, it may cause discomfort or injury to you have to take a break after working for long periods of LCD panel. 3. ...
User Manual
Page 55
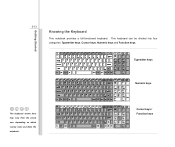
Typewriter keys Numeric keys The keyboard shown here may vary from the actual one, depending on which county users purchase the notebook. Cursor keys / Function keys Getting Started X X X 3-13 Knowing the Keyboard This notebook provides a full-functioned keyboard. This keyboard can be divided into four categories: Typewriter keys, Cursor keys, Numeric keys and Function keys.
Typewriter keys Numeric keys The keyboard shown here may vary from the actual one, depending on which county users purchase the notebook. Cursor keys / Function keys Getting Started X X X 3-13 Knowing the Keyboard This notebook provides a full-functioned keyboard. This keyboard can be divided into four categories: Typewriter keys, Cursor keys, Numeric keys and Function keys.


