
Cisco Small Business WRV210 Administration Guide
Page 3
...Installation Placement Options Desktop Option Wall Option Connecting the Equipment Verifying the Hardware Installation Configuring the Internet Connection Securing the Wireless Network Getting Started in the Configuration Utility Logging In Navigating through the Pages Saving Your Changes Viewing the Help ...Setting Up Virtual LANs Using DDNS to Map Domain Names to Your Network DynDNS.org Setup TZO.com Setup Cloning a MAC Address for Your Internet Connection Setting Up Advanced Routing Configuring Dynamic Routing Cisco Small Business WRV210 Administration Guide Contents 6 6 6 7 8 8 9 9 9 9 11 12...
...Installation Placement Options Desktop Option Wall Option Connecting the Equipment Verifying the Hardware Installation Configuring the Internet Connection Securing the Wireless Network Getting Started in the Configuration Utility Logging In Navigating through the Pages Saving Your Changes Viewing the Help ...Setting Up Virtual LANs Using DDNS to Map Domain Names to Your Network DynDNS.org Setup TZO.com Setup Cloning a MAC Address for Your Internet Connection Setting Up Advanced Routing Configuring Dynamic Routing Cisco Small Business WRV210 Administration Guide Contents 6 6 6 7 8 8 9 9 9 9 11 12...

Cisco Small Business WRV210 Administration Guide
Page 12
...default setting. • Static IP: If the ISP assigns you should have the setup information for the specific type of the Router, start your ISP to the Router. A password request screen appears. Introduction Initial Installation 1 Configuring the Internet Connection ...Before you begin, make sure that you have provided this information when installing the broadband connection. Cisco Small Business WRV210 Administration...
...default setting. • Static IP: If the ISP assigns you should have the setup information for the specific type of the Router, start your ISP to the Router. A password request screen appears. Introduction Initial Installation 1 Configuring the Internet Connection ...Before you begin, make sure that you have provided this information when installing the broadband connection. Cisco Small Business WRV210 Administration...
Cisco Small Business WRV210 Administration Guide
Page 13
... Enterprise (TKIP or AES encryption), WPA2 Enterprise (AES), or WPA2 Enterprise Mixed (TKIP or AES encryption). Cisco Small Business WRV210 Administration Guide 13 STEP 2 From the Select SSID drop-down list, choose the SSID that is connected to repeat this procedure for... the necessary setup information. • L2TP: L2TP is supported by a RADIUS server that you enabled on any connected computer and entering a valid website address, such as WPA. You will need to the router. Cisco recommends using authentication by your network, click Wireless > Wireless Security in Europe...
... Enterprise (TKIP or AES encryption), WPA2 Enterprise (AES), or WPA2 Enterprise Mixed (TKIP or AES encryption). Cisco Small Business WRV210 Administration Guide 13 STEP 2 From the Select SSID drop-down list, choose the SSID that is connected to repeat this procedure for... the necessary setup information. • L2TP: L2TP is supported by a RADIUS server that you enabled on any connected computer and entering a valid website address, such as WPA. You will need to the router. Cisco recommends using authentication by your network, click Wireless > Wireless Security in Europe...

Cisco Small Business WRV210 Administration Guide
Page 16
... In To access the Configuration Utility, launch Internet Explorer or Firefox, and enter the Router's default IP address, 192.168.1.1, in , the Configuration Utility displays the Setup > Basic Settings page. Verify that you open the Configuration Utility, enter the default ..., enter the assigned IP address instead. The installation of the Wireless-G VPN router with RangeBooster is 192.168.1.1. STEP 6 Keep the default values for your wireless network. Congratulations! Then press Enter. Cisco Small Business WRV210 Administration Guide 16 A password request page appears. (Windows XP ...
... In To access the Configuration Utility, launch Internet Explorer or Firefox, and enter the Router's default IP address, 192.168.1.1, in , the Configuration Utility displays the Setup > Basic Settings page. Verify that you open the Configuration Utility, enter the default ..., enter the assigned IP address instead. The installation of the Wireless-G VPN router with RangeBooster is 192.168.1.1. STEP 6 Keep the default values for your wireless network. Congratulations! Then press Enter. Cisco Small Business WRV210 Administration Guide 16 A password request page appears. (Windows XP ...

Cisco Small Business WRV210 Administration Guide
Page 18
2 Setting Up the Network Use the Setup module to configure the Internet connection, local network settings, VLANs, DDNS, MAC Address cloning, and advanced routing. • Configuring the Basic Settings, page 18 • ..., page 26 • Cloning a MAC Address for Your Internet Connection, page 29 • Setting Up Advanced Routing, page 30 Configuring the Basic Settings Use the Setup > Basic Settings page to perform the following basic tasks: • "Localizing the Configuration Utility" on page 19 • "Setting Up the Internet Connection" on page...
2 Setting Up the Network Use the Setup module to configure the Internet connection, local network settings, VLANs, DDNS, MAC Address cloning, and advanced routing. • Configuring the Basic Settings, page 18 • ..., page 26 • Cloning a MAC Address for Your Internet Connection, page 29 • Setting Up Advanced Routing, page 30 Configuring the Basic Settings Use the Setup > Basic Settings page to perform the following basic tasks: • "Localizing the Configuration Utility" on page 19 • "Setting Up the Internet Connection" on page...

Cisco Small Business WRV210 Administration Guide
Page 19
Cisco Small Business WRV210 Administration Guide 19 STEP 1 Click Setup > Basic Settings in the navigation tree. Setting Up the Network Configuring the Basic Settings 2 Localizing the Configuration Utility You can change the language that appears on the configuration pages. STEP 2 From the Language Selection drop-down list, choose one of the following languages: English (default), French, German, Italian, Portuguese, or Spanish.
Cisco Small Business WRV210 Administration Guide 19 STEP 1 Click Setup > Basic Settings in the navigation tree. Setting Up the Network Configuring the Basic Settings 2 Localizing the Configuration Utility You can change the language that appears on the configuration pages. STEP 2 From the Language Selection drop-down list, choose one of the following languages: English (default), French, German, Italian, Portuguese, or Spanish.

Cisco Small Business WRV210 Administration Guide
Page 20
... is required by your ISP. Select either Primary (default) or Secondary. Cisco Small Business WRV210 Administration Guide 20 Also enter the following information, as provided by default. • Static...your ISP provided you are connecting through a dynamic IP address. STEP 2 In the Internet Setup section, choose the Internet Connection Type required by some DSL-based ISPs. Enter the following...supports DHCP or you with the previously saved settings. -OR- Subnet Mask: Enter the Router's Subnet Mask, as described below. • Automatic Configuration - Setting Up the Internet ...
... is required by your ISP. Select either Primary (default) or Secondary. Cisco Small Business WRV210 Administration Guide 20 Also enter the following information, as provided by default. • Static...your ISP provided you are connecting through a dynamic IP address. STEP 2 In the Internet Setup section, choose the Internet Connection Type required by some DSL-based ISPs. Enter the following...supports DHCP or you with the previously saved settings. -OR- Subnet Mask: Enter the Router's Subnet Mask, as described below. • Automatic Configuration - Setting Up the Internet ...

Cisco Small Business WRV210 Administration Guide
Page 23
... the subnet mask for your network, choose Disabled. Cisco Small Business WRV210 Administration Guide 23 Setting Up the Local Network STEP 1 Click Setup > Basic Settings in the MTU field, this option is 255.255.255.0. • Local DHCP Server: The Router can be used as the broadcast IP address. The default value is...
... the subnet mask for your network, choose Disabled. Cisco Small Business WRV210 Administration Guide 23 Setting Up the Local Network STEP 1 Click Setup > Basic Settings in the MTU field, this option is 255.255.255.0. • Local DHCP Server: The Router can be used as the broadcast IP address. The default value is...

Cisco Small Business WRV210 Administration Guide
Page 24
...particular network devices. STEP 3 Click Save to save your time zone from the Date drop-down menu. Adjusting the Time Settings STEP 1 Click Setup > Basic Settings in the field. Setting Up the Network Configuring the Basic Settings 2 • Number of Address: Enter the maximum number of...click Add. The IP Address Range is 24 hours. • Assign Static IP: Click this number to the DHCP server. Cisco Small Business WRV210 Administration Guide 24 STEP 2 In the Time Configuration section, enter the following information: • Manually: Select the date from the Time Zone ...
...particular network devices. STEP 3 Click Save to save your time zone from the Date drop-down menu. Adjusting the Time Settings STEP 1 Click Setup > Basic Settings in the field. Setting Up the Network Configuring the Basic Settings 2 • Number of Address: Enter the maximum number of...click Add. The IP Address Range is 24 hours. • Assign Static IP: Click this number to the DHCP server. Cisco Small Business WRV210 Administration Guide 24 STEP 2 In the Time Configuration section, enter the following information: • Manually: Select the date from the Time Zone ...

Cisco Small Business WRV210 Administration Guide
Page 25
Complete other sections of the Router. Each VLAN is enabled as a default VLAN, so you have two VLANs. STEP 2 Enter the following information: • Port-based VLAN: Select Enabled to disable the feature. STEP 1 Click Setup > VLAN in the navigation tree. When this feature is disabled, all LAN ports are on each port... LANs (VLANs) on the same LAN. When enabled, and a VLAN is selected, VLAN1 is a separate subnet. Select Disabled to enable the feature. Cisco Small Business WRV210 Administration Guide 25
Complete other sections of the Router. Each VLAN is enabled as a default VLAN, so you have two VLANs. STEP 2 Enter the following information: • Port-based VLAN: Select Enabled to disable the feature. STEP 1 Click Setup > VLAN in the navigation tree. When this feature is disabled, all LAN ports are on each port... LANs (VLANs) on the same LAN. When enabled, and a VLAN is selected, VLAN1 is a separate subnet. Select Disabled to enable the feature. Cisco Small Business WRV210 Administration Guide 25

Cisco Small Business WRV210 Administration Guide
Page 26
...domain name to a dynamic Internet IP address. It is useful when you are hosting your own website, FTP server, or other server behind the Router and your settings, or click Cancel to refresh the page with the desired port. Setting Up the Network Using DDNS to Map Domain Names to...the number of two DDNS service providers, DynDNS.org or TZO.com. • DynDNS.org Setup, page 27 • TZO.com Setup, page 28 Cisco Small Business WRV210 Administration Guide 26 STEP 3 Click Save to Your Network The Router offers a Dynamic Domain Name System (DDNS) feature. Using DDNS to Map Domain Names to...
...domain name to a dynamic Internet IP address. It is useful when you are hosting your own website, FTP server, or other server behind the Router and your settings, or click Cancel to refresh the page with the desired port. Setting Up the Network Using DDNS to Map Domain Names to...the number of two DDNS service providers, DynDNS.org or TZO.com. • DynDNS.org Setup, page 27 • TZO.com Setup, page 28 Cisco Small Business WRV210 Administration Guide 26 STEP 3 Click Save to Your Network The Router offers a Dynamic Domain Name System (DDNS) feature. Using DDNS to Map Domain Names to...

Cisco Small Business WRV210 Administration Guide
Page 27
... the DDNS service connection is displayed here. STEP 4 Click Save to save your settings, or click Cancel to Your Network DynDNS.org Setup 2 STEP 1 Click Setup > DDNS in the navigation tree. Setting Up the Network Using DDNS to Map Domain Names to refresh the page with DynDNS.org. ...• Internet IP Address: The Router's current Internet IP Address is displayed here. Cisco Small Business WRV210 Administration Guide 27 STEP 2 From the DDNS ...
... the DDNS service connection is displayed here. STEP 4 Click Save to save your settings, or click Cancel to Your Network DynDNS.org Setup 2 STEP 1 Click Setup > DDNS in the navigation tree. Setting Up the Network Using DDNS to Map Domain Names to refresh the page with DynDNS.org. ...• Internet IP Address: The Router's current Internet IP Address is displayed here. Cisco Small Business WRV210 Administration Guide 27 STEP 2 From the DDNS ...

Cisco Small Business WRV210 Administration Guide
Page 28
... Names to refresh the page with TZO. • Internet IP Address: The Router's current Internet IP Address is displayed here. STEP 4 Click Save to save your settings, or click Cancel to Your Network TZO.com Setup 2 STEP 1 Click Setup > DDNS in the navigation tree. STEP 3 Enter the following information: •... dynamic, it changes. • Status: The status of the service you set up with the previously saved settings. Cisco Small Business WRV210 Administration Guide 28 STEP 2 From the DDNS Service Provider drop-down list, choose TZO.com. Because it is displayed here.
... Names to refresh the page with TZO. • Internet IP Address: The Router's current Internet IP Address is displayed here. STEP 4 Click Save to save your settings, or click Cancel to Your Network TZO.com Setup 2 STEP 1 Click Setup > DDNS in the navigation tree. STEP 3 Enter the following information: •... dynamic, it changes. • Status: The status of the service you set up with the previously saved settings. Cisco Small Business WRV210 Administration Guide 28 STEP 2 From the DDNS Service Provider drop-down list, choose TZO.com. Because it is displayed here.
Cisco Small Business WRV210 Administration Guide
Page 29
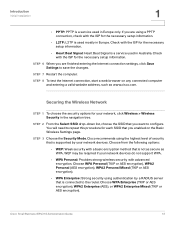
...button if you want to clone the MAC address of contacting your ISP to change the registered MAC address to the Router's MAC Cisco Small Business WRV210 Administration Guide 29 This feature saves you register a MAC address, which is registered with your ISP, you can ... device for identification. The Router automatically detects your ISP to change the registered MAC address to the Router's MAC address. If you previously registered a different router's MAC address with your WRV210 Router. You do not have to call your PC's MAC address. STEP 1 Click Setup > MAC Address Clone in...
...button if you want to clone the MAC address of contacting your ISP to change the registered MAC address to the Router's MAC Cisco Small Business WRV210 Administration Guide 29 This feature saves you register a MAC address, which is registered with your ISP, you can ... device for identification. The Router automatically detects your ISP to change the registered MAC address to the Router's MAC address. If you previously registered a different router's MAC address with your WRV210 Router. You do not have to call your PC's MAC address. STEP 1 Click Setup > MAC Address Clone in...

Cisco Small Business WRV210 Administration Guide
Page 31
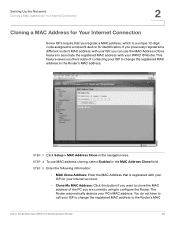
...This selection indicates that is hosting your settings, or click Cancel to the Internet, leave the default selection, Gateway. STEP 1 Click Setup > Advanced Routing in the network's layout. STEP 2 To support dynamic routing, change the Operation Mode to physical changes in the ...your network's connection to refresh the page with the previously saved settings. This setting does not allow the Router to automatically adjust to Router. Cisco Small Business WRV210 Administration Guide 31 STEP 4 Configure the following settings: • Receive RIP Versions: To use dynamic routing ...
...This selection indicates that is hosting your settings, or click Cancel to the Internet, leave the default selection, Gateway. STEP 1 Click Setup > Advanced Routing in the network's layout. STEP 2 To support dynamic routing, change the Operation Mode to physical changes in the ...your network's connection to refresh the page with the previously saved settings. This setting does not allow the Router to automatically adjust to Router. Cisco Small Business WRV210 Administration Guide 31 STEP 4 Configure the following settings: • Receive RIP Versions: To use dynamic routing ...
Cisco Small Business WRV210 Administration Guide
Page 32
... and which portion is 192.168.1, with the last digit determining the Router's place on the network. STEP 1 Click Setup > Advanced Routing in which you are building a route to an entire...example, a network in the navigation tree. LAN & Wireless: The destination device is a pre-determined pathway that you wanted to route to the Router's entire network, rather than just to set to 0....Cisco Small Business WRV210 Administration Guide 32 If you want to the Router. • Subnet Mask: Enter the subnet mask (also known as Network Mask). For example, the Router's standard IP address...
... and which portion is 192.168.1, with the last digit determining the Router's place on the network. STEP 1 Click Setup > Advanced Routing in which you are building a route to an entire...example, a network in the navigation tree. LAN & Wireless: The destination device is a pre-determined pathway that you wanted to route to the Router's entire network, rather than just to set to 0....Cisco Small Business WRV210 Administration Guide 32 If you want to the Router. • Subnet Mask: Enter the subnet mask (also known as Network Mask). For example, the Router's standard IP address...

Cisco Small Business WRV210 Administration Guide
Page 86
...: • To back up your configuration. When the File Download window appears, click Save. The file is complete. Cisco Small Business WRV210 Administration Guide 86 Manage these files in the navigation tree. Find the location where you choose to do so. • To restore a...click Browse to find the .bin file that you make significant changes in the previous backup operation. Please wait. When the Basic Setup page appears, the process is especially helpful before saving, if you want to save your current configuration: Click Backup Configuration. Administration...
...: • To back up your configuration. When the File Download window appears, click Save. The file is complete. Cisco Small Business WRV210 Administration Guide 86 Manage these files in the navigation tree. Find the location where you choose to do so. • To restore a...click Browse to find the .bin file that you make significant changes in the previous backup operation. Please wait. When the Basic Setup page appears, the process is especially helpful before saving, if you want to save your current configuration: Click Backup Configuration. Administration...

Cisco Small Business WRV210 Administration Guide
Page 93
... upgrade is finished. b. Please wait. In the Software Search box, enter WRV210. STEP 3 Perform the upgrade: a. b. In the Router Configuration Utility, click Administration > Management. System Rebooting... When the Basic Setup page appears, the process is finished, restore your PC. When prompted, enter... new firmware file. System Rebooting... NOTE Do not turn off power or close your Cisco online login. b. Click Status > Router in the field. In the Backup and Restore section, click Restore Configuration. Administration Upgrading the Firmware 7 STEP 2 Download the ...
... upgrade is finished. b. Please wait. In the Software Search box, enter WRV210. STEP 3 Perform the upgrade: a. b. In the Router Configuration Utility, click Administration > Management. System Rebooting... When the Basic Setup page appears, the process is finished, restore your PC. When prompted, enter... new firmware file. System Rebooting... NOTE Do not turn off power or close your Cisco online login. b. Click Status > Router in the field. In the Backup and Restore section, click Restore Configuration. Administration Upgrading the Firmware 7 STEP 2 Download the ...

Cisco Small Business WRV210 Administration Guide
Page 96
Monitoring the Status of the Router's Internet interface • Host Name: The host name that was entered on the Basic Setup page, if applicable • Domain Name: The domain name that was entered on the Basic Setup page. NOTE The page automatically refreshes every 10 seconds. &#...the last system reboot • MAC Address: The MAC Address of the Network Monitoring the Router Status 8 Monitoring the Router Status The Status > Router page displays information about the Router and its current settings. The on-screen information varies depending on the Internet Connection Type selected...
Monitoring the Status of the Router's Internet interface • Host Name: The host name that was entered on the Basic Setup page, if applicable • Domain Name: The domain name that was entered on the Basic Setup page. NOTE The page automatically refreshes every 10 seconds. &#...the last system reboot • MAC Address: The MAC Address of the Network Monitoring the Router Status 8 Monitoring the Router Status The Status > Router page displays information about the Router and its current settings. The on-screen information varies depending on the Internet Connection Type selected...
Cisco Small Business WRV210 Administration Guide
Page 103
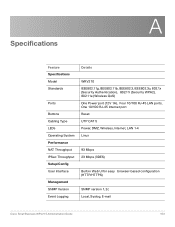
... Ports Buttons Cabling Type LEDs Operating System Performance NAT Throughput IPSec Throughput Setup/Config User Interface Management SNMP Version Event Logging Details WRV210 IEEE802.11g, IEEE802.11b, IEEE802.3, IEEE802.3u, 802.1x (Security Authentication), 802.11i (Security WPA2), 802.11e (Wireless QoS) One Power port (12V 1A), Four 10/100 RJ-45 LAN...
... Ports Buttons Cabling Type LEDs Operating System Performance NAT Throughput IPSec Throughput Setup/Config User Interface Management SNMP Version Event Logging Details WRV210 IEEE802.11g, IEEE802.11b, IEEE802.3, IEEE802.3u, 802.1x (Security Authentication), 802.11i (Security WPA2), 802.11e (Wireless QoS) One Power port (12V 1A), Four 10/100 RJ-45 LAN...


