Cisco WIP310 User Guide
Page 3
Wireless-G IP Phone Table of Contents Changing the Backlight Setting 19 Setting the Date and Time 19 Changing the Phone's Name (Station Name 20 Viewing the Display Name or Phone Number 20 Using Contacts 20 Using Messaging 21 Using Web Services 22 Chapter 4: Advanced Functions 24 Enabling the Web Server 24 Using the Web Interface... 1999/5/EC (R&TTE Directive) . . 36 Wireless Equipment (Wireless-N/G/A/B Products 37 CE Marking 37 National Restrictions 37 Product Usage Restrictions 38 Technical Documents on www.linksys.com/international 38 User Information for Consumer Products ...
Wireless-G IP Phone Table of Contents Changing the Backlight Setting 19 Setting the Date and Time 19 Changing the Phone's Name (Station Name 20 Viewing the Display Name or Phone Number 20 Using Contacts 20 Using Messaging 21 Using Web Services 22 Chapter 4: Advanced Functions 24 Enabling the Web Server 24 Using the Web Interface... 1999/5/EC (R&TTE Directive) . . 36 Wireless Equipment (Wireless-N/G/A/B Products 37 CE Marking 37 National Restrictions 37 Product Usage Restrictions 38 Technical Documents on www.linksys.com/international 38 User Information for Consumer Products ...
Cisco WIP310 User Guide
Page 14
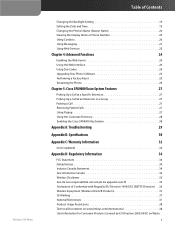
...can also connect your router's web interface using PIN. WPS PIN 6. If required, enter the user name and password. (By default, Linksys routers typically use "admin" for the user name and "admin" for the password.) Wireless-G IP Phone 10 Press the Select Button ... Your Wireless Connection. Navigate to the Wireless Setup menu. Your phone's PIN is successful, the phone creates a Wi-Fi Profile automatically. Power/End Call button 2. Chapter 2 Installing the WIP310 Setup Instructions Press the Wi-Fi Protected Setup button on your wireless router. 1. The phone displays ...
...can also connect your router's web interface using PIN. WPS PIN 6. If required, enter the user name and password. (By default, Linksys routers typically use "admin" for the user name and "admin" for the password.) Wireless-G IP Phone 10 Press the Select Button ... Your Wireless Connection. Navigate to the Wireless Setup menu. Your phone's PIN is successful, the phone creates a Wi-Fi Profile automatically. Power/End Call button 2. Chapter 2 Installing the WIP310 Setup Instructions Press the Wi-Fi Protected Setup button on your wireless router. 1. The phone displays ...

Cisco WIP310 User Guide
Page 15
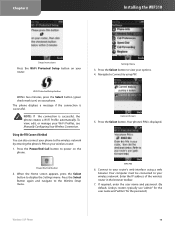
...1. You either directly enter the WEP Wireless-G IP Phone Installing the WIP310 key, or enter a more easily remembered passphrase to authenticate. Press the Select Button again and navigate to display the Settings menu. Locate the Wireless Protected Setup configuration menu. 9. Enter the... wireless router's web interface using a web browser. Determining Your Wireless Router Security Type If you need to setup wireless devices using WEP, note the following security types: •• WEP-Wired Equivalent Privacy. If required, enter the user name and password. (By default, Linksys ...
...1. You either directly enter the WEP Wireless-G IP Phone Installing the WIP310 key, or enter a more easily remembered passphrase to authenticate. Press the Select Button again and navigate to display the Settings menu. Locate the Wireless Protected Setup configuration menu. 9. Enter the... wireless router's web interface using a web browser. Determining Your Wireless Router Security Type If you need to setup wireless devices using WEP, note the following security types: •• WEP-Wired Equivalent Privacy. If required, enter the user name and password. (By default, Linksys ...

Cisco WIP310 User Guide
Page 30
...) to confirm or press the Cancel soft key to access phone supplementary services. Using Star Codes The WIP310 supports numerous "star codes" to exit without changes. WARNING: Do not edit any of the Wireless-G IP Phone Web Interface displays. NOTE: Most phone configuration is a list of your phone settings, such as call forwarding and Do Not Disturb, using...
...) to confirm or press the Cancel soft key to access phone supplementary services. Using Star Codes The WIP310 supports numerous "star codes" to exit without changes. WARNING: Do not edit any of the Wireless-G IP Phone Web Interface displays. NOTE: Most phone configuration is a list of your phone settings, such as call forwarding and Do Not Disturb, using...
SPA500 Series and WIP310 IP Phone Administration Guide
Page 18
... 500 Series and Wireless-G IP Phones with a Cisco SPA 9000, you can download the latest firmware onto your firmware. Cisco SPA 525G • Web Interface (Cisco SPA 525G)-You can use the web interface to your PC desktop and run the upgrade from the product page on . Cisco SPA 500 Series and WIP310 IP Phone Administration Guide 7 See...
... 500 Series and Wireless-G IP Phones with a Cisco SPA 9000, you can download the latest firmware onto your firmware. Cisco SPA 525G • Web Interface (Cisco SPA 525G)-You can use the web interface to your PC desktop and run the upgrade from the product page on . Cisco SPA 500 Series and WIP310 IP Phone Administration Guide 7 See...

SPA500 Series and WIP310 IP Phone Administration Guide
Page 21
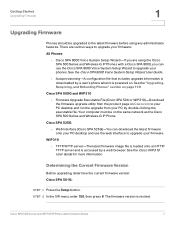
... STEP 2 Click Continue after reading the message regarding upgrading and your phone reboots. WIP310 STEP 1 Turn off your computer by using the USB cable. click wip310-5-0-11.exe). Cisco SPA 500 Series and WIP310 IP Phone Administration Guide 10 Cisco SPA 525G STEP 1 Log in zip format,... its contents to a single folder or to select the firmware file from your phone. STEP 3 Click Firmware Upgrade Window. The firmware is in to your WIP310 and connect it to the web interface for the phone. Getting Started Upgrading Firmware 1 STEP 3 Locate the download page and download the...
... STEP 2 Click Continue after reading the message regarding upgrading and your phone reboots. WIP310 STEP 1 Turn off your computer by using the USB cable. click wip310-5-0-11.exe). Cisco SPA 500 Series and WIP310 IP Phone Administration Guide 10 Cisco SPA 525G STEP 1 Log in zip format,... its contents to a single folder or to select the firmware file from your phone. STEP 3 Click Firmware Upgrade Window. The firmware is in to your WIP310 and connect it to the web interface for the phone. Getting Started Upgrading Firmware 1 STEP 3 Locate the download page and download the...

SPA500 Series and WIP310 IP Phone Administration Guide
Page 23
... that Enable Web Server is set to Yes. WIP310: STEP 1 In the Home screen, press the Select button to reach the Settings menu. Getting Started Using the Web Administration User Interface 1 NOTE If your service provider disabled access to the web UI, you have trouble accessing the web interface, perform the...is set to Yes. STEP 4 Press the left arrow to ensure that it to On. to enable the web server, then press #. Cisco SPA 500 Series and WIP310 IP Phone Administration Guide 12 If you must contact the service provider. STEP 4 Press OK, then press Save. STEP 3...
... that Enable Web Server is set to Yes. WIP310: STEP 1 In the Home screen, press the Select button to reach the Settings menu. Getting Started Using the Web Administration User Interface 1 NOTE If your service provider disabled access to the web UI, you have trouble accessing the web interface, perform the...is set to Yes. STEP 4 Press the left arrow to ensure that it to On. to enable the web server, then press #. Cisco SPA 500 Series and WIP310 IP Phone Administration Guide 12 If you must contact the service provider. STEP 4 Press OK, then press Save. STEP 3...

SPA500 Series and WIP310 IP Phone Administration Guide
Page 24
... make sure it when you might have different privileges. The Administrator account can modify all web profile parameters, including web parameters available to the web interface, then click Admin Login. • Enter the following URL when accessing the interface: http://phone.ip.address/admin/ NOTE To save changes on whether you are prompted for it is... provider, you click Admin Login. NOTE No default passwords are assigned to either : • Log in to the user login. Cisco SPA 500 Series and WIP310 IP Phone Administration Guide 13 These account names cannot be changed.
... make sure it when you might have different privileges. The Administrator account can modify all web profile parameters, including web parameters available to the web interface, then click Admin Login. • Enter the following URL when accessing the interface: http://phone.ip.address/admin/ NOTE To save changes on whether you are prompted for it is... provider, you click Admin Login. NOTE No default passwords are assigned to either : • Log in to the user login. Cisco SPA 500 Series and WIP310 IP Phone Administration Guide 13 These account names cannot be changed.
SPA500 Series and WIP310 IP Phone Administration Guide
Page 30
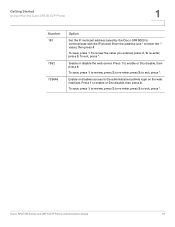
value), then press #. To exit, press *. Enable or disables access to the administrative (admin) login on the Cisco SPA 501G IP Phone 1 Number 181 7932 723646 Option Set the IP multicast address (used by the Cisco SPA 9000 to enter the "." to disable, then... to enable or 0 to re-enter, press 3; to disable, then press #. Cisco SPA 500 Series and WIP310 IP Phone Administration Guide 19 Enable or disable the web server. to review, press 2; Getting Started Using IVR on the web interface. To save , press 1; To save , press 1. to re-enter, press 3; to exit, press *....
value), then press #. To exit, press *. Enable or disables access to the administrative (admin) login on the Cisco SPA 501G IP Phone 1 Number 181 7932 723646 Option Set the IP multicast address (used by the Cisco SPA 9000 to enter the "." to disable, then... to enable or 0 to re-enter, press 3; to disable, then press #. Cisco SPA 500 Series and WIP310 IP Phone Administration Guide 19 Enable or disable the web server. to review, press 2; Getting Started Using IVR on the web interface. To save , press 1; To save , press 1. to re-enter, press 3; to exit, press *....

SPA500 Series and WIP310 IP Phone Administration Guide
Page 77
..., choose yes. STEP 6 In the Enable Web Admin Access field, you can be configured using a web interface. Defaults to the web administration interface. WIP310 STEP 1 Log in to the phone using the IVR. See the "Using IVR on...web administration interface. STEP 3 Click the System tab. STEP 6 Click Submit All Changes. STEP 3 Click the Phone tab. STEP 4 Under SMS Enable, choose yes. To enable the web server: STEP 1 Log in to yes (enabled). (For the Cisco SPA 501G, Cisco SPA 500 Series and WIP310 IP Phone Administration Guide 66 Customizing Cisco SPA and Wireless IP Phones...
..., choose yes. STEP 6 In the Enable Web Admin Access field, you can be configured using a web interface. Defaults to the web administration interface. WIP310 STEP 1 Log in to the phone using the IVR. See the "Using IVR on...web administration interface. STEP 3 Click the System tab. STEP 6 Click Submit All Changes. STEP 3 Click the Phone tab. STEP 4 Under SMS Enable, choose yes. To enable the web server: STEP 1 Log in to yes (enabled). (For the Cisco SPA 501G, Cisco SPA 500 Series and WIP310 IP Phone Administration Guide 66 Customizing Cisco SPA and Wireless IP Phones...

SPA500 Series and WIP310 IP Phone Administration Guide
Page 142
...tunnel group, if required by your VPN server. • (Optional) To connect to the VPN when the phone is set to yes), or connects to the web administration interface. STEP 4 In the TFTP Server field, enter the IP address of the VPN server. • In ... use the phone interface: STEP 1 On the phone, press the Setup button. STEP 5 Click Submit All Changes. The phone obtains its software load from this server when the phone either the administration web interface or the phone itself. Cisco SPA 500 Series and WIP310 IP Phone Administration Guide 131 To use the web interface: STEP 1...
...tunnel group, if required by your VPN server. • (Optional) To connect to the VPN when the phone is set to yes), or connects to the web administration interface. STEP 4 In the TFTP Server field, enter the IP address of the VPN server. • In ... use the phone interface: STEP 1 On the phone, press the Setup button. STEP 5 Click Submit All Changes. The phone obtains its software load from this server when the phone either the administration web interface or the phone itself. Cisco SPA 500 Series and WIP310 IP Phone Administration Guide 131 To use the web interface: STEP 1...

SPA500 Series and WIP310 IP Phone Administration Guide
Page 150
... message and bypassing the web interface. Upgrading Firmware on a Phone Use the upgrade URL to upgrade firmware on the Provisioning web page must be configured to reach a future upgrade state from either a TFTP or HTTP server. The Upgrade Enable parameter on the Cisco IP phone. Cisco SPA 500 Series and WIP310 IP Phone Administration Guide 139 You...
... message and bypassing the web interface. Upgrading Firmware on a Phone Use the upgrade URL to upgrade firmware on the Provisioning web page must be configured to reach a future upgrade state from either a TFTP or HTTP server. The Upgrade Enable parameter on the Cisco IP phone. Cisco SPA 500 Series and WIP310 IP Phone Administration Guide 139 You...

Cisco Small Business Pro IP Phone SPA50X User Guide (SPCP)
Page 5
Contents Updating Your Ring Tone 42 Using the Interactive Voice Response Menu on the SPA501G 43 Advanced Procedures for Technical Support Personnel 44 Status Information and Statistics 44 Rebooting, Restarting, and Resetting a Phone 44 Chapter 5: Using the Web Interface 46 Logging In to the Web Interface 46 Configuring Speed Dials and Fast Dials 47 Changing Your Password and PIN 49 Setting Up Voice Mail Notifications 49 Appendix A: Where to Go From Here 51 Related Documentation 52 Cisco Small Business Pro IP Phone SPA50X User Guide (SPCP) 3
Contents Updating Your Ring Tone 42 Using the Interactive Voice Response Menu on the SPA501G 43 Advanced Procedures for Technical Support Personnel 44 Status Information and Statistics 44 Rebooting, Restarting, and Resetting a Phone 44 Chapter 5: Using the Web Interface 46 Logging In to the Web Interface 46 Configuring Speed Dials and Fast Dials 47 Changing Your Password and PIN 49 Setting Up Voice Mail Notifications 49 Appendix A: Where to Go From Here 51 Related Documentation 52 Cisco Small Business Pro IP Phone SPA50X User Guide (SPCP) 3

Cisco Small Business Pro IP Phone SPA50X User Guide (SPCP)
Page 7
... table describes the contents of each chapter in this document and basic information about your IP Phone. Chapter 1 Chapter 2 Chapter 3 Chapter 4 Chapter 5 Chapter 6 Title Getting Started Installing Your Phone Using Basic Phone Functions Using Advanced Phone Features Using the Web Interface Using the SPA500S Attendant Console Description This chapter provides an overview of this document and...
... table describes the contents of each chapter in this document and basic information about your IP Phone. Chapter 1 Chapter 2 Chapter 3 Chapter 4 Chapter 5 Chapter 6 Title Getting Started Installing Your Phone Using Basic Phone Functions Using Advanced Phone Features Using the Web Interface Using the SPA500S Attendant Console Description This chapter provides an overview of this document and...

Cisco Small Business Pro IP Phone SPA50X User Guide (SPCP)
Page 39
... for Technical Support Personnel, page 44 Creating Speed Dials You can create and edit speed dials using the IP Phone Web Interface. NOTE For the SPA501G, you can be a phone number, IP address or URL. STEP 3 Scroll to CME Services and press Select. STEP 2 Scroll to My... can configure up to configure advanced features on your PC and the IP Phone Web Interface. Cisco Small Business Pro IP Phone SPA50X User Guide (SPCP) 37 and press Select. 4 Using Advanced Phone Features This chapter describes how to 8 speed dials. It contains the following sections: • Creating Speed...
... for Technical Support Personnel, page 44 Creating Speed Dials You can create and edit speed dials using the IP Phone Web Interface. NOTE For the SPA501G, you can be a phone number, IP address or URL. STEP 3 Scroll to CME Services and press Select. STEP 2 Scroll to My... can configure up to configure advanced features on your PC and the IP Phone Web Interface. Cisco Small Business Pro IP Phone SPA50X User Guide (SPCP) 37 and press Select. 4 Using Advanced Phone Features This chapter describes how to 8 speed dials. It contains the following sections: • Creating Speed...

Cisco Small Business Pro IP Phone SPA50X User Guide (SPCP)
Page 48
..., on page 47 • Changing Your Password and PIN, on page 49 • Setting Up Voice Mail Notifications, on page 49 Logging In to the Web Interface When your phone is connected to a Cisco Unified Communications 500, you can check your system administrator may change this setting. Cisco Small Business Pro IP...
..., on page 47 • Changing Your Password and PIN, on page 49 • Setting Up Voice Mail Notifications, on page 49 Logging In to the Web Interface When your phone is connected to a Cisco Unified Communications 500, you can check your system administrator may change this setting. Cisco Small Business Pro IP...

Cisco Small Business Pro IP Phone SPA50X User Guide (SPCP)
Page 49
...speed dials, or fast dials, are unsure how to invoke the number. Cisco Small Business Pro IP Phone SPA50X User Guide (SPCP) 47 NOTE If you are numbers that you can use the web pages to create speed dials and fast dials. • Speed dials allow you to quickly dial a... number from a list or to use a quick access code to log in Directories > Corporate Directory > Personal Speed Dial. Using the Web Interface Configuring Speed Dials and Fast Dials 5 STEP 2 Enter your phone system ...
...speed dials, or fast dials, are unsure how to invoke the number. Cisco Small Business Pro IP Phone SPA50X User Guide (SPCP) 47 NOTE If you are numbers that you can use the web pages to create speed dials and fast dials. • Speed dials allow you to quickly dial a... number from a list or to use a quick access code to log in Directories > Corporate Directory > Personal Speed Dial. Using the Web Interface Configuring Speed Dials and Fast Dials 5 STEP 2 Enter your phone system ...

Cisco Small Business Pro IP Phone SPA50X User Guide (SPCP)
Page 50
... Guide (SPCP) 48 STEP 3 To add a speed dial, find an open space in the Speed Dial Information section • Enter the phone number, including any prefix digit that your system requires for external numbers. • Enter label to identify the fast dial. See "Logging In..., find an open space in the Fast Dial section. • Enter the phone number, including any prefix digit that your system requires for external numbers. • Enter label to identify the speed dial. Using the Web Interface Configuring Speed Dials and Fast Dials 5 To configure your speed dials or fast...
... Guide (SPCP) 48 STEP 3 To add a speed dial, find an open space in the Speed Dial Information section • Enter the phone number, including any prefix digit that your system requires for external numbers. • Enter label to identify the fast dial. See "Logging In..., find an open space in the Fast Dial section. • Enter the phone number, including any prefix digit that your system requires for external numbers. • Enter label to identify the speed dial. Using the Web Interface Configuring Speed Dials and Fast Dials 5 To configure your speed dials or fast...

Cisco Small Business Pro IP Phone SPA50X User Guide (SPCP)
Page 51
...Devices. STEP 1 Log in to the Web Interface," on page 46. STEP 2 From the menu, choose Configure > My Profile. NOTE The password is used for the phone login. Cisco Small Business Pro IP Phone SPA50X User Guide (SPCP) 49 Using the Web Interface Changing Your Password and PIN STEP 5 ...Click Save Change to save your phone system administrator, you can choose up to two internal ...
...Devices. STEP 1 Log in to the Web Interface," on page 46. STEP 2 From the menu, choose Configure > My Profile. NOTE The password is used for the phone login. Cisco Small Business Pro IP Phone SPA50X User Guide (SPCP) 49 Using the Web Interface Changing Your Password and PIN STEP 5 ...Click Save Change to save your phone system administrator, you can choose up to two internal ...

Cisco Small Business Pro IP Phone SPA50X User Guide (SPCP)
Page 52
...you can check or uncheck the check boxes in the message. • Notification Preferences: Choose either Urgent Messages or All Messages. Using the Web Interface Setting Up Voice Mail Notifications 5 • Click the magnifying glass icon to choose an internal extension to be sent. Enter the text ...to the grid. Cisco Small Business Pro IP Phone SPA50X User Guide (SPCP) 50 Continue adding other time periods, as the device type. STEP 5 Click Apply to save your system requires for...
...you can check or uncheck the check boxes in the message. • Notification Preferences: Choose either Urgent Messages or All Messages. Using the Web Interface Setting Up Voice Mail Notifications 5 • Click the magnifying glass icon to choose an internal extension to be sent. Enter the text ...to the grid. Cisco Small Business Pro IP Phone SPA50X User Guide (SPCP) 50 Continue adding other time periods, as the device type. STEP 5 Click Apply to save your system requires for...