User Guide
Page 5
... fall and be abused by persons with pacemakers. • Due to rest on the label. • Do not allow anything to the radio signals between base station and handset, wearers of hearing aids may experience interference in the risk of power source indicated on the power cord.
... fall and be abused by persons with pacemakers. • Due to rest on the label. • Do not allow anything to the radio signals between base station and handset, wearers of hearing aids may experience interference in the risk of power source indicated on the power cord.
User Guide
Page 7
... Panel Chapter 3: Getting Started Before You Begin Getting Started with the Handset Getting Started with the Base Station Powering On the Handset Entering Names, Numbers and Special Characters Phone Features Adjusting the Call Volume First Time Phone Use Chapter 4: Using the Dual-Mode Internet Telephony Kit Overview Skype Basics Setting up a Skype Contact...
... Panel Chapter 3: Getting Started Before You Begin Getting Started with the Handset Getting Started with the Base Station Powering On the Handset Entering Names, Numbers and Special Characters Phone Features Adjusting the Call Volume First Time Phone Use Chapter 4: Using the Dual-Mode Internet Telephony Kit Overview Skype Basics Setting up a Skype Contact...
User Guide
Page 9
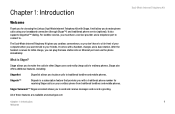
... with a traditional phone number for choosing the Linksys Dual-Mode Internet Telephony Kit with a handset, charger, and a base station. Skype Voicemail™ Skype voicemail allows you to place calls to your broadband connection (through Skype™) and traditional phone service (optional). Chapter 1: Introduction Welcome Thank you for receiving Skype calls on your cordless phone from traditional...
... with a traditional phone number for choosing the Linksys Dual-Mode Internet Telephony Kit with a handset, charger, and a base station. Skype Voicemail™ Skype voicemail allows you to place calls to your broadband connection (through Skype™) and traditional phone service (optional). Chapter 1: Introduction Welcome Thank you for receiving Skype calls on your cordless phone from traditional...
User Guide
Page 11
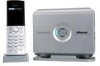
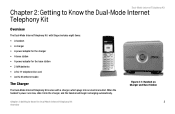
.... Dual-Mode Internet Telephony Kit Chapter 2: Getting to Know the Dual-Mode Internet Telephony Kit 3 Overview Figure 2-1: Handset on Charger and Base Station Chapter 2: Getting to Know the Dual-Mode Internet Telephony Kit Overview The Dual-Mode Internet Telephony Kit with Skype includes eight items: ...• A handset • A charger • A power adapter for the charger • A base station • A power adapter for the base station • 2 AAA batteries • A RJ-11 telephone line cord • An RJ-45 ethernet cable The Charger The Dual...
.... Dual-Mode Internet Telephony Kit Chapter 2: Getting to Know the Dual-Mode Internet Telephony Kit 3 Overview Figure 2-1: Handset on Charger and Base Station Chapter 2: Getting to Know the Dual-Mode Internet Telephony Kit Overview The Dual-Mode Internet Telephony Kit with Skype includes eight items: ...• A handset • A charger • A power adapter for the charger • A base station • A power adapter for the base station • 2 AAA batteries • A RJ-11 telephone line cord • An RJ-45 ethernet cable The Charger The Dual...

User Guide
Page 12
... must be connected to your handset. To make landline calls, the base station should also be connected to an ethernet port to use the end of the base station. PHONE LINE LED Page Button Amber. Figure 2-3: Side Panel of Base Station Chapter 2: Getting to connect the power adapter of a paper clip to push in...
... must be connected to your handset. To make landline calls, the base station should also be connected to an ethernet port to use the end of the base station. PHONE LINE LED Page Button Amber. Figure 2-3: Side Panel of Base Station Chapter 2: Getting to connect the power adapter of a paper clip to push in...

User Guide
Page 13
or right-hand side of Handset 5 During standby mode, press up to four cordless handsets for a single base station (refer to "Chapter 4: Using the Dual-Mode Internet Telephony Kit" for more information). Call Press this key to make or answer calls. Icon Name ...
or right-hand side of Handset 5 During standby mode, press up to four cordless handsets for a single base station (refer to "Chapter 4: Using the Dual-Mode Internet Telephony Kit" for more information). Call Press this key to make or answer calls. Icon Name ...
User Guide
Page 17
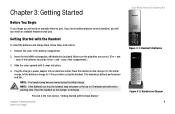
... polarities are low, the handset may become warm during the initial charge. This maximizes battery performance and life. Getting Started with the Base Station." For the initial charge, let the batteries charge for up to 15 minutes and will emit a warning tone. Proceed to ...the next section, "Getting Started with the Handset To insert the batteries and charge them, follow these instructions: 1. If you have traditional phone service (landline), you will need an available telephone wall jack. Chapter 3: Getting Started Before You Begin Dual-Mode Internet Telephony Kit Figure ...
... polarities are low, the handset may become warm during the initial charge. This maximizes battery performance and life. Getting Started with the Base Station." For the initial charge, let the batteries charge for up to 15 minutes and will emit a warning tone. Proceed to ...the next section, "Getting Started with the Handset To insert the batteries and charge them, follow these instructions: 1. If you have traditional phone service (landline), you will need an available telephone wall jack. Chapter 3: Getting Started Before You Begin Dual-Mode Internet Telephony Kit Figure ...
User Guide
Page 18
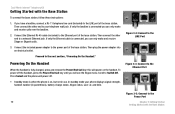
...RJ-45 cable (included) to the Power Port 10 Chapter 3: Getting Started Getting Started with the Base Station To connect the base station, follow these instructions: 1. Press Select and the phone will power on , but not in parenthesis), battery charge status, Skype status, user i.d. To power...• Standby mode is when the phone is connected, you have a landline, connect a RJ-11 telephone line cord (included) to a network Ethernet jack. Figure 3-4: Connect to the Ethernet Port Figure 3-5: Connect to the Ethernet port of the base station. Dual-Mode Internet Telephony Kit ...
...RJ-45 cable (included) to the Power Port 10 Chapter 3: Getting Started Getting Started with the Base Station To connect the base station, follow these instructions: 1. Press Select and the phone will power on , but not in parenthesis), battery charge status, Skype status, user i.d. To power...• Standby mode is when the phone is connected, you have a landline, connect a RJ-11 telephone line cord (included) to a network Ethernet jack. Figure 3-4: Connect to the Ethernet Port Figure 3-5: Connect to the Ethernet port of the base station. Dual-Mode Internet Telephony Kit ...
User Guide
Page 22
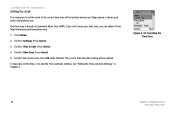
If you don't know your Skype phone is being used before initial phone use. Scroll to Time Zone. Press Select. 4. Scroll to Settings. To manually set the clock to the correct time zone of the location where your ... Date settings, see "Editing the Time and Date Settings" in Chapter 4. Press Menu. 2. Figure 3-10: Selecting the Time Zone 14 Chapter 3: Getting Started First Time Phone Use Press Select. 3. Press OK when finished. Press Select. 5. Scroll to Time & Date. The time zone is...
If you don't know your Skype phone is being used before initial phone use. Scroll to Time Zone. Press Select. 4. Scroll to Settings. To manually set the clock to the correct time zone of the location where your ... Date settings, see "Editing the Time and Date Settings" in Chapter 4. Press Menu. 2. Figure 3-10: Selecting the Time Zone 14 Chapter 3: Getting Started First Time Phone Use Press Select. 3. Press OK when finished. Press Select. 5. Scroll to Time & Date. The time zone is...
User Guide
Page 23
...message has displayed: 1. Press the middle button (PAGE) on the phone's LCD screen. If asked, enter the System PIN (default: 0000). If the signal icon displays, the handset and base station are registered, the base station memory becomes full and no further handsets can be too far from... can register up to confirm. Checking the Signal Strength The signal icon displays the link status between the handset and base station. Move the handset closer to the base unit. Chapter 3: Getting Started First Time Phone Use Dual-Mode Internet Telephony Kit Figure 3-11: Signal Strength icon 15
...message has displayed: 1. Press the middle button (PAGE) on the phone's LCD screen. If asked, enter the System PIN (default: 0000). If the signal icon displays, the handset and base station are registered, the base station memory becomes full and no further handsets can be too far from... can register up to confirm. Checking the Signal Strength The signal icon displays the link status between the handset and base station. Move the handset closer to the base unit. Chapter 3: Getting Started First Time Phone Use Dual-Mode Internet Telephony Kit Figure 3-11: Signal Strength icon 15
User Guide
Page 24
Your call , an alarm tone will sound and the Base/Handset Link icon will be disconnected if you do not move back within range. Congratulations! Dual-Mode Internet Telephony Kit Staying within Range If you move outside of the Dual-Mode Internet Telephony Kit is complete. For more information on the handset's display screen. The installation of the base station's range during a call will flash on how to use the Telephony Kit, refer to "Chapter 4: Using the Dual-Mode Internet Telephony Kit." 16 Chapter 3: Getting Started First Time Phone Use
Your call , an alarm tone will sound and the Base/Handset Link icon will be disconnected if you do not move back within range. Congratulations! Dual-Mode Internet Telephony Kit Staying within Range If you move outside of the Dual-Mode Internet Telephony Kit is complete. For more information on the handset's display screen. The installation of the base station's range during a call will flash on how to use the Telephony Kit, refer to "Chapter 4: Using the Dual-Mode Internet Telephony Kit." 16 Chapter 3: Getting Started First Time Phone Use
User Guide
Page 34
Press Call. Transferring a Call to find the handset you want to call . 2. During a conference call, access the Options menu for other handsets share your same base unit. Scroll to the handset to include in the call will be transferred. Scroll to the handset you want . Press Call. 3. Press INT (intercom) during a ...
Press Call. Transferring a Call to find the handset you want to call . 2. During a conference call, access the Options menu for other handsets share your same base unit. Scroll to the handset to include in the call will be transferred. Scroll to the handset you want . Press Call. 3. Press INT (intercom) during a ...

User Guide
Page 41
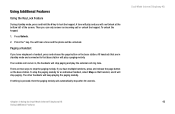
... Sign In to Skype You can decide to allow anyone to call you want. Select the setting you , only your Skype account every time the base unit powers up. 1. Scroll to Settings. Press Select. 3. Choose from Skype Calls, SkypeIn Calls or Blocked Users. Press Select. 3. Press Select. 5. Privacy You can choose...
... Sign In to Skype You can decide to allow anyone to call you want. Select the setting you , only your Skype account every time the base unit powers up. 1. Scroll to Settings. Press Select. 3. Choose from Skype Calls, SkypeIn Calls or Blocked Users. Press Select. 3. Press Select. 5. Privacy You can choose...
User Guide
Page 51
... Kit Chapter 4: Using the Dual-Mode Internet Telephony Kit 43 Using Additional Features If an outside call comes in standby mode and connected to that base station will play the external call or unlock the keypad. The other handsets will be unlocked. You will hear a tone and the... phone will keep playing the paging melody. Using Additional Features Using the Key Lock Feature During standby mode, press and hold the # key to stop the ...
... Kit Chapter 4: Using the Dual-Mode Internet Telephony Kit 43 Using Additional Features If an outside call comes in standby mode and connected to that base station will play the external call or unlock the keypad. The other handsets will be unlocked. You will hear a tone and the... phone will keep playing the paging melody. Using Additional Features Using the Key Lock Feature During standby mode, press and hold the # key to stop the ...
User Guide
Page 61
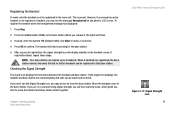
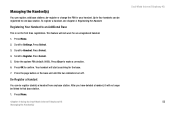
... searching for an unregistered handset. 1. After you have deleted a handset, it will no longer be registered to one base station. Up to four handsets can register, add base stations, de-register or change the PIN for first time registration. Press Select. 4. Press Clear to Register. Press ...Select. 3. Press the page button on the base unit until the two indicators turn off. Scroll to an Additional Base This is not for your handset. Managing the Handset(s) You can be linked to that...
... searching for an unregistered handset. 1. After you have deleted a handset, it will no longer be registered to one base station. Up to four handsets can register, add base stations, de-register or change the PIN for first time registration. Press Select. 4. Press Clear to Register. Press ...Select. 3. Press the page button on the base unit until the two indicators turn off. Scroll to an Additional Base This is not for your handset. Managing the Handset(s) You can be linked to that...
User Guide
Page 64
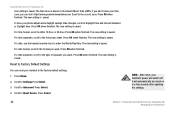
.... Reset to the format you want . Dual-Mode Internet Telephony Kit new setting is saved .The time zone is saved. The new setting is based on in a few seconds after updating the settings. 56 Chapter 4: Using the Dual-Mode Internet Telephony Kit Managing the Handset(s) Press Select. Press...Press Select. 4. To have your handset to Settings.Press Select. 3. For date separator, scroll to the type of separator you can reset your phone adjust when daylight savings time changes, scroll to the correct zone. Press OK when finished. Scroll to either 12 Hour or 24 Hour. The new...
.... Reset to the format you want . Dual-Mode Internet Telephony Kit new setting is saved .The time zone is saved. The new setting is based on in a few seconds after updating the settings. 56 Chapter 4: Using the Dual-Mode Internet Telephony Kit Managing the Handset(s) Press Select. Press...Press Select. 4. To have your handset to Settings.Press Select. 3. For date separator, scroll to the type of separator you can reset your phone adjust when daylight savings time changes, scroll to the correct zone. Press OK when finished. Scroll to either 12 Hour or 24 Hour. The new...
User Guide
Page 75
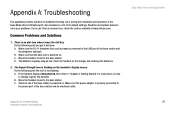
...the following until the icon is powered on the handset's display screen. The batteries capacity may occur during the installation and operation of the base station and the telephone wall jack. B. Read the descriptions below to solve your problems. If you get a dial tone: A. Move the...line cord is flashing on . Do the following until you can't find an answer here, check the Linksys website at www.linksys.com. Move the handset closer to the base station. Place the handset on how to initially register the handset. Appendix A: Troubleshooting This appendix provides ...
...the following until the icon is powered on the handset's display screen. The batteries capacity may occur during the installation and operation of the base station and the telephone wall jack. B. Read the descriptions below to solve your problems. If you get a dial tone: A. Move the...line cord is flashing on . Do the following until you can't find an answer here, check the Linksys website at www.linksys.com. Move the handset closer to the base station. Place the handset on how to initially register the handset. Appendix A: Troubleshooting This appendix provides ...

User Guide
Page 76
...if the batteries are positioned properly in a room with a clean and dry cloth. 4. If you have properly connected the handset, charger, and base station. (Refer to hear a beep. Do the following : A. Do the following : A. Make sure that the batteries are in the battery compartment. ...Empty icon is poor. The audio quality is displayed even though the handset has charged for more than 14 hours. C. Do the following : A. Move the base station as needed . B. B. B. If you were not supposed to "Chapter 3: Getting Started.") C. There may be interference from the charger, and then...
...if the batteries are positioned properly in a room with a clean and dry cloth. 4. If you have properly connected the handset, charger, and base station. (Refer to hear a beep. Do the following : A. Do the following : A. Make sure that the batteries are in the battery compartment. ...Empty icon is poor. The audio quality is displayed even though the handset has charged for more than 14 hours. C. Do the following : A. Move the base station as needed . B. B. B. If you were not supposed to "Chapter 3: Getting Started.") C. There may be interference from the charger, and then...
User Guide
Page 77
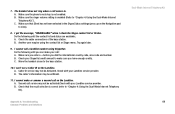
...list and status are available:. A. B. Do the following until you can 't see a Caller ID on the Navigation pad to the base station. 10. Check your Landline service provider. B. Appendix A: Troubleshooting Common Problems and Solutions Dual-Mode Internet Telephony Kit 69 A. Make...user may not be withheld. 11. I get the message, "UNAVAILABLE" when I cannot make your Landline service provider. Make sure the phone's mute key is correct (refer to "Chapter 4: Using the Dual-Mode Internet Telephony Kit). B. Caller ID service may be activated.Check ...
...list and status are available:. A. B. Do the following until you can 't see a Caller ID on the Navigation pad to the base station. 10. Check your Landline service provider. B. Appendix A: Troubleshooting Common Problems and Solutions Dual-Mode Internet Telephony Kit 69 A. Make...user may not be withheld. 11. I get the message, "UNAVAILABLE" when I cannot make your Landline service provider. Make sure the phone's mute key is correct (refer to "Chapter 4: Using the Dual-Mode Internet Telephony Kit). B. Caller ID service may be activated.Check ...
User Guide
Page 79
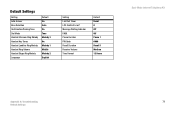
Default Settings Setting Auto Answer Base Selection Confirmation/Parking Tone Dial Mode Handset Intercom Ring Melody Handset Key Tones Handset Landline Ring Melody Handset Ring Volume Handset Skype Ring Melody Language Default On Auto On Tone Melody 3 On Melody 1 Middle Melody 2 English Setting Last Call Timer LCD Contrast Level* Message Waiting Indicator PABX Pause Duration PIN Code Recall Duration Receiver Volume Time Format Default Reset 0 Off Off Pause 1 0000 Recall 1 Medium 12 Hours Dual-Mode Internet Telephony Kit Appendix A: Troubleshooting 71 Default Settings
Default Settings Setting Auto Answer Base Selection Confirmation/Parking Tone Dial Mode Handset Intercom Ring Melody Handset Key Tones Handset Landline Ring Melody Handset Ring Volume Handset Skype Ring Melody Language Default On Auto On Tone Melody 3 On Melody 1 Middle Melody 2 English Setting Last Call Timer LCD Contrast Level* Message Waiting Indicator PABX Pause Duration PIN Code Recall Duration Receiver Volume Time Format Default Reset 0 Off Off Pause 1 0000 Recall 1 Medium 12 Hours Dual-Mode Internet Telephony Kit Appendix A: Troubleshooting 71 Default Settings