User Guide
Page 7
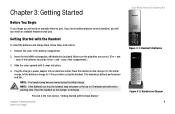
... The Handset's Side Panel The Handset's Back Panel Chapter 3: Getting Started Before You Begin Getting Started with the Handset Getting Started with the Base Station Powering On the Handset Entering Names, Numbers and Special Characters Phone Features Adjusting the Call Volume First Time Phone Use Chapter 4: Using the Dual-Mode Internet Telephony Kit Overview Skype...
... The Handset's Side Panel The Handset's Back Panel Chapter 3: Getting Started Before You Begin Getting Started with the Handset Getting Started with the Base Station Powering On the Handset Entering Names, Numbers and Special Characters Phone Features Adjusting the Call Volume First Time Phone Use Chapter 4: Using the Dual-Mode Internet Telephony Kit Overview Skype...
User Guide
Page 10
... the Dual-Mode Internet Telephony Kit This chapter describes the physical features of the Dual-Mode Internet Telephony Kit. • Chapter 3: Getting Started This chapter explains how to connect and set up the Dual-Mode Internet Telephony Kit. • Chapter 4: Using the Dual-Mode Internet ... the Dual-Mode Internet Telephony Kit. • Appendix E: Contact Information This appendix provides contact information for a variety of Linksys resources, including Technical Support. 2 Chapter 1: Introduction What's in This User Guide? Dual-Mode Internet Telephony Kit What's in This User Guide?
... the Dual-Mode Internet Telephony Kit This chapter describes the physical features of the Dual-Mode Internet Telephony Kit. • Chapter 3: Getting Started This chapter explains how to connect and set up the Dual-Mode Internet Telephony Kit. • Chapter 4: Using the Dual-Mode Internet ... the Dual-Mode Internet Telephony Kit. • Appendix E: Contact Information This appendix provides contact information for a variety of Linksys resources, including Technical Support. 2 Chapter 1: Introduction What's in This User Guide? Dual-Mode Internet Telephony Kit What's in This User Guide?
User Guide
Page 16
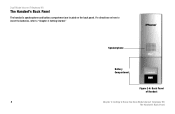
Speakerphone Battery Compartment Figure 2-6: Back Panel of Handset 8 Chapter 2: Getting to "Chapter 3: Getting Started." For directions on the back panel. Dual-Mode Internet Telephony Kit The Handset's Back Panel The handset's speakerphone and battery compartment are located on how to insert the batteries, refer to Know the Dual-Mode Internet Telephony Kit The Handset's Back Panel
Speakerphone Battery Compartment Figure 2-6: Back Panel of Handset 8 Chapter 2: Getting to "Chapter 3: Getting Started." For directions on the back panel. Dual-Mode Internet Telephony Kit The Handset's Back Panel The handset's speakerphone and battery compartment are located on how to insert the batteries, refer to Know the Dual-Mode Internet Telephony Kit The Handset's Back Panel
User Guide
Page 17
...The handset may not power on the charger to the next section, "Getting Started with the Handset To insert the batteries and charge them, follow these instructions: 1. If you have traditional phone service (landline), you will also need an available ethernet port. Insert the two... to recharge. Place the handset on for 14 hours before using the handset. This maximizes battery performance and life. Chapter 3: Getting Started Before You Begin Dual-Mode Internet Telephony Kit Figure 3-1: Handset's Batteries Figure 3-2: Handset on the charger. Make sure the polarities are...
...The handset may not power on the charger to the next section, "Getting Started with the Handset To insert the batteries and charge them, follow these instructions: 1. If you have traditional phone service (landline), you will also need an available ethernet port. Insert the two... to recharge. Place the handset on for 14 hours before using the handset. This maximizes battery performance and life. Chapter 3: Getting Started Before You Begin Dual-Mode Internet Telephony Kit Figure 3-1: Handset's Batteries Figure 3-2: Handset on the charger. Make sure the polarities are...
User Guide
Page 18
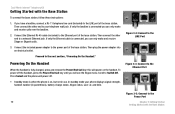
...3. Then connect the other end to a network Ethernet jack. Proceed to Switch Off. To power off . • Standby mode is when the phone is connected, you will power on , but not in parenthesis), battery charge status, Skype status, user i.d. and time. Then connect the other ... the handset is connected you have a landline, connect a RJ-11 telephone line cord (included) to the Power Port 10 Chapter 3: Getting Started Getting Started with the Base Station To connect the base station, follow these instructions: 1. Figure 3-4: Connect to the Ethernet Port Figure 3-5: Connect to the...
...3. Then connect the other end to a network Ethernet jack. Proceed to Switch Off. To power off . • Standby mode is when the phone is connected, you will power on , but not in parenthesis), battery charge status, Skype status, user i.d. and time. Then connect the other ... the handset is connected you have a landline, connect a RJ-11 telephone line cord (included) to the Power Port 10 Chapter 3: Getting Started Getting Started with the Base Station To connect the base station, follow these instructions: 1. Figure 3-4: Connect to the Ethernet Port Figure 3-5: Connect to the...

User Guide
Page 19
...; To delete all characters, press and hold 0 (zero) to change between uppercase and lowercase letters or numeric characters. Dual-Mode Internet Telephony Kit Chapter 3: Getting Started 11 Entering Names, Numbers and Special Characters Entering Names, Numbers and Special Characters Use the handset number keys to add a space. Alpha modes also display...
...; To delete all characters, press and hold 0 (zero) to change between uppercase and lowercase letters or numeric characters. Dual-Mode Internet Telephony Kit Chapter 3: Getting Started 11 Entering Names, Numbers and Special Characters Entering Names, Numbers and Special Characters Use the handset number keys to add a space. Alpha modes also display...

User Guide
Page 20
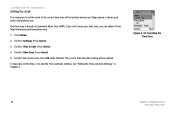
... into the headset port. 3. Making Handsfree Calls You can use the speakerphone instead of the phone facing up or down on the navigation pad to the next section, "First Time Phone Use" 12 HEADSET Figure 3-6: Headset Chapter 3: Getting Started Phone Features For call , press the Speaker key again. Proceed to change the volume level...
... into the headset port. 3. Making Handsfree Calls You can use the speakerphone instead of the phone facing up or down on the navigation pad to the next section, "First Time Phone Use" 12 HEADSET Figure 3-6: Headset Chapter 3: Getting Started Phone Features For call , press the Speaker key again. Proceed to change the volume level...

User Guide
Page 21
...code. Your password needs to be able to confirm. 2. Dual-Mode Internet Telephony Kit Figure 3-7: Agreement Figure 3-8: Country Code Chapter 3: Getting Started First Time Phone Use Figure 3-9: Password 13 Select the language. If the language you are calling from the system PIN of letters, numbers and symbols. and ... not appear on-screen, scroll to find the correct language and press Select to return local, national or international calls received on the phone for the first time, you will be accepted. To be at least 6 characters and can have their own Skype account. Each Skype...
...code. Your password needs to be able to confirm. 2. Dual-Mode Internet Telephony Kit Figure 3-7: Agreement Figure 3-8: Country Code Chapter 3: Getting Started First Time Phone Use Figure 3-9: Password 13 Select the language. If the language you are calling from the system PIN of letters, numbers and symbols. and ... not appear on-screen, scroll to find the correct language and press Select to return local, national or international calls received on the phone for the first time, you will be accepted. To be at least 6 characters and can have their own Skype account. Each Skype...
User Guide
Page 22
...entered. Figure 3-10: Selecting the Time Zone 14 Chapter 3: Getting Started First Time Phone Use To manually set the clock to the correct time zone of the location where your time zone, you don't know your Skype phone is based on Greenwich Mean Time (GMT). Dual-Mode Internet Telephony... "Editing the Time and Date Settings" in Chapter 4. Press Select. 5. Scroll to Time & Date. The time zone is being used before initial phone use. Scroll to Settings. Scroll to Time Zone. Press Select. 4. Scroll to the correct zone. Press OK when finished. If you can obtain it...
...entered. Figure 3-10: Selecting the Time Zone 14 Chapter 3: Getting Started First Time Phone Use To manually set the clock to the correct time zone of the location where your time zone, you don't know your Skype phone is based on Greenwich Mean Time (GMT). Dual-Mode Internet Telephony... "Editing the Time and Date Settings" in Chapter 4. Press Select. 5. Scroll to Time & Date. The time zone is being used before initial phone use. Scroll to Settings. Scroll to Time Zone. Press Select. 4. Scroll to the correct zone. Press OK when finished. If you can obtain it...
User Guide
Page 23
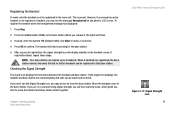
... asked, enter the System PIN (default: 0000). After successful registration, the signal strength icon will flash. 3. Chapter 3: Getting Started First Time Phone Use Dual-Mode Internet Telephony Kit Figure 3-11: Signal Strength icon 15 Press OK to the base station. If registration failed, repeat...becomes full and no further handsets can register up to that base station. The handset will hear warning tones, which gives you will start searching for the base station. 5. Registering the Handset To make a correction. 4. To register the handset when the Unregistered message has ...
... asked, enter the System PIN (default: 0000). After successful registration, the signal strength icon will flash. 3. Chapter 3: Getting Started First Time Phone Use Dual-Mode Internet Telephony Kit Figure 3-11: Signal Strength icon 15 Press OK to the base station. If registration failed, repeat...becomes full and no further handsets can register up to that base station. The handset will hear warning tones, which gives you will start searching for the base station. 5. Registering the Handset To make a correction. 4. To register the handset when the Unregistered message has ...
User Guide
Page 24
For more information on the handset's display screen. Dual-Mode Internet Telephony Kit Staying within range. Your call , an alarm tone will sound and the Base/Handset Link icon will be disconnected if you do not move back within Range If you move outside of the Dual-Mode Internet Telephony Kit is complete. The installation of the base station's range during a call will flash on how to use the Telephony Kit, refer to "Chapter 4: Using the Dual-Mode Internet Telephony Kit." 16 Chapter 3: Getting Started First Time Phone Use Congratulations!
For more information on the handset's display screen. Dual-Mode Internet Telephony Kit Staying within range. Your call , an alarm tone will sound and the Base/Handset Link icon will be disconnected if you do not move back within Range If you move outside of the Dual-Mode Internet Telephony Kit is complete. The installation of the base station's range during a call will flash on how to use the Telephony Kit, refer to "Chapter 4: Using the Dual-Mode Internet Telephony Kit." 16 Chapter 3: Getting Started First Time Phone Use Congratulations!

User Guide
Page 26
... get an error message.) The Contact will be added to Skype or SkypeOut type of the Contact, starting with the + sign (press and hold zero) followed by the international country code, area code and phone number. NOTE: To make a SkypeOut call for the Contact's information. For a Skype Contact, enter the Name or...
... get an error message.) The Contact will be added to Skype or SkypeOut type of the Contact, starting with the + sign (press and hold zero) followed by the international country code, area code and phone number. NOTE: To make a SkypeOut call for the Contact's information. For a Skype Contact, enter the Name or...
User Guide
Page 34
... the first Skype contact or landline user through SkypeOut. 2. Dual-Mode Internet Telephony Kit Intercom and Conference Calls Intercom Calls Press INT (intercom). Press Call. 3. Starting a Conference Call You can place a conference call will be transferred. Press CALL. 5. Scroll to find the handset you want to another Handset 1. Scroll to call...
... the first Skype contact or landline user through SkypeOut. 2. Dual-Mode Internet Telephony Kit Intercom and Conference Calls Intercom Calls Press INT (intercom). Press Call. 3. Starting a Conference Call You can place a conference call will be transferred. Press CALL. 5. Scroll to find the handset you want to another Handset 1. Scroll to call...
User Guide
Page 61
... to confirm. De-Register a Handset You can register, add base stations, de-register or change the PIN for the base. 7. Press Menu. This feature will start searching for your handset. Press Select. 5. Press the page button on the base unit until the two indicators turn off. Your handset will not work...
... to confirm. De-Register a Handset You can register, add base stations, de-register or change the PIN for the base. 7. Press Menu. This feature will start searching for your handset. Press Select. 5. Press the page button on the base unit until the two indicators turn off. Your handset will not work...
User Guide
Page 75
...low. Dual-Mode Internet Telephony Kit Appendix A: Troubleshooting 67 Common Problems and Solutions If the handset displays Unregistered, then refer to "Chapter 3: Getting Started" for instructions on the handset's display screen. Check to see if the base station is powered on the charger and recharge the batteries. 2. ...port of the Dual-Mode Internet Telephony Kit. Do the following until you can't find an answer here, check the Linksys website at www.linksys.com. Place the handset on . C. B. B. Make sure the power adapter is no dial tone when I press the Call key.
...low. Dual-Mode Internet Telephony Kit Appendix A: Troubleshooting 67 Common Problems and Solutions If the handset displays Unregistered, then refer to "Chapter 3: Getting Started" for instructions on the handset's display screen. Check to see if the base station is powered on the charger and recharge the batteries. 2. ...port of the Dual-Mode Internet Telephony Kit. Do the following until you can't find an answer here, check the Linksys website at www.linksys.com. Place the handset on . C. B. B. Make sure the power adapter is no dial tone when I press the Call key.

User Guide
Page 76
If you were not supposed to "Chapter 3: Getting Started.") C. Do the following : A. Make sure the handset is normal, and you have properly connected the handset, charger, and base station. (Refer to hear a beep. Use ...
If you were not supposed to "Chapter 3: Getting Started.") C. Do the following : A. Make sure the handset is normal, and you have properly connected the handset, charger, and base station. (Refer to hear a beep. Use ...