User Guide
Page 7
... Chapter 1: Introduction Welcome What's in This User Guide? Chapter 2: Getting to Know the Dual-Mode Internet Telephony Kit Overview The Charger The USB Base Station The Handset's Front Panel The Handset's Side Panel The Handset's Back Panel The Handset's Display Screen Chapter 3: Getting Started Overview ...Before You Begin Getting Started with the Handset Getting Started with the USB Base Station Powering On the Handset Setting Up Your PC Using the Telephony Kit Setting the Handset's Clock Chapter 4: Using the Dual-...
... Chapter 1: Introduction Welcome What's in This User Guide? Chapter 2: Getting to Know the Dual-Mode Internet Telephony Kit Overview The Charger The USB Base Station The Handset's Front Panel The Handset's Side Panel The Handset's Back Panel The Handset's Display Screen Chapter 3: Getting Started Overview ...Before You Begin Getting Started with the Handset Getting Started with the USB Base Station Powering On the Handset Setting Up Your PC Using the Telephony Kit Setting the Handset's Clock Chapter 4: Using the Dual-...
User Guide
Page 9
List of Figures Figure 2-1: Handset on Charger Figure 2-2: Front Panel of USB Base Station Figure 2-3: Back Panel of USB Base Station Figure 2-4: Front of Handset Figure 2-5: Headset Port Figure 2-6: Back Panel of Handset Figure 2-7: Handset with Clip Figure 3-1: Handset's Batteries Figure 3-2: Handset on Charger ...
List of Figures Figure 2-1: Handset on Charger Figure 2-2: Front Panel of USB Base Station Figure 2-3: Back Panel of USB Base Station Figure 2-4: Front of Handset Figure 2-5: Headset Port Figure 2-6: Back Panel of Handset Figure 2-7: Handset with Clip Figure 3-1: Handset's Batteries Figure 3-2: Handset on Charger ...
User Guide
Page 11
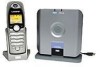
... will allow you to make phone calls using USB, and then connect its charger, and a USB base station. It rings when you have to sit in front of a regular phone plus the capability to handle Skype calls. You can display your broadband connection (through Skype™) and traditional phone service. The Linksys Dual-Mode Internet Telephony...
... will allow you to make phone calls using USB, and then connect its charger, and a USB base station. It rings when you have to sit in front of a regular phone plus the capability to handle Skype calls. You can display your broadband connection (through Skype™) and traditional phone service. The Linksys Dual-Mode Internet Telephony...
User Guide
Page 13
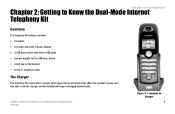
... Telephony Kit Overview The Telephony Kit includes six items: • A handset • A charger with built-in power adapter • A USB base station with built-in USB cable • A power adapter for the USB base station • A belt clip for the handset • An RJ-11 telephone cable The Charger The Telephony Kit comes...
... Telephony Kit Overview The Telephony Kit includes six items: • A handset • A charger with built-in power adapter • A USB base station with built-in USB cable • A power adapter for the USB base station • A belt clip for the handset • An RJ-11 telephone cable The Charger The Telephony Kit comes...
User Guide
Page 14
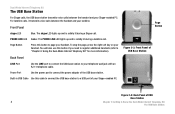
... Use this button if you need to register additional handsets (refer to page your handset. PHONE LINE LED Amber. Dual-Mode Internet Telephony Kit The USB Base Station For Skype calls, the USB base station transmits voice calls between the handset and your landline. For landline calls, it transmits voice calls between the...
... Use this button if you need to register additional handsets (refer to page your handset. PHONE LINE LED Amber. Dual-Mode Internet Telephony Kit The USB Base Station For Skype calls, the USB base station transmits voice calls between the handset and your landline. For landline calls, it transmits voice calls between the...
User Guide
Page 15
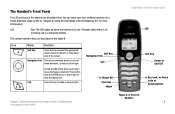
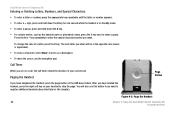
... a message waiting. Call Press this table. It flashes when there is in use. Call During standby mode, press up to four cordless handsets for a single USB base station (refer to view the DIALED list. Press left to view the SKYPE menu, or press right to "Chapter 4: Using the Dual-Mode Internet...
... a message waiting. Call Press this table. It flashes when there is in use. Call During standby mode, press up to four cordless handsets for a single USB base station (refer to view the DIALED list. Press left to view the SKYPE menu, or press right to "Chapter 4: Using the Dual-Mode Internet...
User Guide
Page 19
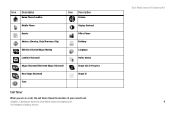
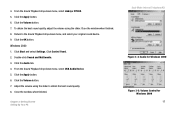
Chapter 2: Getting to Know the Dual-Mode Internet Telephony Kit The Handset's Display Screen Dual-Mode Internet Telephony Kit 9 Icon Description Home Phone/Landline Icon Description Volume Mobile Phone Display Contrast Gender Office Phone Address (Country, State/Province, City) Birthday USB Base Station/Skype Melody Language Landline Voicemail Online Status Skype Voicemail/Retrieved Skype Voicemail Skype Call in Progress New Skype Voicemail Skype ID Time Call Timer When you are on a call, the call timer shows the duration of your current call.
Chapter 2: Getting to Know the Dual-Mode Internet Telephony Kit The Handset's Display Screen Dual-Mode Internet Telephony Kit 9 Icon Description Home Phone/Landline Icon Description Volume Mobile Phone Display Contrast Gender Office Phone Address (Country, State/Province, City) Birthday USB Base Station/Skype Melody Language Landline Voicemail Online Status Skype Voicemail/Retrieved Skype Voicemail Skype Call in Progress New Skype Voicemail Skype ID Time Call Timer When you are on a call, the call timer shows the duration of your current call.
User Guide
Page 23
... a PC with the following: • Windows 2000 or XP • Skype software (www.skype.com) • High-speed Internet connection • Available USB port If you have traditional phone service (a landline), make sure you can follow the instructions in this chapter and run the Setup Wizard when instructed to do so. If...
... a PC with the following: • Windows 2000 or XP • Skype software (www.skype.com) • High-speed Internet connection • Available USB port If you have traditional phone service (a landline), make sure you can follow the instructions in this chapter and run the Setup Wizard when instructed to do so. If...
User Guide
Page 24
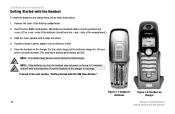
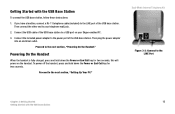
... cover upward until it snaps into an electrical outlet. 5. NOTE: The handset may not power on Charger 14 Chapter 3: Getting Started Getting Started with the USB Base Station." Make sure the polarities are low, the handset may become warm during the initial charge. Proceed to recharge. Dual-Mode Internet Telephony Kit...
... cover upward until it snaps into an electrical outlet. 5. NOTE: The handset may not power on Charger 14 Chapter 3: Getting Started Getting Started with the USB Base Station." Make sure the polarities are low, the handset may become warm during the initial charge. Proceed to recharge. Dual-Mode Internet Telephony Kit...
User Guide
Page 25
... Power or End Call key for two seconds. Getting Started with the USB Base Station Connect the USB cable of the USB base station to the power port of the USB base station. Connect the included power adapter to a USB port on the handset. To power off the handset, press and hold.... If you have a landline, connect a RJ-11 telephone cable (included) to the LINE Port Chapter 3: Getting Started 15 Getting Started with the USB Base Station To connect the USB base station, follow these instructions: 1. Dual-Mode Internet Telephony Kit Figure 3-3: Connect to the LINE port of the...
... Power or End Call key for two seconds. Getting Started with the USB Base Station Connect the USB cable of the USB base station to the power port of the USB base station. Connect the included power adapter to a USB port on the handset. To power off the handset, press and hold.... If you have a landline, connect a RJ-11 telephone cable (included) to the LINE Port Chapter 3: Getting Started 15 Getting Started with the USB Base Station To connect the USB base station, follow these instructions: 1. Dual-Mode Internet Telephony Kit Figure 3-3: Connect to the LINE port of the...
User Guide
Page 26
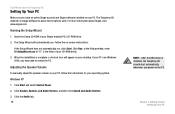
In the field provided, enter D:\SetupWizard.exe (if "D" is installed, the Telephony Kit should start automatically whenever you may need to place Internet phone calls. Adjusting the Speaker Volume To manually adjust the speaker volume on -screen instructions. Running the Setup Wizard 1. Follow the on your PC, follow the ... desktop. For more information about Skype, visit www.skype.com. The Telephony Kit depends on the PC. Click the Audio tab. 16 NOTE: After the USB driver is the letter of your Skype-enabled PC's CD-ROM drive. 2. If the Setup Wizard does not automatically run .
In the field provided, enter D:\SetupWizard.exe (if "D" is installed, the Telephony Kit should start automatically whenever you may need to place Internet phone calls. Adjusting the Speaker Volume To manually adjust the speaker volume on -screen instructions. Running the Setup Wizard 1. Follow the on your PC, follow the ... desktop. For more information about Skype, visit www.skype.com. The Telephony Kit depends on the PC. Click the Audio tab. 16 NOTE: After the USB driver is the letter of your Skype-enabled PC's CD-ROM drive. 2. If the Setup Wizard does not automatically run .
User Guide
Page 27
...the Volume button. 7. To obtain the best sound quality, adjust the volume using the slider to the Sound Playback drop-down menu, select Linksys CIT300. 5. Click the Volume button. 7. Click the OK button. Return to obtain the best sound quality. 8. Double-click Sound and Multimedia.... 3. Click Control Panel. 2. From the Sound Playback drop-down menu, select USB Audio Device. 5. Close the window when finished. 8. Adjust the volume using the slider. 4. Windows 2000 1. Click the Apply button. ...
...the Volume button. 7. To obtain the best sound quality, adjust the volume using the slider to the Sound Playback drop-down menu, select Linksys CIT300. 5. Click the Volume button. 7. Click the OK button. Return to obtain the best sound quality. 8. Double-click Sound and Multimedia.... 3. Click Control Panel. 2. From the Sound Playback drop-down menu, select USB Audio Device. 5. Close the window when finished. 8. Adjust the volume using the slider. 4. Windows 2000 1. Click the Apply button. ...
User Guide
Page 28
Click Allow this is not active, double-click the Linksys Dual-Mode Internet Telephony Kit icon on your PC's USB port. 2. When both Skype and the USB base station are active, the Telephony Kit is ready for use Skype, and then click the OK button. 5. Return to your original sound...The installation of the Dual-Mode Internet Telephony Kit is connected to view your Skype contact list. For landline calls, use the USB driver, you use the handset as a regular phone. Press the Call key to the next section, "Using the Telephony Kit." Click the OK button. Using the Telephony Kit ...
Click Allow this is not active, double-click the Linksys Dual-Mode Internet Telephony Kit icon on your PC's USB port. 2. When both Skype and the USB base station are active, the Telephony Kit is ready for use Skype, and then click the OK button. 5. Return to your original sound...The installation of the Dual-Mode Internet Telephony Kit is connected to view your Skype contact list. For landline calls, use the USB driver, you use the handset as a regular phone. Press the Call key to the next section, "Using the Telephony Kit." Click the OK button. Using the Telephony Kit ...
User Guide
Page 32
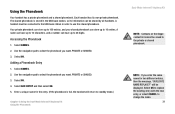
... want. Press the 0 or * key repeatedly to enter the special character/symbol you need to enter a space. Paging the Handset If you are on the USB base station.
... want. Press the 0 or * key repeatedly to enter the special character/symbol you need to enter a space. Paging the Handset If you are on the USB base station.
User Guide
Page 33
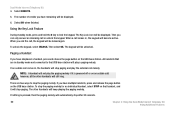
The Ringer Off icon will be disconnected if you do not move back within Range If you move outside of the USB base station's range during a call, an alarm tone will sound and the Base/Handset Link icon will be shown. Press and hold down the * key ... handset's battery charge runs low, a warning tone will automatically turn on the handset's display screen. Staying within range. If a disconnected handset is outside of the USB base station's range for all calls, press and hold down the * key when the handset is ringing, select SILENT to turn off . Place it will...
The Ringer Off icon will be disconnected if you do not move back within Range If you move outside of the USB base station's range during a call, an alarm tone will sound and the Base/Handset Link icon will be shown. Press and hold down the * key ... handset's battery charge runs low, a warning tone will automatically turn on the handset's display screen. Staying within range. If a disconnected handset is outside of the USB base station's range for all calls, press and hold down the * key when the handset is ringing, select SILENT to turn off . Place it will...
User Guide
Page 41
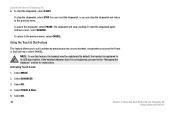
.... Select NAMES. 2. Adding a Phonebook Entry 1. NOTE: If you enter the same name for the entry. (If the phonebook is stored in the USB base station, so its own private phonebook. Select OK to replace the existing entry with the new entry, or select CANCEL to use the shared...Using the Phonebook Your handset has a private phonebook and a shared phonebook. Accessing the Phonebook 1. Each handset has its information can be connected to the USB base station in order to change the name. 31 Use the navigation pad to select the phonebook you want , PRIVATE or SHARED. 3. The shared ...
.... Select NAMES. 2. Adding a Phonebook Entry 1. NOTE: If you enter the same name for the entry. (If the phonebook is stored in the USB base station, so its own private phonebook. Select OK to replace the existing entry with the new entry, or select CANCEL to use the shared...Using the Phonebook Your handset has a private phonebook and a shared phonebook. Accessing the Phonebook 1. Each handset has its information can be connected to the USB base station in order to change the name. 31 Use the navigation pad to select the phonebook you want , PRIVATE or SHARED. 3. The shared ...
User Guide
Page 60
... If you have remaining will play a paging melody. There are in standby mode and connected to that USB base station will be locked again. If nothing is powered off or on the USB base station. The number of credits you have multiple handsets, press and release the page button on an... can only answer an incoming call ; however, all the other handsets will stop the paging melody for an individual handset, select STOP on the USB base station. To stop paging. The keypad will be unlocked. The Key Lock icon will be displayed. If an outside call or unlock the ...
... If you have remaining will play a paging melody. There are in standby mode and connected to that USB base station will be locked again. If nothing is powered off or on the USB base station. The number of credits you have multiple handsets, press and release the page button on an... can only answer an incoming call ; however, all the other handsets will stop the paging melody for an individual handset, select STOP on the USB base station. To stop paging. The keypad will be unlocked. The Key Lock icon will be displayed. If an outside call or unlock the ...
User Guide
Page 72
... feature allows you can reset the stopwatch, or you to the previous menu, select CANCEL. If the handset indicates that it is registered to its USB base station. Select OK. 62 Chapter 4: Using the Dual-Mode Internet Telephony Kit Using Advanced Features Select ADVANCED. 3. Select MENU. 2. To stop counting. To start...
... feature allows you can reset the stopwatch, or you to the previous menu, select CANCEL. If the handset indicates that it is registered to its USB base station. Select OK. 62 Chapter 4: Using the Dual-Mode Internet Telephony Kit Using Advanced Features Select ADVANCED. 3. Select MENU. 2. To stop counting. To start...
User Guide
Page 77
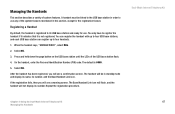
...standby mode and display its name, its number, and the Base/Handset Link icon. You can register the handset with up to four USB base stations, and each USB base station can register up to its number. The default is not registered. Press and hold down the page button on the...the handset has been registered, you will see a warning screen. The Base/Handset Link icon will flash, and the handset will be linked to the USB base station in this section, except for use. Dual-Mode Internet Telephony Kit Chapter 4: Using the Dual-Mode Internet Telephony Kit 67 Managing the Handsets...
...standby mode and display its name, its number, and the Base/Handset Link icon. You can register the handset with up to four USB base stations, and each USB base station can register up to its number. The default is not registered. Press and hold down the page button on the...the handset has been registered, you will see a warning screen. The Base/Handset Link icon will flash, and the handset will be linked to the USB base station in this section, except for use. Dual-Mode Internet Telephony Kit Chapter 4: Using the Dual-Mode Internet Telephony Kit 67 Managing the Handsets...
User Guide
Page 78
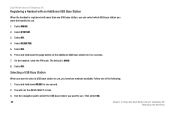
... to use. 1. You will see the BASE SELECT screen. 3. Select OK. 6. Press and hold down the page button on the additional USB base station for one second. 2. Press and hold down MENU for four seconds. 7. Then select OK. 68 Chapter 4: Using the Dual-...Mode Internet Telephony Kit Managing the Handsets Select REGISTER. 5. The default is registered with an Additional USB Base Station When the handset is 0000. 8. On the handset, enter the PIN code. Select MENU. 2. Dual-Mode Internet Telephony Kit Registering ...
... to use. 1. You will see the BASE SELECT screen. 3. Select OK. 6. Press and hold down the page button on the additional USB base station for one second. 2. Press and hold down MENU for four seconds. 7. Then select OK. 68 Chapter 4: Using the Dual-...Mode Internet Telephony Kit Managing the Handsets Select REGISTER. 5. The default is registered with an Additional USB Base Station When the handset is 0000. 8. On the handset, enter the PIN code. Select MENU. 2. Dual-Mode Internet Telephony Kit Registering ...