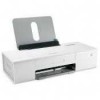

Getting Started
Page 2
... may not always be obvious. SAVE THESE INSTRUCTIONS. Lexmark is near the product and easily accessible. Operating system notice All features and functions are operating system-dependent. For complete descriptions: •...; Windows users-See the User's Guide. • Macintosh users-If your product supports Macintosh, see the Mac Help installed with the printer software. CAUTION: Do not set up this product or the manufacturer's authorized replacement power supply and power supply cord. Connect the power supply...
... may not always be obvious. SAVE THESE INSTRUCTIONS. Lexmark is near the product and easily accessible. Operating system notice All features and functions are operating system-dependent. For complete descriptions: •...; Windows users-See the User's Guide. • Macintosh users-If your product supports Macintosh, see the Mac Help installed with the printer software. CAUTION: Do not set up this product or the manufacturer's authorized replacement power supply and power supply cord. Connect the power supply...
Getting Started
Page 3
... on a Macintosh operating system 10 Setting up the printer for wireless printing 14 Setting up the printer using a USB cable...15 Installing the printer on additional network computers 16 Wireless networking...17 Networking overview...17 Learning about the printer 22 Understanding ...print cartridges...30 Removing a used print cartridge...30 Installing print cartridges...31 Ordering Supplies...32 Ordering print cartridges...32 Ordering paper and other supplies ...32 Troubleshooting...34 Setup troubleshooting...34 Power button is not lit ...34 Software does not install ...34 Page does not...
... on a Macintosh operating system 10 Setting up the printer for wireless printing 14 Setting up the printer using a USB cable...15 Installing the printer on additional network computers 16 Wireless networking...17 Networking overview...17 Learning about the printer 22 Understanding ...print cartridges...30 Removing a used print cartridge...30 Installing print cartridges...31 Ordering Supplies...32 Ordering print cartridges...32 Ordering paper and other supplies ...32 Troubleshooting...34 Setup troubleshooting...34 Power button is not lit ...34 Software does not install ...34 Page does not...

Getting Started
Page 12
6 Insert the power supply. 7 Connect the power cord. 8 Make sure the power is on. 2 1 9 Open the access cover. 12
6 Insert the power supply. 7 Connect the power cord. 8 Make sure the power is on. 2 1 9 Open the access cover. 12

Getting Started
Page 23
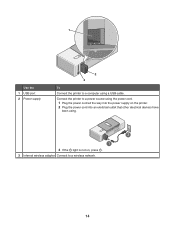
Use the 8 Paper support To Load paper. 1 Use the 1 USB port 2 Power supply 2 3 To Connect the printer to a wireless network. 23 Connect the printer to a power source using the power cord. 1 Plug the power cord all the way into the power supply on the printer. 2 Plug the power cord into an electrical outlet that other electrical devices have been using. 2 1 3 If the light is not on, press . 3 Internal wireless adapter Connect to a computer using a USB cable.
Use the 8 Paper support To Load paper. 1 Use the 1 USB port 2 Power supply 2 3 To Connect the printer to a wireless network. 23 Connect the printer to a power source using the power cord. 1 Plug the power cord all the way into the power supply on the printer. 2 Plug the power cord into an electrical outlet that other electrical devices have been using. 2 1 3 If the light is not on, press . 3 Internal wireless adapter Connect to a computer using a USB cable.
Getting Started
Page 34
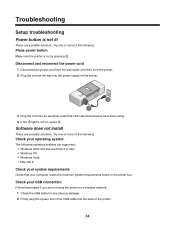
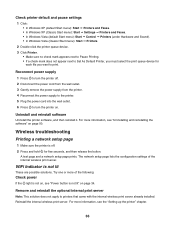
... Make sure the printer is on by pressing . Disconnect and reconnect the power cord 1 Disconnect the power cord from the wall outlet, and then from the printer. 2 Plug the cord all the way into the power supply on the printer. 2 1 3 Plug the cord into the back of the printer.... Troubleshooting Setup troubleshooting Power button is not lit These are supported: • Windows 2000 with Service Pack 3 or later • Windows XP • Windows Vista • Mac OS X Check your system requirements Check that other electrical devices have been using the printer on a wireless network: 1 Check...
... Make sure the printer is on by pressing . Disconnect and reconnect the power cord 1 Disconnect the power cord from the wall outlet, and then from the printer. 2 Plug the cord all the way into the power supply on the printer. 2 1 3 Plug the cord into the back of the printer.... Troubleshooting Setup troubleshooting Power button is not lit These are supported: • Windows 2000 with Service Pack 3 or later • Windows XP • Windows Vista • Mac OS X Check your system requirements Check that other electrical devices have been using the printer on a wireless network: 1 Check...
Getting Started
Page 35
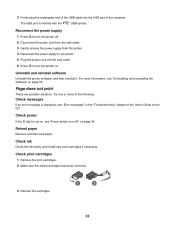
... to turn the printer on page 34. Reconnect the power supply 1 Press to turn the printer off. 2 Disconnect the power cord from the wall outlet. 3 Gently remove the power supply from the printer. 4 Reconnect the power supply to the printer. 5 Plug the power cord into the USB port of the User's Guide on...been removed. 3 Reinsert the cartridges. 1 2 35 Try one or more information, see "Uninstalling and reinstalling the software" on page 50. Check power If the light is not on, see "Error messages" in the "Troubleshooting" chapter of the computer. Check ink Check the ink levels, and...
... to turn the printer on page 34. Reconnect the power supply 1 Press to turn the printer off. 2 Disconnect the power cord from the wall outlet. 3 Gently remove the power supply from the printer. 4 Reconnect the power supply to the printer. 5 Plug the power cord into the USB port of the User's Guide on...been removed. 3 Reinsert the cartridges. 1 2 35 Try one or more information, see "Uninstalling and reinstalling the software" on page 50. Check power If the light is not on, see "Error messages" in the "Troubleshooting" chapter of the computer. Check ink Check the ink levels, and...
Getting Started
Page 36
...the light is not on page 34. Try one or more information, see "Power button is off . 2 Disconnect the power cord from the wall outlet. 3 Gently remove the power supply from the printer. 4 Reconnect the power supply to the printer. 5 Plug the power cord into the wall outlet. 6 Press to turn the printer off . ...optional internal print server Note: This solution does not apply to turn the printer on page 50. For more of the internal wireless print server. Reconnect power supply 1 Press to printers that came with the internal wireless print server already installed. Reinstall the internal...
...the light is not on page 34. Try one or more information, see "Power button is off . 2 Disconnect the power cord from the wall outlet. 3 Gently remove the power supply from the printer. 4 Reconnect the power supply to the printer. 5 Plug the power cord into the wall outlet. 6 Press to turn the printer off . ...optional internal print server Note: This solution does not apply to turn the printer on page 50. For more of the internal wireless print server. Reconnect power supply 1 Press to printers that came with the internal wireless print server already installed. Reinstall the internal...

User's Guide
Page 2
... or the manufacturer's authorized replacement power supply and power supply cord. SAVE THESE INSTRUCTIONS. The safety features of specific Lexmark components. Lexmark is near water or wet locations. Do not set up this product near the product and easily accessible. Operating system notice All features and functions are operating system-dependent. Connect the power supply cord to a properly grounded...
... or the manufacturer's authorized replacement power supply and power supply cord. SAVE THESE INSTRUCTIONS. The safety features of specific Lexmark components. Lexmark is near water or wet locations. Do not set up this product near the product and easily accessible. Operating system notice All features and functions are operating system-dependent. Connect the power supply cord to a properly grounded...
User's Guide
Page 4
... nozzles ...34 Wiping the print cartridge nozzles and contacts 35 Preserving the print cartridges...36 Ordering supplies...36 Using genuine Lexmark print cartridges 37 Refilling a print cartridge...37 Recycling Lexmark products...37 Troubleshooting...38 Setup troubleshooting...38 Power light is not lit...38 Software does not install ...38 Page does not print ...39 Print...
... nozzles ...34 Wiping the print cartridge nozzles and contacts 35 Preserving the print cartridges...36 Ordering supplies...36 Using genuine Lexmark print cartridges 37 Refilling a print cartridge...37 Recycling Lexmark products...37 Troubleshooting...38 Setup troubleshooting...38 Power light is not lit...38 Software does not install ...38 Page does not print ...39 Print...
User's Guide
Page 11
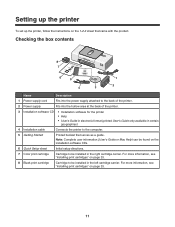
... directions. 7 Color print cartridge Cartridge to be installed in the right cartridge carrier. Checking the box contents 8 1 7 2 3 6 5 1 2 4 3 Name Description 1 Power supply cord Fits into the power supply attached to the back of the printer. 2 Power supply Fits into the hollow area at the back of the printer. 3 Installation software CD • Installation software for the printer...
... directions. 7 Color print cartridge Cartridge to be installed in the right cartridge carrier. Checking the box contents 8 1 7 2 3 6 5 1 2 4 3 Name Description 1 Power supply cord Fits into the power supply attached to the back of the printer. 2 Power supply Fits into the hollow area at the back of the printer. 3 Installation software CD • Installation software for the printer...
User's Guide
Page 14
1 Use the 1 USB port 2 Power supply 2 3 To Connect the printer to a computer using . 2 1 3 If the light is not on, press . 3 Internal wireless adapter Connect to a power source using the power cord. 1 Plug the power cord all the way into the power supply on the printer. 2 Plug the power cord into an electrical outlet that other electrical devices have been using a USB cable. Connect the printer to a wireless network. 14
1 Use the 1 USB port 2 Power supply 2 3 To Connect the printer to a computer using . 2 1 3 If the light is not on, press . 3 Internal wireless adapter Connect to a power source using the power cord. 1 Plug the power cord all the way into the power supply on the printer. 2 Plug the power cord into an electrical outlet that other electrical devices have been using a USB cable. Connect the printer to a wireless network. 14

User's Guide
Page 38
... computer. 2 Click Cancel on all the way into the power supply on the printer. 2 Plug the cord into an electrical outlet that your computer meets the minimum system requirements listed on the box. Troubleshooting Setup troubleshooting Power light is not lit Make sure you have been using. ...light is marked with Service Pack 3 or later • Windows XP • Windows Vista Solution 1 Check that other electrical devices have disconnected the power supply cord from the wall outlet and then from the printer. 1 Plug the cord all New Hardware Found screens. 3 Insert the CD, and then...
... computer. 2 Click Cancel on all the way into the power supply on the printer. 2 Plug the cord into an electrical outlet that your computer meets the minimum system requirements listed on the box. Troubleshooting Setup troubleshooting Power light is not lit Make sure you have been using. ...light is marked with Service Pack 3 or later • Windows XP • Windows Vista Solution 1 Check that other electrical devices have disconnected the power supply cord from the wall outlet and then from the printer. 1 Plug the cord all New Hardware Found screens. 3 Insert the CD, and then...
User's Guide
Page 39
...lexmark.com to check for drivers or downloads. 4 Select your printer family. 5 Select your printer model. 6 Select your operating system. 7 Select the file you want to turn the printer off. 2 Disconnect the power cord from the wall outlet. 3 Gently remove the power supply from the printer. 4 Reconnect the power supply... to the printer. 5 Plug the power cord into the wall outlet. 6 Press to download, and then follow...
...lexmark.com to check for drivers or downloads. 4 Select your printer family. 5 Select your printer model. 6 Select your operating system. 7 Select the file you want to turn the printer off. 2 Disconnect the power cord from the wall outlet. 3 Gently remove the power supply from the printer. 4 Reconnect the power supply... to the printer. 5 Plug the power cord into the wall outlet. 6 Press to download, and then follow...
User's Guide
Page 46
.... (The Continue button is available only at the beginning of a print job.) Note: A variable amount of a print job. Power light blinks rapidly There is out of paper in the middle of ink remains in this guide. Error messages troubleshooting These messages appear ...on your computer screen. To order supplies, click Order Ink on your computer screen. Blinking power light troubleshooting Power light blinks slowly The printer is a paper jam. Load more information, see "Ordering supplies" on page 36 in the black print cartridge. Follow these...
.... (The Continue button is available only at the beginning of a print job.) Note: A variable amount of a print job. Power light blinks rapidly There is out of paper in the middle of ink remains in this guide. Error messages troubleshooting These messages appear ...on your computer screen. To order supplies, click Order Ink on your computer screen. Blinking power light troubleshooting Power light blinks slowly The printer is a paper jam. Load more information, see "Ordering supplies" on page 36 in the black print cartridge. Follow these...

User's Guide
Page 50
...lexmark.com. 50 not applicable High Off The product is plugged into a wall outlet, but the power switch is waiting for remanufacturing, refilling or recycling. not applicable Ready The product is turned off mode which still consumes a small amount of power, then to stop product power consumption, disconnect the power supply...documents. End-user license agreement Opening this single use the print cartridge terminates, and the used cartridge must be multiplied by the time the product spends in power units of Watts, the power consumption should be returned only to calculate ...
...lexmark.com. 50 not applicable High Off The product is plugged into a wall outlet, but the power switch is waiting for remanufacturing, refilling or recycling. not applicable Ready The product is turned off mode which still consumes a small amount of power, then to stop product power consumption, disconnect the power supply...documents. End-user license agreement Opening this single use the print cartridge terminates, and the used cartridge must be multiplied by the time the product spends in power units of Watts, the power consumption should be returned only to calculate ...

User's Guide
Page 52
... poor text and graphic quality 43 portrait orientation, selecting 18 postcards loading 22 printing 24 power button 13 power light blinks rapidly 46 power light blinks slowly 46 power light is not lit 38 power supply 14 print cartridge cleaning 34 removing 32 wiping 35 print cartridge nozzles, cleaning 34 print ... page order 27 transparencies 27 Web page 27 Web page, photos only 28 publications, finding 7 Q Quality/Copies tab 18 R recycling Lexmark products 37 WEEE statement 49 removing print cartridge 32 reverse page order 27 S safety information 2 setup troubleshooting page does not print 39...
... poor text and graphic quality 43 portrait orientation, selecting 18 postcards loading 22 printing 24 power button 13 power light blinks rapidly 46 power light blinks slowly 46 power light is not lit 38 power supply 14 print cartridge cleaning 34 removing 32 wiping 35 print cartridge nozzles, cleaning 34 print ... page order 27 transparencies 27 Web page 27 Web page, photos only 28 publications, finding 7 Q Quality/Copies tab 18 R recycling Lexmark products 37 WEEE statement 49 removing print cartridge 32 reverse page order 27 S safety information 2 setup troubleshooting page does not print 39...


