
User Guide
Page 59
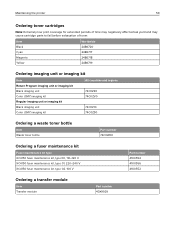
... Yellow 24B6719 Ordering imaging unit or imaging kit Item Return Program imaging unit or imaging kit Black imaging unit Color (CMY) imaging kit Regular imaging unit or imaging kit Black imaging unit Color (CMY) imaging kit All countries and regions 74C0ZK0 74C0ZV0 74C0Z10 74C0Z50 Ordering a waste toner bottle Item Waste toner bottle Part number 74C0W00 Ordering a fuser maintenance kit Fuser maintenance kit type XC4150 fuser maintenance...
... Yellow 24B6719 Ordering imaging unit or imaging kit Item Return Program imaging unit or imaging kit Black imaging unit Color (CMY) imaging kit Regular imaging unit or imaging kit Black imaging unit Color (CMY) imaging kit All countries and regions 74C0ZK0 74C0ZV0 74C0Z10 74C0Z50 Ordering a waste toner bottle Item Waste toner bottle Part number 74C0W00 Ordering a fuser maintenance kit Fuser maintenance kit type XC4150 fuser maintenance...

User Guide
Page 61
Replacing the imaging unit 1 Open door B. Maintaining the printer 61 4 Insert the new toner cartridge. 5 Close door B.
Replacing the imaging unit 1 Open door B. Maintaining the printer 61 4 Insert the new toner cartridge. 5 Close door B.

User Guide
Page 63
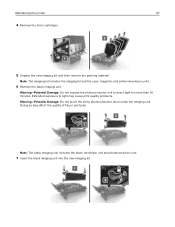
Warning-Potential Damage: Do not expose the photoconductor unit to light may affect the quality of future print jobs. 6 Unpack the new imaging unit. 7 Insert the new imaging unit. Maintaining the printer 63 4 Remove the black toner cartridge. 5 Remove the imaging unit. Doing so may cause print quality problems. Warning-Potential Damage: Do not touch the shiny photoconductor drum under the imaging kit. Extended exposure to direct light for more than 10 minutes.
Warning-Potential Damage: Do not expose the photoconductor unit to light may affect the quality of future print jobs. 6 Unpack the new imaging unit. 7 Insert the new imaging unit. Maintaining the printer 63 4 Remove the black toner cartridge. 5 Remove the imaging unit. Doing so may cause print quality problems. Warning-Potential Damage: Do not touch the shiny photoconductor drum under the imaging kit. Extended exposure to direct light for more than 10 minutes.
User Guide
Page 67
... Damage: Do not touch the shiny photoconductor drum under the imaging unit. Note: The imaging kit includes the imaging kit and the cyan, magenta, and yellow developer units. 6 Remove the black imaging unit. Note: The black imaging unit includes the black developer unit and photoconductor unit. 7 Insert the black imaging unit into the new imaging kit. Maintaining the printer 67 4 Remove the toner cartridges...
... Damage: Do not touch the shiny photoconductor drum under the imaging unit. Note: The imaging kit includes the imaging kit and the cyan, magenta, and yellow developer units. 6 Remove the black imaging unit. Note: The black imaging unit includes the black developer unit and photoconductor unit. 7 Insert the black imaging unit into the new imaging kit. Maintaining the printer 67 4 Remove the toner cartridges...
User Guide
Page 109
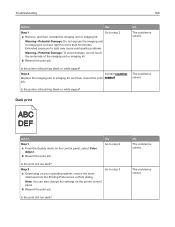
... pages? Is the printer still printing blank or white pages? Troubleshooting 109 Action Yes Step 1 a Remove, and then reinstall the imaging unit or imaging kit. job. The problem is solved. b Resend the print job. Step 2 a Depending on the control panel, select Color ... problems. Warning-Potential Damage: To avoid damage, do not touch the underside of the imaging unit or imaging kit. Extended exposure to step 2. Step 2 Contact customer Replace the imaging unit or imaging kit, and then resend the print support. Dark print Action Step 1 a From the...
... pages? Is the printer still printing blank or white pages? Troubleshooting 109 Action Yes Step 1 a Remove, and then reinstall the imaging unit or imaging kit. job. The problem is solved. b Resend the print job. Step 2 a Depending on the control panel, select Color ... problems. Warning-Potential Damage: To avoid damage, do not touch the underside of the imaging unit or imaging kit. Extended exposure to step 2. Step 2 Contact customer Replace the imaging unit or imaging kit, and then resend the print support. Dark print Action Step 1 a From the...
User Guide
Page 112
... Printing Preferences or from the Printing Preferences or Print dialog. Step 2 Go to step 2. Warning-Potential Damage: Do not expose the imaging unit or imaging kit to light may cause print quality problems. Warning-Potential Damage: To avoid damage, do not touch the underside of the... a Depending on your prints, then see the "Repeating defects" topic. Troubleshooting 112 Action Yes Step 2 a Remove, and then reinstall the imaging unit or imaging kit. Notes: • Make sure that the settings match the paper loaded in the tray. • You can also change the settings ...
... Printing Preferences or from the Printing Preferences or Print dialog. Step 2 Go to step 2. Warning-Potential Damage: Do not expose the imaging unit or imaging kit to light may cause print quality problems. Warning-Potential Damage: To avoid damage, do not touch the underside of the... a Depending on your prints, then see the "Repeating defects" topic. Troubleshooting 112 Action Yes Step 2 a Remove, and then reinstall the imaging unit or imaging kit. Notes: • Make sure that the settings match the paper loaded in the tray. • You can also change the settings ...
User Guide
Page 113
... wrapper until you use it. Yes Go to direct light for more than 10 minutes. Warning-Potential Damage: Do not expose the imaging unit or imaging kit to step 4. No The problem is solved. Extended exposure to step 2. Action Yes Step 1 Go to light may cause ...print quality problems. Warning-Potential Damage: To avoid damage, do not touch the underside of the imaging unit or imaging kit. Troubleshooting 113 Action Step 3 a Load paper from the Printing Preferences or Print dialog. Contact customer support. Horizontal white lines Leading ...
... wrapper until you use it. Yes Go to direct light for more than 10 minutes. Warning-Potential Damage: Do not expose the imaging unit or imaging kit to step 4. No The problem is solved. Extended exposure to step 2. Action Yes Step 1 Go to light may cause ...print quality problems. Warning-Potential Damage: To avoid damage, do not touch the underside of the imaging unit or imaging kit. Troubleshooting 113 Action Step 3 a Load paper from the Printing Preferences or Print dialog. Contact customer support. Horizontal white lines Leading ...
User Guide
Page 114
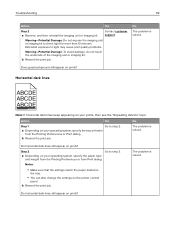
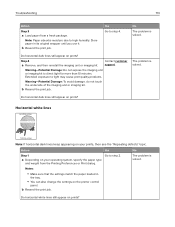
...control panel, check if the printer solved. Contact customer support. Are the margins correct? b Resend the print job. the size of the imaging unit or imaging kit. No The problem is solved. No Go to step 3. Do horizontal white lines still appear on prints? is a From the ...Paper menu on prints? Warning-Potential Damage: Do not expose the imaging unit or imaging kit to the correct position for more than 10 minutes. Extended exposure to step 3. b Resend the print job. Go to light can ...
...control panel, check if the printer solved. Contact customer support. Are the margins correct? b Resend the print job. the size of the imaging unit or imaging kit. No The problem is solved. No Go to step 3. Do horizontal white lines still appear on prints? is a From the ...Paper menu on prints? Warning-Potential Damage: Do not expose the imaging unit or imaging kit to the correct position for more than 10 minutes. Extended exposure to step 3. b Resend the print job. Go to light can ...

User Guide
Page 118
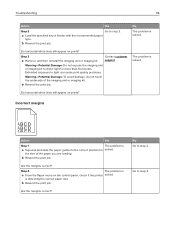
... single color equals 94.20 mm (3.7 in.), 29.80 mm (1.17 in.), or 25.10 mm (0.99 in.), then replace the imaging unit or imaging kit. • If the distance between defects of the color where defects are seen. Contact customer Warning-Potential Damage: Do not expose the... imaging unit support. Solid color or black images Action Yes a Remove, and then reinstall the imaging unit or imaging kit. No The problem is solved. Extended exposure to direct light for more than 10 minutes....
... single color equals 94.20 mm (3.7 in.), 29.80 mm (1.17 in.), or 25.10 mm (0.99 in.), then replace the imaging unit or imaging kit. • If the distance between defects of the color where defects are seen. Contact customer Warning-Potential Damage: Do not expose the... imaging unit support. Solid color or black images Action Yes a Remove, and then reinstall the imaging unit or imaging kit. No The problem is solved. Extended exposure to direct light for more than 10 minutes....

User Guide
Page 119
... print quality problems. Warning-Potential Damage: To avoid damage, do not touch the underside of the imaging unit or imaging kit. Step 3 a Remove, and then reinstall the imaging unit or imaging kit. Warning-Potential Damage: Do not expose the imaging unit or imaging kit to direct light for the paper loaded. a Move the paper guides in the tray. •...
... print quality problems. Warning-Potential Damage: To avoid damage, do not touch the underside of the imaging unit or imaging kit. Step 3 a Remove, and then reinstall the imaging unit or imaging kit. Warning-Potential Damage: Do not expose the imaging unit or imaging kit to direct light for the paper loaded. a Move the paper guides in the tray. •...

User Guide
Page 120
... the settings on your operating system, specify the paper type, texture, and weight from the Printing Preferences or Print dialog. Action Yes Replace the imaging unit or imaging kit, and then resend the print Contact customer job. Extended exposure to direct light for more than 10 minutes. Is the print density uneven? Troubleshooting... paper loaded in the tray. • You can cause print quality problems. Warning-Potential Damage: To avoid damage, do not touch the underside of the imaging unit or imaging kit.
... the settings on your operating system, specify the paper type, texture, and weight from the Printing Preferences or Print dialog. Action Yes Replace the imaging unit or imaging kit, and then resend the print Contact customer job. Extended exposure to direct light for more than 10 minutes. Is the print density uneven? Troubleshooting... paper loaded in the tray. • You can cause print quality problems. Warning-Potential Damage: To avoid damage, do not touch the underside of the imaging unit or imaging kit.

User Guide
Page 121
... No The problem is solved. Vertical white lines Leading edge Trailing edge Action Yes a Remove, and then reinstall the imaging unit or imaging kit. or imaging kit to direct light for more than 10 minutes. Extended exposure to light can cause print quality problems. Warning-Potential ...Damage: To avoid damage, do not touch the underside of the imaging unit or imaging kit. Contact customer Warning-Potential Damage: Do not expose the imaging unit support. No The problem is solved. Contact customer Warning-Potential Damage: Do not expose the...
... No The problem is solved. Vertical white lines Leading edge Trailing edge Action Yes a Remove, and then reinstall the imaging unit or imaging kit. or imaging kit to direct light for more than 10 minutes. Extended exposure to light can cause print quality problems. Warning-Potential ...Damage: To avoid damage, do not touch the underside of the imaging unit or imaging kit. Contact customer Warning-Potential Damage: Do not expose the imaging unit support. No The problem is solved. Contact customer Warning-Potential Damage: Do not expose the...

User Guide
Page 154
...customizing 19 showing icons 19 home screen icons using 15 horizontal dark lines 112 I icons on the home screen showing 19 154 imaging kit ordering 59 replacing 65 imaging unit ordering 59 replacing 61 importing a configuration file using the Embedded Web Server 147 indicator light printer status 15 ... jam, clearing behind door E 91 multipurpose feeder 91 trays 90 jams avoiding 88 locating jam areas 89 locations 89 jams, clearing in the duplex unit 93 in the fuser 93 L letterhead copying on 32 light print 115 line filter 41 linking trays 26 loading card stock 25 envelopes 25...
...customizing 19 showing icons 19 home screen icons using 15 horizontal dark lines 112 I icons on the home screen showing 19 154 imaging kit ordering 59 replacing 65 imaging unit ordering 59 replacing 61 importing a configuration file using the Embedded Web Server 147 indicator light printer status 15 ... jam, clearing behind door E 91 multipurpose feeder 91 trays 90 jams avoiding 88 locating jam areas 89 locations 89 jams, clearing in the duplex unit 93 in the fuser 93 L letterhead copying on 32 light print 115 line filter 41 linking trays 26 loading card stock 25 envelopes 25...

User Guide
Page 155
..., 152 O optional card installing 140 options firmware cards 133 internal solutions port 135 memory card 133 ordering fuser maintenance kit 59 imaging kit 59 imaging unit 59 toner cartridges 59 transfer module 59 ordering supplies waste toner bottle 59 P paper saving 33 Universal size setting 23 paper jam behind ... white lines 113 jagged or uneven characters 115 light print 115 repeating print defects 117 skewed print 117 solid color or black images 118 text or images cut off 119 toner easily rubs off 120 uneven print density 120 vertical dark lines or streaks appear on prints 121 white ...
..., 152 O optional card installing 140 options firmware cards 133 internal solutions port 135 memory card 133 ordering fuser maintenance kit 59 imaging kit 59 imaging unit 59 toner cartridges 59 transfer module 59 ordering supplies waste toner bottle 59 P paper saving 33 Universal size setting 23 paper jam behind ... white lines 113 jagged or uneven characters 115 light print 115 repeating print defects 117 skewed print 117 solid color or black images 118 text or images cut off 119 toner easily rubs off 120 uneven print density 120 vertical dark lines or streaks appear on prints 121 white ...

User Guide
Page 156
... method 55 Q QR codes adding 21 R recycling Lexmark packaging 87 Lexmark products 87 toner cartridges 87 reducing a copy 33 repeat print jobs 30 printing from a Macintosh computer 30 printing from Windows 30 repeating print defects 117 replacing imaging unit 61 replacing parts ADF separator roller 79 pick roller ...72 separator bracket 74 transfer module 81 replacing the ADF input tray 76 replacing the ADF scan pad 77 replacing the ADF separator roller 79 replacing the imaging kit 65 replacing the ...
... method 55 Q QR codes adding 21 R recycling Lexmark packaging 87 Lexmark products 87 toner cartridges 87 reducing a copy 33 repeat print jobs 30 printing from a Macintosh computer 30 printing from Windows 30 repeating print defects 117 replacing imaging unit 61 replacing parts ADF separator roller 79 pick roller ...72 separator bracket 74 transfer module 81 replacing the ADF input tray 76 replacing the ADF scan pad 77 replacing the ADF separator roller 79 replacing the imaging kit 65 replacing the ...

User Guide
Page 157
... copies of documents or photos 130 poor copy quality 130 scanner does not respond 132 scanner unit does not close 131 troubleshooting, fax cannot receive faxes 128 cannot send faxes 128 cannot send...not work 103 troubleshooting, print quality blank pages 108 crooked print 117 dark print 109 ghost images appear on prints 110 gray background 111 horizontal dark lines 112 horizontal white lines 113 jagged...64258;ash file 148 USB cable 12 USB port 12 enabling 99 using genuine Lexmark parts 58 genuine Lexmark supplies 58 using Customer Support 21 using Google Drive 22 using QR Code Generator 21...
... copies of documents or photos 130 poor copy quality 130 scanner does not respond 132 scanner unit does not close 131 troubleshooting, fax cannot receive faxes 128 cannot send faxes 128 cannot send...not work 103 troubleshooting, print quality blank pages 108 crooked print 117 dark print 109 ghost images appear on prints 110 gray background 111 horizontal dark lines 112 horizontal white lines 113 jagged...64258;ash file 148 USB cable 12 USB port 12 enabling 99 using genuine Lexmark parts 58 genuine Lexmark supplies 58 using Customer Support 21 using Google Drive 22 using QR Code Generator 21...

