User's Guide for Windows
Page 13
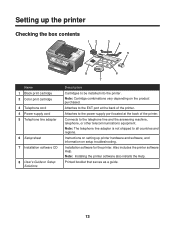
...Black print cartridge 2 Color print cartridge 3 Telephone cord 4 Power supply cord 5 Telephone line adapter 6 Setup sheet 7 Installation software CD 8 User's Guide or Setup Solutions 8 6 7 Description Cartridges to the EXT port at the back of the printer. Note: Installing the printer software also installs the..., or other telecommunications equipment. Printed booklet that serves as a guide. 13 Installation software for the printer. Setting up printer hardware and software, and information on the product purchased. Note: Cartridge combinations vary depending on setup ...
...Black print cartridge 2 Color print cartridge 3 Telephone cord 4 Power supply cord 5 Telephone line adapter 6 Setup sheet 7 Installation software CD 8 User's Guide or Setup Solutions 8 6 7 Description Cartridges to the EXT port at the back of the printer. Note: Installing the printer software also installs the..., or other telecommunications equipment. Printed booklet that serves as a guide. 13 Installation software for the printer. Setting up printer hardware and software, and information on the product purchased. Note: Cartridge combinations vary depending on setup ...
User's Guide for Windows
Page 14
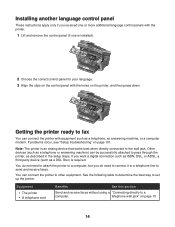
...the following table to determine the best way to pass through the printer, as described in the setup steps. Note: The printer is required. Other devices (such as a telephone or answering machine) can connect the printer to send and receive faxes. If problems occur, see "Setup...need to connect it to a telephone line to other equipment. You can be successfully attached to set up the printer. Equipment • The printer • A telephone cord Benefits See this section Send and receive faxes without using a "Connecting directly to the wall jack. Installing another language...
...the following table to determine the best way to pass through the printer, as described in the setup steps. Note: The printer is required. Other devices (such as a telephone or answering machine) can connect the printer to send and receive faxes. If problems occur, see "Setup...need to connect it to a telephone line to other equipment. You can be successfully attached to set up the printer. Equipment • The printer • A telephone cord Benefits See this section Send and receive faxes without using a "Connecting directly to the wall jack. Installing another language...
User's Guide for Windows
Page 15
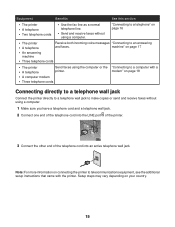
...voice messages "Connecting to make copies or send and receive faxes without using a computer. Equipment Benefits See this section • The printer • A telephone • Two telephone cords • Use the fax line as a normal telephone line. • Send and receive faxes without using a computer. 1 ...Make sure you have a telephone cord and a telephone wall jack. 2 Connect one end of the printer. LINE EXT 3 Connect the other end of the telephone cord into the LINE port of the telephone cord into an active telephone wall jack. Note: For more information...
...voice messages "Connecting to make copies or send and receive faxes without using a computer. Equipment Benefits See this section • The printer • A telephone • Two telephone cords • Use the fax line as a normal telephone line. • Send and receive faxes without using a computer. 1 ...Make sure you have a telephone cord and a telephone wall jack. 2 Connect one end of the printer. LINE EXT 3 Connect the other end of the telephone cord into the LINE port of the telephone cord into an active telephone wall jack. Note: For more information...
User's Guide for Windows
Page 16
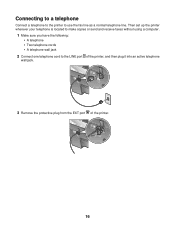
LINE EXT LINE EXT 3 Remove the protective plug from the EXT port of the printer, and then plug it into an active telephone wall jack. Then set up the printer wherever your telephone is located to make copies or send and receive faxes without using a computer. 1 Make sure you have the following: • A telephone • Two telephone cords • A telephone wall jack 2 Connect one telephone cord to use the fax line as a normal telephone line. LINE EXT LINE EXT 16 Connecting to a telephone Connect a telephone to the printer to the LINE port of the printer.
LINE EXT LINE EXT 3 Remove the protective plug from the EXT port of the printer, and then plug it into an active telephone wall jack. Then set up the printer wherever your telephone is located to make copies or send and receive faxes without using a computer. 1 Make sure you have the following: • A telephone • Two telephone cords • A telephone wall jack 2 Connect one telephone cord to use the fax line as a normal telephone line. LINE EXT LINE EXT 16 Connecting to a telephone Connect a telephone to the printer to the LINE port of the printer.
User's Guide for Windows
Page 17
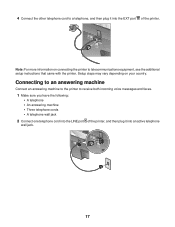
...steps may vary depending on connecting the printer to telecommunications equipment, see the additional setup instructions that came with the printer. LINE EXT LINE EXT 17 4 Connect the other telephone cord to a telephone, and then plug it into the EXT port of the printer, and then plug it into the... LINE port of the printer. LINE EXT Note: For more information on...
...steps may vary depending on connecting the printer to telecommunications equipment, see the additional setup instructions that came with the printer. LINE EXT LINE EXT 17 4 Connect the other telephone cord to a telephone, and then plug it into the EXT port of the printer, and then plug it into the... LINE port of the printer. LINE EXT Note: For more information on...

User's Guide for Windows
Page 18
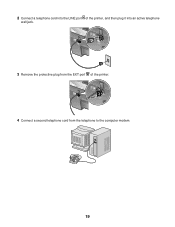
...the following: • A telephone • A computer with the printer. Setup steps may vary depending on connecting the printer to the EXT port of the printer. 3 Remove the protective plug from the EXT port of the printer. LINE EXT Note: For more information on your country. LINE EXT... LINE EXT 4 Connect a second telephone cord from the telephone to the answering machine. 5 Connect a third telephone cord from the answering machine to telecommunications equipment, see...
...the following: • A telephone • A computer with the printer. Setup steps may vary depending on connecting the printer to the EXT port of the printer. 3 Remove the protective plug from the EXT port of the printer. LINE EXT Note: For more information on your country. LINE EXT... LINE EXT 4 Connect a second telephone cord from the telephone to the answering machine. 5 Connect a third telephone cord from the answering machine to telecommunications equipment, see...
User's Guide for Windows
Page 19
LINE EXT LINE EXT 4 Connect a second telephone cord from the EXT port of the printer, and then plug it into an active telephone wall jack. 2 Connect a telephone cord into the LINE port of the printer. LINE EXT LINE EXT 3 Remove the protective plug from the telephone to the computer modem. 19
LINE EXT LINE EXT 4 Connect a second telephone cord from the EXT port of the printer, and then plug it into an active telephone wall jack. 2 Connect a telephone cord into the LINE port of the printer. LINE EXT LINE EXT 3 Remove the protective plug from the telephone to the computer modem. 19

User's Guide for Windows
Page 20
LINE EXT LINE EXT Note: For more information on your country. 20 5 Connect a third telephone cord from the computer modem to telecommunications equipment, see the additional setup instructions that came with the printer. Setup steps may vary depending on connecting the printer to the EXT port of the printer.
LINE EXT LINE EXT Note: For more information on your country. 20 5 Connect a third telephone cord from the computer modem to telecommunications equipment, see the additional setup instructions that came with the printer. Setup steps may vary depending on connecting the printer to the EXT port of the printer.
User's Guide for Windows
Page 102
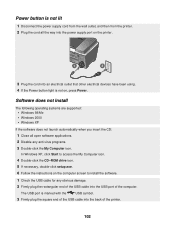
...My Computer icon. 4 Double-click the CD-ROM drive icon. 5 If necessary, double-click setup.exe. 6 Follow the instructions on the printer. 1 2 3 Plug the cord into an electrical outlet that other electrical devices have been using. 4 If the Power button light is marked with the USB symbol. 3 ...anti-virus programs. 3 Double-click the My Computer icon. Power button is not lit 1 Disconnect the power supply cord from the wall outlet, and then from the printer. 2 Plug the cord all open software applications. 2 Disable any obvious damage. 2 Firmly plug the rectangular end of the USB cable ...
...My Computer icon. 4 Double-click the CD-ROM drive icon. 5 If necessary, double-click setup.exe. 6 Follow the instructions on the printer. 1 2 3 Plug the cord into an electrical outlet that other electrical devices have been using. 4 If the Power button light is marked with the USB symbol. 3 ...anti-virus programs. 3 Double-click the My Computer icon. Power button is not lit 1 Disconnect the power supply cord from the wall outlet, and then from the printer. 2 Plug the cord all open software applications. 2 Disable any obvious damage. 2 Firmly plug the rectangular end of the USB cable ...
User's Guide for Windows
Page 104
... 125. See the digital camera documentation to turn the printer off. 2 Disconnect the power supply cord from the wall outlet. 3 Gently remove the power supply from the printer. 4 Reconnect the power supply to the printer. 5 Plug the power supply cord into the wall outlet. 6 Press Power to determine whether...quality at the edges of a document, make sure you are not satisfied with the camera. Use Lexmark Premium Photo Paper if you : • Use the appropriate paper for the document. 3 Click Printer. • Make sure no check mark appears next to Pause Printing. • Make sure a ...
... 125. See the digital camera documentation to turn the printer off. 2 Disconnect the power supply cord from the wall outlet. 3 Gently remove the power supply from the printer. 4 Reconnect the power supply to the printer. 5 Plug the power supply cord into the wall outlet. 6 Press Power to determine whether...quality at the edges of a document, make sure you are not satisfied with the camera. Use Lexmark Premium Photo Paper if you : • Use the appropriate paper for the document. 3 Click Printer. • Make sure no check mark appears next to Pause Printing. • Make sure a ...
User's Guide for Windows
Page 121
...occurs when the cartridge is marked with the USB symbol . 3 Firmly plug the square end of the USB cable into the USB port of the printer. Cartridge Error This includes the following cartridge errors: • 1105 • 1203 • 1204 • 1205 • 1206 Procedure 1 ...1 Remove the print cartridges. 2 Disconnect the power supply cord from the electrical outlet. 3 Reconnect the power supply cord to continue. Error messages Low Ink 1 Check the ink levels and install a new cartridge if necessary. Paper Jam See "Jams...
...occurs when the cartridge is marked with the USB symbol . 3 Firmly plug the square end of the USB cable into the USB port of the printer. Cartridge Error This includes the following cartridge errors: • 1105 • 1203 • 1204 • 1205 • 1206 Procedure 1 ...1 Remove the print cartridges. 2 Disconnect the power supply cord from the electrical outlet. 3 Reconnect the power supply cord to continue. Error messages Low Ink 1 Check the ink levels and install a new cartridge if necessary. Paper Jam See "Jams...


