
Clearing Jams Guide
Page 3
..., go to clear the entire width of paper as shown to refasten them. 11 Close the doors. 2 While holding down the latches. Clearing image transfer unit jams 1 Open the front access door and the left access door and the front access door. Let it cool before continuing. 3 Pull down the front... access door, insert a folded piece of the paper path. 3 Close the left access door. 6 Lift up to clear the paper sensors under the image transfer unit. CAUTION: The fuser assembly may be hot. If the jam persists, continue with step Turn the printer off. Open the front cover.. Clearing...
..., go to clear the entire width of paper as shown to refasten them. 11 Close the doors. 2 While holding down the latches. Clearing image transfer unit jams 1 Open the front access door and the left access door and the front access door. Let it cool before continuing. 3 Pull down the front... access door, insert a folded piece of the paper path. 3 Close the left access door. 6 Lift up to clear the paper sensors under the image transfer unit. CAUTION: The fuser assembly may be hot. If the jam persists, continue with step Turn the printer off. Open the front cover.. Clearing...
Troubleshooting Guide
Page 5
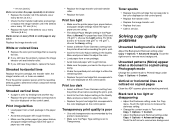
...8226; Avoid textured paper with rough finishes. • Make sure the paper you are using. • Replace the image transfer unit and transfer roller. • Replace the fuser. Touch the right arrow to increase the darkness setting. • Change the content mode to the color displayed on the control ...occur every 60 mm (2.4 in.) • Check the first transfer bellcranks and springs or replace the image transfer unit if the defects occur every 101 mm (4 in.) • Replace the fuser if the defects occur every 148 mm (5.8 in.) Marks occur on the control panel. • Replace the ...
...8226; Avoid textured paper with rough finishes. • Make sure the paper you are using. • Replace the image transfer unit and transfer roller. • Replace the fuser. Touch the right arrow to increase the darkness setting. • Change the content mode to the color displayed on the control ...occur every 60 mm (2.4 in.) • Check the first transfer bellcranks and springs or replace the image transfer unit if the defects occur every 101 mm (4 in.) • Replace the fuser if the defects occur every 148 mm (5.8 in.) Marks occur on the control panel. • Replace the ...
User's Guide
Page 87
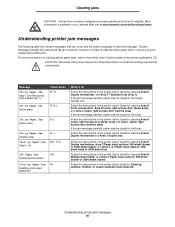
... publications CD. If the jam message persists, paper may be caught in the image transfer unit. Follow the instructions in the fuser. CAUTION: The inside of the printer may be caught in the fuser. Follow the instructions in the printer User's Guide for clearing Area D Front access door,... input options: 500-sheet drawer or 2000-sheet drawer. Allow the printer to the printer User's Guide located on our Lexmark Web site at www.lexmark.com/multifunctionprinters. Understanding printer jam messages The following table lists the jam messages that can occur and the action necessary to...
... publications CD. If the jam message persists, paper may be caught in the image transfer unit. Follow the instructions in the fuser. CAUTION: The inside of the printer may be caught in the fuser. Follow the instructions in the printer User's Guide for clearing Area D Front access door,... input options: 500-sheet drawer or 2000-sheet drawer. Allow the printer to the printer User's Guide located on our Lexmark Web site at www.lexmark.com/multifunctionprinters. Understanding printer jam messages The following table lists the jam messages that can occur and the action necessary to...


