Clearing Jams Guide
Page 4
...and place it off . a Pull up , and push gently to open the multipurpose feeder (area A) all the print cartridges. b Rotate the handle up slightly on a clean, flat surface. c Place the cartridges on the handle. 9 Insert the image transfer unit back into the printer. 4 Turn the printer off the guides. Open...damage the image transfer unit. b Pull down on a clean, flat surface out of direct light. a Raise the lever to lift it on the cartridge handhold. b Pull the cartridge straight out and use the handle to unlock the image transfer unit. 8 Look inside the printer.
...and place it off . a Pull up , and push gently to open the multipurpose feeder (area A) all the print cartridges. b Rotate the handle up slightly on a clean, flat surface. c Place the cartridges on the handle. 9 Insert the image transfer unit back into the printer. 4 Turn the printer off the guides. Open...damage the image transfer unit. b Pull down on a clean, flat surface out of direct light. a Raise the lever to lift it on the cartridge handhold. b Pull the cartridge straight out and use the handle to unlock the image transfer unit. 8 Look inside the printer.
Clearing Jams Guide
Page 5
The printer returns to its working position. Reinstall all the print cartridges. 11 Close the printer door. 12 Turn the printer on . 2 Contact your administrator or Help desk if you still need help 1 Turn the printer off and then back on . c Lower the lever to lock the image transfer unit into place. 10 Return the multipurpose feeder to a Ready state. If you need more assistance.
The printer returns to its working position. Reinstall all the print cartridges. 11 Close the printer door. 12 Turn the printer on . 2 Contact your administrator or Help desk if you still need help 1 Turn the printer off and then back on . c Lower the lever to lock the image transfer unit into place. 10 Return the multipurpose feeder to a Ready state. If you need more assistance.
Troubleshooting Guide
Page 4
...meets specifications. • Guides are positioned correctly for service. Top to Bottom or Left to match the type of the tray or on the Lexmark Web site at the front of media loaded. Call 1-800LEXMARK for the paper size selected. The page that can help isolate print quality problems, ... the printer door, and make sure all the pages print. The Paper Jam message remains after you turn the printer on a page: • Replace the cartridge if the defects occur every: - 38 mm (1.5 in.) - 48 mm (1.9 in the ADF • Adjust the guides toward the media until you remove...
...meets specifications. • Guides are positioned correctly for service. Top to Bottom or Left to match the type of the tray or on the Lexmark Web site at the front of media loaded. Call 1-800LEXMARK for the paper size selected. The page that can help isolate print quality problems, ... the printer door, and make sure all the pages print. The Paper Jam message remains after you turn the printer on a page: • Replace the cartridge if the defects occur every: - 38 mm (1.5 in.) - 48 mm (1.9 in the ADF • Adjust the guides toward the media until you remove...
Troubleshooting Guide
Page 5
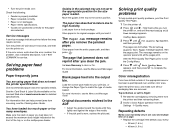
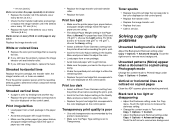
... Advanced Imaging. Print too dark • Select a different Toner Darkness setting from another tray. • Replace the print cartridge that corresponds to Transparency. Transparency print quality is poor • Use only transparencies recommended by the printer's manufacturer. • Make ... • Replace the image transfer unit. • Replace the fuser. • Call for service. Streaked horizontal lines Replace the print cartridge, the transfer roller, the image transfer unit, or fuser as needed. Print irregularities • Load paper from a new package. •...
... Advanced Imaging. Print too dark • Select a different Toner Darkness setting from another tray. • Replace the print cartridge that corresponds to Transparency. Transparency print quality is poor • Use only transparencies recommended by the printer's manufacturer. • Make ... • Replace the image transfer unit. • Replace the fuser. • Call for service. Streaked horizontal lines Replace the print cartridge, the transfer roller, the image transfer unit, or fuser as needed. Print irregularities • Load paper from a new package. •...
User's Guide
Page 11
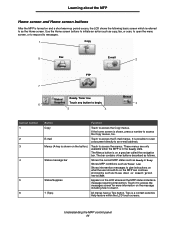
... turned on and a short warm-up period occurs, the LCD shows the following basic screen which is referred to as Close door or insert print cartridge. The bar contains other buttons described as Ready or Busy. Touch it . ? (Tips) All menus have a Tips button. Understanding the MFP control panel 11 Status...
... turned on and a short warm-up period occurs, the LCD shows the following basic screen which is referred to as Close door or insert print cartridge. The bar contains other buttons described as Ready or Busy. Touch it . ? (Tips) All menus have a Tips button. Understanding the MFP control panel 11 Status...
User's Guide
Page 70
...8226; Do not use preprinted card stock manufactured with the MFP before purchasing a large quantity. Partial sheets also contaminate the MFP and your cartridge with paper or transparencies in the same source; Adhesive material contaminates the MFP and could void the MFP and... to prevent labels from peeling inside the MFP. • Portrait orientation is single ply, and has a large array of the adhesive at www.lexmark.com/publications. We recommend zone coating of properties, such as the moisture content, thickness, and texture, that have exposed adhesive. Selecting print media ...
...8226; Do not use preprinted card stock manufactured with the MFP before purchasing a large quantity. Partial sheets also contaminate the MFP and your cartridge with paper or transparencies in the same source; Adhesive material contaminates the MFP and could void the MFP and... to prevent labels from peeling inside the MFP. • Portrait orientation is single ply, and has a large array of the adhesive at www.lexmark.com/publications. We recommend zone coating of properties, such as the moisture content, thickness, and texture, that have exposed adhesive. Selecting print media ...
User's Guide
Page 114
... feeder 62 trays 1, 2, 3 58, 60 Start button 10 static sensitivity notice 3 status message bar 11 Stop button 10 supplies recycling 80 T time stamp 23 toner cartridge recycling 80 transparencies loading input tray 57 transparencies, copying 24 tray linking 62 tray selection 25 troubleshooting settings software application overrides 8 U USB Direct interface 49...
... feeder 62 trays 1, 2, 3 58, 60 Start button 10 static sensitivity notice 3 status message bar 11 Stop button 10 supplies recycling 80 T time stamp 23 toner cartridge recycling 80 transparencies loading input tray 57 transparencies, copying 24 tray linking 62 tray selection 25 troubleshooting settings software application overrides 8 U USB Direct interface 49...

