
Troubleshooting Guide
Page 1
... USB device unsupported appears when using a USB device For information regarding tested and approved USB flash memory devices, see our Lexmark Web site at www.lexmark.com. Job takes longer than expected to print The job is too complex Reduce the complexity of held jobs and deleting others...Check the Print as image box. 4 Click OK. Solving printing problems The operator panel display is not securely connected Make sure you have properly configured the printer for Direct USB printing. You are using the wrong printer driver or are printing to a file • Verify you are using ...
... USB device unsupported appears when using a USB device For information regarding tested and approved USB flash memory devices, see our Lexmark Web site at www.lexmark.com. Job takes longer than expected to print The job is too complex Reduce the complexity of held jobs and deleting others...Check the Print as image box. 4 Click OK. Solving printing problems The operator panel display is not securely connected Make sure you have properly configured the printer for Direct USB printing. You are using the wrong printer driver or are printing to a file • Verify you are using ...

Troubleshooting Guide
Page 4
... Paper menu. • Verify the print media is installed correctly. • The Toner Darkness setting may be printed. The MFP enters the Configuration menu. 6 Touch Print Quality Pages. 7 Touch Exit Configuration Menu. Toner smears or print comes off . 4 Hold down the number 2 and number 6 keys on the numeric pad. 5 Continue to be...
... Paper menu. • Verify the print media is installed correctly. • The Toner Darkness setting may be printed. The MFP enters the Configuration menu. 6 Touch Print Quality Pages. 7 Touch Exit Configuration Menu. Toner smears or print comes off . 4 Hold down the number 2 and number 6 keys on the numeric pad. 5 Continue to be...

User's Guide
Page 4
Contents Chapter 1: Learning about the MFP 9 Identifying the MFP 9 Using the scanner 11 Configured models 13 Understanding the MFP control panel 14 Using the LCD touch-screen buttons 21 Menus ...27 Chapter 2: Copying 28 Quick copy ...28 Multiple page ...
Contents Chapter 1: Learning about the MFP 9 Identifying the MFP 9 Using the scanner 11 Configured models 13 Understanding the MFP control panel 14 Using the LCD touch-screen buttons 21 Menus ...27 Chapter 2: Copying 28 Quick copy ...28 Multiple page ...

User's Guide
Page 7
... shield 123 Chapter 10: Understanding the MFP 124 Determining the status of supplies 125 Conserving supplies 126 Ordering supplies 126 Recycling Lexmark products 131 Cleaning the scanner glass (flatbed) and backing material 132 Scanner registration 132 Moving the MFP 134 Chapter 11: ...Administrative support 135 Adjusting control panel brightness 135 Restoring factory default settings 135 Adjusting screen timeout 136 Adjusting Power Saver 136 Configuring the MFP 136 Using the restricted server list function 145 Chapter 12: Clearing jams 146 Identifying jams 146 Access doors and...
... shield 123 Chapter 10: Understanding the MFP 124 Determining the status of supplies 125 Conserving supplies 126 Ordering supplies 126 Recycling Lexmark products 131 Cleaning the scanner glass (flatbed) and backing material 132 Scanner registration 132 Moving the MFP 134 Chapter 11: ...Administrative support 135 Adjusting control panel brightness 135 Restoring factory default settings 135 Adjusting screen timeout 136 Adjusting Power Saver 136 Configuring the MFP 136 Using the restricted server list function 145 Chapter 12: Clearing jams 146 Identifying jams 146 Access doors and...

User's Guide
Page 13
... additional furniture for stability. More information is available on our Lexmark Web site at www.lexmark.com/ multifunctionprinters. 1 Scanner 2 Standard output bin 3 Control panel 4 Multipurpose feeder 5 Tray 1 (integrated tray or standard tray) 6 Duplex unit 7 Tray 2 (500 sheets) 13 Certain other configurations also must use either a printer stand or printer base if using a 2000...
... additional furniture for stability. More information is available on our Lexmark Web site at www.lexmark.com/ multifunctionprinters. 1 Scanner 2 Standard output bin 3 Control panel 4 Multipurpose feeder 5 Tray 1 (integrated tray or standard tray) 6 Duplex unit 7 Tray 2 (500 sheets) 13 Certain other configurations also must use either a printer stand or printer base if using a 2000...
User's Guide
Page 27
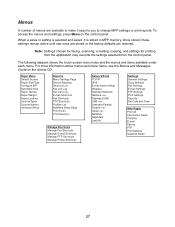
Paper Menu Default Source Paper Size/Type Configure MP Substitute Size Paper Texture Paper Weight Paper Loading Custom Types Custom Names Universal Setup Reports Menu Settings Page Device Statistics Shortcut List Fax Job ...
Paper Menu Default Source Paper Size/Type Configure MP Substitute Size Paper Texture Paper Weight Paper Loading Custom Types Custom Names Universal Setup Reports Menu Settings Page Device Statistics Shortcut List Fax Job ...

User's Guide
Page 40
3 E-mail The MFP can be created in the Manage Destinations link located under the Configuration tab on the Web page. Permanent e-mail destinations can type the e-mail address, use a shortcut number, use the address book, or a profile. For more information ...
3 E-mail The MFP can be created in the Manage Destinations link located under the Configuration tab on the Web page. Permanent e-mail destinations can type the e-mail address, use a shortcut number, use the address book, or a profile. For more information ...

User's Guide
Page 43
... want to send. • PDF: This creates a single file with multiple pages, viewable with Adobe Reader. If Multi-page TIFF is turned off in the Configuration menu, then TIFF saves one page in each page of the original document, and is viewable by Adobe at http://www.adobe.com. • TIFF...
... want to send. • PDF: This creates a single file with multiple pages, viewable with Adobe Reader. If Multi-page TIFF is turned off in the Configuration menu, then TIFF saves one page in each page of the original document, and is viewable by Adobe at http://www.adobe.com. • TIFF...

User's Guide
Page 44
... frame). Creating an e-mail shortcut From a computer 1 Enter the IP address of the MFP into the URL field (address bar) of the Web browser. 2 Click Configuration (in the left frame), and then click Manage Destinations (in the automatic document feeder facing up, short-edge first. 8 Touch E-mail. 9 Press #, and then enter...
... frame). Creating an e-mail shortcut From a computer 1 Enter the IP address of the MFP into the URL field (address bar) of the Web browser. 2 Click Configuration (in the left frame), and then click Manage Destinations (in the automatic document feeder facing up, short-edge first. 8 Touch E-mail. 9 Press #, and then enter...

User's Guide
Page 45
To create a group of the MFP you want to configure using the format: http://ip_address/. 2 Click Configuration. 3 Click E-mail/FTP Settings. 4 Click Manage E-mail Shortcuts. 5 Fill in the ADF facing up, short-edge first, and adjust the paper guides. 2 Touch E-mail. 3 Enter ...
To create a group of the MFP you want to configure using the format: http://ip_address/. 2 Click Configuration. 3 Click E-mail/FTP Settings. 4 Click Manage E-mail Shortcuts. 5 Fill in the ADF facing up, short-edge first, and adjust the paper guides. 2 Touch E-mail. 3 Enter ...

User's Guide
Page 46
... be turned on or off with your selection and return you to the e-mail Options screen. • When Original Size is turned off in the Configuration menu, then TIFF saves one page in each in grayscale only. 46 Choose from Text, Text/Photo, or Photo. Text/Photo: Used when the original...
... be turned on or off with your selection and return you to the e-mail Options screen. • When Original Size is turned off in the Configuration menu, then TIFF saves one page in each in grayscale only. 46 Choose from Text, Text/Photo, or Photo. Text/Photo: Used when the original...
User's Guide
Page 47
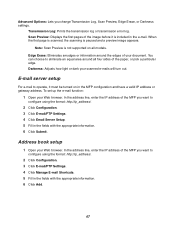
.... 6 Click Submit. In the address line, enter the IP address of the MFP you want to operate, it is included in the MFP configuration and have a valid IP address or gateway address. Note: Scan Preview is paused and a preview image appears. Darkness: Adjusts how light or... is not supported on in the e-mail. To set up the e-mail function: 1 Open your Web browser. You can choose to configure using the format: http://ip_address/. 2 Click Configuration. 3 Click E-mail/FTP Settings. 4 Click Manage E-mail Shortcuts. 5 Fill in the fields with the appropriate information. 6 Click Add...
.... 6 Click Submit. In the address line, enter the IP address of the MFP you want to operate, it is included in the MFP configuration and have a valid IP address or gateway address. Note: Scan Preview is paused and a preview image appears. Darkness: Adjusts how light or... is not supported on in the e-mail. To set up the e-mail function: 1 Open your Web browser. You can choose to configure using the format: http://ip_address/. 2 Click Configuration. 3 Click E-mail/FTP Settings. 4 Click Manage E-mail Shortcuts. 5 Fill in the fields with the appropriate information. 6 Click Add...

User's Guide
Page 49
... this and other chapters. You enter the fax number and touch Fax It to fit your fax. When you scan items and fax them to configure the MFP for faxing. During initial MFP setup, you may be required to one or more recipients directly from a computer Understanding fax options Changing the...
... this and other chapters. You enter the fax number and touch Fax It to fit your fax. When you scan items and fax them to configure the MFP for faxing. During initial MFP setup, you may be required to one or more recipients directly from a computer Understanding fax options Changing the...

User's Guide
Page 50
... (1-99999) can assign shortcut numbers when creating permanent fax destinations. The dial pause will appear as a comma in the Manage Destinations link located under the Configuration tab on the Web page. You can contain a single recipient or multiple recipients. Note: To place a two-second dialing pause within a fax number, use a shortcut...
... (1-99999) can assign shortcut numbers when creating permanent fax destinations. The dial pause will appear as a comma in the Manage Destinations link located under the Configuration tab on the Web page. You can contain a single recipient or multiple recipients. Note: To place a two-second dialing pause within a fax number, use a shortcut...

User's Guide
Page 52
... MFP touch screen. Note: Separate each time you want to send a fax, you do not know the IP address, see your system support person. 2 Click Configuration (in the left frame of your browser window), and then click Manage Destinations (in the automatic document feeder facing up, short-edge first. 8 From the...
... MFP touch screen. Note: Separate each time you want to send a fax, you do not know the IP address, see your system support person. 2 Click Configuration (in the left frame of your browser window), and then click Manage Destinations (in the automatic document feeder facing up, short-edge first. 8 From the...

User's Guide
Page 58
Note: If you do not have a TCP/IP environment, you want to access the MFP IP address and then entering the Configure menu. Performing manual fax setup Performing browser fax setup Performing manual fax setup 1 Press Menu. 2 Touch Settings. 3 Touch Fax Settings. 4 Touch General Fax Settings. 5 Touch ...
Note: If you do not have a TCP/IP environment, you want to access the MFP IP address and then entering the Configure menu. Performing manual fax setup Performing browser fax setup Performing manual fax setup 1 Press Menu. 2 Touch Settings. 3 Touch Fax Settings. 4 Touch General Fax Settings. 5 Touch ...

User's Guide
Page 59
... send or receive a fax, an entry of your options for example, http:// 192.168.236.24), and then press Enter. 2 Click Configuration. 3 Under the MFP heading, click Fax Setup. 4 Click Configuration. Changing optional settings such as Eastern (USA and Canada, Eastern Standard Time). Performing browser fax setup Note...: Configuration is configured to get the correct time. 5 Enter the required FCC information: • Date and time (current date and time) • Station name (...
... send or receive a fax, an entry of your options for example, http:// 192.168.236.24), and then press Enter. 2 Click Configuration. 3 Under the MFP heading, click Fax Setup. 4 Click Configuration. Changing optional settings such as Eastern (USA and Canada, Eastern Standard Time). Performing browser fax setup Note...: Configuration is configured to get the correct time. 5 Enter the required FCC information: • Date and time (current date and time) • Station name (...

User's Guide
Page 60
Sending a document to an FTP server is that you scan documents directly to at a time. Once an FTP destination has been configured by your network instead of the destination becomes available as a shortcut number or listed as a profile under the Held Jobs icon. The difference is similar ...
Sending a document to an FTP server is that you scan documents directly to at a time. Once an FTP destination has been configured by your network instead of the destination becomes available as a shortcut number or listed as a profile under the Held Jobs icon. The difference is similar ...

User's Guide
Page 61
... the control panel each time you want to add to an FTP, you do not know the IP address, see your system support person. 2 Click Configuration (in the left frame of your browser window) and then click Manage Destinations (in the right frame of your Web browser. Using the address book...
... the control panel each time you want to add to an FTP, you do not know the IP address, see your system support person. 2 Click Configuration (in the left frame of your browser window) and then click Manage Destinations (in the right frame of your Web browser. Using the address book...

User's Guide
Page 62
... legal size pages). Resolution: Adjusts the output quality of files. 62 If Multi-page TIFF is a single file. PDF output is turned off in the Configuration menu, then TIFF saves one page in each in the ADF facing up, short-edge first, and adjust the paper guides. 2 Touch FTP. 3 Enter the...
... legal size pages). Resolution: Adjusts the output quality of files. 62 If Multi-page TIFF is a single file. PDF output is turned off in the Configuration menu, then TIFF saves one page in each in the ADF facing up, short-edge first, and adjust the paper guides. 2 Touch FTP. 3 Enter the...


