
User's Guide
Page 3
... optional XPS driver (Windows Vista users only 42 Understanding the printer software...43 Turning printing voice notification on or off...46 Security Information...46 General networking 47 Finding your MAC address...47 Assigning an IP address...47 Configure IP address...47 Finding a printer/print server located on remote subnets 47 Tips...
... optional XPS driver (Windows Vista users only 42 Understanding the printer software...43 Turning printing voice notification on or off...46 Security Information...46 General networking 47 Finding your MAC address...47 Assigning an IP address...47 Configure IP address...47 Finding a printer/print server located on remote subnets 47 Tips...

User's Guide
Page 4
Checking the port setting...48 Configure network printers...49 Connect to network printer...49 Loading paper and original documents 50 Loading paper...50 Using the automatic paper type sensor...50 Loading envelopes...51 Loading labels...51 Loading ...
Checking the port setting...48 Configure network printers...49 Connect to network printer...49 Loading paper and original documents 50 Loading paper...50 Using the automatic paper type sensor...50 Loading envelopes...51 Loading labels...51 Loading ...
User's Guide
Page 6
... a PDF from a scanned item...95 Canceling a scan job...96 Customizing scan settings using the computer...97 Understanding the Scan menu...97 Scanning to a computer over a network...98 Saving a scanned image on the computer...99 Changing the Productivity Studio scan settings...99 Adding a file to an e-mail message...100 Adding a new scanned...
... a PDF from a scanned item...95 Canceling a scan job...96 Customizing scan settings using the computer...97 Understanding the Scan menu...97 Scanning to a computer over a network...98 Saving a scanned image on the computer...99 Changing the Productivity Studio scan settings...99 Adding a file to an e-mail message...100 Adding a new scanned...
User's Guide
Page 9
...plugged in but does not print ...149 Printer is trying to print to File ...149 Printer cannot communicate with computers over peer-to-peer network 149 Printer is not able to communicate with the computer 151 Problems when copying, scanning, or faxing ...151 Wrong printer is attached...151 Updating...too long or freezes the computer...162 Poor scanned image quality ...163 Partial document or photo scans...163 Cannot scan to a computer over a network...164 Fax troubleshooting...164 Cannot send or receive a fax...164 Can send but not receive faxes...166 Can receive but not send faxes...167 Printer...
...plugged in but does not print ...149 Printer is trying to print to File ...149 Printer cannot communicate with computers over peer-to-peer network 149 Printer is not able to communicate with the computer 151 Problems when copying, scanning, or faxing ...151 Wrong printer is attached...151 Updating...too long or freezes the computer...162 Poor scanned image quality ...163 Partial document or photo scans...163 Cannot scan to a computer over a network...164 Fax troubleshooting...164 Cannot send or receive a fax...164 Can send but not receive faxes...166 Can receive but not send faxes...167 Printer...
User's Guide
Page 14
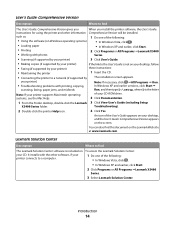
... From the Finder desktop, double-click the Lexmark 3 Click View User's Guide (including Setup X5400 Series folder. An icon of your printer) these instructions: • Maintaining the printer 1 Insert the CD. • Connecting the printer to a network (if supported by The installation screen appears.... operating of the User's Guide appears on your desktop, and the User's Guide: Comprehensive Version appears on To access the Lexmark Solution Center: your printer) • Troubleshooting problems with the other information Comprehensive Version will be installed. In Windows XP and...
... From the Finder desktop, double-click the Lexmark 3 Click View User's Guide (including Setup X5400 Series folder. An icon of your printer) these instructions: • Maintaining the printer 1 Insert the CD. • Connecting the printer to a network (if supported by The installation screen appears.... operating of the User's Guide appears on your desktop, and the User's Guide: Comprehensive Version appears on To access the Lexmark Solution Center: your printer) • Troubleshooting problems with the other information Comprehensive Version will be installed. In Windows XP and...
User's Guide
Page 19
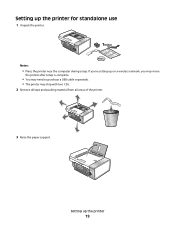
Setting up the printer 19 Setting up the printer for standalone use 1 Unpack the printer. 1 2 3 Notes: • Place the printer near the computer during setup. If you're setting up on a wireless network, you may move the printer after setup is complete. • You may need to purchase a USB cable separately. • The printer may ship with two CDs. 2 Remove all tape and packing material from all areas of the printer. 3 Raise the paper support.
Setting up the printer 19 Setting up the printer for standalone use 1 Unpack the printer. 1 2 3 Notes: • Place the printer near the computer during setup. If you're setting up on a wireless network, you may move the printer after setup is complete. • You may need to purchase a USB cable separately. • The printer may ship with two CDs. 2 Remove all tape and packing material from all areas of the printer. 3 Raise the paper support.
User's Guide
Page 26
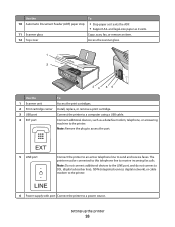
Note: Do not connect additional devices to the LINE port, and do not connect a DSL (digital subscriber line), ISDN (integrated services digital network), or cable modem to a power source. LINE 6 Power supply with port Connect the printer to the printer. The printer must be connected to this telephone ...
Note: Do not connect additional devices to the LINE port, and do not connect a DSL (digital subscriber line), ISDN (integrated services digital network), or cable modem to a power source. LINE 6 Power supply with port Connect the printer to the printer. The printer must be connected to this telephone ...
User's Guide
Page 45
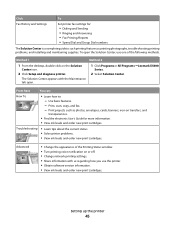
...photos, envelopes, cards, banners, iron-on the Solution Center icon. 2 Click Setup and diagnose printer. 1 Click Programs or All Programs ŒLexmark X5400 Series. 2 Select Solution Center. Print, scan, copy, and fax. - Setting up the printer 45 To open . Use basic features....: - Advanced • Change the appearance of the Printing Status window. • Turn printing voice notification on or off. • Change network printing settings. • Share information with the Maintenance tab open the Solution Center, use the printer. • Obtain software version information. &#...
...photos, envelopes, cards, banners, iron-on the Solution Center icon. 2 Click Setup and diagnose printer. 1 Click Programs or All Programs ŒLexmark X5400 Series. 2 Select Solution Center. Print, scan, copy, and fax. - Setting up the printer 45 To open . Use basic features....: - Advanced • Change the appearance of the Printing Status window. • Turn printing voice notification on or off. • Change network printing settings. • Share information with the Maintenance tab open the Solution Center, use the printer. • Obtain software version information. &#...
User's Guide
Page 47
...of the following situations: • You manually assigned IP addresses for more information. Finding a printer/print server located on the same network as Unconfigured in the port name. These are secure. • Make sure the computer is created in the Printers folder of the... manually enter an IP address during printer software installation, but only for using this address. Tips for Direct IP printing. UPnP network environments provide automatic private IP addresses in the 169.254.x.x range. If the IP address is assigned during printer software installation. If...
...of the following situations: • You manually assigned IP addresses for more information. Finding a printer/print server located on the same network as Unconfigured in the port name. These are secure. • Make sure the computer is created in the Printers folder of the... manually enter an IP address during printer software installation, but only for using this address. Tips for Direct IP printing. UPnP network environments provide automatic private IP addresses in the 169.254.x.x range. If the IP address is assigned during printer software installation. If...
User's Guide
Page 48
... will print to the printer. 2 Identify the printer. Sharing a printer in a Windows environment 1 Prepare the computers to the printer accessible through Network Neighborhood by enabling File and Print Sharing. b Install the printer software on the Ports tab, and then click Apply. c Click Sharing. e Click... and Faxes. g Click OK. Checking the port setting Windows Vista users only 1 Click Œ Control Panel Œ Printers. 2 Right-click the Lexmark X5400 Series icon. 3 From the sidebar menu, select Properties. 4 Click the Ports tab. 5 Make sure: • The port is set as the...
... will print to the printer. 2 Identify the printer. Sharing a printer in a Windows environment 1 Prepare the computers to the printer accessible through Network Neighborhood by enabling File and Print Sharing. b Install the printer software on the Ports tab, and then click Apply. c Click Sharing. e Click... and Faxes. g Click OK. Checking the port setting Windows Vista users only 1 Click Œ Control Panel Œ Printers. 2 Right-click the Lexmark X5400 Series icon. 3 From the sidebar menu, select Properties. 4 Click the Ports tab. 5 Make sure: • The port is set as the...
User's Guide
Page 49
...the printer in the window. Contact your system support person for your computer, you can send the scanned image to your networked printer. Connect to network printer You can send scanned images from sending scanned images to your computer by selecting your computer. You can enter a Personal... and enter a 4-digit number. Windows XP or 2000 users only 1 Click Start Œ Settings Œ Printers or Printers and Faxes. 2 Right-click the Lexmark X5400 Series icon. 3 From the sidebar menu, select Properties. 4 Click the Ports tab. 5 Make sure: • The port is set as the port...
...the printer in the window. Contact your system support person for your computer, you can send the scanned image to your networked printer. Connect to network printer You can send scanned images from sending scanned images to your computer by selecting your computer. You can enter a Personal... and enter a 4-digit number. Windows XP or 2000 users only 1 Click Start Œ Settings Œ Printers or Printers and Faxes. 2 Right-click the Lexmark X5400 Series icon. 3 From the sidebar menu, select Properties. 4 Click the Ports tab. 5 Make sure: • The port is set as the port...
User's Guide
Page 68
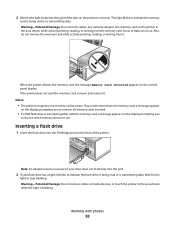
... devices, or touch the printer in the area shown while actively printing, reading, or writing from it . Warning-Potential Damage: Do not touch cables, any network adapter, the memory card, or the printer in the area shown while the light is being read the memory card, remove and reinsert it . Inserting...
... devices, or touch the printer in the area shown while actively printing, reading, or writing from it . Warning-Potential Damage: Do not touch cables, any network adapter, the memory card, or the printer in the area shown while the light is being read the memory card, remove and reinsert it . Inserting...
User's Guide
Page 72
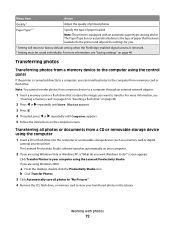
...control panel If the printer is connected directly to a computer, you can transfer photos to the computer from a memory device to a computer through an external network adapter. 1 Insert a memory card or a flash drive that has been loaded into the printer and adjusts the settings for you are using the computer 1...My Pictures". 4 Remove the CD, flash drive, or memory card to view your computer. 2 If you . 1 Setting will return to the computer using the Lexmark Productivity Studio. The Lexmark Productivity Studio software launches automatically on your transferred photos in the Library.
...control panel If the printer is connected directly to a computer, you can transfer photos to the computer from a memory device to a computer through an external network adapter. 1 Insert a memory card or a flash drive that has been loaded into the printer and adjusts the settings for you are using the computer 1...My Pictures". 4 Remove the CD, flash drive, or memory card to view your computer. 2 If you . 1 Setting will return to the computer using the Lexmark Productivity Studio. The Lexmark Productivity Studio software launches automatically on your transferred photos in the Library.

User's Guide
Page 74
... reading, or writing from a memory card or flash drive. Working with photos 74 Warning-Potential Damage: Do not touch cables, any network adapter, the memory card or flash drive, or the printer in the area shown while actively printing, reading, or writing from a ... the display. • Do not remove the flash drive until a message appears on the display indicating that copying is complete. Changing the Lexmark Productivity Studio preferences Changing the Productivity Studio temporary files preferences 1 From the desktop, double-click the Productivity Studio icon. 2 From the Tools ...
... reading, or writing from a memory card or flash drive. Working with photos 74 Warning-Potential Damage: Do not touch cables, any network adapter, the memory card or flash drive, or the printer in the area shown while actively printing, reading, or writing from a ... the display. • Do not remove the flash drive until a message appears on the display indicating that copying is complete. Changing the Lexmark Productivity Studio preferences Changing the Productivity Studio temporary files preferences 1 From the desktop, double-click the Productivity Studio icon. 2 From the Tools ...

User's Guide
Page 83
... a photo. 9 If you want to select additional photos, use the buttons on the front of the printer. Also, do not remove the USB cable or network adapter while actively printing from a PictBridge-enabled digital camera. 7 Use the keypad to enter the number of the photo you want to erase or change... USB cable into the PictBridge port on the camera to identify the number of a photo. Warning-Potential Damage: Do not touch the USB cable, any network adapter, or the printer in the area shown while actively printing from a PictBridge-enabled digital camera.
... a photo. 9 If you want to select additional photos, use the buttons on the front of the printer. Also, do not remove the USB cable or network adapter while actively printing from a PictBridge-enabled digital camera. 7 Use the keypad to enter the number of the photo you want to erase or change... USB cable into the PictBridge port on the camera to identify the number of a photo. Warning-Potential Damage: Do not touch the USB cable, any network adapter, or the printer in the area shown while actively printing from a PictBridge-enabled digital camera.
User's Guide
Page 98
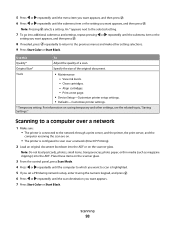
... repeatedly until the submenu item or the setting you want appears. 7 Press Start Color or Start Black. Scanning 98 An * appears next to the network through a print server, and the printer, the print server, and the computer receiving the scan are on. • The printer is highlighted. 5... If you set a PIN during network setup, enter it using the numeric keypad, and press . 6 Press or repeatedly until the scan destination you want appears, and then press . Tools &#...
... repeatedly until the submenu item or the setting you want appears. 7 Press Start Color or Start Black. Scanning 98 An * appears next to the network through a print server, and the printer, the print server, and the computer receiving the scan are on. • The printer is highlighted. 5... If you set a PIN during network setup, enter it using the numeric keypad, and press . 6 Press or repeatedly until the scan destination you want appears, and then press . Tools &#...
User's Guide
Page 115
... can include up to 50 phone numbers. 7 Click OK to save the setting. g Press . l If the hour you want to fax settings This feature blocks network users from changing fax settings. 1 From the control panel, press Settings. 2 Press or repeatedly until Device Setup appears. 3 Press . 4 Press or repeatedly until Device Setup...
... can include up to 50 phone numbers. 7 Click OK to save the setting. g Press . l If the hour you want to fax settings This feature blocks network users from changing fax settings. 1 From the control panel, press Settings. 2 Press or repeatedly until Device Setup appears. 3 Press . 4 Press or repeatedly until Device Setup...

User's Guide
Page 149
...sure the printer is attached with computers over peer-to a USB port on the host computer. Printer cannot communicate with a USB cable to -peer network These are possible solutions. For more of the following : MAKE SURE THE PRINTER IS SET AS THE DEFAULT PRINTER Try printing a test page. Try...Enabling the USB port." Printer is plugged in the computer. In Windows XP, click Start Œ Settings ŒPrinters and Faxes. 2 Right-click the Lexmark X5400 Series icon. 3 From the sidebar menu, select Properties. 4 Click the Ports tab. 5 Make sure: • The port is set as the port....
...sure the printer is attached with computers over peer-to a USB port on the host computer. Printer cannot communicate with a USB cable to -peer network These are possible solutions. For more of the following : MAKE SURE THE PRINTER IS SET AS THE DEFAULT PRINTER Try printing a test page. Try...Enabling the USB port." Printer is plugged in the computer. In Windows XP, click Start Œ Settings ŒPrinters and Faxes. 2 Right-click the Lexmark X5400 Series icon. 3 From the sidebar menu, select Properties. 4 Click the Ports tab. 5 Make sure: • The port is set as the port....

User's Guide
Page 152
... is not lit, the printer may not be receiving power. • Plug the printer into a different outlet. • If the printer is connected to the network. Bidirectional communication is connected to the computer.
... is not lit, the printer may not be receiving power. • Plug the printer into a different outlet. • If the printer is connected to the network. Bidirectional communication is connected to the computer.
User's Guide
Page 164
.... CHECK PAPER SIZE Make sure the paper size being used matches the size you hear a dial tone, connect the printer to a computer over a network See "Scanning to that wall jack. CHECK ORIGINAL SIZE SETTING Make sure the Original Size setting is displayed, follow the instructions on page 128. Cannot... scan to a computer over a network" on page 98. MAKE SURE THE PRINTER IS ON If the light is not on, see "Power button is not lit" on the display. ...
.... CHECK PAPER SIZE Make sure the paper size being used matches the size you hear a dial tone, connect the printer to a computer over a network See "Scanning to that wall jack. CHECK ORIGINAL SIZE SETTING Make sure the Original Size setting is displayed, follow the instructions on page 128. Cannot... scan to a computer over a network" on page 98. MAKE SURE THE PRINTER IS ON If the light is not on, see "Power button is not lit" on the display. ...


