
User Guide
Page 4
...63 Copying from one size to another...63 Making copies using paper from a selected tray ...64 Copying on both sides of the paper (duplexing) ...64 Reducing or enlarging copies ...65 Making a copy lighter or darker ...65 Adjusting copy quality...66 Collating copies...66 Placing separator sheets...mail using a shortcut number ...71 Sending an e-mail using the address book ...72 Canceling an e-mail...72 Faxing 73 Getting the printer ready to fax...73 Initial fax setup...74 Choosing a fax connection...75 Connecting to an analog telephone line ...76 Connecting to a DSL service ...76 Connecting to a PBX...
...63 Copying from one size to another...63 Making copies using paper from a selected tray ...64 Copying on both sides of the paper (duplexing) ...64 Reducing or enlarging copies ...65 Making a copy lighter or darker ...65 Adjusting copy quality...66 Collating copies...66 Placing separator sheets...mail using a shortcut number ...71 Sending an e-mail using the address book ...72 Canceling an e-mail...72 Faxing 73 Getting the printer ready to fax...73 Initial fax setup...74 Choosing a fax connection...75 Connecting to an analog telephone line ...76 Connecting to a DSL service ...76 Connecting to a PBX...

User Guide
Page 5
......91 Customizing fax settings...91 Changing the fax resolution ...91 Making a fax lighter or darker ...92 Sending a fax at a scheduled time...92 Viewing a fax log...92 Canceling an outgoing fax...93 Understanding fax options...93 Original Size ...93 Content...93 Sides (Duplex) ...93 Resolution...94 Darkness...94 Improving fax quality...94 Holding and forwarding faxes...94 Holding faxes...94 Forwarding a fax ...95...
......91 Customizing fax settings...91 Changing the fax resolution ...91 Making a fax lighter or darker ...92 Sending a fax at a scheduled time...92 Viewing a fax log...92 Canceling an outgoing fax...93 Understanding fax options...93 Original Size ...93 Content...93 Sides (Duplex) ...93 Resolution...94 Darkness...94 Improving fax quality...94 Holding and forwarding faxes...94 Holding faxes...94 Forwarding a fax ...95...

User Guide
Page 6
......119 Active NIC menu...119 Network menu ...119 Wireless menu...120 USB menu ...121 Settings menu...123 General Settings menu ...123 Copy Settings menu ...126 Fax Settings menu...128 Flash Drive menu ...134 Print Settings ...137 Set Date and Time ...146 Understanding printer messages 148 List of status and error messages...
......119 Active NIC menu...119 Network menu ...119 Wireless menu...120 USB menu ...121 Settings menu...123 General Settings menu ...123 Copy Settings menu ...126 Fax Settings menu...128 Flash Drive menu ...134 Print Settings ...137 Set Date and Time ...146 Understanding printer messages 148 List of status and error messages...

User Guide
Page 8
......200 Caller ID is not shown...200 Cannot send or receive a fax...201 Can send but not receive faxes...202 Can receive but not send faxes...203 Received fax has poor print quality...203 Blocking junk faxes...204 Solving option problems...204 Option does not operate correctly or quits... have jagged or uneven edges ...207 Clipped images...208 Dark lines ...208 Gray background ...208 Incorrect margins...209 Light colored line, white line, or incorrectly colored line 209 Paper curl...210 Print irregularities ...210 Repeating defects...211 Skewed print...211 Print is too light ...211 Print...
......200 Caller ID is not shown...200 Cannot send or receive a fax...201 Can send but not receive faxes...202 Can receive but not send faxes...203 Received fax has poor print quality...203 Blocking junk faxes...204 Solving option problems...204 Option does not operate correctly or quits... have jagged or uneven edges ...207 Clipped images...208 Dark lines ...208 Gray background ...208 Incorrect margins...209 Light colored line, white line, or incorrectly colored line 209 Paper curl...210 Print irregularities ...210 Repeating defects...211 Skewed print...211 Print is too light ...211 Print...

User Guide
Page 12
... printer, unplug the power cord from the wall outlet and disconnect all cables from the printer before proceeding. CAUTION-SHOCK HAZARD: Do not use the fax feature during a lightning storm. Refer service or repairs, other than those described in the user documentation, to a professional service person. Do not set up this...
... printer, unplug the power cord from the wall outlet and disconnect all cables from the printer before proceeding. CAUTION-SHOCK HAZARD: Do not use the fax feature during a lightning storm. Refer service or repairs, other than those described in the user documentation, to a professional service person. Do not set up this...
User Guide
Page 16
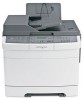
...; Make quick copies, or change the settings on the printer control panel to perform specific copy jobs. • Send a fax using the printer control panel. • Send a fax to multiple fax destinations at the same time. • Scan documents and send them to -network capability for workgroups. Printer configurations Basic models... 6 Standard 250-sheet tray (Tray 1) 7 Manual feeder 8 Optional 650-sheet duo drawer (Tray 2) Basic functions of the scanner The scanner provides copy, fax, and scan-to your computer, an e-mail address, or a USB flash memory device. Learning about the printer 16
...; Make quick copies, or change the settings on the printer control panel to perform specific copy jobs. • Send a fax using the printer control panel. • Send a fax to multiple fax destinations at the same time. • Scan documents and send them to -network capability for workgroups. Printer configurations Basic models... 6 Standard 250-sheet tray (Tray 1) 7 Manual feeder 8 Optional 650-sheet duo drawer (Tray 2) Basic functions of the scanner The scanner provides copy, fax, and scan-to your computer, an e-mail address, or a USB flash memory device. Learning about the printer 16
User Guide
Page 18
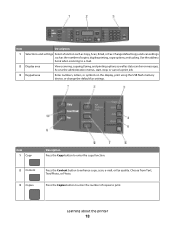
...copy function. 2 Content 3 Copies Press the Content button to e-mail. 2 Display area View scanning, copying, faxing, and printing options as well as Copy, Scan, Email, or Fax. Choose from Text, Text/Photo, or Photo. Learning about the printer 18 Item Description 1 Selections and settings Select... a function such as status and error messages. Use the address book when scanning to enhance copy, scan, e-mail, or fax quality. Access the administration menus, start, stop, or cancel a print job. 3 Keypad area Enter numbers, letters, or symbols on the display...
...copy function. 2 Content 3 Copies Press the Content button to e-mail. 2 Display area View scanning, copying, faxing, and printing options as well as Copy, Scan, Email, or Fax. Choose from Text, Text/Photo, or Photo. Learning about the printer 18 Item Description 1 Selections and settings Select... a function such as status and error messages. Use the address book when scanning to enhance copy, scan, e-mail, or fax quality. Access the administration menus, start, stop, or cancel a print job. 3 Keypad area Enter numbers, letters, or symbols on the display...
User Guide
Page 19
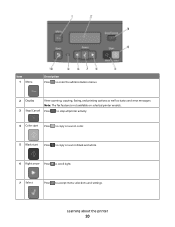
Learning about the printer 19 Note: Fax mode is not available on both sides of the copied document to fit onto the currently selected paper size. 5 Options Press the Options button to ... settings. 6 Address Book Press to enter the address book. 7 Darkness Press the Darkness button to adjust the current darkness settings. 8 Duplex 2-Sided Press the Duplex 2-Sided button to e-mail function. Note: The duplex feature is not available on selected printer models. 10 Scan/Email Press the Scan/Email button to enter the scan...
Learning about the printer 19 Note: Fax mode is not available on both sides of the copied document to fit onto the currently selected paper size. 5 Options Press the Options button to ... settings. 6 Address Book Press to enter the address book. 7 Darkness Press the Darkness button to adjust the current darkness settings. 8 Duplex 2-Sided Press the Duplex 2-Sided button to e-mail function. Note: The duplex feature is not available on selected printer models. 10 Scan/Email Press the Scan/Email button to enter the scan...
User Guide
Page 20
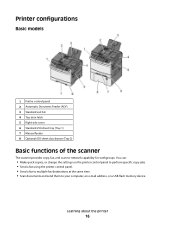
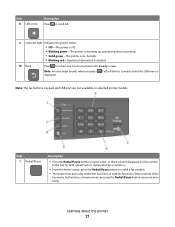
Item 1 Menu Description Press to enter the administration menus. 2 Display View scanning, copying, faxing, and printing options as well as status and error messages Note: The fax feature is not available on selected printer models. 3 Stop/Cancel Press to stop all printer activity. 4 Color start Press to copy or scan in color. 5 Black start Press to copy or scan in black and white. 6 Right arrow Press to scroll right. 7 Select Press to accept menu selections and settings. Learning about the printer 20
Item 1 Menu Description Press to enter the administration menus. 2 Display View scanning, copying, faxing, and printing options as well as status and error messages Note: The fax feature is not available on selected printer models. 3 Stop/Cancel Press to stop all printer activity. 4 Color start Press to copy or scan in color. 5 Black start Press to copy or scan in black and white. 6 Right arrow Press to scroll right. 7 Select Press to accept menu selections and settings. Learning about the printer 20
User Guide
Page 21
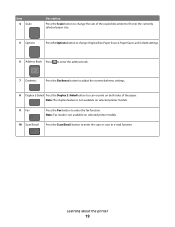
...• Blinking red-Operator intervention is needed. 10 Back Press to return one screen at a time to redial a fax number. • The button functions only within the Fax menu or with fax functions. In the Fax To: field, a Dial Pause is represented by a comma (,). • From the home screen, press the Redial...Note: An error beep sounds when you press if a flash drive is connected and the USB menu is displayed. Learning about the printer 21 When outside of the Fax menu, fax function, or home screen, pressing the Redial/Pause button causes an error beep. or three-second dial pause in...
...• Blinking red-Operator intervention is needed. 10 Back Press to return one screen at a time to redial a fax number. • The button functions only within the Fax menu or with fax functions. In the Fax To: field, a Dial Pause is represented by a comma (,). • From the home screen, press the Redial...Note: An error beep sounds when you press if a flash drive is connected and the USB menu is displayed. Learning about the printer 21 When outside of the Fax menu, fax function, or home screen, pressing the Redial/Pause button causes an error beep. or three-second dial pause in...
User Guide
Page 32
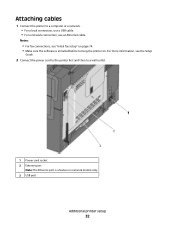
For more information, see "Initial fax setup" on page 74. • Make sure the software is a feature on . Attaching cables 1 Connect the printer to a wall outlet. 1 Power cord socket 2 Ethernet port Note: The Ethernet port is installed before turning the printer on network models only. 3 USB port Additional printer setup 32 Notes: • For fax connections, see the Setup Guide. 2 Connect the power cord to the printer first and then to a computer or a network. • For a local connection, use a USB cable. • For a network connection, use an Ethernet cable.
For more information, see "Initial fax setup" on page 74. • Make sure the software is a feature on . Attaching cables 1 Connect the printer to a wall outlet. 1 Power cord socket 2 Ethernet port Note: The Ethernet port is installed before turning the printer on network models only. 3 USB port Additional printer setup 32 Notes: • For fax connections, see the Setup Guide. 2 Connect the power cord to the printer first and then to a computer or a network. • For a local connection, use a USB cable. • For a network connection, use an Ethernet cable.

User Guide
Page 35
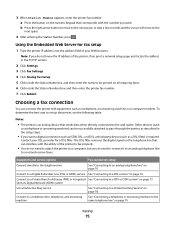
... Macintosh users In Mac OS X version 10.5 1 From the Apple menu, choose System Preferences. 2 Click Print & Fax. 3 Select the printer, and then click Options & Supplies. 4 Click Driver, and then add any installed hardware options. 6 Click Apply. In Windows XP a Click Start. b Click ...
... Macintosh users In Mac OS X version 10.5 1 From the Apple menu, choose System Preferences. 2 Click Print & Fax. 3 Select the printer, and then click Options & Supplies. 4 Click Driver, and then add any installed hardware options. 6 Click Apply. In Windows XP a Click Start. b Click ...

User Guide
Page 60
For Macintosh users In Mac OS X version 10.5: 1 From the Apple menu, choose System Preferences. 2 Click Print & Fax, and then double-click the printer icon. 3 From the printer window, select the job to cancel. 4 From the icon bar at the top of the ... the printer icon. 4 From the printer window, select the job to cancel. 3 From the keyboard, press Delete. In Windows XP: 1 Click Start. 2 From Printers and Faxes, double-click the printer icon. 3 Select the job to cancel. 7 From the keyboard, press Delete. A list of print jobs appears in the right corner of...
For Macintosh users In Mac OS X version 10.5: 1 From the Apple menu, choose System Preferences. 2 Click Print & Fax, and then double-click the printer icon. 3 From the printer window, select the job to cancel. 4 From the icon bar at the top of the ... the printer icon. 4 From the printer window, select the job to cancel. 3 From the keyboard, press Delete. In Windows XP: 1 Click Start. 2 From Printers and Faxes, double-click the printer icon. 3 Select the job to cancel. 7 From the keyboard, press Delete. A list of print jobs appears in the right corner of...

User Guide
Page 73
...set up this product or make any electrical or cabling connections, such as magazine clippings). Faxing 73 Use the scanner glass for multiple-page documents. Getting the printer ready to fax The following connection methods may not be applicable in the area shown while actively sending or ...receiving a fax. Faxing ADF Scanner glass Use the ADF for single pages, small items (such as postcards or ...
...set up this product or make any electrical or cabling connections, such as magazine clippings). Faxing 73 Use the scanner glass for multiple-page documents. Getting the printer ready to fax The following connection methods may not be applicable in the area shown while actively sending or ...receiving a fax. Faxing ADF Scanner glass Use the ADF for single pages, small items (such as postcards or ...

User Guide
Page 74
...to that button appears. The display changes to the next space. 2 After entering the Station Name, press . When you must use your fax setup information. Note: If you do not have a TCP/IP environment, then you press the button again, one of start-up screens appear.... the business, other entity, or individual sending the message) and station number (telephone number of the sending fax machine, business, other entity, or individual). Faxing 74 To enter your fax setup information, use the printer control panel, or use the printer control panel to enter your browser to access...
...to that button appears. The display changes to the next space. 2 After entering the Station Name, press . When you must use your fax setup information. Note: If you do not have a TCP/IP environment, then you press the button again, one of start-up screens appear.... the business, other entity, or individual sending the message) and station number (telephone number of the sending fax machine, business, other entity, or individual). Faxing 74 To enter your fax setup information, use the printer control panel, or use the printer control panel to enter your browser to access...
User Guide
Page 75
... DSL filter. The DSL filter removes the digital signal on the telephone line that works best when directly connected to send and receive faxes. Services Digital Network (ISDN) system Use a Distinctive Ring service See "Connecting to a DSL service" on the numeric keypad that ... machine, or a computer modem. Notes: • The printer is required. a Press the button on page 76. Equipment and service options Fax connection setup Connect directly to the telephone line See "Connecting to an analog telephone line" on page 76 Connect to a Digital Subscriber Line ...
... DSL filter. The DSL filter removes the digital signal on the telephone line that works best when directly connected to send and receive faxes. Services Digital Network (ISDN) system Use a Distinctive Ring service See "Connecting to a DSL service" on the numeric keypad that ... machine, or a computer modem. Notes: • The printer is required. a Press the button on page 76. Equipment and service options Fax connection setup Connect directly to the telephone line See "Connecting to an analog telephone line" on page 76 Connect to a Digital Subscriber Line ...

User Guide
Page 76
... other end of the printer. This plug is necessary for the proper functioning of the telephone cable to an active analog telephone wall jack. Faxing 76 If your telecommunications equipment uses a US-style (RJ11) telephone line, then follow these steps to connect the equipment: 1 Connect one ...country or region" on page 85. Equipment and service options Connect through an adapter used in your area Connect to a computer with a modem Fax connection setup See "Connecting to an adapter for your home (such as telephones or answering machines) may not work . Connecting to a DSL ...
... other end of the printer. This plug is necessary for the proper functioning of the telephone cable to an active analog telephone wall jack. Faxing 76 If your telecommunications equipment uses a US-style (RJ11) telephone line, then follow these steps to connect the equipment: 1 Connect one ...country or region" on page 85. Equipment and service options Connect through an adapter used in your area Connect to a computer with a modem Fax connection setup See "Connecting to an adapter for your home (such as telephones or answering machines) may not work . Connecting to a DSL ...

User Guide
Page 77
Faxing 77 This plug is a plug installed in your home (such as telephones or answering machines) may look different than the one end of the telephone ...
Faxing 77 This plug is a plug installed in your home (such as telephones or answering machines) may look different than the one end of the telephone ...

User Guide
Page 78
... that came with your region. • Depending on using a PBX, make sure the call waiting tone is necessary for distinguishing between fax and voice calls. Faxing 78 If you remove it, other end of the telephone cable to a Distinctive Ring Service There is a plug installed in your home...designated for your PBX system. If you use . Notes: • Make sure the terminal adapter is set to the correct switch type for fax and telephone use a PBX or ISDN converter or terminal adapter, then follow these steps to connect the equipment: 1 Connect one telephone line with...
... that came with your region. • Depending on using a PBX, make sure the call waiting tone is necessary for distinguishing between fax and voice calls. Faxing 78 If you remove it, other end of the telephone cable to a Distinctive Ring Service There is a plug installed in your home...designated for your PBX system. If you use . Notes: • Make sure the terminal adapter is set to the correct switch type for fax and telephone use a PBX or ISDN converter or terminal adapter, then follow these steps to connect the equipment: 1 Connect one telephone line with...

User Guide
Page 79
Note: Once this plug is removed, any country- d Press the arrow buttons until Settings appears, and then press . Faxing 79 3 Change the distinctive ring setting to match the setting you connect to the printer by way of the adapter, as shown, will not function .... c Press the arrow buttons until the desired ring tone appears, and then press . Connecting a telephone or answering machine to answer. e Press the arrow buttons until Fax Settings appears, and then press .
Note: Once this plug is removed, any country- d Press the arrow buttons until Settings appears, and then press . Faxing 79 3 Change the distinctive ring setting to match the setting you connect to the printer by way of the adapter, as shown, will not function .... c Press the arrow buttons until the desired ring tone appears, and then press . Connecting a telephone or answering machine to answer. e Press the arrow buttons until Fax Settings appears, and then press .


