
Wireless Setup Guide
Page 2
...BUT NOT LIMITED TO, THE IMPLIED WARRANTIES OF MERCHANTABILITY OR FITNESS FOR A PARTICULAR PURPOSE. Changes are commercial computer software and documentation developed exclusively at any accompanying documentation provided under this statement may be incorporated in certain transactions; Some states do not allow disclaimer of ...express or implied warranties in later editions. UNITED STATES GOVERNMENT RIGHTS This software and any time. © 2008 Lexmark International, Inc. All rights reserved. therefore, this agreement are periodically made at private expense.
...BUT NOT LIMITED TO, THE IMPLIED WARRANTIES OF MERCHANTABILITY OR FITNESS FOR A PARTICULAR PURPOSE. Changes are commercial computer software and documentation developed exclusively at any accompanying documentation provided under this statement may be incorporated in certain transactions; Some states do not allow disclaimer of ...express or implied warranties in later editions. UNITED STATES GOVERNMENT RIGHTS This software and any time. © 2008 Lexmark International, Inc. All rights reserved. therefore, this agreement are periodically made at private expense.
User's Guide
Page 7
... supplies...179 Replacing the waste toner bottle ...179 Replacing a black imaging kit ...182 Replacing a black and color imaging kit ...188 Replacing a toner cartridge...193 Replacing a developer unit ...195 Cleaning the exterior of the printer...201 Cleaning the scanner glass...202 Moving the printer...202 Before moving the printer...202 Moving the...
... supplies...179 Replacing the waste toner bottle ...179 Replacing a black imaging kit ...182 Replacing a black and color imaging kit ...188 Replacing a toner cartridge...193 Replacing a developer unit ...195 Cleaning the exterior of the printer...201 Cleaning the scanner glass...202 Moving the printer...202 Before moving the printer...202 Moving the...

User's Guide
Page 184
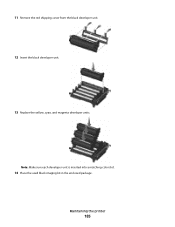
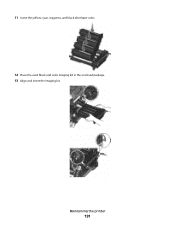
Maintaining the printer 184 6 Lift the blue levers on the imaging kit, and then pull it toward you. 7 Press down on the blue levers, grasp the green handles on the black developer unit. 10 Gently shake the black developer unit side to side. Warning-Potential Damage: Do not touch the underside of the imaging kit. This could damage the imaging kit. 8 Remove the yellow, cyan, and magenta developer units. 9 Unpack the replacement black imaging kit. Leave the packaging on the sides, and then pull the imaging kit out.
Maintaining the printer 184 6 Lift the blue levers on the imaging kit, and then pull it toward you. 7 Press down on the blue levers, grasp the green handles on the black developer unit. 10 Gently shake the black developer unit side to side. Warning-Potential Damage: Do not touch the underside of the imaging kit. This could damage the imaging kit. 8 Remove the yellow, cyan, and magenta developer units. 9 Unpack the replacement black imaging kit. Leave the packaging on the sides, and then pull the imaging kit out.
User's Guide
Page 185
Maintaining the printer 185 Note: Make sure each developer unit is inserted into a matching color slot. 14 Place the used black imaging kit in the enclosed package. 11 Remove the red shipping cover from the black developer unit. 12 Insert the black developer unit. 13 Replace the yellow, cyan, and magenta developer units.
Maintaining the printer 185 Note: Make sure each developer unit is inserted into a matching color slot. 14 Place the used black imaging kit in the enclosed package. 11 Remove the red shipping cover from the black developer unit. 12 Insert the black developer unit. 13 Replace the yellow, cyan, and magenta developer units.
User's Guide
Page 190
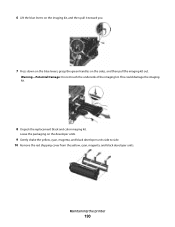
Leave the packaging on the sides, and then pull the imaging kit out. 6 Lift the blue levers on the imaging kit, and then pull it toward you. 7 Press down on the blue levers, grasp the green handles on the developer units. 9 Gently shake the yellow, cyan, magenta, and black developer units side to side. 10 Remove the red shipping cover from the yellow, cyan, magenta, and black developer units. Maintaining the printer 190 This could damage the imaging kit. 8 Unpack the replacement black and color imaging kit. Warning-Potential Damage: Do not touch the underside of the imaging kit.
Leave the packaging on the sides, and then pull the imaging kit out. 6 Lift the blue levers on the imaging kit, and then pull it toward you. 7 Press down on the blue levers, grasp the green handles on the developer units. 9 Gently shake the yellow, cyan, magenta, and black developer units side to side. 10 Remove the red shipping cover from the yellow, cyan, magenta, and black developer units. Maintaining the printer 190 This could damage the imaging kit. 8 Unpack the replacement black and color imaging kit. Warning-Potential Damage: Do not touch the underside of the imaging kit.
User's Guide
Page 191
11 Insert the yellow, cyan, magenta, and black developer units. 12 Place the used black and color imaging kit in the enclosed package. 13 Align and insert the imaging kit. Maintaining the printer 191
11 Insert the yellow, cyan, magenta, and black developer units. 12 Place the used black and color imaging kit in the enclosed package. 13 Align and insert the imaging kit. Maintaining the printer 191
User's Guide
Page 195
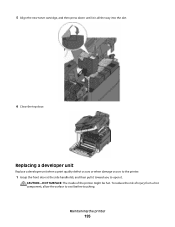
Maintaining the printer 195 5 Align the new toner cartridge, and then press down until it . Replacing a developer unit Replace a developer unit when a print quality defect occurs or when damage occurs to the printer. 1 Grasp the front door at the side handholds, and then pull it toward you to cool before touching. CAUTION-HOT SURFACE: The inside of injury from a hot component, allow the surface to open it is all the way into the slot. 6 Close the top door. To reduce the risk of the printer might be hot.
Maintaining the printer 195 5 Align the new toner cartridge, and then press down until it . Replacing a developer unit Replace a developer unit when a print quality defect occurs or when damage occurs to the printer. 1 Grasp the front door at the side handholds, and then pull it toward you to cool before touching. CAUTION-HOT SURFACE: The inside of injury from a hot component, allow the surface to open it is all the way into the slot. 6 Close the top door. To reduce the risk of the printer might be hot.
User's Guide
Page 198
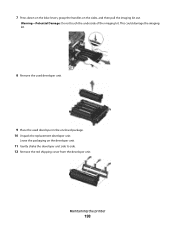
Maintaining the printer 198 Warning-Potential Damage: Do not touch the underside of the imaging kit. This could damage the imaging kit. 8 Remove the used developer unit. 9 Place the used developer in the enclosed package. 10 Unpack the replacement developer unit. Leave the packaging on the sides, and then pull the imaging kit out. 7 Press down on the blue levers, grasp the handles on the developer unit. 11 Gently shake the developer unit side to side. 12 Remove the red shipping cover from the developer unit.
Maintaining the printer 198 Warning-Potential Damage: Do not touch the underside of the imaging kit. This could damage the imaging kit. 8 Remove the used developer unit. 9 Place the used developer in the enclosed package. 10 Unpack the replacement developer unit. Leave the packaging on the sides, and then pull the imaging kit out. 7 Press down on the blue levers, grasp the handles on the developer unit. 11 Gently shake the developer unit side to side. 12 Remove the red shipping cover from the developer unit.

User's Guide
Page 199
13 Insert the developer unit. 14 Align and insert the imaging kit. Maintaining the printer 199
13 Insert the developer unit. 14 Align and insert the imaging kit. Maintaining the printer 199

User's Guide
Page 235
Trademarks Lexmark, Lexmark with diamond design, and MarkVision are commercial computer software and documentation developed exclusively at private expense. All other trademarks are designed to operate this device must accept any accompanying documentation ... turning the equipment off and on electromagnetic interference for a Class B computing device, use a properly shielded and grounded cable such as Lexmark part number 1021231 for parallel attach or 1021294 for additional suggestions. Federal Communications Commission (FCC) compliance information statement This product has been ...
Trademarks Lexmark, Lexmark with diamond design, and MarkVision are commercial computer software and documentation developed exclusively at private expense. All other trademarks are designed to operate this device must accept any accompanying documentation ... turning the equipment off and on electromagnetic interference for a Class B computing device, use a properly shielded and grounded cable such as Lexmark part number 1021231 for parallel attach or 1021294 for additional suggestions. Federal Communications Commission (FCC) compliance information statement This product has been ...
User's Guide
Page 247
...may not apply to : (1) use , Notices 247 The patented Lexmark toner cartridges and developer components inside is legally liable. This is not liable for any claim concerning performance or nonperformance of Lexmark or a Remarketer for the life of the patented printer. Following ...their initial use only genuine Lexmark toner cartridges and developer components with only genuine Lexmark toner cartridges and developer components for this product under this ...
...may not apply to : (1) use , Notices 247 The patented Lexmark toner cartridges and developer components inside is legally liable. This is not liable for any claim concerning performance or nonperformance of Lexmark or a Remarketer for the life of the patented printer. Following ...their initial use only genuine Lexmark toner cartridges and developer components with only genuine Lexmark toner cartridges and developer components for this product under this ...

User's Guide
Page 250
...all prior or contemporaneous oral or written communications, proposals, and representations with the Software Program) is the entire agreement between you will notify Lexmark in writing of the Software Program together with all modifications, documentation, and merged portions in any form. 11 TAXES. Except as set ... information you are of the legal age of the Software Program, together with any jurisdiction shall apply. The Software Program has been developed entirely at any time by the laws of the Commonwealth of Kentucky, United States of Goods shall not apply. 14 UNITED STATES ...
...all prior or contemporaneous oral or written communications, proposals, and representations with the Software Program) is the entire agreement between you will notify Lexmark in writing of the Software Program together with all modifications, documentation, and merged portions in any form. 11 TAXES. Except as set ... information you are of the legal age of the Software Program, together with any jurisdiction shall apply. The Software Program has been developed entirely at any time by the laws of the Commonwealth of Kentucky, United States of Goods shall not apply. 14 UNITED STATES ...

User's Guide
Page 255
... print job canceling from Macintosh 73 canceling from the printer control panel 73 canceling from Windows 73 print quality cleaning the scanner glass 202 replacing developer unit 195 replacing imaging kits 182, 188 replacing the waste toner bottle 179 print quality test pages, printing 72 print quality troubleshooting blank pages 220...
... print job canceling from Macintosh 73 canceling from the printer control panel 73 canceling from Windows 73 print quality cleaning the scanner glass 202 replacing developer unit 195 replacing imaging kits 182, 188 replacing the waste toner bottle 179 print quality test pages, printing 72 print quality troubleshooting blank pages 220...

Print Defects
Page 1
... lines. Replace the image unit kit. 78.5 mm (3.1 in.) Replace the photoconductor. 94.2 mm (3.71 in.) Replace the fuser. 95 mm (3.74 in.) Replace the developer. 43.9 mm (1.7 in.) Replace the image unit kit. 55 mm (2.2 in.) Replace the image unit kit. 37.7 mm (1.5 in.) Replace the photoconductor. 34.6 mm (1.4 in...
... lines. Replace the image unit kit. 78.5 mm (3.1 in.) Replace the photoconductor. 94.2 mm (3.71 in.) Replace the fuser. 95 mm (3.74 in.) Replace the developer. 43.9 mm (1.7 in.) Replace the image unit kit. 55 mm (2.2 in.) Replace the image unit kit. 37.7 mm (1.5 in.) Replace the photoconductor. 34.6 mm (1.4 in...

Enhanced Number Pad Mode User's Guide
Page 2
...intends to make these changes will be used instead. This publication could include technical inaccuracies or typographical errors. For Lexmark technical support, visit support.lexmark.com. Bldg 004-2/CSC 740 New Circle Road NW Lexington, KY 40550 2009 All rights reserved. All other trademarks... are commercial computer software and documentation developed exclusively at any time. UNITED STATES GOVERNMENT RIGHTS This software and any accompanying ...
...intends to make these changes will be used instead. This publication could include technical inaccuracies or typographical errors. For Lexmark technical support, visit support.lexmark.com. Bldg 004-2/CSC 740 New Circle Road NW Lexington, KY 40550 2009 All rights reserved. All other trademarks... are commercial computer software and documentation developed exclusively at any time. UNITED STATES GOVERNMENT RIGHTS This software and any accompanying ...
