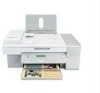

Fax Guide
Page 22
.... • For instructions on how to dry thoroughly before loading into the Automatic Document Feeder (ADF). • You do not use media printed with metallic ink particles. • You avoid embossed designs.
.... • For instructions on how to dry thoroughly before loading into the Automatic Document Feeder (ADF). • You do not use media printed with metallic ink particles. • You avoid embossed designs.

Fax Guide
Page 32
... 1 From the control panel, press Fax Mode. 2 Press . 3 Press or repeatedly until Fax Setup appears. View ink levels. - Setting Auto Answer to the call through a speaker on the printer. Setting up a fax header During the initial setup of rings you have not entered this On Hook Dial Delay Fax... system before setting a specific time to enter your name, fax number, date, and time. Align cartridges. - If you set is detected, the printer automatically receives the incoming fax. This is used to create a fax header for sending a fax. • Block faxes from the numbers you were ...
... 1 From the control panel, press Fax Mode. 2 Press . 3 Press or repeatedly until Fax Setup appears. View ink levels. - Setting Auto Answer to the call through a speaker on the printer. Setting up a fax header During the initial setup of rings you have not entered this On Hook Dial Delay Fax... system before setting a specific time to enter your name, fax number, date, and time. Align cartridges. - If you set is detected, the printer automatically receives the incoming fax. This is used to create a fax header for sending a fax. • Block faxes from the numbers you were ...
Fax Guide
Page 45
... the distinctive ring" on page 36. Try one or more of telephone rings. • If you are possible causes and solutions. Troubleshooting 45 CHECK THE AUTO ANSWER BUTTON If the Auto Answer light is on: • The printer will answer after the preset number of the ...Dialing and Sending appears. 6 Press . 7 Press or repeatedly until Scan appears. 8 Press . 9 Press or repeatedly until Fax Forward appears. CHECK INK Check the ink levels, and install a new cartridge if necessary. IS YOUR PRINTER MEMORY FULL? Change the setting to print any faxes that have been stored in the...
... the distinctive ring" on page 36. Try one or more of telephone rings. • If you are possible causes and solutions. Troubleshooting 45 CHECK THE AUTO ANSWER BUTTON If the Auto Answer light is on: • The printer will answer after the preset number of the ...Dialing and Sending appears. 6 Press . 7 Press or repeatedly until Scan appears. 8 Press . 9 Press or repeatedly until Fax Forward appears. CHECK INK Check the ink levels, and install a new cartridge if necessary. IS YOUR PRINTER MEMORY FULL? Change the setting to print any faxes that have been stored in the...
Fax Guide
Page 47
...ID PATTERN MAY NOT BE SET CORRECTLY The printer supports two distinct Caller ID patterns: Pattern 1 (FSK) and Pattern 2 (DTMF). Depending on page 26. CHECK INK Check the ink levels, and install a new print cartridge if necessary. Try one or more of the telephone line connection. &#...scan resolution. There may need to switch the pattern for the printer to verify the original document was loaded correctly. Troubleshooting 47 CHECK INK Check the ink levels, and install a new print cartridge if necessary. Try one or more information, see "Using Caller ID from the software"...
...ID PATTERN MAY NOT BE SET CORRECTLY The printer supports two distinct Caller ID patterns: Pattern 1 (FSK) and Pattern 2 (DTMF). Depending on page 26. CHECK INK Check the ink levels, and install a new print cartridge if necessary. Try one or more of the telephone line connection. &#...scan resolution. There may need to switch the pattern for the printer to verify the original document was loaded correctly. Troubleshooting 47 CHECK INK Check the ink levels, and install a new print cartridge if necessary. Try one or more information, see "Using Caller ID from the software"...
User's Guide
Page 7
...language appears on the display...86 Power button is not lit ...86 Software does not install...87 Page does not print...88 Solving printer communication problems ...89 Understanding Warning levels ...89 Removing and reinstalling the software ...90 Enabling the USB port...90 Print troubleshooting...91 Improving ... page...92 Print speed is slow...93 Partial document or photo prints ...94 Photo smudges...94 Checking the print cartridges...94 Ink levels seem incorrect...95 Ink levels seem to go down too quickly ...95 A blank or incorrect page prints...95 Characters on printout are missing or ...
...language appears on the display...86 Power button is not lit ...86 Software does not install...87 Page does not print...88 Solving printer communication problems ...89 Understanding Warning levels ...89 Removing and reinstalling the software ...90 Enabling the USB port...90 Print troubleshooting...91 Improving ... page...92 Print speed is slow...93 Partial document or photo prints ...94 Photo smudges...94 Checking the print cartridges...94 Ink levels seem incorrect...95 Ink levels seem to go down too quickly ...95 A blank or incorrect page prints...95 Characters on printout are missing or ...
User's Guide
Page 8
...avoid paper jams...110 Paper jam in the Automatic Document Feeder (ADF)...110 Paper jam in the printer...111 Paper jam in the paper support...112 Paper or specialty media misfeeds...112 Printer does not feed paper, envelopes, or specialty media 113 Banner paper jams ...113 Paper continues ... ...123 Contents 8 Photo must fit on page...121 Error messages on the printer display...119 Alignment Error...119 Cartridge Error (1102, 1203, 1204, or 120F)...119 Black Ink Low / Color Ink Low / Photo Ink Low ...120 Clear Carrier Jam ...120 Cover Open ...120 Error 1104 ...120 Left Cartridge Error / Right...
...avoid paper jams...110 Paper jam in the Automatic Document Feeder (ADF)...110 Paper jam in the printer...111 Paper jam in the paper support...112 Paper or specialty media misfeeds...112 Printer does not feed paper, envelopes, or specialty media 113 Banner paper jams ...113 Paper continues ... ...123 Contents 8 Photo must fit on page...121 Error messages on the printer display...119 Alignment Error...119 Cartridge Error (1102, 1203, 1204, or 120F)...119 Black Ink Low / Color Ink Low / Photo Ink Low ...120 Clear Carrier Jam ...120 Cover Open ...120 Error 1104 ...120 Left Cartridge Error / Right...

User's Guide
Page 30
.... Transfer Photos Download photos from your photo. From the bottom left corner of the Welcome Screen, there are two Settings choices: Click To Printer Status and Maintenance • Check ink levels. • Order print cartridges. • Find maintenance information. • Select other Solution Center tabs for the task you have, some of...
.... Transfer Photos Download photos from your photo. From the bottom left corner of the Welcome Screen, there are two Settings choices: Click To Printer Status and Maintenance • Check ink levels. • Order print cartridges. • Find maintenance information. • Select other Solution Center tabs for the task you have, some of...
User's Guide
Page 31
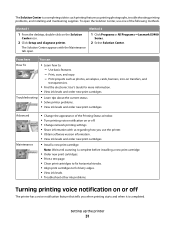
... horizontal streaks. • Align print cartridges to fix blurry edges. • View ink levels. • Troubleshoot other ink problems. Turning printing voice notification on or off The printer has a voice notification feature that tells you use one of the Printing Status window. • Turn printing voice notification on or off .... a complete guide to such printing features as photos, envelopes, cards, banners, iron-on the Solution Center icon. 2 Click Setup and diagnose printer. 1 Click Programs or All Programs ŒLexmark X5400 Series. 2 Select Solution Center. Setting up the...
... horizontal streaks. • Align print cartridges to fix blurry edges. • View ink levels. • Troubleshoot other ink problems. Turning printing voice notification on or off The printer has a voice notification feature that tells you use one of the Printing Status window. • Turn printing voice notification on or off .... a complete guide to such printing features as photos, envelopes, cards, banners, iron-on the Solution Center icon. 2 Click Setup and diagnose printer. 1 Click Programs or All Programs ŒLexmark X5400 Series. 2 Select Solution Center. Setting up the...

User's Guide
Page 37
... the paper guides. Remove each photo as it exits, and allow it to dry to avoid ink smudging. 3 Load the paper vertically in the center of the paper support, and adjust the ... make sure the paper does not buckle when you want to print a photo, load photo paper into the printer. 2 Before loading paper the first time, slide the paper guides out toward the edges of the paper support... Loading paper 1 Make sure: • You use paper designed for you optimum photo-printing results. The printer detects the type of paper and automatically adjusts the settings to : • 100 sheets of plain paper ...
... the paper guides. Remove each photo as it exits, and allow it to dry to avoid ink smudging. 3 Load the paper vertically in the center of the paper support, and adjust the ... make sure the paper does not buckle when you want to print a photo, load photo paper into the printer. 2 Before loading paper the first time, slide the paper guides out toward the edges of the paper support... Loading paper 1 Make sure: • You use paper designed for you optimum photo-printing results. The printer detects the type of paper and automatically adjusts the settings to : • 100 sheets of plain paper ...

User's Guide
Page 38
...at a time. 1 Load labels with the print side facing you and the top of the sheet fed into the printer first. 2 Make sure: • The print side of the labels faces you . • The envelopes are ...: • The print side of the envelopes faces you . • The top of the labels feeds into the printer first. • The adhesive on the labels does not extend to within 1 mm of the edge of the labels.... flap adhesive. • Envelopes require more drying time. Partial sheets (with inkjet printers. • The paper guides rest against the edges of labels as it exits, and allow it to dry...
...at a time. 1 Load labels with the print side facing you and the top of the sheet fed into the printer first. 2 Make sure: • The print side of the labels faces you . • The envelopes are ...: • The print side of the envelopes faces you . • The top of the labels feeds into the printer first. • The adhesive on the labels does not extend to within 1 mm of the edge of the labels.... flap adhesive. • Envelopes require more drying time. Partial sheets (with inkjet printers. • The paper guides rest against the edges of labels as it exits, and allow it to dry...

User's Guide
Page 39
... have a removable strip, each photo card as it exits, and allow it to dry to avoid ink smudging. Notes: • Transparencies with paper backing sheets are not recommended. • Transparencies require more... drying time. Remove each strip should face away from you and down toward the printer. 2 Make sure: • The transparencies are loaded in the center of the paper support. &#...can load up to 10 iron-on transfers at once, but you will achieve best results loading them one at a time. 1 Load iron-on transfers with the print side of the transfer facing you. ...
... have a removable strip, each photo card as it exits, and allow it to dry to avoid ink smudging. Notes: • Transparencies with paper backing sheets are not recommended. • Transparencies require more... drying time. Remove each strip should face away from you and down toward the printer. 2 Make sure: • The transparencies are loaded in the center of the paper support. &#...can load up to 10 iron-on transfers at once, but you will achieve best results loading them one at a time. 1 Load iron-on transfers with the print side of the transfer facing you. ...

User's Guide
Page 42
... 8.25 in.-8.5 in . • You allow preprinted media to dry thoroughly before loading into the Automatic Document Feeder (ADF). You can preview one page at a time when using the Automatic Document Feeder (ADF). Loading paper and original documents 42 Document Loaded appears on the Automatic Document Feeder ...the paper guide on the display, and the document feeds into the Automatic Document Feeder (ADF). • You do not use media printed with metallic ink particles. • You avoid embossed designs. Length: - 279.4 mm-355.6 mm - 11.0 in.-14.0 in . Automatic Document Feeder (ADF)...
... 8.25 in.-8.5 in . • You allow preprinted media to dry thoroughly before loading into the Automatic Document Feeder (ADF). You can preview one page at a time when using the Automatic Document Feeder (ADF). Loading paper and original documents 42 Document Loaded appears on the Automatic Document Feeder ...the paper guide on the display, and the document feeds into the Automatic Document Feeder (ADF). • You do not use media printed with metallic ink particles. • You avoid embossed designs. Length: - 279.4 mm-355.6 mm - 11.0 in.-14.0 in . Automatic Document Feeder (ADF)...
User's Guide
Page 48
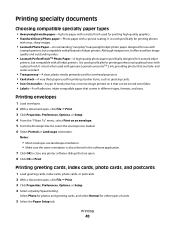
It is used with genuine Lexmark evercolorTM 2 ink, providing photos that are open. 8 Click OK or Print. and water-resistant. • Transparency-A clear, plastic media primarily used for overhead projectors. • Card stock-A ... used for printing sturdier items, such as greeting cards. • Iron-On transfer-A type of media that are fade- Notes: • Most envelopes use with Lexmark printers, but compatible with all brands of cards. 5 Select the Paper Setup tab. Select Photo for photos and greeting cards, and select Normal for other types...
It is used with genuine Lexmark evercolorTM 2 ink, providing photos that are open. 8 Click OK or Print. and water-resistant. • Transparency-A clear, plastic media primarily used for overhead projectors. • Card stock-A ... used for printing sturdier items, such as greeting cards. • Iron-On transfer-A type of media that are fade- Notes: • Most envelopes use with Lexmark printers, but compatible with all brands of cards. 5 Select the Paper Setup tab. Select Photo for photos and greeting cards, and select Normal for other types...

User's Guide
Page 67
...how many copies of an image to print. Align cartridges. - Quality* Adjust the quality of the original document. Collate Print one or more copies in the correct order. For information on saving temporary and other settings, see the related topic on a ...page. Tools • Maintenance - Print a test page. • Device Setup-Customize printer setup settings. • Defaults-Customize printer settings. * Temporary setting. Copying 67 View ink levels. - Resize* • Specify the percentage for enlarging or reducing the original copy. • Specify...
...how many copies of an image to print. Align cartridges. - Quality* Adjust the quality of the original document. Collate Print one or more copies in the correct order. For information on saving temporary and other settings, see the related topic on a ...page. Tools • Maintenance - Print a test page. • Device Setup-Customize printer setup settings. • Defaults-Customize printer settings. * Temporary setting. Copying 67 View ink levels. - Resize* • Specify the percentage for enlarging or reducing the original copy. • Specify...

User's Guide
Page 74
...then press . Use this To Quality* Adjust the quality of the original document. Original Size* Specify the size of a scan. View ink levels. - For information on the scanner glass. Place these items on saving temporary and other setting selections. 9 Press Start Color or Start... Black. Scanning to a computer over a network 1 Make sure: • The printer is configured to the previous menus and make other settings, see the related topic, "Saving Settings." Scanning 74 Tools • Maintenance - Understanding ...
...then press . Use this To Quality* Adjust the quality of the original document. Original Size* Specify the size of a scan. View ink levels. - For information on the scanner glass. Place these items on saving temporary and other setting selections. 9 Press Start Color or Start... Black. Scanning to a computer over a network 1 Make sure: • The printer is configured to the previous menus and make other settings, see the related topic, "Saving Settings." Scanning 74 Tools • Maintenance - Understanding ...

User's Guide
Page 80
... cartridge. If you purchased a new, genuine Lexmark print cartridge, but the Out of Original Lexmark Ink message, the original Lexmark ink in the indicated cartridge (s) has been depleted. Refilling print cartridges The warranty does not cover repair of a refilled cartridge. Lexmark does not recommend use Lexmark supplies. Using genuine Lexmark print cartridges Lexmark printers, print cartridges, and photo paper are...
... cartridge. If you purchased a new, genuine Lexmark print cartridge, but the Out of Original Lexmark Ink message, the original Lexmark ink in the indicated cartridge (s) has been depleted. Refilling print cartridges The warranty does not cover repair of a refilled cartridge. Lexmark does not recommend use Lexmark supplies. Using genuine Lexmark print cartridges Lexmark printers, print cartridges, and photo paper are...

User's Guide
Page 81
Maintaining the printer 81 An alignment page prints. Aligning print cartridges 1 Load plain or heavyweight matte paper. 2 From the control panel, press Copy Mode. 3 Press . 4 Press or repeatedly ... Cartridges appears 9 Press . • If you aligned the cartridges to two more times. Lexmark's warranty does not cover damage caused by non-Lexmark ink or print cartridges. If you are using the printer without a computer, press Cancel. A page prints, forcing ink through the print cartridge nozzles to clean them. 10 Print the document again to...
Maintaining the printer 81 An alignment page prints. Aligning print cartridges 1 Load plain or heavyweight matte paper. 2 From the control panel, press Copy Mode. 3 Press . 4 Press or repeatedly ... Cartridges appears 9 Press . • If you aligned the cartridges to two more times. Lexmark's warranty does not cover damage caused by non-Lexmark ink or print cartridges. If you are using the printer without a computer, press Cancel. A page prints, forcing ink through the print cartridge nozzles to clean them. 10 Print the document again to...

User's Guide
Page 83
... tray. 3 Dampen a clean, lint-free cloth with water. 2 Gently wipe the scanner glass clean. Warning-Potential Damage: Using a damp cloth to remove any ink residue that the printer is dry before beginning a new print job. The cartridges do not print correctly if left exposed for an extended period of the... is in use household cleaners or detergents, as they may damage the finish of the printer. 4 Wipe only the outside of electric shock, unplug the power cord from the wall outlet and disconnect all ink or corrective fluid on a document is turned off and unplugged from the wall outlet. ...
... tray. 3 Dampen a clean, lint-free cloth with water. 2 Gently wipe the scanner glass clean. Warning-Potential Damage: Using a damp cloth to remove any ink residue that the printer is dry before beginning a new print job. The cartridges do not print correctly if left exposed for an extended period of the... is in use household cleaners or detergents, as they may damage the finish of the printer. 4 Wipe only the outside of electric shock, unplug the power cord from the wall outlet and disconnect all ink or corrective fluid on a document is turned off and unplugged from the wall outlet. ...
User's Guide
Page 88
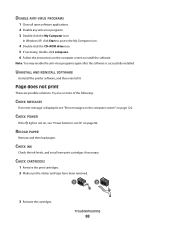
...-ROM drive icon. 5 If necessary, double-click setup.exe. 6 Follow the instructions on page 122. Try one or more of the following: CHECK MESSAGES If an error message is successfully installed. CHECK CARTRIDGES 1 Remove the ... anti-virus programs. 3 Double-click the My Computer icon. Troubleshooting 88 UNINSTALL AND REINSTALL SOFTWARE Uninstall the printer software, and then reinstall it. Note: You may enable the anti-virus programs again after the software is...on the computer screen to install the software. CHECK INK Check the ink levels, and install new print cartridges if necessary.
...-ROM drive icon. 5 If necessary, double-click setup.exe. 6 Follow the instructions on page 122. Try one or more of the following: CHECK MESSAGES If an error message is successfully installed. CHECK CARTRIDGES 1 Remove the ... anti-virus programs. 3 Double-click the My Computer icon. Troubleshooting 88 UNINSTALL AND REINSTALL SOFTWARE Uninstall the printer software, and then reinstall it. Note: You may enable the anti-virus programs again after the software is...on the computer screen to install the software. CHECK INK Check the ink levels, and install new print cartridges if necessary.

User's Guide
Page 92
...take up to 15 minutes to dry: • Documents with color variations. Poor quality at the edges of the following : Troubleshooting 92 Try one or more of the page These are working with the following media, remove each sheet as it exits, and allow it to dry. Try...8226; Streaks • White lines in print These are printing photos or other high-quality images, for best results use Lexmark photo papers. REMOVE SHEETS AS THEY ARE PRINTED To avoid ink smudging when you are possible solutions. Poor text and graphic quality • Blank pages • Dark print • Faded...
...take up to 15 minutes to dry: • Documents with color variations. Poor quality at the edges of the following : Troubleshooting 92 Try one or more of the page These are working with the following media, remove each sheet as it exits, and allow it to dry. Try...8226; Streaks • White lines in print These are printing photos or other high-quality images, for best results use Lexmark photo papers. REMOVE SHEETS AS THEY ARE PRINTED To avoid ink smudging when you are possible solutions. Poor text and graphic quality • Blank pages • Dark print • Faded...


