Fax Guide
Page 3
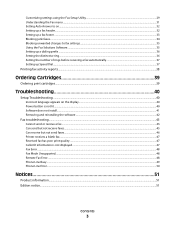
...Setting the number of rings before receiving a fax automatically 37 Setting up Speed Dial...37 Printing fax activity reports...38 Ordering Cartridges 39 Ordering print cartridges...39 Troubleshooting 40 Setup Troubleshooting...40 Incorrect language appears on the display...40 Power button is not lit ...40 Software does ...Fax troubleshooting...43 Cannot send or receive a fax...43 Can send but not receive faxes...45 Can receive but not send faxes...46 Printer receives a blank fax...47 Received fax has poor print quality...47 Caller ID information is not displayed...47 Fax Error ...48 Fax Mode...
...Setting the number of rings before receiving a fax automatically 37 Setting up Speed Dial...37 Printing fax activity reports...38 Ordering Cartridges 39 Ordering print cartridges...39 Troubleshooting 40 Setup Troubleshooting...40 Incorrect language appears on the display...40 Power button is not lit ...40 Software does ...Fax troubleshooting...43 Cannot send or receive a fax...43 Can send but not receive faxes...45 Can receive but not send faxes...46 Printer receives a blank fax...47 Received fax has poor print quality...47 Caller ID information is not displayed...47 Fax Error ...48 Fax Mode...
Fax Guide
Page 8
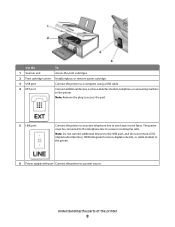
... subscriber line), ISDN (integrated services digital network), or cable modem to the printer. 6 Power supply with port Connect the printer to the printer. Use the To 1 Scanner unit Access the print cartridges. 2 Print cartridge carrier Install, replace, or remove a print cartridge. 3 USB port Connect the printer to a computer using a USB cable. 4 EXT port Connect additional devices, such...
... subscriber line), ISDN (integrated services digital network), or cable modem to the printer. 6 Power supply with port Connect the printer to the printer. Use the To 1 Scanner unit Access the print cartridges. 2 Print cartridge carrier Install, replace, or remove a print cartridge. 3 USB port Connect the printer to a computer using a USB cable. 4 EXT port Connect additional devices, such...

Fax Guide
Page 32
... before sending your name, fax number, date, and time. Answer all incoming phone calls. Clean cartridges. - Print a test page. • Device Setup-Customize printer setup settings. • Defaults-Customize printer settings. When the number of a fax you send. If you were prompted to enter your fax.... Align cartridges. - The Auto Answer light on the control panel comes on the printer. Using Fax 32 Use this information: 1 From the control panel, press Fax Mode. 2 Press . 3 Press or...
... before sending your name, fax number, date, and time. Answer all incoming phone calls. Clean cartridges. - Print a test page. • Device Setup-Customize printer setup settings. • Defaults-Customize printer settings. When the number of a fax you send. If you were prompted to enter your fax.... Align cartridges. - The Auto Answer light on the control panel comes on the printer. Using Fax 32 Use this information: 1 From the control panel, press Fax Mode. 2 Press . 3 Press or...
Fax Guide
Page 39
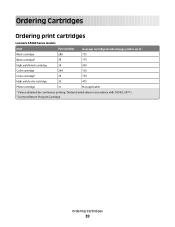
Declared yield value in accordance with ISO/IEC 24711. 2 Licensed Return Program Cartridge Ordering Cartridges 39 Ordering Cartridges Ordering print cartridges Lexmark X5400 Series models Item Part number Average cartridge standard page yield is up to1 Black cartridge 28A 175 Black cartridge2 28 175 High yield black cartridge 34 500 Color cartridge 29A 150 Color cartridge2 29 150 High yield color cartridge 35 475 Photo cartridge 31 Not applicable 1 Values obtained by continuous printing.
Declared yield value in accordance with ISO/IEC 24711. 2 Licensed Return Program Cartridge Ordering Cartridges 39 Ordering Cartridges Ordering print cartridges Lexmark X5400 Series models Item Part number Average cartridge standard page yield is up to1 Black cartridge 28A 175 Black cartridge2 28 175 High yield black cartridge 34 500 Color cartridge 29A 150 Color cartridge2 29 150 High yield color cartridge 35 475 Photo cartridge 31 Not applicable 1 Values obtained by continuous printing.
Fax Guide
Page 45
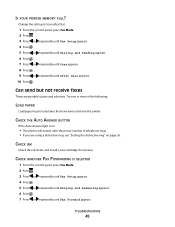
... Dial appears. 10 Press . Change the setting to print any faxes that have been stored in the printer. Troubleshooting 45 CHECK THE AUTO ANSWER BUTTON If the Auto Answer light is on page 36. Try one or more of telephone rings. • If you are possible causes and solutions. Can send but... appears. 6 Press . 7 Press or repeatedly until Scan appears. 8 Press . 9 Press or repeatedly until Fax Forward appears. CHECK INK Check the ink levels, and install a new cartridge if necessary.
... Dial appears. 10 Press . Change the setting to print any faxes that have been stored in the printer. Troubleshooting 45 CHECK THE AUTO ANSWER BUTTON If the Auto Answer light is on page 36. Try one or more of telephone rings. • If you are possible causes and solutions. Can send but... appears. 6 Press . 7 Press or repeatedly until Scan appears. 8 Press . 9 Press or repeatedly until Fax Forward appears. CHECK INK Check the ink levels, and install a new cartridge if necessary.
Fax Guide
Page 47
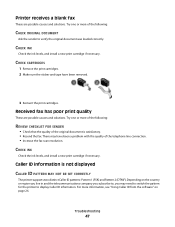
... CALLER ID PATTERN MAY NOT BE SET CORRECTLY The printer supports two distinct Caller ID patterns: Pattern 1 (FSK) and Pattern 2 (DTMF). CHECK INK Check the ink levels, and install a new print cartridge if necessary. Caller ID information is satisfactory. • Resend the fax. Try one or more information, see "Using Caller ID from...
... CALLER ID PATTERN MAY NOT BE SET CORRECTLY The printer supports two distinct Caller ID patterns: Pattern 1 (FSK) and Pattern 2 (DTMF). CHECK INK Check the ink levels, and install a new print cartridge if necessary. Caller ID information is satisfactory. • Resend the fax. Try one or more information, see "Using Caller ID from...
User's Guide
Page 6
...Scanning text for editing...70 Scanning images for editing...70 Scanning a photo to the Library...71 Scanning multiple photos at one time using the computer 71 Creating a PDF from a scanned item...72 Canceling a scan job...72 Customizing scan ... printer 78 Replacing print cartridges...78 Installing print cartridges...78 Removing a used print cartridge ...79 Refilling print cartridges...80 Using genuine Lexmark print cartridges...80 Aligning print cartridges...81 Cleaning the print cartridge nozzles...81 Wiping the print cartridge nozzles and contacts...82 Preserving the print cartridges...83...
...Scanning text for editing...70 Scanning images for editing...70 Scanning a photo to the Library...71 Scanning multiple photos at one time using the computer 71 Creating a PDF from a scanned item...72 Canceling a scan job...72 Customizing scan ... printer 78 Replacing print cartridges...78 Installing print cartridges...78 Removing a used print cartridge ...79 Refilling print cartridges...80 Using genuine Lexmark print cartridges...80 Aligning print cartridges...81 Cleaning the print cartridge nozzles...81 Wiping the print cartridge nozzles and contacts...82 Preserving the print cartridges...83...
User's Guide
Page 7
... language appears on the display...86 Power button is not lit ...86 Software does not install...87 Page does not print...88 Solving printer communication problems ...89 Understanding Warning levels ...89 Removing and reinstalling the software ...90 Enabling the USB port...90 Print troubleshooting...91 Improving print... at the edges of the page...92 Print speed is slow...93 Partial document or photo prints ...94 Photo smudges...94 Checking the print cartridges...94 Ink levels seem incorrect...95 Ink levels seem to go down too quickly ...95 A blank or incorrect page prints...95 Characters on...
... language appears on the display...86 Power button is not lit ...86 Software does not install...87 Page does not print...88 Solving printer communication problems ...89 Understanding Warning levels ...89 Removing and reinstalling the software ...90 Enabling the USB port...90 Print troubleshooting...91 Improving print... at the edges of the page...92 Print speed is slow...93 Partial document or photo prints ...94 Photo smudges...94 Checking the print cartridges...94 Ink levels seem incorrect...95 Ink levels seem to go down too quickly ...95 A blank or incorrect page prints...95 Characters on...
User's Guide
Page 8
... Low / Color Ink Low / Photo Ink Low ...120 Clear Carrier Jam ...120 Cover Open ...120 Error 1104 ...120 Left Cartridge Error / Right Cartridge Error...121 Left Cartridge Incorrect / Right Cartridge Incorrect ...121 Right Cartridge Missing ...121 Photo size error. Printer is not able to communicate with the computer 108 Problems when copying or scanning...108 Wrong...
... Low / Color Ink Low / Photo Ink Low ...120 Clear Carrier Jam ...120 Cover Open ...120 Error 1104 ...120 Left Cartridge Error / Right Cartridge Error...121 Left Cartridge Incorrect / Right Cartridge Incorrect ...121 Right Cartridge Missing ...121 Photo size error. Printer is not able to communicate with the computer 108 Problems when copying or scanning...108 Wrong...

User's Guide
Page 9
Out of Memory...123 Out of Paper...123 Fixing a printing failure...123 Paper Jam ...123 Multiple All-In-Ones found...124 Color Cartridge replacement required...124 Notices 125 Product information...125 Edition notice...125 Power consumption...127 Index 133 Contents 9
Out of Memory...123 Out of Paper...123 Fixing a printing failure...123 Paper Jam ...123 Multiple All-In-Ones found...124 Color Cartridge replacement required...124 Notices 125 Product information...125 Edition notice...125 Power consumption...127 Index 133 Contents 9
User's Guide
Page 16
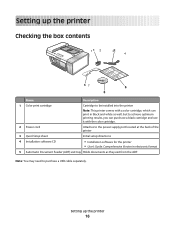
... Name Description 1 Color print cartridge Cartridge to be installed into the printer Note: This printer comes with a color cartridge, which can print in black and white as well, but to achieve optimum printing results, you can purchase a black cartridge and use it with the color cartridge. 2 Power cord Attaches to... the power supply port located at the back of the printer 3 Quick Setup sheet Initial setup directions 4 Installation software CD &#...
... Name Description 1 Color print cartridge Cartridge to be installed into the printer Note: This printer comes with a color cartridge, which can print in black and white as well, but to achieve optimum printing results, you can purchase a black cartridge and use it with the color cartridge. 2 Power cord Attaches to... the power supply port located at the back of the printer 3 Quick Setup sheet Initial setup directions 4 Installation software CD &#...
User's Guide
Page 17
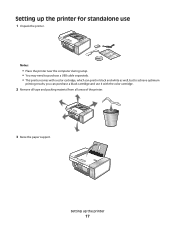
Setting up the printer for standalone use 1 Unpack the printer. 1 2 3 Notes: • Place the printer near the computer during setup. • You may need to purchase a USB cable separately. • This printer comes with a color cartridge, which can print in black and white as well, but to achieve optimum printing results, you can purchase a black cartridge and use it with the color cartridge. 2 Remove all tape and packing material from all areas of the printer. 3 Raise the paper support. Setting up the printer 17
Setting up the printer for standalone use 1 Unpack the printer. 1 2 3 Notes: • Place the printer near the computer during setup. • You may need to purchase a USB cable separately. • This printer comes with a color cartridge, which can print in black and white as well, but to achieve optimum printing results, you can purchase a black cartridge and use it with the color cartridge. 2 Remove all tape and packing material from all areas of the printer. 3 Raise the paper support. Setting up the printer 17

User's Guide
Page 21
13 If prompted, set the country or region. 1 2 1 a Using the control panel of the printer, press or repeatedly until the country or region that you want appears on the print cartridge carrier levers. 16 Open the color print cartridge foil, and then remove the cartridge from the pack. b Press to save. 14 Open the printer. 15 Press down on the display. Setting up the printer 21
13 If prompted, set the country or region. 1 2 1 a Using the control panel of the printer, press or repeatedly until the country or region that you want appears on the print cartridge carrier levers. 16 Open the color print cartridge foil, and then remove the cartridge from the pack. b Press to save. 14 Open the printer. 15 Press down on the display. Setting up the printer 21

User's Guide
Page 22
You can purchase an optional black cartridge separately. 21 Remove the tape from the pack. Setting up the printer 22 17 If a storage unit is included, remove the color cartridge from the storage unit. 2 1 18 Remove the tape from the color cartridge. 19 Insert the cartridge in the right carrier, and close the color cartridge carrier lid. 20 If you are installing a black print cartridge, open the black cartridge foil, and remove the cartridge from the black cartridge. Note: This printer comes with a color cartridge only.
You can purchase an optional black cartridge separately. 21 Remove the tape from the pack. Setting up the printer 22 17 If a storage unit is included, remove the color cartridge from the storage unit. 2 1 18 Remove the tape from the color cartridge. 19 Insert the cartridge in the right carrier, and close the color cartridge carrier lid. 20 If you are installing a black print cartridge, open the black cartridge foil, and remove the cartridge from the black cartridge. Note: This printer comes with a color cartridge only.

User's Guide
Page 23
22 Insert the cartridge in the left cartridge carrier, and close the black cartridge carrier lid. 23 Close the printer. 24 Press . An alignment page prints. 25 Discard or recycle the alignment page. Setting up the printer 23
22 Insert the cartridge in the left cartridge carrier, and close the black cartridge carrier lid. 23 Close the printer. 24 Press . An alignment page prints. 25 Discard or recycle the alignment page. Setting up the printer 23

User's Guide
Page 25
... • Menus 2 4 3 5 6 Press 1 2 Copy Mode 1 To • Turn the printer on . Setting up the printer 25 Access the copy default screen and make copies. 1 2 3 4 Use the To 1 Scanner unit Access the print cartridges. 2 Print cartridge carrier Install, replace, or remove a print cartridge. 3 USB port Connect the printer to a computer using a USB cable. 4 Power supply with port...
... • Menus 2 4 3 5 6 Press 1 2 Copy Mode 1 To • Turn the printer on . Setting up the printer 25 Access the copy default screen and make copies. 1 2 3 4 Use the To 1 Scanner unit Access the print cartridges. 2 Print cartridge carrier Install, replace, or remove a print cartridge. 3 USB port Connect the printer to a computer using a USB cable. 4 Power supply with port...

User's Guide
Page 30
... sizes. From the bottom left corner of the Welcome Screen, there are two Settings choices: Click To Printer Status and Maintenance • Check ink levels. • Order print cartridges. • Find maintenance information. • Select other Solution Center tabs for the task you have, ...some of the features of this software may not be applicable. Depending on the printer you want to the Library. Setting up the printer 30 Photo Greeting Cards...
... sizes. From the bottom left corner of the Welcome Screen, there are two Settings choices: Click To Printer Status and Maintenance • Check ink levels. • Order print cartridges. • Find maintenance information. • Select other Solution Center tabs for the task you have, ...some of the features of this software may not be applicable. Depending on the printer you want to the Library. Setting up the printer 30 Photo Greeting Cards...
User's Guide
Page 31
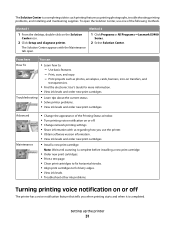
...levels. • Troubleshoot other ink problems. Turning printing voice notification on or off The printer has a voice notification feature that tells you use one of the Printing Status window. • Turn printing voice notification on or off. &#...cartridge. • Order new print cartridges. • Print a test page. • Clean print cartridges to fix horizontal streaks. • Align print cartridges to such printing features as photos, envelopes, cards, banners, iron-on the Solution Center icon. 2 Click Setup and diagnose printer. 1 Click Programs or All Programs ŒLexmark...
...levels. • Troubleshoot other ink problems. Turning printing voice notification on or off The printer has a voice notification feature that tells you use one of the Printing Status window. • Turn printing voice notification on or off. &#...cartridge. • Order new print cartridges. • Print a test page. • Clean print cartridges to fix horizontal streaks. • Align print cartridges to such printing features as photos, envelopes, cards, banners, iron-on the Solution Center icon. 2 Click Setup and diagnose printer. 1 Click Programs or All Programs ŒLexmark...

User's Guide
Page 67
... document. Collate Print one or more copies in the correct order. Original Size* Specify the size of a copy. Original Type* Specify the type of the paper loaded. Print a test page. • Device Setup-Customize printer setup settings. • Defaults-Customize printer settings. * Temporary ... size you want appears and press . • If you select Borderless, the printer will reduce or enlarge the document or photo as necessary to print a borderless copy on a page. Align cartridges. - For information on saving temporary and other settings, see the related topic on...
... document. Collate Print one or more copies in the correct order. Original Size* Specify the size of a copy. Original Type* Specify the type of the paper loaded. Print a test page. • Device Setup-Customize printer setup settings. • Defaults-Customize printer settings. * Temporary ... size you want appears and press . • If you select Borderless, the printer will reduce or enlarge the document or photo as necessary to print a borderless copy on a page. Align cartridges. - For information on saving temporary and other settings, see the related topic on...

User's Guide
Page 74
... setting. Original Size* Specify the size of a scan. For information on the scanner glass. Clean cartridges. - Scanning to a computer over a network 1 Make sure: • The printer is connected to scan over a network (Direct IP Printing). 2 Load an original document facedown into... the scan are on the scanner glass. Print a test page. • Device Setup-Customize printer setup settings. • Defaults-Customize printer settings. * Temporary setting. Scanning 74 Align cartridges. - View ink levels. - The scan default screen appears. 2 Press or repeatedly until the...
... setting. Original Size* Specify the size of a scan. For information on the scanner glass. Clean cartridges. - Scanning to a computer over a network 1 Make sure: • The printer is connected to scan over a network (Direct IP Printing). 2 Load an original document facedown into... the scan are on the scanner glass. Print a test page. • Device Setup-Customize printer setup settings. • Defaults-Customize printer settings. * Temporary setting. Scanning 74 Align cartridges. - View ink levels. - The scan default screen appears. 2 Press or repeatedly until the...


