Setup Sheet
Page 1
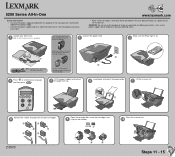
...lids closed. Connect the power cord. 2 Make sure the Power light is near the product and easily accessible. Load paper and adjust the paper guide. 6 Lift the scanner unit. 7 Remove the sticker and tape from the print cartridge storage unit. www.lexmark.com • Refer...make any electrical or cabling connections, such as the power supply cord or telephone, during a lightning storm. CAUTION: Do not set up this product or the manufacturer's authorized replacement power supply. • Connect the power supply cord to a professional service person. Lift the paper ...
...lids closed. Connect the power cord. 2 Make sure the Power light is near the product and easily accessible. Load paper and adjust the paper guide. 6 Lift the scanner unit. 7 Remove the sticker and tape from the print cartridge storage unit. www.lexmark.com • Refer...make any electrical or cabling connections, such as the power supply cord or telephone, during a lightning storm. CAUTION: Do not set up this product or the manufacturer's authorized replacement power supply. • Connect the power supply cord to a professional service person. Lift the paper ...
Setup Sheet
Page 2
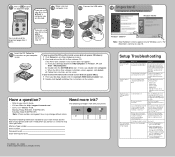
...following cartridges work with your All-In-One without notice. See "Error messages troubleshooting" in the wrong language Diagnosis: Solution: Is the power cord pushed all the way into the All-In-One? Insert the CD. If you inserted the CD and the install screen did not ...• 32 • 34 • 33 • 35 P/N 21D0070 E.C. 21D005 © 2004 Lexmark International, Inc. Windows 98/Me You may change without a computer, you want appears on the screen. Reconnect the power cord by pushing it between the All-InOne and your store receipt and the back of this...
...following cartridges work with your All-In-One without notice. See "Error messages troubleshooting" in the wrong language Diagnosis: Solution: Is the power cord pushed all the way into the All-In-One? Insert the CD. If you inserted the CD and the install screen did not ...• 32 • 34 • 33 • 35 P/N 21D0070 E.C. 21D005 © 2004 Lexmark International, Inc. Windows 98/Me You may change without a computer, you want appears on the screen. Reconnect the power cord by pushing it between the All-InOne and your store receipt and the back of this...

Setup Guide
Page 5
Keep unused cartridges in the box with your All-In-One: Note: A USB cable may or may not be included. 1 Power supply cord 2 USB cable 3 Setup sheet 4 Color print cartridge 5 Black or photo print cartridge 6 User's Guide 7 Software CD Note: If your All-In-One comes with a photo print cartridge, remove it from the print cartridge storage unit before installing it. English English Contents checklist Verify that these items are in the storage unit. 5
Keep unused cartridges in the box with your All-In-One: Note: A USB cable may or may not be included. 1 Power supply cord 2 USB cable 3 Setup sheet 4 Color print cartridge 5 Black or photo print cartridge 6 User's Guide 7 Software CD Note: If your All-In-One comes with a photo print cartridge, remove it from the print cartridge storage unit before installing it. English English Contents checklist Verify that these items are in the storage unit. 5

Setup Guide
Page 6
... Symptom: The All-In-One's control panel is displaying text in the user documentation, to your computer through another device, such as the power cord, during a lightning storm. If so, disconnect the USB cable from the All-In-One to turn on the display. 4 Press the Arrow... with this product or make any other than those described in the wrong language Solution: 1 Press the Power button to your computer. 6 CAUTION: Do not set up this product or the manufacturer's authorized replacement power supply. • Connect the power cord to an electrical outlet that language.
... Symptom: The All-In-One's control panel is displaying text in the user documentation, to your computer through another device, such as the power cord, during a lightning storm. If so, disconnect the USB cable from the All-In-One to turn on the display. 4 Press the Arrow... with this product or make any other than those described in the wrong language Solution: 1 Press the Power button to your computer. 6 CAUTION: Do not set up this product or the manufacturer's authorized replacement power supply. • Connect the power cord to an electrical outlet that language.

Setup Guide
Page 8
... way into the All-In-One. • Disconnect the power cord from the wall outlet, and then from the bottom of programs, see if the software was installed correctly: For Windows From your desktop, click Start Æ Programs or All Programs. If Lexmark 5200 Series does not appear in the right carrier. Make...
... way into the All-In-One. • Disconnect the power cord from the wall outlet, and then from the bottom of programs, see if the software was installed correctly: For Windows From your desktop, click Start Æ Programs or All Programs. If Lexmark 5200 Series does not appear in the right carrier. Make...


