User's Guide
Page 15
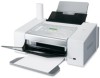
...to send and receive faxes. Notes: • Remove the plug to access the port. • This connection method may not be connected to this telephone line to someone on the phone. • Listen for fax tones when sending a fax. Connect the ... a USB cable. The printer must be applicable in all countries or regions. Connect additional devices, such as a data/fax modem, telephone, or answering machine to the printer. 15 Note: Do not connect additional devices to the LINE port, .... 11 Telephone handset • Answer incoming telephone calls and talk to receive incoming fax calls.
...to send and receive faxes. Notes: • Remove the plug to access the port. • This connection method may not be connected to this telephone line to someone on the phone. • Listen for fax tones when sending a fax. Connect the ... a USB cable. The printer must be applicable in all countries or regions. Connect additional devices, such as a data/fax modem, telephone, or answering machine to the printer. 15 Note: Do not connect additional devices to the LINE port, .... 11 Telephone handset • Answer incoming telephone calls and talk to receive incoming fax calls.
User's Guide
Page 16
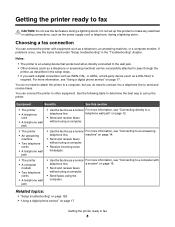
... or cabling connections, such as a normal For more information, see "Using a digital phone service" on page 20. • Send and receive faxes without using a computer. • The printer • An answering machine • Two telephone cords • A telephone wall jack • Use the...; If you do not need to connect it to a telephone line to a power source. Choosing a fax connection You can connect the printer with port Connect the printer to send and receive faxes. Notes: • The printer is an analog device that works best when directly connected to the wall...
... or cabling connections, such as a normal For more information, see "Using a digital phone service" on page 20. • Send and receive faxes without using a computer. • The printer • An answering machine • Two telephone cords • A telephone wall jack • Use the...; If you do not need to connect it to a telephone line to a power source. Choosing a fax connection You can connect the printer with port Connect the printer to send and receive faxes. Notes: • The printer is an analog device that works best when directly connected to the wall...
User's Guide
Page 17
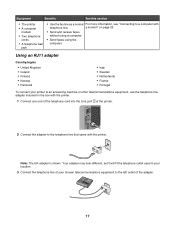
a modem" on page 23. • Send and receive faxes without using a computer. • Send faxes using the computer. Using an RJ11 adapter Country/region • United Kingdom • Ireland • Finland • Norway • Denmark • Italy • Sweden • ... adapter is shown. Equipment Benefits See this section • The printer • A computer modem • Two telephone cords • A telephone wall jack • Use the fax line as a normal For more information, see "Connecting to the telephone line that came with the printer.
a modem" on page 23. • Send and receive faxes without using a computer. • Send faxes using the computer. Using an RJ11 adapter Country/region • United Kingdom • Ireland • Finland • Norway • Denmark • Italy • Sweden • ... adapter is shown. Equipment Benefits See this section • The printer • A computer modem • Two telephone cords • A telephone wall jack • Use the fax line as a normal For more information, see "Connecting to the telephone line that came with the printer.
User's Guide
Page 20
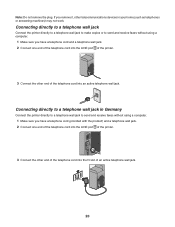
...remove the plug. Connecting directly to a telephone wall jack Connect the printer directly to a telephone wall jack to make copies or to send and receive faxes without using a computer. 1 Make sure you have a telephone cord (provided with the product) and a telephone wall jack. 2 Connect one...telephone wall jack. 20 If you remove it, other telecommunications devices in Germany Connect the printer directly to a telephone wall jack to send and receive faxes without using a computer. 1 Make sure you have a telephone cord and a telephone wall jack. 2 Connect one end of the telephone ...
...remove the plug. Connecting directly to a telephone wall jack Connect the printer directly to a telephone wall jack to make copies or to send and receive faxes without using a computer. 1 Make sure you have a telephone cord (provided with the product) and a telephone wall jack. 2 Connect one...telephone wall jack. 20 If you remove it, other telecommunications devices in Germany Connect the printer directly to a telephone wall jack to send and receive faxes without using a computer. 1 Make sure you have a telephone cord and a telephone wall jack. 2 Connect one end of the telephone ...
User's Guide
Page 21
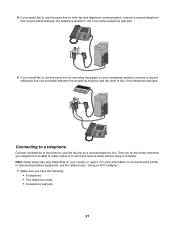
...to telecommunications equipment, see the related topic, "Using an RJ11 adapter." 1 Make sure you would like to use the same line for both fax and telephone communication, connect a second telephone line (not provided) between the answering machine and the other N slot of an active telephone wall...for recording messages on your telephone is located to make copies or to use the fax line as a normal telephone line. Connecting to a telephone Connect a telephone to the printer to send and receive faxes without using a computer. Then set up the printer wherever your country or region....
...to telecommunications equipment, see the related topic, "Using an RJ11 adapter." 1 Make sure you would like to use the same line for both fax and telephone communication, connect a second telephone line (not provided) between the answering machine and the other N slot of an active telephone wall...for recording messages on your telephone is located to make copies or to use the fax line as a normal telephone line. Connecting to a telephone Connect a telephone to the printer to send and receive faxes without using a computer. Then set up the printer wherever your country or region....

User's Guide
Page 42
... For more information, see "Entering a fax number." Note: At the designated time, the fax program dials and sends the fax to select a number from the Speed Dial or Group Dial list. Receiving a fax using the control panel Receiving a fax automatically using the control panel 1 Make ...rings before the printer automatically receives faxes: a Press Fax Mode. 4 Enter a fax or Speed Dial (1-89) number; Note: Each fax number contained in the Automatic Document Feeder (ADF). 2 From the control panel, press Fax Mode. 3 Press . 4 Press or repeatedly until Delay Fax appears, and then press ....
... For more information, see "Entering a fax number." Note: At the designated time, the fax program dials and sends the fax to select a number from the Speed Dial or Group Dial list. Receiving a fax using the control panel Receiving a fax automatically using the control panel 1 Make ...rings before the printer automatically receives faxes: a Press Fax Mode. 4 Enter a fax or Speed Dial (1-89) number; Note: Each fax number contained in the Automatic Document Feeder (ADF). 2 From the control panel, press Fax Mode. 3 Press . 4 Press or repeatedly until Delay Fax appears, and then press ....
User's Guide
Page 53
.... 8 If there are any additional documents that you want a paper copy of your fax, select Print a copy of your phone line type" area. 8 Click OK to save the settings. 53 Receiving a fax using the computer Receiving a fax automatically using the computer 1 From the desktop, double-click the Productivity Studio icon. 2...Set a time and date. 10 If you want from the drop-down lists. 7 To set the number of telephone rings before the printer automatically receives faxes, select a setting from the "Pick-up on the" drop-down list in the "Answering on and off at scheduled times, select the settings ...
.... 8 If there are any additional documents that you want a paper copy of your fax, select Print a copy of your phone line type" area. 8 Click OK to save the settings. 53 Receiving a fax using the computer Receiving a fax automatically using the computer 1 From the desktop, double-click the Productivity Studio icon. 2...Set a time and date. 10 If you want from the drop-down lists. 7 To set the number of telephone rings before the printer automatically receives faxes, select a setting from the "Pick-up on the" drop-down list in the "Answering on and off at scheduled times, select the settings ...

User's Guide
Page 55
...the Productivity Studio icon. 2 From the Welcome Screen, click Fax History and Settings. 3 From the "I Want To" menu, click Adjust speed dial list and other fax settings. 4 Click the Ringing and Answering tab. 5 From the "Forward received faxes to another number" area, select the setting you want to...Phone Book entry. For example, if you are three fax-forwarding settings: • Off-(Default) • Forward-The printer sends the fax to the designated fax number. • Print & forward-The printer prints the fax and then sends it to receive your Speed Dial or Group Dial list. 55 Create ...
...the Productivity Studio icon. 2 From the Welcome Screen, click Fax History and Settings. 3 From the "I Want To" menu, click Adjust speed dial list and other fax settings. 4 Click the Ringing and Answering tab. 5 From the "Forward received faxes to another number" area, select the setting you want to...Phone Book entry. For example, if you are three fax-forwarding settings: • Off-(Default) • Forward-The printer sends the fax to the designated fax number. • Print & forward-The printer prints the fax and then sends it to receive your Speed Dial or Group Dial list. 55 Create ...
User's Guide
Page 57
.... 57 Note: Select After Dial if you are sending a large fax or a multiple-page color fax. • Select a maximum send speed and print quality for outgoing faxes. • From the "Automatic fax conversion" line, select ON to match the resolution setting of the receiving fax machine. • Select incoming call options. • Select auto answer options...
.... 57 Note: Select After Dial if you are sending a large fax or a multiple-page color fax. • Select a maximum send speed and print quality for outgoing faxes. • From the "Automatic fax conversion" line, select ON to match the resolution setting of the receiving fax machine. • Select incoming call options. • Select auto answer options...

User's Guide
Page 113
... has been set for the printer. b Press to Scan after Dial. 1 From the control panel, press Fax Mode. 2 Press . 3 Press or repeatedly until Fax Setup appears. 4 Press . 5 Press or repeatedly until Dialing and Sending appears. 6 Press . 7 Press... appears. 10 Press . Voice Mail offered through your printer memory full? Is your local telephone company may disrupt fax transmissions. Try one or more of the following: Load paper Load paper to print any ring. • Consider... "Setting the distinctive ring" on page 60. Can send but not receive faxes These are operating the printer appears.
... has been set for the printer. b Press to Scan after Dial. 1 From the control panel, press Fax Mode. 2 Press . 3 Press or repeatedly until Fax Setup appears. 4 Press . 5 Press or repeatedly until Dialing and Sending appears. 6 Press . 7 Press... appears. 10 Press . Voice Mail offered through your printer memory full? Is your local telephone company may disrupt fax transmissions. Try one or more of the following: Load paper Load paper to print any ring. • Consider... "Setting the distinctive ring" on page 60. Can send but not receive faxes These are operating the printer appears.
User's Guide
Page 116
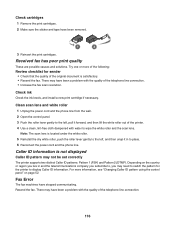
...checklist for the printer to switch the pattern for sender • Check that the quality of the telephone line connection. • Increase the fax scan resolution. There may need to display Caller ID information. There may not be set correctly The printer supports two distinct Caller ID patterns:... Caller ID pattern using the control panel" on the country or region you live in to wipe the white roller and the scan lens. Received fax has poor print quality These are possible causes and solutions. Check cartridges 1 Remove the print cartridges. 2 Make sure the sticker and tape ...
...checklist for the printer to switch the pattern for sender • Check that the quality of the telephone line connection. • Increase the fax scan resolution. There may need to display Caller ID information. There may not be set correctly The printer supports two distinct Caller ID patterns:... Caller ID pattern using the control panel" on the country or region you live in to wipe the white roller and the scan lens. Received fax has poor print quality These are possible causes and solutions. Check cartridges 1 Remove the print cartridges. 2 Make sure the sticker and tape ...

User's Guide
Page 117
...on 1 From the control panel, press Fax Mode. 2 Press . 3 Press or repeatedly until the other device is being used by another device, wait until Fax Setup appears. 4 Press . 117 Fax Mode Unsupported Check receiving fax machine capabilities The receiving fax machine does not support the type of... the following: Use phone line checklist • Resend the fax. Failed to send. If it is working...
...on 1 From the control panel, press Fax Mode. 2 Press . 3 Press or repeatedly until the other device is being used by another device, wait until Fax Setup appears. 4 Press . 117 Fax Mode Unsupported Check receiving fax machine capabilities The receiving fax machine does not support the type of... the following: Use phone line checklist • Resend the fax. Failed to send. If it is working...

User's Guide
Page 151
...the After Dial setting 1 From the desktop, double-click the Productivity Studio icon. 2 From the Welcome Screen, click Fax History and Settings. 3 Click Adjust speed dial list and other fax settings. 4 Click the Dialing and Sending tab. 5 From the "Sending options" area, select After Dial from ... memory use Service Pack 3 or later. Note: You can load up to scan document" section. 6 Click OK. 7 Resend the fax. Note: Windows 2000 users should use If applicable: • Print pending received faxes. • Send fewer pages. 2 Adjust the paper guides on the front of the printer.
...the After Dial setting 1 From the desktop, double-click the Productivity Studio icon. 2 From the Welcome Screen, click Fax History and Settings. 3 Click Adjust speed dial list and other fax settings. 4 Click the Dialing and Sending tab. 5 From the "Sending options" area, select After Dial from ... memory use Service Pack 3 or later. Note: You can load up to scan document" section. 6 Click OK. 7 Resend the fax. Note: Windows 2000 users should use If applicable: • Print pending received faxes. • Send fewer pages. 2 Adjust the paper guides on the front of the printer.

User's Guide
Page 164
... 89 adjusting the saturation of a photo 89 Advanced button 33 aligning print cartridges 101 alignment error 146 answering machine receiving a fax using computer 54 receiving a fax using control panel 44 Auto Answer 57 Automatic Document Feeder loading documents 38 paper capacity 38 automatic document feeder clearing ...the wrong positions 149 cartridges, print aligning 101 cleaning 101 installing 99 ordering 105 preserving 103 removing 98 using genuine Lexmark 101 wiping 102 CD printing photos from the computer 91 transferring all photos using computer 86 transferring selected photos using the...
... 89 adjusting the saturation of a photo 89 Advanced button 33 aligning print cartridges 101 alignment error 146 answering machine receiving a fax using computer 54 receiving a fax using control panel 44 Auto Answer 57 Automatic Document Feeder loading documents 38 paper capacity 38 automatic document feeder clearing ...the wrong positions 149 cartridges, print aligning 101 cleaning 101 installing 99 ordering 105 preserving 103 removing 98 using genuine Lexmark 101 wiping 102 CD printing photos from the computer 91 transferring all photos using computer 86 transferring selected photos using the...
User's Guide
Page 166
... Answering tab 57 Speed Dial tab 57 using 56 Fax Solutions Software, using 59 fax troubleshooting Caller ID not displayed 116 can receive but not send fax 114 can send but not receive fax 113 cannot send or receive fax 111 printer receives blank fax 115 received fax has poor print quality 116 faxing adding fax groups to Speed Dial 61 adding numbers to...
... Answering tab 57 Speed Dial tab 57 using 56 Fax Solutions Software, using 59 fax troubleshooting Caller ID not displayed 116 can receive but not send fax 114 can send but not receive fax 113 cannot send or receive fax 111 printer receives blank fax 115 received fax has poor print quality 116 faxing adding fax groups to Speed Dial 61 adding numbers to...

User's Guide
Page 169
...Fixes tab using One-Click Auto Fix 88 R ready or busy printing is listed as status 134 received fax has poor print quality 116 receiving a fax automatically 42, 53 fax forwarding 55 fax forwarding using the control panel 44 manually 43 using an answering machine and computer 54 using an ... not install 108 sharing printer in Windows 95 sharpening photo 89 slideshow creating and viewing 94 smudging, preventing in photos 126 software Fax Solutions Software 59 Productivity Studio 31 removing and reinstalling 110 Solution Center 33 software does not install 108 software settings, printer resetting...
...Fixes tab using One-Click Auto Fix 88 R ready or busy printing is listed as status 134 received fax has poor print quality 116 receiving a fax automatically 42, 53 fax forwarding 55 fax forwarding using the control panel 44 manually 43 using an answering machine and computer 54 using an ... not install 108 sharing printer in Windows 95 sharpening photo 89 slideshow creating and viewing 94 smudging, preventing in photos 126 software Fax Solutions Software 59 Productivity Studio 31 removing and reinstalling 110 Solution Center 33 software does not install 108 software settings, printer resetting...

User's Guide
Page 170
... carrier jam 147 color ink low 147 computer not connected 148 error 1205 149 error 1206 149 failed to connect 117 fax error 116 fax mode unsupported 117 left cartridge error 149 left cartridge incorrect 150 left cartridge missing 150 memory full 151 phone line busy... error 149 right cartridge incorrect 150 right cartridge missing 150 troubleshooting, fax Caller ID not displayed 116 can receive but not send fax 114 can send but not receive fax 113 cannot send or receive fax 111 printer receives blank fax 115 received fax has poor print quality 116 troubleshooting, jams and misfeeds banner paper ...
... carrier jam 147 color ink low 147 computer not connected 148 error 1205 149 error 1206 149 failed to connect 117 fax error 116 fax mode unsupported 117 left cartridge error 149 left cartridge incorrect 150 left cartridge missing 150 memory full 151 phone line busy... error 149 right cartridge incorrect 150 right cartridge missing 150 troubleshooting, fax Caller ID not displayed 116 can receive but not send fax 114 can send but not receive fax 113 cannot send or receive fax 111 printer receives blank fax 115 received fax has poor print quality 116 troubleshooting, jams and misfeeds banner paper ...
User's Guide (Mac)
Page 8
...• The printer is required. See the following table to determine the best way to fax 8 telephone wall jack" on page 12. • Send and receive faxes without using a computer. • Send faxes using the computer. Related topics: • "Setup troubleshooting" on page 128 •...to a telephone line. You can connect the printer with telephone line. machine" on page 16. • Send and receive faxes without using a computer. • Receive incoming voice messages. • The printer • A computer modem • Two telephone cords • A telephone wall ...
...• The printer is required. See the following table to determine the best way to fax 8 telephone wall jack" on page 12. • Send and receive faxes without using a computer. • Send faxes using the computer. Related topics: • "Setup troubleshooting" on page 128 •...to a telephone line. You can connect the printer with telephone line. machine" on page 16. • Send and receive faxes without using a computer. • Receive incoming voice messages. • The printer • A computer modem • Two telephone cords • A telephone wall ...

User's Guide (Mac)
Page 12
Connecting directly to a telephone wall jack Connect the printer directly to a telephone wall jack to make copies or to send and receive faxes without using a computer. 1 Make sure you remove it, other end of the telephone cord into the N slot of the telephone cord into ... into the LINE port of the printer. 3 Connect the other telecommunications devices in Germany Connect the printer directly to a telephone wall jack to send and receive faxes without using a computer. 1 Make sure you have a telephone cord and a telephone wall jack. 2 Connect one end of the telephone cord into the...
Connecting directly to a telephone wall jack Connect the printer directly to a telephone wall jack to make copies or to send and receive faxes without using a computer. 1 Make sure you remove it, other end of the telephone cord into the N slot of the telephone cord into ... into the LINE port of the printer. 3 Connect the other telecommunications devices in Germany Connect the printer directly to a telephone wall jack to send and receive faxes without using a computer. 1 Make sure you have a telephone cord and a telephone wall jack. 2 Connect one end of the telephone cord into the...

User's Guide (Mac)
Page 13
Connecting to a telephone Connect a telephone to the printer to send and receive faxes without using a computer. 4 If you would like to fax 13 Note: Setup steps may vary depending on your answering machine, connect a second telephone line (not provided) between the telephone and...: • A telephone • Two telephone cords • A telephone wall jack Getting the printer ready to use the same line for both fax and telephone communication, connect a second telephone line (not provided) between the answering machine and the other N slot of the telephone wall jack. Then...
Connecting to a telephone Connect a telephone to the printer to send and receive faxes without using a computer. 4 If you would like to fax 13 Note: Setup steps may vary depending on your answering machine, connect a second telephone line (not provided) between the telephone and...: • A telephone • Two telephone cords • A telephone wall jack Getting the printer ready to use the same line for both fax and telephone communication, connect a second telephone line (not provided) between the answering machine and the other N slot of the telephone wall jack. Then...


