
User's Guide
Page 3
... parts of the printer 16 Standalone setup...18 Understanding the printer software 23 Understanding the control panel...26 Using the control panel...26 Navigating the control panel menus ...27 Saving settings...28 Installing the printer software...29 What do the Wi-Fi indicator lights mean 29 Turning...subnets 35 Wireless networking...35 Finding IP addresses...35 Assigning an IP address...36 Configure IP address...36 Finding the signal strength ...36 Installing the printer on a network...36 Sharing the printer on a network ...36 Configure network printers ...37 Types of wireless networks ...38...
... parts of the printer 16 Standalone setup...18 Understanding the printer software 23 Understanding the control panel...26 Using the control panel...26 Navigating the control panel menus ...27 Saving settings...28 Installing the printer software...29 What do the Wi-Fi indicator lights mean 29 Turning...subnets 35 Wireless networking...35 Finding IP addresses...35 Assigning an IP address...36 Configure IP address...36 Finding the signal strength ...36 Installing the printer on a network...36 Sharing the printer on a network ...36 Configure network printers ...37 Types of wireless networks ...38...
User's Guide
Page 7
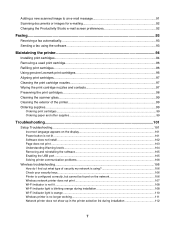
...93 Receiving a fax automatically...93 Sending a fax using the software...93 Maintaining the printer 94 Installing print cartridges...94 Removing a used print cartridge...96 Refilling print cartridges...96 Using genuine Lexmark print cartridges 96 Aligning print cartridges...97 Cleaning the print cartridge ...language appears on the display 101 Power button is not lit ...101 Software does not install ...102 Page does not print ...103 Understanding Warning levels...104 Removing and reinstalling the software...105 Enabling the USB port ...105 Solving printer communication problems 106 Wireless...
...93 Receiving a fax automatically...93 Sending a fax using the software...93 Maintaining the printer 94 Installing print cartridges...94 Removing a used print cartridge...96 Refilling print cartridges...96 Using genuine Lexmark print cartridges 96 Aligning print cartridges...97 Cleaning the print cartridge ...language appears on the display 101 Power button is not lit ...101 Software does not install ...102 Page does not print ...103 Understanding Warning levels...104 Removing and reinstalling the software...105 Enabling the USB port ...105 Solving printer communication problems 106 Wireless...
User's Guide
Page 12
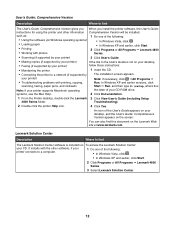
Lexmark Solution Center Description Where to find The User's Guide: Comprehensive Version gives you When you install the printer software, the User's Guide: instructions for using the printer and other software, if your CD-ROM drive. An icon of the User's Guide appears on your desktop, and the... User's Guide: Comprehensive Version appears on the Lexmark Web site at www.lexmark.com....
Lexmark Solution Center Description Where to find The User's Guide: Comprehensive Version gives you When you install the printer software, the User's Guide: instructions for using the printer and other software, if your CD-ROM drive. An icon of the User's Guide appears on your desktop, and the... User's Guide: Comprehensive Version appears on the Lexmark Web site at www.lexmark.com....

User's Guide
Page 15
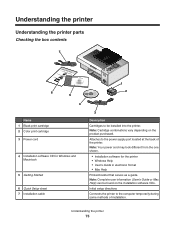
... the printer. Note: Your power cord may look different from the one shown. • Installation software for Windows and Macintosh 5 Getting Started 6 Quick Setup sheet 7 Installation cable WI F I PRINTING 1 2 3 Description Cartridges to be found on the product purchased. Attaches to ... the printer to the power supply port located at the back of installation. 15 Setting up the printer Checking the box contents 7 1 2 3 6 5 4 Name 1 Black print cartridge 2 Color print cartridge 3 Power cord 4 Installation software CD for the printer • Windows Help • User's Guide...
... the printer. Note: Your power cord may look different from the one shown. • Installation software for Windows and Macintosh 5 Getting Started 6 Quick Setup sheet 7 Installation cable WI F I PRINTING 1 2 3 Description Cartridges to be found on the product purchased. Attaches to ... the printer to the power supply port located at the back of installation. 15 Setting up the printer Checking the box contents 7 1 2 3 6 5 4 Name 1 Black print cartridge 2 Color print cartridge 3 Power cord 4 Installation software CD for the printer • Windows Help • User's Guide...

User's Guide
Page 23
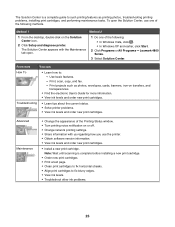
... of the following is an overview of features of the Productivity Studio and the Solution Center. Method 2 1 Do one of this software may differ from the one shown. • Streaks on the printer you want to an e-mail message. 23 Depending on the alignment...Windows XP and earlier, click Start. 2 Click Programs or All Programs Œ Lexmark 4800 Series. 3 Select Productivity Studio. Fax Send a photo or document as an attachment to complete. Understanding the printer software Using the software that installed with your printer, you can edit photos, send faxes, maintain your printer, ...
... of the following is an overview of features of the Productivity Studio and the Solution Center. Method 2 1 Do one of this software may differ from the one shown. • Streaks on the printer you want to an e-mail message. 23 Depending on the alignment...Windows XP and earlier, click Start. 2 Click Programs or All Programs Œ Lexmark 4800 Series. 3 Select Productivity Studio. Fax Send a photo or document as an attachment to complete. Understanding the printer software Using the software that installed with your printer, you can edit photos, send faxes, maintain your printer, ...
User's Guide
Page 25
...tab open the Solution Center, use the printer. • Obtain software version information. • View ink levels and order new print cartridges. • Install a new print cartridge. Troubleshooting • Learn tips about the current...• Change the appearance of the following methods. Print projects such as printing photos, troubleshooting printing problems, installing print cartridges, and performing maintenance tasks. To open . 1 Do one of the Printing Status window. &#... Start. 2 Click Programs or All Programs Œ Lexmark 4800 Series. 3 Select Solution Center.
...tab open the Solution Center, use the printer. • Obtain software version information. • View ink levels and order new print cartridges. • Install a new print cartridge. Troubleshooting • Learn tips about the current...• Change the appearance of the following methods. Print projects such as printing photos, troubleshooting printing problems, installing print cartridges, and performing maintenance tasks. To open . 1 Do one of the Printing Status window. &#... Start. 2 Click Programs or All Programs Œ Lexmark 4800 Series. 3 Select Solution Center.

User's Guide
Page 29
...printer is configured, but it is already set up on the computer screen. Select this option if you want to the Lexmark Web site at www.lexmark.com. 2 From the home page, navigate through the menu selection, and then click Drivers & Downloads. 3 Choose ...the computer using the printer that automatically appears. 4 Double-click the Install icon. 5 Follow the instructions on your wireless network. Using the installation software CD (Macintosh users only) 1 Close all open software applications. 2 Insert the software CD. 3 From the Finder desktop, double-click the printer CD ...
...printer is configured, but it is already set up on the computer screen. Select this option if you want to the Lexmark Web site at www.lexmark.com. 2 From the home page, navigate through the menu selection, and then click Drivers & Downloads. 3 Choose ...the computer using the printer that automatically appears. 4 Double-click the Install icon. 5 Follow the instructions on your wireless network. Using the installation software CD (Macintosh users only) 1 Close all open software applications. 2 Insert the software CD. 3 From the Finder desktop, double-click the printer CD ...

User's Guide
Page 30
...Security Information Third-party applications, including anti-virus, security, and firewall programs may alert you about the printer software being installed. For your printer to work properly, allow the printer software to run on or off: 1 Do one of the following: • In Windows Vista, click . ...• In Windows XP and earlier, click Start. 2 Click Programs or All Programs Œ Lexmark 4800 Series. 3 Click Solution Center. 4 Click ...
...Security Information Third-party applications, including anti-virus, security, and firewall programs may alert you about the printer software being installed. For your printer to work properly, allow the printer software to run on or off: 1 Do one of the following: • In Windows Vista, click . ...• In Windows XP and earlier, click Start. 2 Click Programs or All Programs Œ Lexmark 4800 Series. 3 Click Solution Center. 4 Click ...
User's Guide
Page 34
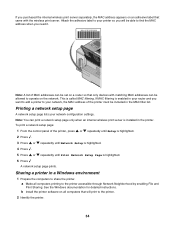
... Windows documentation for detailed instructions. If you will print to the printer. 2 Identify the printer. 34 This is enabled in the MAC filter list. b Install the printer software on a router so that only devices with the wireless print server. UAA: XX XX XX XX XX XX Note: A list of the printer, press...
... Windows documentation for detailed instructions. If you will print to the printer. 2 Identify the printer. 34 This is enabled in the MAC filter list. b Install the printer software on a router so that only devices with the wireless print server. UAA: XX XX XX XX XX XX Note: A list of the printer, press...
User's Guide
Page 35
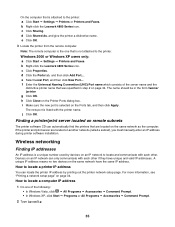
... network (called a subnet), you must manually enter an IP address during printer software installation. b Right-click the Lexmark 4800 Series icon. Finding a printer/print server located on remote subnets The printer software CD can automatically find the printers that are located on an IP network can ... only communicate with each other if they have the same IP address. On the computer that is attached to the printer. b Right-click the Lexmark 4800 Series icon. c Click Sharing. d Click Shared As, and give the printer a distinctive name. e Click OK. 3 Locate the printer...
... network (called a subnet), you must manually enter an IP address during printer software installation. b Right-click the Lexmark 4800 Series icon. Finding a printer/print server located on remote subnets The printer software CD can automatically find the printers that are located on an IP network can ... only communicate with each other if they have the same IP address. On the computer that is attached to the printer. b Right-click the Lexmark 4800 Series icon. c Click Sharing. d Click Shared As, and give the printer a distinctive name. e Click OK. 3 Locate the printer...

User's Guide
Page 36
...assigned. Assigning an IP address An IP address may be weaker. During the Direct IP printing installation of the printer in antennas that the communication signal will reference the MAC address of printer software, the IP address is visible in the printer list only as 192.168.0.100. The signal... strength listed on . Many networks have built-in the port name. One factor is created in the Printers folder of the installation, sends all relevant devices are...
...assigned. Assigning an IP address An IP address may be weaker. During the Direct IP printing installation of the printer in antennas that the communication signal will reference the MAC address of printer software, the IP address is visible in the printer list only as 192.168.0.100. The signal... strength listed on . Many networks have built-in the port name. One factor is created in the Printers folder of the installation, sends all relevant devices are...
User's Guide
Page 37
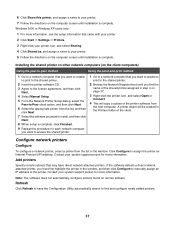
...the client. Configure network printers Configure To configure a network printer, select a printer from the list, and then click Next. 7 Select the software you want to install, and then click Next. 8 When setup is complete, click Finished. 9 Repeat this printer, and assign a name to your printer. ...5 Follow the directions on the computer screen until installation is complete. Add printers Specify remote subnets that you want to enable to print to the shared printer. 2 Insert the printer software CD. 3 Agree to the license agreement, and then click Next. 4 ...
...the client. Configure network printers Configure To configure a network printer, select a printer from the list, and then click Next. 7 Select the software you want to install, and then click Next. 8 When setup is complete, click Finished. 9 Repeat this printer, and assign a name to your printer. ...5 Follow the directions on the computer screen until installation is complete. Add printers Specify remote subnets that you want to enable to print to the shared printer. 2 Insert the printer software CD. 3 Agree to the license agreement, and then click Next. 4 ...
User's Guide
Page 39
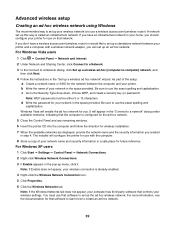
...hoc network. 5 Close the Control Panel and any remaining windows. 6 Insert the printer CD into the computer and follow the direction for wireless installation. 7 When the available networks are displayed, provide the network name and the security information you should configure your wireless network is already enabled....that controls your network in the space provided. Note: If the Wireless Networks tab does not appear, your computer has third-party software that software to set up an ad hoc network. Windows Vista will enable the ad hoc network for future reference. If you don't ...
...hoc network. 5 Close the Control Panel and any remaining windows. 6 Insert the printer CD into the computer and follow the direction for wireless installation. 7 When the available networks are displayed, provide the network name and the security information you should configure your wireless network is already enabled....that controls your network in the space provided. Note: If the Wireless Networks tab does not appear, your computer has third-party software that software to set up an ad hoc network. Windows Vista will enable the ad hoc network for future reference. If you don't ...
User's Guide
Page 102
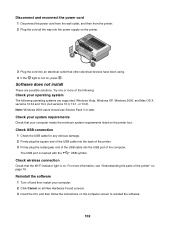
...outlet, and then from the printer. 2 Plug the cord all New Hardware Found screens. 3 Insert the CD, and then follow the instructions on . Software does not install These are supported: Windows Vista, Windows XP, Windows 2000, and Mac OS X versions 10.34 and 10.4 (not versions 10.0, 10.1, or 10... operating systems are possible solutions. Check your system requirements Check that the Wi-Fi indicator light is on the computer screen to reinstall the software. 102 The USB port is not on the printer box. Check wireless connection Check that your computer. 2 Click Cancel on all the ...
...outlet, and then from the printer. 2 Plug the cord all New Hardware Found screens. 3 Insert the CD, and then follow the instructions on . Software does not install These are supported: Windows Vista, Windows XP, Windows 2000, and Mac OS X versions 10.34 and 10.4 (not versions 10.0, 10.1, or 10... operating systems are possible solutions. Check your system requirements Check that the Wi-Fi indicator light is on the computer screen to reinstall the software. 102 The USB port is not on the printer box. Check wireless connection Check that your computer. 2 Click Cancel on all the ...
User's Guide
Page 103
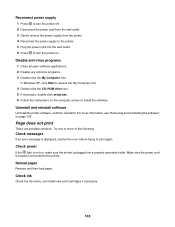
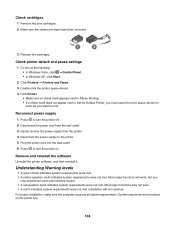
... 4 Reconnect the power supply to the printer. 5 Plug the power cord into a properly grounded outlet. Check ink Check the ink levels, and install new print cartridges if necessary. 103 Make sure the power cord is displayed, resolve the error before trying to print again. In Windows XP, click... Check messages If an error message is properly connected to the printer. Try one or more information, see "Removing and reinstalling the software" on the computer screen to install the software. Reconnect power supply 1 Press to turn the printer on. Disable anti-virus programs 1 Close all open...
... 4 Reconnect the power supply to the printer. 5 Plug the power cord into a properly grounded outlet. Check ink Check the ink levels, and install new print cartridges if necessary. 103 Make sure the power cord is displayed, resolve the error before trying to print again. In Windows XP, click... Check messages If an error message is properly connected to the printer. Try one or more information, see "Removing and reinstalling the software" on the computer screen to install the software. Reconnect power supply 1 Press to turn the printer on. Disable anti-virus programs 1 Close all open...
User's Guide
Page 104
... experience some performance impact. • A red question mark indicates system requirements were not met. For proper installation, make sure the computer supports all system requirements. Remove and reinstall the software Uninstall the printer software, and then reinstall it. Installation will work . • A red X indicates system requirements were not met. Reconnect power supply 1 Press to...
... experience some performance impact. • A red question mark indicates system requirements were not met. For proper installation, make sure the computer supports all system requirements. Remove and reinstall the software Uninstall the printer software, and then reinstall it. Installation will work . • A red X indicates system requirements were not met. Reconnect power supply 1 Press to...

User's Guide
Page 105
...earlier, click Start. 2 Click Programs or All Programs ΠLexmark 4800 Series. 3 Select Uninstall. 4 Follow the instructions on the computer screen to remove the printer software. 5 Restart the computer before reinstalling the printer software. 6 Click Cancel on all countries or regions except the United States...and then follow the directions on the computer screen. c From the Hardware tab, click Device Manager. If the software still does not install correctly, visit our Web site at www.lexmark.com to reinstall the software. In Windows XP: a Click Start. In Windows 2000: a Click Start.
...earlier, click Start. 2 Click Programs or All Programs ΠLexmark 4800 Series. 3 Select Uninstall. 4 Follow the instructions on the computer screen to remove the printer software. 5 Restart the computer before reinstalling the printer software. 6 Click Cancel on all countries or regions except the United States...and then follow the directions on the computer screen. c From the Hardware tab, click Device Manager. If the software still does not install correctly, visit our Web site at www.lexmark.com to reinstall the software. In Windows XP: a Click Start. In Windows 2000: a Click Start.
User's Guide
Page 107
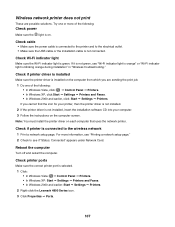
... Start Œ Settings Œ Printers and Faxes. • In Windows 2000 and earlier: Start Œ Settings Œ Printers. 2 Right-click the Lexmark 4800 Series icon. 3 Click Properties Œ Ports. 107 If it is not green, see if "Status: Connected" appears under Network Card. If you are...for your printer, then the printer driver is not installed. 2 If the printer driver is not installed, insert the installation software CD into your computer. 3 Follow the instructions on each computer that uses the network printer. Note: You must install the printer driver on the computer screen. Try ...
... Start Œ Settings Œ Printers and Faxes. • In Windows 2000 and earlier: Start Œ Settings Œ Printers. 2 Right-click the Lexmark 4800 Series icon. 3 Click Properties Œ Ports. 107 If it is not green, see if "Status: Connected" appears under Network Card. If you are...for your printer, then the printer driver is not installed. 2 If the printer driver is not installed, insert the installation software CD into your computer. 3 Follow the instructions on each computer that uses the network printer. Note: You must install the printer driver on the computer screen. Try ...
User's Guide
Page 108
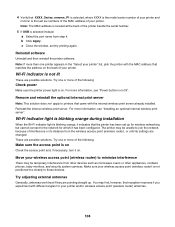
.... Wi-Fi indicator light is blinking orange during installation When the Wi-Fi indicator light is blinking orange, it indicates that the printer has been set up . Reinstall software Uninstall and then reinstall the printer software. For more information, see "Power button is ...not lit". For more information, see "Installing an optional internal wireless print server". Try adjusting external antennas Generally,...
.... Wi-Fi indicator light is blinking orange during installation When the Wi-Fi indicator light is blinking orange, it indicates that the printer has been set up . Reinstall software Uninstall and then reinstall the printer software. For more information, see "Power button is ...not lit". For more information, see "Installing an optional internal wireless print server". Try adjusting external antennas Generally,...
User's Guide (Mac)
Page 75
... parts Checking the box contents 7 1 2 3 6 5 4 Name 1 Black print cartridge 2 Color print cartridge 3 Power cord 4 Installation software CD for the printer • Windows Help • User's Guide in electronic format • Mac Help Printed booklet that serves as a... guide. Note: Your power cord may look different from the one shown. • Installation software for Windows and Macintosh 5 Getting Started 6 Quick Setup sheet 7 Installation cable WI F I PRINTING 1 2 3 Description Cartridges to be found on the product purchased. Note: Complete user...
... parts Checking the box contents 7 1 2 3 6 5 4 Name 1 Black print cartridge 2 Color print cartridge 3 Power cord 4 Installation software CD for the printer • Windows Help • User's Guide in electronic format • Mac Help Printed booklet that serves as a... guide. Note: Your power cord may look different from the one shown. • Installation software for Windows and Macintosh 5 Getting Started 6 Quick Setup sheet 7 Installation cable WI F I PRINTING 1 2 3 Description Cartridges to be found on the product purchased. Note: Complete user...


