User's Guide
Page 5
...Aligning the print cartridge using the computer 54 Cleaning the print cartridge nozzles...54 Wiping the print cartridge nozzles and contacts 55 Preserving the print cartridge...56 Cleaning the scanner glass...56 Ordering supplies...56 Using genuine Lexmark print cartridges 56 Refilling a print cartridge...57 Recycling Lexmark products...57 Troubleshooting...61 Poor text and graphic quality...62 Poor quality at the edges of the page...63 Print speed is slow...63 Printer does not print or respond...64 Partial document or photo prints...64 Copy troubleshooting...64 Copier does not respond...64 ...
...Aligning the print cartridge using the computer 54 Cleaning the print cartridge nozzles...54 Wiping the print cartridge nozzles and contacts 55 Preserving the print cartridge...56 Cleaning the scanner glass...56 Ordering supplies...56 Using genuine Lexmark print cartridges 56 Refilling a print cartridge...57 Recycling Lexmark products...57 Troubleshooting...61 Poor text and graphic quality...62 Poor quality at the edges of the page...63 Print speed is slow...63 Printer does not print or respond...64 Partial document or photo prints...64 Copy troubleshooting...64 Copier does not respond...64 ...
User's Guide
Page 6
......69 Printer does not feed paper, envelopes, or specialty media 69 Banner paper jams...69 Memory card troubleshooting...70 Memory card cannot be inserted...70 Nothing happens when a memory card is inserted 70 Error messages on display...70 Error messages...71 Alignment problem...71 Cartridge Error...71 Cartridge missing......selected...73 No photo/paper size selection has been made 73 No photo files found...73 No proof sheet information...73 Only one device or media card is allowed 74 Paper skewed, please reposition 74 Change paper size setting...74 PictBridge Communications Error 74 6
......69 Printer does not feed paper, envelopes, or specialty media 69 Banner paper jams...69 Memory card troubleshooting...70 Memory card cannot be inserted...70 Nothing happens when a memory card is inserted 70 Error messages on display...70 Error messages...71 Alignment problem...71 Cartridge Error...71 Cartridge missing......selected...73 No photo/paper size selection has been made 73 No photo files found...73 No proof sheet information...73 Only one device or media card is allowed 74 Paper skewed, please reposition 74 Change paper size setting...74 PictBridge Communications Error 74 6
User's Guide
Page 10
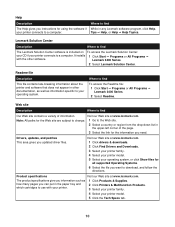
...; Programs or All Programs Πwith your printer. 1 Click Products & Supplies. 2 Click Printers & Multifunction Products. 3 Select your printer family. 4 Select your printer model. 5 Click the Tech Specs tab. 10 Lexmark 3400 Series. 2 Select Lexmark Solution Center. Web site Description Where to find While in the paper tray and which cartridges to use with the other documentation, as...
...; Programs or All Programs Πwith your printer. 1 Click Products & Supplies. 2 Click Printers & Multifunction Products. 3 Select your printer family. 4 Select your printer model. 5 Click the Tech Specs tab. 10 Lexmark 3400 Series. 2 Select Lexmark Solution Center. Web site Description Where to find While in the paper tray and which cartridges to use with the other documentation, as...
User's Guide
Page 11
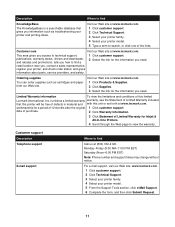
...and rebates and promotions; Customer care Visit our Web site at www.lexmark.com. 1 Click Products & Supplies. 2 Click Supplies. 3 Select the link for Inkjet & All-In-One Printers. 4 Scroll through the Web page to search, or click one of the links. This area gives you need . date of ... PM EST) Saturday (Noon-6:00 PM EST) Note: Phone number and support times may change without notice. tells you information such as cartridges and paper from our Web site. and gives information about parts, service providers, and safety. workmanship for the information you , contact ...
...and rebates and promotions; Customer care Visit our Web site at www.lexmark.com. 1 Click Products & Supplies. 2 Click Supplies. 3 Select the link for Inkjet & All-In-One Printers. 4 Scroll through the Web page to search, or click one of the links. This area gives you need . date of ... PM EST) Saturday (Noon-6:00 PM EST) Note: Phone number and support times may change without notice. tells you information such as cartridges and paper from our Web site. and gives information about parts, service providers, and safety. workmanship for the information you , contact ...
User's Guide
Page 13
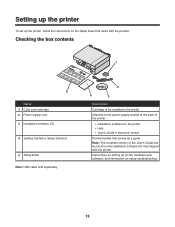
... Started or Setup Solutions 5 Setup sheet Note: USB cable sold separately 2 4 3 Description Cartridge to be installed in the printer Attaches to the power supply located at the back of the printer • Installation software for the printer • Help • User's Guide in electronic format Printed booklet that serves as a ...guide Note: The complete version of the User's Guide can be found on the installation software CD that came with the printer. Instructions on setting up the printer, follow the instructions on the Setup sheet that shipped with the product. Setting up the...
... Started or Setup Solutions 5 Setup sheet Note: USB cable sold separately 2 4 3 Description Cartridge to be installed in the printer Attaches to the power supply located at the back of the printer • Installation software for the printer • Help • User's Guide in electronic format Printed booklet that serves as a ...guide Note: The complete version of the User's Guide can be found on the installation software CD that came with the printer. Instructions on setting up the printer, follow the instructions on the Setup sheet that shipped with the product. Setting up the...
User's Guide
Page 15
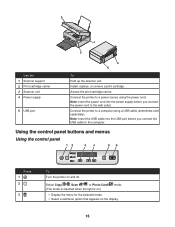
... • Display the menu for the selected mode. • Select a submenu option that appears on and off. Connect the printer to the wall outlet. 3 1 2 Use the 1 Scanner support 2 Print cartridge carrier 3 Scanner unit 4 Power supply 5 USB port 4 5 To Hold up the scanner unit. Note: Insert the USB... and menus Using the control panel Press 1 2 3 To Turn the printer on the display. 15 Note: Insert the power cord into the USB port before you connect the USB cable to a computer using the power cord. Access the print cartridge carrier. Install, replace, or remove a print...
... • Display the menu for the selected mode. • Select a submenu option that appears on and off. Connect the printer to the wall outlet. 3 1 2 Use the 1 Scanner support 2 Print cartridge carrier 3 Scanner unit 4 Power supply 5 USB port 4 5 To Hold up the scanner unit. Note: Insert the USB... and menus Using the control panel Press 1 2 3 To Turn the printer on the display. 15 Note: Insert the power cord into the USB port before you connect the USB cable to a computer using the power cord. Access the print cartridge carrier. Install, replace, or remove a print...
User's Guide
Page 18
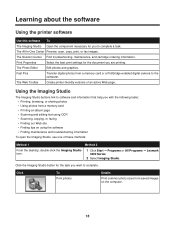
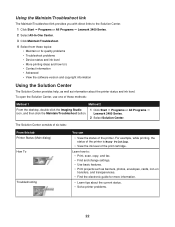
... maintenance and troubleshooting information To open the Imaging Studio, use one of an active Web page. The Web Toolbar Create printer-friendly versions of these methods: Method 1 Method 2 From ...Click Start ΠPrograms or All Programs ΠLexmark 3400 Series. 2 Select Imaging Studio. Learning about the software Using the printer software Use this software To The Imaging Studio Open ...the component necessary for you to complete. The Solution Center Find troubleshooting, maintenance, and cartridge ordering ...
... maintenance and troubleshooting information To open the Imaging Studio, use one of an active Web page. The Web Toolbar Create printer-friendly versions of these methods: Method 1 Method 2 From ...Click Start ΠPrograms or All Programs ΠLexmark 3400 Series. 2 Select Imaging Studio. Learning about the software Using the printer software Use this software To The Imaging Studio Open ...the component necessary for you to complete. The Solution Center Find troubleshooting, maintenance, and cartridge ordering ...
User's Guide
Page 22
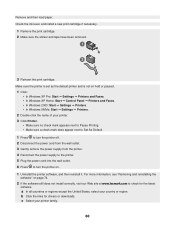
... electronic guide for more information. • Learn tips about the printer status and ink level. To open the Solution Center, use one of the print cartridge. The Solution Center consists of six tabs: From this tab Printer Status (Main dialog) How To Troubleshooting You can • View... the status of the printer. Using the Maintain/Troubleshoot link The Maintain/Troubleshoot link provides you with direct links to the Solution Center. 1 Click Start Œ Programs or All Programs Œ Lexmark 3400 Series. 2 Select All-In-One Center. 3 Click Maintain/Troubleshoot. 4 ...
... electronic guide for more information. • Learn tips about the printer status and ink level. To open the Solution Center, use one of the print cartridge. The Solution Center consists of six tabs: From this tab Printer Status (Main dialog) How To Troubleshooting You can • View... the status of the printer. Using the Maintain/Troubleshoot link The Maintain/Troubleshoot link provides you with direct links to the Solution Center. 1 Click Start Œ Programs or All Programs Œ Lexmark 3400 Series. 2 Select All-In-One Center. 3 Click Maintain/Troubleshoot. 4 ...
User's Guide
Page 23
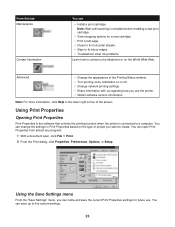
...Setup. Note: For more information, click Help in Print Properties based on the World Wide Web. You can • Install a print cartridge. Advanced • Change the appearance of the Printing Status window. • Turn printing voice notification on or off. • Change ...Print Properties Print Properties is the software that controls the printing function when the printer is complete before installing a new print cartridge. • View shopping options for future use the printer. • Obtain software version information. Note: Wait until scanning is connected to...
...Setup. Note: For more information, click Help in Print Properties based on the World Wide Web. You can • Install a print cartridge. Advanced • Change the appearance of the Printing Status window. • Turn printing voice notification on or off. • Change ...Print Properties Print Properties is the software that controls the printing function when the printer is complete before installing a new print cartridge. • View shopping options for future use the printer. • Obtain software version information. Note: Wait until scanning is connected to...
User's Guide
Page 52
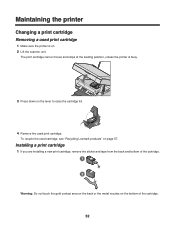
... the back and bottom of the cartridge. 52 To recycle the used print cartridge 1 Make sure the printer is busy. 3 Press down on the lever to raise the cartridge lid. 4 Remove the used print cartridge. Maintaining the printer Changing a print cartridge Removing a used cartridge, see "Recycling Lexmark products" on page 57. The print cartridge carrier moves and stops at the...
... the back and bottom of the cartridge. 52 To recycle the used print cartridge 1 Make sure the printer is busy. 3 Press down on the lever to raise the cartridge lid. 4 Remove the used print cartridge. Maintaining the printer Changing a print cartridge Removing a used cartridge, see "Recycling Lexmark products" on page 57. The print cartridge carrier moves and stops at the...
User's Guide
Page 56
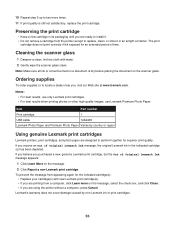
... message. 2 Click Report a non-Lexmark print cartridge. Item Part number Print cartridge 1 USB cable 12A2405 Lexmark Photo Paper and Premium Photo Paper Varies by non-Lexmark ink or print cartridges. 56 Lexmark's warranty does not cover damage caused by country or region Using genuine Lexmark print cartridges Lexmark printers, print cartridges, and photo paper are using the printer without a computer, press Cancel. If...
... message. 2 Click Report a non-Lexmark print cartridge. Item Part number Print cartridge 1 USB cable 12A2405 Lexmark Photo Paper and Premium Photo Paper Varies by non-Lexmark ink or print cartridges. 56 Lexmark's warranty does not cover damage caused by country or region Using genuine Lexmark print cartridges Lexmark printers, print cartridges, and photo paper are using the printer without a computer, press Cancel. If...

User's Guide
Page 57
Lexmark does not recommend use Lexmark supplies. Recycling Lexmark products To return Lexmark products to the printer. For best results, use of failures or damage caused by a refilled cartridge. Refilling a cartridge can affect print quality and may cause damage to Lexmark for recycling: 1 Visit our Web site at www.lexmark.com/recycle. 2 Follow the instructions on the computer screen. 57 Refilling a print cartridge The warranty does not cover repair of a refilled cartridge.
Lexmark does not recommend use Lexmark supplies. Recycling Lexmark products To return Lexmark products to the printer. For best results, use of failures or damage caused by a refilled cartridge. Refilling a cartridge can affect print quality and may cause damage to Lexmark for recycling: 1 Visit our Web site at www.lexmark.com/recycle. 2 Follow the instructions on the computer screen. 57 Refilling a print cartridge The warranty does not cover repair of a refilled cartridge.
User's Guide
Page 60
...remove the power supply from the printer. 4 Reconnect the power supply to the printer. 5 Plug the power cord into the wall outlet. 6 Press to turn the printer on page 74. 2 If the software still does not install correctly, visit our Web site at www.lexmark.com to check for drivers or... downloads. For more information, see "Removing and reinstalling the software" on . 1 Uninstall the printer software, and then reinstall it. Check the ink level, and install a new print cartridge if necessary. 1 Remove the print cartridge. 2 Make sure the ...
...remove the power supply from the printer. 4 Reconnect the power supply to the printer. 5 Plug the power cord into the wall outlet. 6 Press to turn the printer on page 74. 2 If the software still does not install correctly, visit our Web site at www.lexmark.com to check for drivers or... downloads. For more information, see "Removing and reinstalling the software" on . 1 Uninstall the printer software, and then reinstall it. Check the ink level, and install a new print cartridge if necessary. 1 Remove the print cartridge. 2 Make sure the ...
User's Guide
Page 61
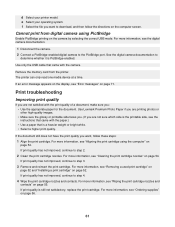
...printer model. Use Lexmark Premium Photo Paper if you are printing photos or other high-quality images. • Make sure the glossy or printable side faces you. (If you are not satisfied with the camera. If print quality has not improved, continue to step 3. 3 Remove and reinsert the print cartridge... page 52. If print quality has not improved, continue to the PictBridge port. The printer can only read one media device at a time. For more information, see "Wiping the print cartridge nozzles and contacts" on page 71. For more information, see "Error messages" on ...
...printer model. Use Lexmark Premium Photo Paper if you are printing photos or other high-quality images. • Make sure the glossy or printable side faces you. (If you are not satisfied with the camera. If print quality has not improved, continue to step 3. 3 Remove and reinsert the print cartridge... page 52. If print quality has not improved, continue to the PictBridge port. The printer can only read one media device at a time. For more information, see "Wiping the print cartridge nozzles and contacts" on page 71. For more information, see "Error messages" on ...

User's Guide
Page 62
... 74. 2 If the software still does not install correctly, visit our Web site at www.lexmark.com to download, and follow the directions on page 61. c Select your printer model. d Select your printer family. Use Lexmark Premium Photo Paper if you want to check for drivers and downloads. For more information, see ...bands in print • Skewed lines • Smudges • Streaks • White lines in print Check the ink level, and install a new print cartridge if necessary. See "Improving print quality" on the computer screen. 62 Poor text and graphic quality Examples of paper.
... 74. 2 If the software still does not install correctly, visit our Web site at www.lexmark.com to download, and follow the directions on page 61. c Select your printer model. d Select your printer family. Use Lexmark Premium Photo Paper if you want to check for drivers and downloads. For more information, see ...bands in print • Skewed lines • Smudges • Streaks • White lines in print Check the ink level, and install a new print cartridge if necessary. See "Improving print quality" on the computer screen. 62 Poor text and graphic quality Examples of paper.
User's Guide
Page 65
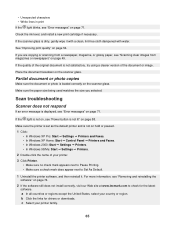
...printer. 3 Click Printer. • Make sure no check mark appears next to Pause Printing. • Make sure a check mark does appear next to check for drivers or downloads. c Select your country or region. See "Improving print quality" on the scanner glass. Check the ink level, and install a new print cartridge...United States, select your printer family. 65 If the scanner glass is displayed, see "Error messages" on page 74. 2 If the software still does not install correctly, visit our Web site at www.lexmark.com to Set As Default. 1 Uninstall the printer software, and then ...
...printer. 3 Click Printer. • Make sure no check mark appears next to Pause Printing. • Make sure a check mark does appear next to check for drivers or downloads. c Select your country or region. See "Improving print quality" on the scanner glass. Check the ink level, and install a new print cartridge...United States, select your printer family. 65 If the scanner glass is displayed, see "Error messages" on page 74. 2 If the software still does not install correctly, visit our Web site at www.lexmark.com to Set As Default. 1 Uninstall the printer software, and then ...
User's Guide
Page 68
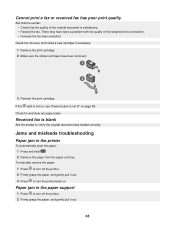
Check the ink level, and install a new cartridge if necessary. 1 Remove the print cartridge. 2 Make sure the sticker and tape have been a problem with the quality of the original document is blank Ask the sender to turn off the printer. 2 Firmly grasp the paper, and gently pull it out. 68 Jams and ..." on . Check for and clear any paper jams. Received fax is satisfactory. • Resend the fax. There may have been removed. 3 Reinsert the print cartridge. Paper jam in the printer To automatically eject the paper: 1 Press and hold . 2 Remove the paper from the paper exit tray.
Check the ink level, and install a new cartridge if necessary. 1 Remove the print cartridge. 2 Make sure the sticker and tape have been a problem with the quality of the original document is blank Ask the sender to turn off the printer. 2 Firmly grasp the paper, and gently pull it out. 68 Jams and ..." on . Check for and clear any paper jams. Received fax is satisfactory. • Resend the fax. There may have been removed. 3 Reinsert the print cartridge. Paper jam in the printer To automatically eject the paper: 1 Press and hold . 2 Remove the paper from the paper exit tray.
User's Guide
Page 71
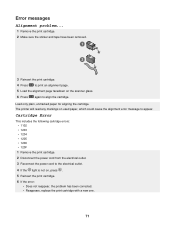
..., which could cause the alignment error message to appear. The printer will read any markings on the scanner glass. 6 Press again to the electrical outlet. 4 If the light is not on, press . 5 Reinsert the print cartridge. 6 If the error: • Does not reappear, the... problem has been corrected. • Reappears, replace the print cartridge with a new one. 71 Cartridge Error This includes the following cartridge errors: • 1102 • 1203 • 1204 • 1205 • 1206 • 120F 1 Remove the print cartridge. 2 Disconnect the power cord from the electrical outlet. 3 ...
..., which could cause the alignment error message to appear. The printer will read any markings on the scanner glass. 6 Press again to the electrical outlet. 4 If the light is not on, press . 5 Reinsert the print cartridge. 6 If the error: • Does not reappear, the... problem has been corrected. • Reappears, replace the print cartridge with a new one. 71 Cartridge Error This includes the following cartridge errors: • 1102 • 1203 • 1204 • 1205 • 1206 • 120F 1 Remove the print cartridge. 2 Disconnect the power cord from the electrical outlet. 3 ...
User's Guide
Page 72
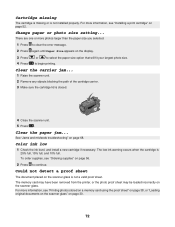
... jam... 1 Raise the scanner unit. 2 Remove any objects blocking the path of the cartridge carrier. 3 Make sure the cartridge lid is not installed properly. The memory card may have been removed from the printer, or the photo proof sheet may be loaded incorrectly on page 68. See "Jams and... you selected. 1 Press to select the paper size option that will fit your largest photo size. Cartridge missing The cartridge is missing or is closed. 4 Close the scanner unit. 5 Press . There are one or more information, see "Printing photos stored on a memory card using the proof sheet" on page...
... jam... 1 Raise the scanner unit. 2 Remove any objects blocking the path of the cartridge carrier. 3 Make sure the cartridge lid is not installed properly. The memory card may have been removed from the printer, or the photo proof sheet may be loaded incorrectly on page 68. See "Jams and... you selected. 1 Press to select the paper size option that will fit your largest photo size. Cartridge missing The cartridge is missing or is closed. 4 Close the scanner unit. 5 Press . There are one or more information, see "Printing photos stored on a memory card using the proof sheet" on page...
User's Guide
Page 83
..., finding 9 ink level, checking 22 insert camera/memory card error 73 inserting memory cards 36 PictBridge-enabled digital camera 37 installing print cartridge 52 printer software 74 invalid photo/paper size selection 73 iron-on transfers, loading 28 J jams and misfeeds troubleshooting banner paper jams 69 paper jam... nothing happens when memory card is inserted 70 notices 76, 77, 78, 79 N-up feature 34 O OCR, editing document text 48 only one device or media card allowed 74 ordering supplies 56 orientation, changing landscape 24 portrait 24 P page does not print 59 paper exit tray 14...
..., finding 9 ink level, checking 22 insert camera/memory card error 73 inserting memory cards 36 PictBridge-enabled digital camera 37 installing print cartridge 52 printer software 74 invalid photo/paper size selection 73 iron-on transfers, loading 28 J jams and misfeeds troubleshooting banner paper jams 69 paper jam... nothing happens when memory card is inserted 70 notices 76, 77, 78, 79 N-up feature 34 O OCR, editing document text 48 only one device or media card allowed 74 ordering supplies 56 orientation, changing landscape 24 portrait 24 P page does not print 59 paper exit tray 14...


