Sending a fax using the computer
Page 1
... fax number in the printer driver. 3 From the Print dialog Fax screen, type the name and number of faxing documents directly from software programs. Sending a fax from the dialog that lets the computer communicate with the printer. Installing a PostScript driver A PostScript printer driver ...is installed in the To field, and enter other information as needed. 4 Click Fax. Getting ready to install the software after setup, follow these instructions: Sending a fax using the computer For Windows users 1 Verify that the PostScript driver is installed. 2 Verify...
... fax number in the printer driver. 3 From the Print dialog Fax screen, type the name and number of faxing documents directly from software programs. Sending a fax from the dialog that lets the computer communicate with the printer. Installing a PostScript driver A PostScript printer driver ...is installed in the To field, and enter other information as needed. 4 Click Fax. Getting ready to install the software after setup, follow these instructions: Sending a fax using the computer For Windows users 1 Verify that the PostScript driver is installed. 2 Verify...
Sending a fax using the computer
Page 2
...follow the instructions on the screen. For Windows users 1 Close all open software programs. 2 Insert the Software and Documentation CD. Sending a fax using the computer 2 Using the World Wide Web 1 Go to the Lexmark Web site at www.lexmark.com. See "Using the World Wide Web" on page 2. 3 From... the main installation dialog, click Install Printer and Software. 4 Click Agree to accept the licensing agreement. 5 From the Drivers and Utilities...
...follow the instructions on the screen. For Windows users 1 Close all open software programs. 2 Insert the Software and Documentation CD. Sending a fax using the computer 2 Using the World Wide Web 1 Go to the Lexmark Web site at www.lexmark.com. See "Using the World Wide Web" on page 2. 3 From... the main installation dialog, click Install Printer and Software. 4 Click Agree to accept the licensing agreement. 5 From the Drivers and Utilities...
Sending a fax using the computer
Page 3
..., or Setup. 3 Click the Other Options tab, and then click Fax. 4 On the Fax screen, type the name and number of faxing documents directly from software programs. For Windows users Notes: • In order to perform this function from a computer lets you must use the PostScript printer driver for your desk...
..., or Setup. 3 Click the Other Options tab, and then click Fax. 4 On the Fax screen, type the name and number of faxing documents directly from software programs. For Windows users Notes: • In order to perform this function from a computer lets you must use the PostScript printer driver for your desk...
Troubleshooting Guide
Page 1
... the USB cable from the computer. 2 From the desktop, click Start Programs Lexmark Lexmark Software Uninstall. 3 Follow the instructions on the computer screen to remove the software. 4 Restart the computer. 5 If any Add New Hardware screens appear, click Cancel. 6 Eject ...and reinsert the software CD. 7 Reconnect the USB cable to help prevent document and paper jams. &#...
... the USB cable from the computer. 2 From the desktop, click Start Programs Lexmark Lexmark Software Uninstall. 3 Follow the instructions on the computer screen to remove the software. 4 Restart the computer. 5 If any Add New Hardware screens appear, click Cancel. 6 Eject ...and reinsert the software CD. 7 Reconnect the USB cable to help prevent document and paper jams. &#...

Troubleshooting Guide
Page 2
...and reinstalling the drivers software" on page 1. • If you are using the MFP. • Restart the computer. • Make sure the MFP is installed correctly. or Click Start Control Panel Printers and Other Hardware Printers and Faxes. 2 Double-click the Lexmark X340/X340n/ X342n icon...feed • Make sure paper is normal. Print and copy troubleshooting MFP does not print or respond • Remove and reinstall the software. Paper or specialty media misfeeds, skews, or multiple sheets stick together • Load a smaller amount of paper into the MFP. Print...
...and reinstalling the drivers software" on page 1. • If you are using the MFP. • Restart the computer. • Make sure the MFP is installed correctly. or Click Start Control Panel Printers and Other Hardware Printers and Faxes. 2 Double-click the Lexmark X340/X340n/ X342n icon...feed • Make sure paper is normal. Print and copy troubleshooting MFP does not print or respond • Remove and reinstall the software. Paper or specialty media misfeeds, skews, or multiple sheets stick together • Load a smaller amount of paper into the MFP. Print...

Troubleshooting Guide
Page 4
... software" on the scanner glass. • Check the Prefix setting. 1 From the control panel, press Fax. 2 Press Menu. 3 Press or repeatedly until Off appears. 8 Press . or Click Start Control Panel Printers and Other Hardware Printers and Faxes. 2 Double-click the Lexmark X340... printing is loaded correctly into the ADF or on page 1. Scan was unsuccessful • Restart the computer. • Remove and reinstall the software. Power supply - Answering machine • Check the telephone wall jack. 1 Plug a telephone into the wall jack. 2 Listen for temporarily ...
... software" on the scanner glass. • Check the Prefix setting. 1 From the control panel, press Fax. 2 Press Menu. 3 Press or repeatedly until Off appears. 8 Press . or Click Start Control Panel Printers and Other Hardware Printers and Faxes. 2 Double-click the Lexmark X340... printing is loaded correctly into the ADF or on page 1. Scan was unsuccessful • Restart the computer. • Remove and reinstall the software. Power supply - Answering machine • Check the telephone wall jack. 1 Plug a telephone into the wall jack. 2 Listen for temporarily ...
User's Guide
Page 2
... be used . In the United Kingdom and Eire, send to you harm. UNITED STATES GOVERNMENT RIGHTS This software and any accompanying documentation provided under this product, visit the Lexmark Web site at any time. CAUTION: Do not use or distribute any of the information you . Conventions Note...the guidelines for the use of other replacement parts. Changes are periodically made at www.lexmark.com. Comments about this product to the information herein; References in your product hardware or software. 2 Do not set up this product or make these changes will be obvious. You...
... be used . In the United Kingdom and Eire, send to you harm. UNITED STATES GOVERNMENT RIGHTS This software and any accompanying documentation provided under this product, visit the Lexmark Web site at any time. CAUTION: Do not use or distribute any of the information you . Conventions Note...the guidelines for the use of other replacement parts. Changes are periodically made at www.lexmark.com. Comments about this product to the information herein; References in your product hardware or software. 2 Do not set up this product or make these changes will be obvious. You...
User's Guide
Page 3
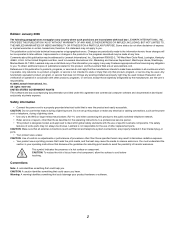
... overlay for another language 10 Installing an additional paper tray 11 Getting the MFP ready to print and scan 12 Installing the software for USB attach 12 Installing the software for network attach (X342n only 13 Getting the MFP ready to fax 14 Connecting directly to a telephone wall jack 14 Connecting to... setup page (X342n only 22 Changing the default mode 24 Setting the Timeout option 24 Setting the network options (X342n only 25 Using the MFP software 26 Using Print Properties 26 Using Presto!
... overlay for another language 10 Installing an additional paper tray 11 Getting the MFP ready to print and scan 12 Installing the software for USB attach 12 Installing the software for network attach (X342n only 13 Getting the MFP ready to fax 14 Connecting directly to a telephone wall jack 14 Connecting to... setup page (X342n only 22 Changing the default mode 24 Setting the Timeout option 24 Setting the network options (X342n only 25 Using the MFP software 26 Using Print Properties 26 Using Presto!

User's Guide
Page 5
... Cleaning the outside of the MFP 67 Cleaning the inside of the MFP 68 Ordering supplies ...70 Recycling Lexmark products 70 Chapter 10: Troubleshooting 71 Setup troubleshooting ...72 Removing and reinstalling the drivers software 74 Jams and misfeeds troubleshooting 75 Clearing a paper jam 76 Print and copy troubleshooting 84 Print quality troubleshooting...
... Cleaning the outside of the MFP 67 Cleaning the inside of the MFP 68 Ordering supplies ...70 Recycling Lexmark products 70 Chapter 10: Troubleshooting 71 Setup troubleshooting ...72 Removing and reinstalling the drivers software 74 Jams and misfeeds troubleshooting 75 Clearing a paper jam 76 Print and copy troubleshooting 84 Print quality troubleshooting...
User's Guide
Page 7
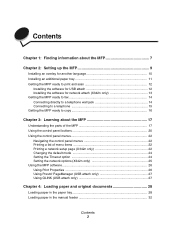
... resources: Setup sheet Description Where to find You can find this CD in the MFP box or on the up hardware and software. Lexmark Web site. 1 Finding information about the MFP 7 Where to find The Setup sheet gives you instructions for using You can ... document in the MFP box. Finding information about the MFP The Lexmark™ X340/X340n/X342n Multifunction Printer (MFP) comes with the MFP. • Maintenance • Troubleshooting • Safety CD Description The CD contains drivers, software, and publications files. User's Guide Description Where to find The ...
... resources: Setup sheet Description Where to find You can find this CD in the MFP box or on the up hardware and software. Lexmark Web site. 1 Finding information about the MFP 7 Where to find The Setup sheet gives you instructions for using You can ... document in the MFP box. Finding information about the MFP The Lexmark™ X340/X340n/X342n Multifunction Printer (MFP) comes with the MFP. • Maintenance • Troubleshooting • Safety CD Description The CD contains drivers, software, and publications files. User's Guide Description Where to find The ...

User's Guide
Page 8
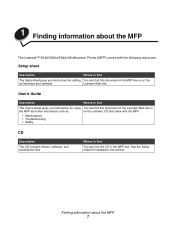
... Where to find This file contains late-breaking information about the MFP and software that we may serve you need. To access the Readme file: 1 Click Start Æ Programs or All Programs Æ Lexmark Æ Lexmark X34x Series. 2 Select Readme. Readme file Description Where to find Visit our... Web site at www.lexmark.com. 1 Go to the Web site. 2 Select a country or region from the drop-...
... Where to find This file contains late-breaking information about the MFP and software that we may serve you need. To access the Readme file: 1 Click Start Æ Programs or All Programs Æ Lexmark Æ Lexmark X34x Series. 2 Select Readme. Readme file Description Where to find Visit our... Web site at www.lexmark.com. 1 Go to the Web site. 2 Select a country or region from the drop-...
User's Guide
Page 12
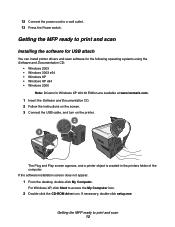
...Double-click the CD-ROM drive icon. Getting the MFP ready to print and scan Installing the software for USB attach You can install printer drivers and scan software for the following operating systems using the Software and Documentation CD: • Windows 2003 • Windows 2003 x64 • Windows XP ...• Windows XP x64 • Windows 2000 Note: Drivers for Windows XP x64 bit Edition are available at www.lexmark.com. 1 Insert the Software and Documentation CD. 2 Follow the instructions on the screen. 3 Connect the USB cable, and turn on the printer. 2 1 The Plug...
...Double-click the CD-ROM drive icon. Getting the MFP ready to print and scan Installing the software for USB attach You can install printer drivers and scan software for the following operating systems using the Software and Documentation CD: • Windows 2003 • Windows 2003 x64 • Windows XP ...• Windows XP x64 • Windows 2000 Note: Drivers for Windows XP x64 bit Edition are available at www.lexmark.com. 1 Insert the Software and Documentation CD. 2 Follow the instructions on the screen. 3 Connect the USB cable, and turn on the printer. 2 1 The Plug...
User's Guide
Page 13
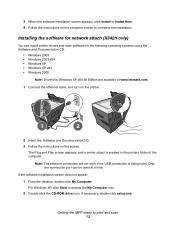
... Drivers for network attach (X342n only) You can be used . For Windows XP, click Start to print and scan 13 3 When the software installation screen appears, click Install or Install Now. 4 Follow the instructions on the screen. Note: The ethernet connection will not work if the... folder of the computer. The Plug and Play screen appears, and a printer object is being used at www.lexmark.com. 1 Connect the ethernet cable, and turn on the printer. 1 2 2 Insert the Software and Documentation CD. 3 Follow the instructions on the computer screen to complete the installation.
... Drivers for network attach (X342n only) You can be used . For Windows XP, click Start to print and scan 13 3 When the software installation screen appears, click Install or Install Now. 4 Follow the instructions on the screen. Note: The ethernet connection will not work if the... folder of the computer. The Plug and Play screen appears, and a printer object is being used at www.lexmark.com. 1 Connect the ethernet cable, and turn on the printer. 1 2 2 Insert the Software and Documentation CD. 3 Follow the instructions on the computer screen to complete the installation.

User's Guide
Page 14
..., but you have a telephone cord and a telephone wall jack. 2 Connect one end of the telephone cord into the LINE port of the MFP. 3 When the software installation screen appears, click Install or Install Now. You can connect the printer to other equipment.
..., but you have a telephone cord and a telephone wall jack. 2 Connect one end of the telephone cord into the LINE port of the MFP. 3 When the software installation screen appears, click Install or Install Now. You can connect the printer to other equipment.
User's Guide
Page 26
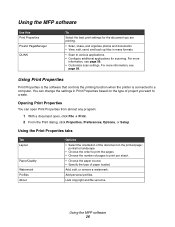
... formats. • Scan to various applications. • Configure additional applications for the document you want to create. Using the MFP software 26 Add personal profiles. Using the Print Properties tabs Tab Layout Paper/Quality Watermark Profiles About Options • Select the orientation of ...the document on the type of paper loaded. Lists copyright and file versions. Using Print Properties Print Properties is the software that controls the printing function when the printer is connected to print per sheet. • Choose the paper source. • ...
... formats. • Scan to various applications. • Configure additional applications for the document you want to create. Using the MFP software 26 Add personal profiles. Using the Print Properties tabs Tab Layout Paper/Quality Watermark Profiles About Options • Select the orientation of ...the document on the type of paper loaded. Lists copyright and file versions. Using Print Properties Print Properties is the software that controls the printing function when the printer is connected to print per sheet. • Choose the paper source. • ...

User's Guide
Page 27
...! PageManager to various applications. • Configure additional applications for scanning. PageManager, click Start Æ Programs or All Programs Æ Lexmark Applications Æ Presto! For more information, see page 58. PageManager. 2 Click Help Æ Help. PageManager Help: 1 Open...• Click Start Æ Programs or All Programs Æ Lexmark Æ Lexmark X34x Series Æ QLINK. For more information, see page 56. • Customize scan settings. To access the Presto! Using the MFP software 27 PageManager (USB attach only) Use Presto! Using QLINK (USB...
...! PageManager to various applications. • Configure additional applications for scanning. PageManager, click Start Æ Programs or All Programs Æ Lexmark Applications Æ Presto! For more information, see page 58. PageManager. 2 Click Help Æ Help. PageManager Help: 1 Open...• Click Start Æ Programs or All Programs Æ Lexmark Æ Lexmark X34x Series Æ QLINK. For more information, see page 56. • Customize scan settings. To access the Presto! Using the MFP software 27 PageManager (USB attach only) Use Presto! Using QLINK (USB...

User's Guide
Page 39
Note: Make sure the envelope flap is also selected in the manual feeder. Printing an envelope 1 Load an envelope face-up in the software application. 5 From the Paper/Quality tab, select the paper source. 6 Select Envelope from the Media drop-down . 2 With a document open , click File Æ Print. 3 Click ...
Note: Make sure the envelope flap is also selected in the manual feeder. Printing an envelope 1 Load an envelope face-up in the software application. 5 From the Paper/Quality tab, select the paper source. 6 Select Envelope from the Media drop-down . 2 With a document open , click File Æ Print. 3 Click ...
User's Guide
Page 55
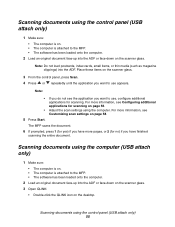
... using the control panel (USB attach only) 1 Make sure: • The computer is on. • The computer is attached to the MFP. • The software has been loaded onto the computer. 2 Load an original document face-up into the ADF. For more information, see Configuring additional applications for scanning. Place... MFP scans the document. 6 If prompted, press 1 (for yes) if you have more information, see the application you want to the MFP. • The software has been loaded onto the computer. 2 Load an original document face-up into the ADF or face-down on the scanner glass.
... using the control panel (USB attach only) 1 Make sure: • The computer is on. • The computer is attached to the MFP. • The software has been loaded onto the computer. 2 Load an original document face-up into the ADF. For more information, see Configuring additional applications for scanning. Place... MFP scans the document. 6 If prompted, press 1 (for yes) if you have more information, see the application you want to the MFP. • The software has been loaded onto the computer. 2 Load an original document face-up into the ADF or face-down on the scanner glass.
User's Guide
Page 57
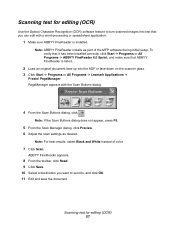
... to turn scanned images into the ADF or face-down on the scanner glass. 3 Click Start Æ Programs or All Programs Æ Lexmark Applications Æ Presto! ABBYY FineReader appears. 8 From the toolbar, click Read. 9 Click Save. 10 Select a destination you can edit with the Scan ...Preview. 6 Adjust the scan settings as part of color. 7 Click Scan. Note: For best results, select Black and White instead of the MFP software during initial setup. Note: ABBYY FineReader installs as desired. To verify that it has been installed correctly, click Start Æ Programs or All Programs ...
... to turn scanned images into the ADF or face-down on the scanner glass. 3 Click Start Æ Programs or All Programs Æ Lexmark Applications Æ Presto! ABBYY FineReader appears. 8 From the toolbar, click Read. 9 Click Save. 10 Select a destination you can edit with the Scan ...Preview. 6 Adjust the scan settings as part of color. 7 Click Scan. Note: For best results, select Black and White instead of the MFP software during initial setup. Note: ABBYY FineReader installs as desired. To verify that it has been installed correctly, click Start Æ Programs or All Programs ...
User's Guide
Page 72
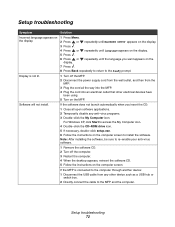
...instructions on the MFP. If the MFP is not lit. 1 Turn off the computer. 3 Restart the computer. 4 When the desktop appears, reinsert the software CD. 5 Follow the instructions on the display. 7 Press . 8 Press Back repeatedly to return to the Ready prompt. Display is connected to the computer ... not launch automatically when you want appears on the computer screen. Note: After installing the software, be sure to re-enable your anti-virus software. 1 Remove the software CD. 2 Turn off the MFP. 2 Disconnect the power supply cord from the wall outlet, and then from any anti-virus ...
...instructions on the MFP. If the MFP is not lit. 1 Turn off the computer. 3 Restart the computer. 4 When the desktop appears, reinsert the software CD. 5 Follow the instructions on the display. 7 Press . 8 Press Back repeatedly to return to the Ready prompt. Display is connected to the computer ... not launch automatically when you want appears on the computer screen. Note: After installing the software, be sure to re-enable your anti-virus software. 1 Remove the software CD. 2 Turn off the MFP. 2 Disconnect the power supply cord from the wall outlet, and then from any anti-virus ...


