
Setup Sheet
Page 1
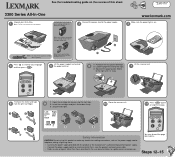
...support and extend 5 the paper exit tray. 2 1 6 1 Pull back the transparent deflector. 2 Load the paper flat and to the power supply. 2 www.lexmark.com Make sure the power light is on. 3 Before you continue, remove the photo cartridge from the print cartridges. 1 2 1 2 9 1 Open the cartridge ...the manufacturer's authorized replacement power supply. • Connect the power supply cord to an electrical outlet that is snug. 2 3 1 Lift the scanner unit. 7 Remove the sticker and tape 8 from the print cartridge storage unit. Slide it to the right until it prints. Steps 12-15...
...support and extend 5 the paper exit tray. 2 1 6 1 Pull back the transparent deflector. 2 Load the paper flat and to the power supply. 2 www.lexmark.com Make sure the power light is on. 3 Before you continue, remove the photo cartridge from the print cartridges. 1 2 1 2 9 1 Open the cartridge ...the manufacturer's authorized replacement power supply. • Connect the power supply cord to an electrical outlet that is snug. 2 3 1 Lift the scanner unit. 7 Remove the sticker and tape 8 from the print cartridge storage unit. Slide it to the right until it prints. Steps 12-15...

