
Service Manual
Page 4
... 2-1 Error codes 2-1 POST errors 2-1 Catastrophic errors 2-2 User intervention errors 2-8 POST symptom table 2-9 Symptom tables 2-10 Service checks 2-13 Carrier transport service check 2-13 CIS module assembly service check 2-14 PictBridge service check 2-15 Maintenance station service check 2-15 Paper feed service check 2-16 Power service check 2-17 Print quality service check 2-18 Scan and copy quality service check 2-20 Diagnostic aids 3-1 Single test page 3-1 Self Test menu 3-2 Repair information 4-1 Handling ESD-sensitive parts 4-1 Adjustments 4-2 Removal procedures...
... 2-1 Error codes 2-1 POST errors 2-1 Catastrophic errors 2-2 User intervention errors 2-8 POST symptom table 2-9 Symptom tables 2-10 Service checks 2-13 Carrier transport service check 2-13 CIS module assembly service check 2-14 PictBridge service check 2-15 Maintenance station service check 2-15 Paper feed service check 2-16 Power service check 2-17 Print quality service check 2-18 Scan and copy quality service check 2-20 Diagnostic aids 3-1 Single test page 3-1 Self Test menu 3-2 Repair information 4-1 Handling ESD-sensitive parts 4-1 Adjustments 4-2 Removal procedures...
Service Manual
Page 11
... harm. Preface 4479-XXX This manual contains maintenance procedures for individual FRUs. Locations and connections uses illustrations to prevent problems. 7. Definitions Note: A note provides additional information. Parts catalog contains illustrations and part numbers for service personnel. Repair information provides instructions for making All-In-One adjustments and removing and installing FRUs. 5. CAUTION: A caution identifies something that could damage the product hardware or software. It is divided into...
... harm. Preface 4479-XXX This manual contains maintenance procedures for individual FRUs. Locations and connections uses illustrations to prevent problems. 7. Definitions Note: A note provides additional information. Parts catalog contains illustrations and part numbers for service personnel. Repair information provides instructions for making All-In-One adjustments and removing and installing FRUs. 5. CAUTION: A caution identifies something that could damage the product hardware or software. It is divided into...
Service Manual
Page 13
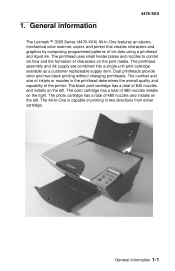
... printhead assembly and ink supply are combined into a single-unit print cartridge available as a customer replaceable supply item. Dual printheads provide color and true black printing without changing printheads. The color cartridge has a total of 640 nozzles and installs on the print media. 1. General information 1-1 The black print cartridge has a total of 480 nozzles installs on the left . The printhead uses small heater plates and nozzles to control ink flow and the formation of ink dots using a printhead...
... printhead assembly and ink supply are combined into a single-unit print cartridge available as a customer replaceable supply item. Dual printheads provide color and true black printing without changing printheads. The color cartridge has a total of 640 nozzles and installs on the print media. 1. General information 1-1 The black print cartridge has a total of 480 nozzles installs on the left . The printhead uses small heater plates and nozzles to control ink flow and the formation of ink dots using a printhead...
Service Manual
Page 14
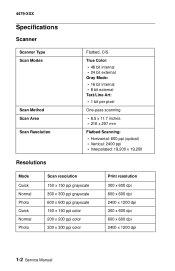
...Specifications Scanner Scanner Type Scan Modes Scan Method Scan Area Scan Resolution Flatbed, CIS True Color: • 48 bit internal • 24 bit external Gray Mode: • 16 bit internal • 8 bit external Text/Line Art: • 1 bit per pixel One-pass scanning • 8.5 x 11.7 inches • 216 x 297 mm Flatbed Scanning...: 19,200 x 19,200 Resolutions Mode Quick Normal Photo Quick Normal Photo Scan resolution 150 x 150 ppi grayscale 300 x 300 ppi grayscale 600 x 600 ppi grayscale 150 x 150 ppi color 200 x 200 ppi color 300 x 300 ppi color Print resolution 300 x 600 dpi 600 x...
...Specifications Scanner Scanner Type Scan Modes Scan Method Scan Area Scan Resolution Flatbed, CIS True Color: • 48 bit internal • 24 bit external Gray Mode: • 16 bit internal • 8 bit external Text/Line Art: • 1 bit per pixel One-pass scanning • 8.5 x 11.7 inches • 216 x 297 mm Flatbed Scanning...: 19,200 x 19,200 Resolutions Mode Quick Normal Photo Quick Normal Photo Scan resolution 150 x 150 ppi grayscale 300 x 300 ppi grayscale 600 x 600 ppi grayscale 150 x 150 ppi color 200 x 200 ppi color 300 x 300 ppi color Print resolution 300 x 600 dpi 600 x...
Service Manual
Page 15
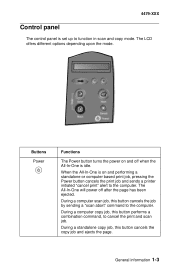
4479-XXX Control panel The control panel is idle. Buttons Power Functions The Power button turns the power on and performing a standalone or computer based print job, pressing the Power button cancels the print job and sends a printer initiated "cancel print" alert to cancel the print and scan job. When the All-In-One is on and off after the page has been ejected. General information 1-3 During a computer copy job, this button performs a combination command, to the...
4479-XXX Control panel The control panel is idle. Buttons Power Functions The Power button turns the power on and performing a standalone or computer based print job, pressing the Power button cancels the print job and sends a printer initiated "cancel print" alert to cancel the print and scan job. When the All-In-One is on and off after the page has been ejected. General information 1-3 During a computer copy job, this button performs a combination command, to the...

Service Manual
Page 16
... available settings. buttons are used to the computer, and the ejects the page. The All-In-One is equipped with a green Color Copy button. The All-In-One is equipped with a Black Copy button. When in a menu is to make the selection. If a setting in other menus, the +/- The primary function of copies. The Scan button has no function defined for non-host attached operation. 1-4 Service Manual During a standalone copy job...
... available settings. buttons are used to the computer, and the ejects the page. The All-In-One is equipped with a green Color Copy button. The All-In-One is equipped with a Black Copy button. When in a menu is to make the selection. If a setting in other menus, the +/- The primary function of copies. The Scan button has no function defined for non-host attached operation. 1-4 Service Manual During a standalone copy job...

Service Manual
Page 17
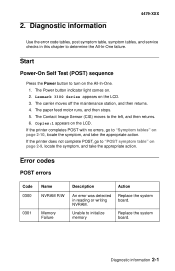
Use the error codes, symptom tables, service checks, and diagnostic aids to the correct field replaceable unit (FRU) or part. Tools required for service • Flat-blade screwdriver • #1 Phillips screwdriver • #2 Phillips screwdriver • Spring hook • Analog or digital multimeter General information 1-5 4479-XXX Maintenance approach The diagnostic information in this manual leads you complete the repair, perform tests as needed to verify the repair. After you to determine the symptom and repair the failure.
Use the error codes, symptom tables, service checks, and diagnostic aids to the correct field replaceable unit (FRU) or part. Tools required for service • Flat-blade screwdriver • #1 Phillips screwdriver • #2 Phillips screwdriver • Spring hook • Analog or digital multimeter General information 1-5 4479-XXX Maintenance approach The diagnostic information in this manual leads you complete the repair, perform tests as needed to verify the repair. After you to determine the symptom and repair the failure.
Service Manual
Page 19
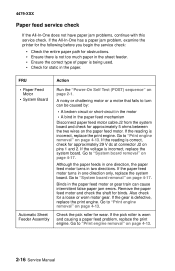
... to turn on the LCD. 3. Copies:1 appears on . 2. The Power button indicator light comes on the LCD. The paper feed motor runs, and then stops. 5. Replace the system board. The carrier moves off the maintenance station, and then returns. 4. Start Power-On Self Test (POST) sequence Press the Power button to "Symptom tables" on page 2-9, locate the symptom, and take the appropriate action. 2. Lexmark 3300 Series appears on...
... to turn on the LCD. 3. Copies:1 appears on . 2. The Power button indicator light comes on the LCD. The paper feed motor runs, and then stops. 5. Replace the system board. The carrier moves off the maintenance station, and then returns. 4. Start Power-On Self Test (POST) sequence Press the Power button to "Symptom tables" on page 2-9, locate the symptom, and take the appropriate action. 2. Lexmark 3300 Series appears on...
Service Manual
Page 26
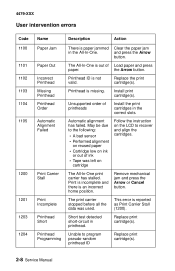
... ink or out of ink • Tape was used. Print is incomplete and there is reported as Print Carrier Stall (1200). This error is an incorrect home position. Replace the print cartridge(s). Install the print cartridges in printhead. Short test detected short-circuit in the correct slots. the Arrow button. Printhead ID is paper jammed Clear the paper jam in the All-In-One. May be due to program pseudo-random printhead ID Replace print cartridge(s). 2-8 Service Manual...
... ink or out of ink • Tape was used. Print is incomplete and there is reported as Print Carrier Stall (1200). This error is an incorrect home position. Replace the print cartridge(s). Install the print cartridges in printhead. Short test detected short-circuit in the correct slots. the Arrow button. Printhead ID is paper jammed Clear the paper jam in the All-In-One. May be due to program pseudo-random printhead ID Replace print cartridge(s). 2-8 Service Manual...
Service Manual
Page 28
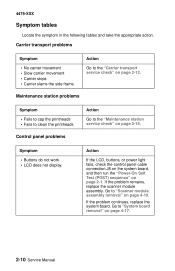
... clean the printheads Control panel problems Action Go to "System board removal" on page 4-10. Carrier transport problems Symptom • No carrier movement • Slow carrier movement • Carrier stops • Carrier slams the side frame Action Go to "Scanner module assembly removal" on page 4-17. 2-10 Service Manual Go to the "Carrier transport service check" on page 2-1. If the problem remains, replace the scanner module assembly. Symptom • Buttons do not work...
... clean the printheads Control panel problems Action Go to "System board removal" on page 4-10. Carrier transport problems Symptom • No carrier movement • Slow carrier movement • Carrier stops • Carrier slams the side frame Action Go to "Scanner module assembly removal" on page 4-17. 2-10 Service Manual Go to the "Carrier transport service check" on page 2-1. If the problem remains, replace the scanner module assembly. Symptom • Buttons do not work...
Service Manual
Page 30
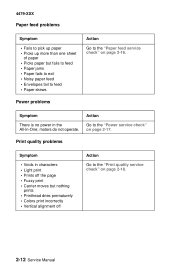
... Paper feed problems Symptom • Fails to pick up paper • Picks up more than one sheet of paper • Picks paper but nothing prints • Printhead dries prematurely • Colors print incorrectly • Vertical alignment off the page • Fuzzy print • Carrier moves but fails to feed • Paper jams • Paper fails to exit • Noisy paper feed • Envelopes fail to feed • Paper skews Power problems Action Go to the "Paper feed service check...
... Paper feed problems Symptom • Fails to pick up paper • Picks up more than one sheet of paper • Picks paper but nothing prints • Printhead dries prematurely • Colors print incorrectly • Vertical alignment off the page • Fuzzy print • Carrier moves but fails to feed • Paper jams • Paper fails to exit • Noisy paper feed • Envelopes fail to feed • Paper skews Power problems Action Go to the "Paper feed service check...

Service Manual
Page 32
... or damage: • Printhead cartridge latch • Latch spring • Carrier • Printhead cables Ensure that the belt is installed and is okay and the problem remains, replace the scanner module assembly. Go to clean the contacts. Go to "Carrier assembly and encoder strip removal" on page 4-10. 2-14 Service Manual 4479-XXX FRU Carrier Assembly Action Check the following parts for dirt, wear, and...
... or damage: • Printhead cartridge latch • Latch spring • Carrier • Printhead cables Ensure that the belt is installed and is okay and the problem remains, replace the scanner module assembly. Go to clean the contacts. Go to "Carrier assembly and encoder strip removal" on page 4-10. 2-14 Service Manual 4479-XXX FRU Carrier Assembly Action Check the following parts for dirt, wear, and...

Service Manual
Page 33
... all nozzles, keeping them clear for loose or worn caps. Wipes (cleans) the printhead nozzle plates 2. Diagnostic information 2-15 Worn wipers can cause poor print quality after printhead cleaning. Check for loose or worn wipers. Worn caps cause the printhead nozzles to the right, it uncaps the printheads. Go to "Scanner module assembly removal" on pin 1. Go to "Maintenance station removal" on page 4-17. Seals...
... all nozzles, keeping them clear for loose or worn caps. Wipes (cleans) the printhead nozzle plates 2. Diagnostic information 2-15 Worn wipers can cause poor print quality after printhead cleaning. Check for loose or worn wipers. Worn caps cause the printhead nozzles to the right, it uncaps the printheads. Go to "Scanner module assembly removal" on pin 1. Go to "Maintenance station removal" on page 4-17. Seals...
Service Manual
Page 34
... used. • Check for approximately 5 ohms between the two wires on page 4-13. Go to "Print engine removal" on page 4-13. Go to "Print engine removal" on page 4-13. 2-16 Service Manual A noisy or chattering motor or a motor that fails to "System board removal" on page 2-1. Go to turn can cause intermittent false paper jam errors. Also check for binds. If the gear is worn and causing a paper feed problem, replace the print...
... used. • Check for approximately 5 ohms between the two wires on page 4-13. Go to "Print engine removal" on page 4-13. Go to "Print engine removal" on page 4-13. 2-16 Service Manual A noisy or chattering motor or a motor that fails to "System board removal" on page 2-1. Go to turn can cause intermittent false paper jam errors. Also check for binds. If the gear is worn and causing a paper feed problem, replace the print...
Service Manual
Page 36
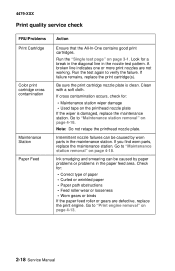
... binds If the paper feed roller or gears are not working. A broken line indicates one or more print nozzles are defective, replace the print engine. 4479-XXX Print quality service check FRU/Problems Print Cartridge Color print cartridge cross contamination Maintenance Station Paper Feed Action Ensure that the All-In-One contains good print cartridges. If failure remains, replace the print cartridge(s). Go to "Print engine removal" on page 4-18. Run the "Single test page" on the printhead nozzle plate If...
... binds If the paper feed roller or gears are not working. A broken line indicates one or more print nozzles are defective, replace the print engine. 4479-XXX Print quality service check FRU/Problems Print Cartridge Color print cartridge cross contamination Maintenance Station Paper Feed Action Ensure that the All-In-One contains good print cartridges. If failure remains, replace the print cartridge(s). Go to "Print engine removal" on page 4-18. Run the "Single test page" on the printhead nozzle plate If...
Service Manual
Page 37
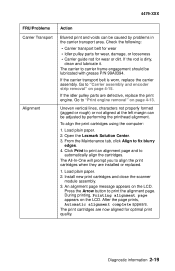
... dirty, clean and lubricate it. To align the print cartridges using the computer: 1. From the Maintenance tab, click Align to align the print cartridges when they are installed or replaced. 1. An alignment page message appears on page 4-13. After the page prints, Automatic alignment complete appears. Go to "Print engine removal" on the LCD. The print cartridges are defective, replace the print engine. Check the following: • Carrier transport belt for wear • Idler pulley parts for...
... dirty, clean and lubricate it. To align the print cartridges using the computer: 1. From the Maintenance tab, click Align to align the print cartridges when they are installed or replaced. 1. An alignment page message appears on page 4-13. After the page prints, Automatic alignment complete appears. Go to "Print engine removal" on the LCD. The print cartridges are defective, replace the print engine. Check the following: • Carrier transport belt for wear • Idler pulley parts for...
Service Manual
Page 38
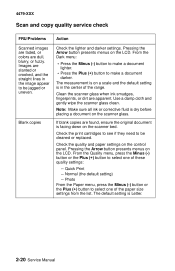
4479-XXX Scan and copy quality service check FRU/Problems Action Scanned images are faded, or colors are apparent. From the Dark menu: • Press the Minus (-) button to make a document lighter. • Press the Plus (+) button to be jagged or uneven. Check the print cartridges to see if they need to make a document darker. Pressing the Arrow button presents menus on the control panel. Quick Print - Note: Make sure all ink or corrective fluid is facing...
4479-XXX Scan and copy quality service check FRU/Problems Action Scanned images are faded, or colors are apparent. From the Dark menu: • Press the Minus (-) button to make a document lighter. • Press the Plus (+) button to be jagged or uneven. Check the print cartridges to see if they need to make a document darker. Pressing the Arrow button presents menus on the control panel. Quick Print - Note: Make sure all ink or corrective fluid is facing...

Service Manual
Page 39
... side of the following information: • Build Date • Code Level - Page Count • Last Error • Maint • USB Serial Number • MFG • CMD • Model • Class • USB Vendor ID • Digital Logic Type • Printer Engine • Printhead Type • Scanner Diagnostic aids 3-1 Install a good black print cartridge in the right. 4. Press and hold the Black Copy button and the Power button simultaneously until LCD Button Test appears. 10. 3. Load paper in good condition. Turn...
... side of the following information: • Build Date • Code Level - Page Count • Last Error • Maint • USB Serial Number • MFG • CMD • Model • Class • USB Vendor ID • Digital Logic Type • Printer Engine • Printhead Type • Scanner Diagnostic aids 3-1 Install a good black print cartridge in the right. 4. Press and hold the Black Copy button and the Power button simultaneously until LCD Button Test appears. 10. 3. Load paper in good condition. Turn...
Service Manual
Page 40
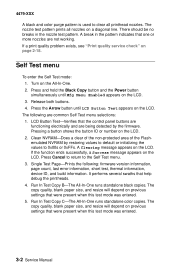
... buttons. 4. Pressing a button shows the button ID or number on page 2-18. Single Test Page-Prints the following are not working. The copy quality, blank paper size, and resize will depend on previous settings that help debug the printheads. 4. A Clearing message appears on the LCD. The nozzle test pattern prints all printhead nozzles. Self Test menu To enter the Self Test mode: 1. Run In Test Copy C-The All-In-One runs standalone color copies. Press the Arrow button until Mfg Menu Enabled...
... buttons. 4. Pressing a button shows the button ID or number on page 2-18. Single Test Page-Prints the following are not working. The copy quality, blank paper size, and resize will depend on previous settings that help debug the printheads. 4. A Clearing message appears on the LCD. The nozzle test pattern prints all printhead nozzles. Self Test menu To enter the Self Test mode: 1. Run In Test Copy C-The All-In-One runs standalone color copies. Press the Arrow button until Mfg Menu Enabled...
Service Manual
Page 73
... 2-10 lubrication specifications 6-1 M maintenance approach 1-5 maintenance station 2-15 maintenance station problems 2-10 P paper feed 2-16 paper feed problems 2-12 paper jam 2-12 part number index 1-3 parts catalog 7-1 covers, scanner, and base 7-2 how to use 7-1 print engine, carrier, and electronics 7-5 PictBridge problems 2-11 plastic latches 4-2 POST (Power-On Self Test) sequence 2-1 POST symptom table 2-9 power problems 2-12 preventive maintenance 6-1 print cartridge 1-1 print quality 2-18 print quality problems 2-12 printer communication problems 2-11 R removals ASF guide with spring...
... 2-10 lubrication specifications 6-1 M maintenance approach 1-5 maintenance station 2-15 maintenance station problems 2-10 P paper feed 2-16 paper feed problems 2-12 paper jam 2-12 part number index 1-3 parts catalog 7-1 covers, scanner, and base 7-2 how to use 7-1 print engine, carrier, and electronics 7-5 PictBridge problems 2-11 plastic latches 4-2 POST (Power-On Self Test) sequence 2-1 POST symptom table 2-9 power problems 2-12 preventive maintenance 6-1 print cartridge 1-1 print quality 2-18 print quality problems 2-12 printer communication problems 2-11 R removals ASF guide with spring...


