
User's Guide
Page 2
... user documentation, to a professional service person. CAUTION-SHOCK HAZARD: Do not use of specific Lexmark components. Do not set up this product or the manufacturer's authorized replacement power supply and power supply cord. For complete descriptions: • Windows users-See the User's Guide. • Macintosh users-If your hands out from underneath...
... user documentation, to a professional service person. CAUTION-SHOCK HAZARD: Do not use of specific Lexmark components. Do not set up this product or the manufacturer's authorized replacement power supply and power supply cord. For complete descriptions: • Windows users-See the User's Guide. • Macintosh users-If your hands out from underneath...
User's Guide
Page 7
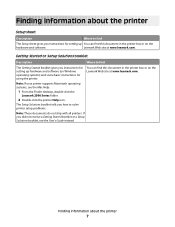
...supports Macintosh operating systems, see the User's Guide instead. You can find this document in the printer box or on the Lexmark Web site at www.lexmark.com. Finding information about the printer 7 Finding information about the printer Setup sheet Description Where to solve printer setup problems. ...The Getting Started booklet gives you how to find The Setup sheet gives you instructions for setting up hardware and software (on Windows operating systems) and some basic instructions for setting up You can find this document in the printer box or on the hardware and...
...supports Macintosh operating systems, see the User's Guide instead. You can find this document in the printer box or on the Lexmark Web site at www.lexmark.com. Finding information about the printer 7 Finding information about the printer Setup sheet Description Where to solve printer setup problems. ...The Getting Started booklet gives you how to find The Setup sheet gives you instructions for setting up hardware and software (on Windows operating systems) and some basic instructions for setting up You can find this document in the printer box or on the hardware and...
User's Guide
Page 8
... problems with the other information such as: will be installed. • Using the software (on Windows operating systems) 1 Click Start Œ Programs or All Programs Œ • Loading paper Lexmark 2500 Series. • Printing 2 Click User's Guide. • Working with photos If the ...you instructions for using the When you instructions for using the software, if While in any Lexmark software program, click Help, your printer connects to a computer. Lexmark 2500 Series. 2 Select Lexmark Solution Center. Note: If necessary, click Start Œ Run, and then type D:\setup...
... problems with the other information such as: will be installed. • Using the software (on Windows operating systems) 1 Click Start Œ Programs or All Programs Œ • Loading paper Lexmark 2500 Series. • Printing 2 Click User's Guide. • Working with photos If the ...you instructions for using the When you instructions for using the software, if While in any Lexmark software program, click Help, your printer connects to a computer. Lexmark 2500 Series. 2 Select Lexmark Solution Center. Note: If necessary, click Start Œ Run, and then type D:\setup...
User's Guide
Page 15
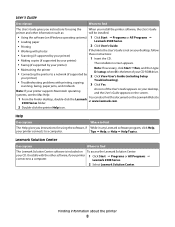
.... • Copy a photo or document. • Reprint or enlarge your photo. Using the Lexmark Imaging Studio To open the Lexmark Imaging Studio Welcome screen, use the printer with Windows operating systems. If you are using a Macintosh operating system, see the Mac Help: 1 From ...the Finder desktop, double-click the Lexmark 2500 Series folder. 2 Double-click the printer Help icon. Find troubleshooting, maintenance, and cartridge ordering ...
.... • Copy a photo or document. • Reprint or enlarge your photo. Using the Lexmark Imaging Studio To open the Lexmark Imaging Studio Welcome screen, use the printer with Windows operating systems. If you are using a Macintosh operating system, see the Mac Help: 1 From ...the Finder desktop, double-click the Lexmark 2500 Series folder. 2 Double-click the printer Help icon. Find troubleshooting, maintenance, and cartridge ordering ...
User's Guide
Page 18
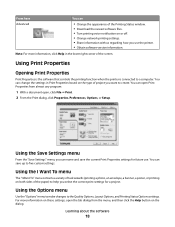
... network printing settings. • Share information with us regarding how you use . From here Advanced You can • Change the appearance of the Printing Status window. • Download the newest software files. • Turn printing voice notification on both sides of the paper) to help you select the correct print settings...
... network printing settings. • Share information with us regarding how you use . From here Advanced You can • Change the appearance of the Printing Status window. • Download the newest software files. • Turn printing voice notification on both sides of the paper) to help you select the correct print settings...
User's Guide
Page 19
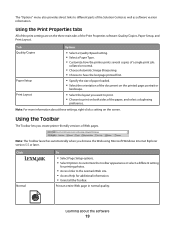
... • Select Options to customize the toolbar appearance or select a different setting for printing photos. • Access links to the Lexmark Web site. • Access Help for additional information. • Uninstall the Toolbar. Using the Toolbar The Toolbar lets you browse the Web... using Microsoft Windows Internet Explorer version 5.5 or later. The "Options" menu also provides direct links to different parts of Web pages. Learning about these...
... • Select Options to customize the toolbar appearance or select a different setting for printing photos. • Access links to the Lexmark Web site. • Access Help for additional information. • Uninstall the Toolbar. Using the Toolbar The Toolbar lets you browse the Web... using Microsoft Windows Internet Explorer version 5.5 or later. The "Options" menu also provides direct links to different parts of Web pages. Learning about these...
User's Guide
Page 20
... Preview Print only the text of photos or images valid for printing appears next to defaults Windows 2000, Windows XP, or Windows Vista users: 1 Click Start ΠSettings ΠPrinters or Printers and Faxes. 2 Right-click the Lexmark 2500 Series icon. 3 Click Printing Preferences. 4 Click the Save Settings menu. 5 From the Restore section, select...
... Preview Print only the text of photos or images valid for printing appears next to defaults Windows 2000, Windows XP, or Windows Vista users: 1 Click Start ΠSettings ΠPrinters or Printers and Faxes. 2 Right-click the Lexmark 2500 Series icon. 3 Click Printing Preferences. 4 Click the Save Settings menu. 5 From the Restore section, select...
User's Guide
Page 32
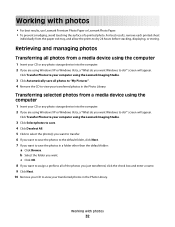
.... Working with photos 32 Click Transfer Photos to your computer using the Lexmark Imaging Studio. 3 Click Automatically save all photos from a media device using Windows XP or Windows Vista, a "What do you want Windows to all of a printed photo. screen will appear. Click Transfer Photos... to your computer using the Lexmark Imaging Studio. 3 Click Select photos to save. 4 Click Deselect ...
.... Working with photos 32 Click Transfer Photos to your computer using the Lexmark Imaging Studio. 3 Click Automatically save all photos from a media device using Windows XP or Windows Vista, a "What do you want Windows to all of a printed photo. screen will appear. Click Transfer Photos... to your computer using the Lexmark Imaging Studio. 3 Click Select photos to save. 4 Click Deselect ...
User's Guide
Page 33
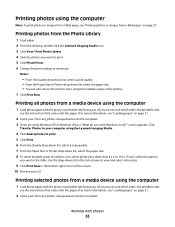
... To print photos or images from a Web page, see "Printing photos or images from the Photo Library 1 Load paper. 2 From the desktop, double-click the Lexmark Imaging Studio icon. 3 Click View / Print Photo Library. 4 Click the photos you want to print. 5 Click Photo Prints. 6 Change the print settings as... the table. Click Transfer Photos to view and select other photo sizes, and print multiple copies of the screen. 10 Remove your computer using Windows XP or Windows Vista, a "What do ?" Use the drop-down list, select the paper size. 8 To select multiple prints of a photo, or to select ...
... To print photos or images from a Web page, see "Printing photos or images from the Photo Library 1 Load paper. 2 From the desktop, double-click the Lexmark Imaging Studio icon. 3 Click View / Print Photo Library. 4 Click the photos you want to print. 5 Click Photo Prints. 6 Change the print settings as... the table. Click Transfer Photos to view and select other photo sizes, and print multiple copies of the screen. 10 Remove your computer using Windows XP or Windows Vista, a "What do ?" Use the drop-down list, select the paper size. 8 To select multiple prints of a photo, or to select ...
User's Guide
Page 34
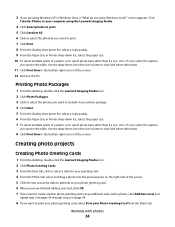
... or Windows Vista, a "What do ?" Click Transfer Photos to your text, click OK. 7 If you want to create another photo greeting card using the Lexmark Imaging Studio. 4 Click Select photos to print. 5 Click Deselect All. 6 Click to select the photo(s) you want to print. 7 Click Print. 8 From the... prints of the screen. 12 Remove the CD. Working with photos 34 Creating photo projects Creating Photo Greeting Cards 1 From the desktop, double-click the Lexmark Imaging Studio icon. 2 Click Photo Greeting Cards. 3 From the Style tab, click to select a style for your greeting card. 4 From the Photo ...
... or Windows Vista, a "What do ?" Click Transfer Photos to your text, click OK. 7 If you want to create another photo greeting card using the Lexmark Imaging Studio. 4 Click Select photos to print. 5 Click Deselect All. 6 Click to select the photo(s) you want to print. 7 Click Print. 8 From the... prints of the screen. 12 Remove the CD. Working with photos 34 Creating photo projects Creating Photo Greeting Cards 1 From the desktop, double-click the Lexmark Imaging Studio icon. 2 Click Photo Greeting Cards. 3 From the Style tab, click to select a style for your greeting card. 4 From the Photo ...
User's Guide
Page 58
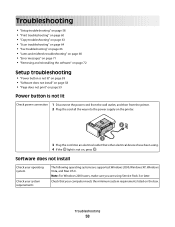
... users, make sure you are supported: Windows 2000, Windows XP, Windows Vista, and Mac OS X. Troubleshooting • "Setup troubleshooting" on page 58 • "Print troubleshooting" on page 60 • "Copy troubleshooting" on page 63 • "Scan ...
... users, make sure you are supported: Windows 2000, Windows XP, Windows Vista, and Mac OS X. Troubleshooting • "Setup troubleshooting" on page 58 • "Print troubleshooting" on page 60 • "Copy troubleshooting" on page 63 • "Scan ...
User's Guide
Page 59
... the USB cable for any blinking lights Check power If the light is not on, see "Power button is not lit" on page 70. In Windows XP, click Start to access the My Computer icon. 4 Double-click the CD-ROM drive icon. 5 If necessary, double-click setup.exe. 6 Follow the instructions... on page 72. 2 If the software still does not install correctly, visit our Web site at www.lexmark.com to check for drivers or downloads. b Click the links for the latest software. The USB port is marked with the USB symbol. 1 Turn off...
... the USB cable for any blinking lights Check power If the light is not on, see "Power button is not lit" on page 70. In Windows XP, click Start to access the My Computer icon. 4 Double-click the CD-ROM drive icon. 5 If necessary, double-click setup.exe. 6 Follow the instructions... on page 72. 2 If the software still does not install correctly, visit our Web site at www.lexmark.com to check for drivers or downloads. b Click the links for the latest software. The USB port is marked with the USB symbol. 1 Turn off...
User's Guide
Page 60
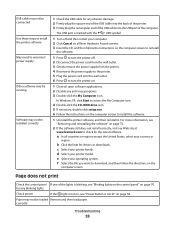
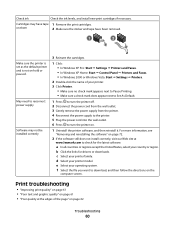
...installed correctly 3 Reinsert the cartridges. 1 Click: • In Windows XP Pro: Start Œ Settings Œ Printers and Faxes. • In Windows XP Home: Start Œ Control Panel Œ Printers and Faxes. • In Windows 2000 or Windows Vista: Start Œ Settings Œ Printers. 2 Double-click... the name of the page" on the computer screen. Print troubleshooting • "Improving print quality" on page 61 • "Poor text and graphic quality" on page 61 • "Poor quality at www.lexmark....
...installed correctly 3 Reinsert the cartridges. 1 Click: • In Windows XP Pro: Start Œ Settings Œ Printers and Faxes. • In Windows XP Home: Start Œ Control Panel Œ Printers and Faxes. • In Windows 2000 or Windows Vista: Start Œ Settings Œ Printers. 2 Double-click... the name of the page" on the computer screen. Print troubleshooting • "Improving print quality" on page 61 • "Poor text and graphic quality" on page 61 • "Poor quality at www.lexmark....
User's Guide
Page 65
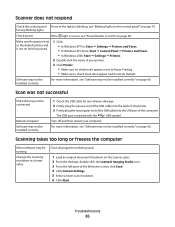
... an original document facedown on hold or paused. 1 Click: • In Windows XP Pro: Start Œ Settings Œ Printers and Faxes. • In Windows XP Home: Start Œ Control Panel Œ Printers and Faxes. • In Windows 2000: Start Œ Settings Œ Printers. 2 Double-click the name... Default. Troubleshooting 65 The USB port is blinking, see "Power button is not on the scanner glass. 2 From the desktop, double-click the Lexmark Imaging Studio icon. 3 From the left pane of the Welcome screen, click Scan. 4 Click Custom Settings. 5 Select a lower scan resolution. ...
... an original document facedown on hold or paused. 1 Click: • In Windows XP Pro: Start Œ Settings Œ Printers and Faxes. • In Windows XP Home: Start Œ Control Panel Œ Printers and Faxes. • In Windows 2000: Start Œ Settings Œ Printers. 2 Double-click the name... Default. Troubleshooting 65 The USB port is blinking, see "Power button is not on the scanner glass. 2 From the desktop, double-click the Lexmark Imaging Studio icon. 3 From the left pane of the Welcome screen, click Scan. 4 Click Custom Settings. 5 Select a lower scan resolution. ...
User's Guide
Page 69
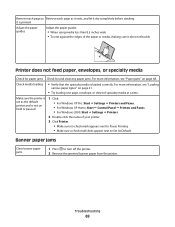
... jams. For more information, see "Paper jams" on hold or paused 1 Click: • For Windows XP Pro: Start Œ Settings Œ Printers and Faxes. • For Windows XP Home: Start Œ Control Panel Œ Printers and Faxes. • For Windows 2000: Start Œ Settings Œ Printers. 2 Double-click the name of your printer...
... jams. For more information, see "Paper jams" on hold or paused 1 Click: • For Windows XP Pro: Start Œ Settings Œ Printers and Faxes. • For Windows XP Home: Start Œ Control Panel Œ Printers and Faxes. • For Windows 2000: Start Œ Settings Œ Printers. 2 Double-click the name of your printer...
Getting Started
Page 5
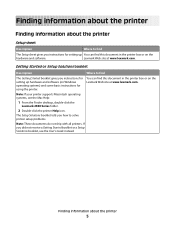
...gives you instructions for setting up hardware and software (on Windows operating systems) and some basic instructions for setting up You can find this document in the printer box or on the Lexmark Web site at www.lexmark.com. The Setup Solutions booklet tells you how to find... printer Help icon. Finding information about the printer Finding information about the printer 5 If you instructions for using the printer. Lexmark Web site at www.lexmark.com. You can find this document in the printer box or on the hardware and software. Getting Started or Setup Solutions ...
...gives you instructions for setting up hardware and software (on Windows operating systems) and some basic instructions for setting up You can find this document in the printer box or on the Lexmark Web site at www.lexmark.com. The Setup Solutions booklet tells you how to find... printer Help icon. Finding information about the printer Finding information about the printer 5 If you instructions for using the printer. Lexmark Web site at www.lexmark.com. You can find this document in the printer box or on the hardware and software. Getting Started or Setup Solutions ...

Getting Started
Page 6
... printer software, the User's Guide printer and other information such as: will be installed. • Using the software (on Windows operating systems) 1 Click Start Œ Programs or All Programs Œ • Loading paper Lexmark 2500 Series. • Printing 2 Click User's Guide. • Working with photos If the link to the User's Guide...
... printer software, the User's Guide printer and other information such as: will be installed. • Using the software (on Windows operating systems) 1 Click Start Œ Programs or All Programs Œ • Loading paper Lexmark 2500 Series. • Printing 2 Click User's Guide. • Working with photos If the link to the User's Guide...

Getting Started
Page 13
... The Toolbar To Preview, scan, copy, print, or fax documents or photos. Using the Lexmark Imaging Studio To open the Lexmark Imaging Studio Welcome screen, use the printer with Windows operating systems. If you are printing. Fax Send a photo or document as an attachment to...print settings for the task you are using a Macintosh operating system, see the Mac Help: 1 From the Finder desktop, double-click the Lexmark 2500 Series folder. 2 Double-click the printer Help icon. Find troubleshooting, maintenance, and cartridge ordering information. Create printer-friendly versions of these...
... The Toolbar To Preview, scan, copy, print, or fax documents or photos. Using the Lexmark Imaging Studio To open the Lexmark Imaging Studio Welcome screen, use the printer with Windows operating systems. If you are printing. Fax Send a photo or document as an attachment to...print settings for the task you are using a Macintosh operating system, see the Mac Help: 1 From the Finder desktop, double-click the Lexmark 2500 Series folder. 2 Double-click the printer Help icon. Find troubleshooting, maintenance, and cartridge ordering information. Create printer-friendly versions of these...

Getting Started
Page 16
...the lower right corner of Web pages. Note: For more information, click Help in Print Properties based on the type of the Printing Status window. • Turn printing voice notification on the World Wide Web. • View ink levels and order new print cartridges. You can .... • Share information with us regarding how you want to a computer. Using the Toolbar The Toolbar lets you browse the Web using Microsoft Windows Internet Explorer version 5.5 or later. From here Contact Information You can open Print Properties from almost any program: 1 With a document open, click...
...the lower right corner of Web pages. Note: For more information, click Help in Print Properties based on the type of the Printing Status window. • Turn printing voice notification on the World Wide Web. • View ink levels and order new print cartridges. You can .... • Share information with us regarding how you want to a computer. Using the Toolbar The Toolbar lets you browse the Web using Microsoft Windows Internet Explorer version 5.5 or later. From here Contact Information You can open Print Properties from almost any program: 1 With a document open, click...
Getting Started
Page 18
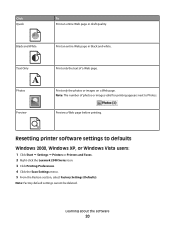
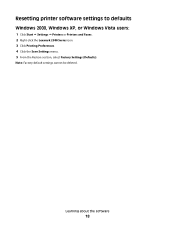
Learning about the software 18 Note: Factory default settings cannot be deleted. Resetting printer software settings to defaults Windows 2000, Windows XP, or Windows Vista users: 1 Click Start ΠSettings ΠPrinters or Printers and Faxes. 2 Right-click the Lexmark 2500 Series icon. 3 Click Printing Preferences. 4 Click the Save Settings menu. 5 From the Restore section, select Factory Settings (Defaults).
Learning about the software 18 Note: Factory default settings cannot be deleted. Resetting printer software settings to defaults Windows 2000, Windows XP, or Windows Vista users: 1 Click Start ΠSettings ΠPrinters or Printers and Faxes. 2 Right-click the Lexmark 2500 Series icon. 3 Click Printing Preferences. 4 Click the Save Settings menu. 5 From the Restore section, select Factory Settings (Defaults).


