
User's Guide
Page 2
... When closing the scanner unit, make any electrical or cabling connections, such as the power supply cord or telephone, during a lightning storm. Lexmark is designed, tested, and approved to meet strict global safety standards with the printer software. Do not set up this product or the manufacturer...and power supply cord. Connect the power supply cord to a professional service person. This product is not responsible for the use the fax feature during a lightning storm. Important safety information Use only the power supply and power supply cord provided with this product or make ...
... When closing the scanner unit, make any electrical or cabling connections, such as the power supply cord or telephone, during a lightning storm. Lexmark is designed, tested, and approved to meet strict global safety standards with the printer software. Do not set up this product or the manufacturer...and power supply cord. Connect the power supply cord to a professional service person. This product is not responsible for the use the fax feature during a lightning storm. Important safety information Use only the power supply and power supply cord provided with this product or make ...
User's Guide
Page 5
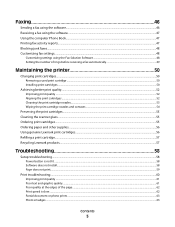
... Installing print cartridges...50 Achieving better print quality...52 Improving print quality ...52 Aligning the print cartridges ...52 Cleaning the print cartridge nozzles...53 Wiping the print cartridge nozzles and contacts ...54 Preserving the print cartridges...55 Cleaning the scanner glass...55 Ordering print cartridges...55 Ordering paper and other supplies...56 Using genuine Lexmark print cartridges...56 Refilling a print cartridge...
... Installing print cartridges...50 Achieving better print quality...52 Improving print quality ...52 Aligning the print cartridges ...52 Cleaning the print cartridge nozzles...53 Wiping the print cartridge nozzles and contacts ...54 Preserving the print cartridges...55 Cleaning the scanner glass...55 Ordering print cartridges...55 Ordering paper and other supplies...56 Using genuine Lexmark print cartridges...56 Refilling a print cartridge...
User's Guide
Page 6
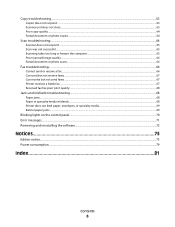
...copies...64 Scan troubleshooting...64 Scanner does not respond ...65 Scan was not successful ...65 Scanning takes too long or freezes the computer...65 Poor scanned image quality ...66 Partial document or photo scans...66 Fax troubleshooting...66 Cannot send or receive a fax...66 Can send but not receive faxes......67 Can receive but not send faxes...67 Printer receives a blank fax...67 Received fax has poor print quality...68 ...
...copies...64 Scan troubleshooting...64 Scanner does not respond ...65 Scan was not successful ...65 Scanning takes too long or freezes the computer...65 Poor scanned image quality ...66 Partial document or photo scans...66 Fax troubleshooting...66 Cannot send or receive a fax...66 Can send but not receive faxes......67 Can receive but not send faxes...67 Printer receives a blank fax...67 Received fax has poor print quality...68 ...
User's Guide
Page 8
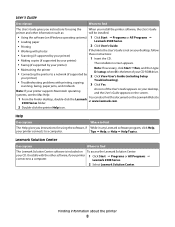
...operating systems) 1 Click Start Œ Programs or All Programs Œ • Loading paper Lexmark 2500 Series. • Printing 2 Click User's Guide. • Working with printing, copying, scanning, faxing, paper jams, and misfeeds 3 Click Yes. Finding information about the printer 8 User's Guide ...'s Guide is not on your desktop, follow • Scanning (if supported by your printer) these instructions: • Making copies (if supported by your printer) 1 Insert the CD. • Faxing (if supported by your printer) • Maintaining the printer...
...operating systems) 1 Click Start Œ Programs or All Programs Œ • Loading paper Lexmark 2500 Series. • Printing 2 Click User's Guide. • Working with printing, copying, scanning, faxing, paper jams, and misfeeds 3 Click Yes. Finding information about the printer 8 User's Guide ...'s Guide is not on your desktop, follow • Scanning (if supported by your printer) these instructions: • Making copies (if supported by your printer) 1 Insert the CD. • Faxing (if supported by your printer) • Maintaining the printer...

User's Guide
Page 12
For more information, see "Using the control panel buttons" on page 14. 3 Paper exit tray Hold paper as it exits. 4 Top cover Access the scanner glass. 5 Paper feed guard Prevent small objects from falling inside. 6 Paper guide Keep paper straight when feeding. 7 Scanner glass Copy, scan, fax, or remove an item. Learning about the printer Understanding the parts of the printer 5 6 4 1 7 3 2 Use the To 1 Paper support Load paper. 2 Control panel Operate the printer. Learning about the printer 12
For more information, see "Using the control panel buttons" on page 14. 3 Paper exit tray Hold paper as it exits. 4 Top cover Access the scanner glass. 5 Paper feed guard Prevent small objects from falling inside. 6 Paper guide Keep paper straight when feeding. 7 Scanner glass Copy, scan, fax, or remove an item. Learning about the printer Understanding the parts of the printer 5 6 4 1 7 3 2 Use the To 1 Paper support Load paper. 2 Control panel Operate the printer. Learning about the printer 12
User's Guide
Page 15
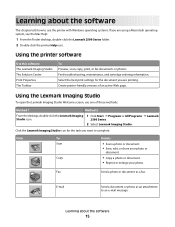
... 15 Using the printer software Use this software The Lexmark Imaging Studio The Solution Center Print Properties The Toolbar To Preview, scan, copy, print, or fax documents or photos. Using the Lexmark Imaging Studio To open the Lexmark Imaging Studio Welcome screen, use the printer with Windows... a fax. Learning about the software This chapter tells how to complete. Select the best print settings for the task you want to use one of an active Web page. Click the Lexmark Imaging Studio icon for the document you are printing. Click To Scan Copy Details • Scan a ...
... 15 Using the printer software Use this software The Lexmark Imaging Studio The Solution Center Print Properties The Toolbar To Preview, scan, copy, print, or fax documents or photos. Using the Lexmark Imaging Studio To open the Lexmark Imaging Studio Welcome screen, use the printer with Windows... a fax. Learning about the software This chapter tells how to complete. Select the best print settings for the task you want to use one of an active Web page. Click the Lexmark Imaging Studio icon for the document you are printing. Click To Scan Copy Details • Scan a ...
User's Guide
Page 16
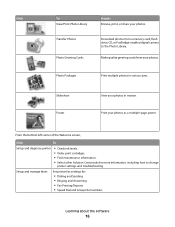
... Solution Center tabs for : • Dialing and Sending • Ringing and Answering • Fax Printing/Reports • Speed Dial and Group Dial numbers Learning about the software 16 Photo Packages Print multiple photos in motion. Setup and manage faxes Set printer fax settings for more information, including how to the Photo Library. Slideshow Poster View...
... Solution Center tabs for : • Dialing and Sending • Ringing and Answering • Fax Printing/Reports • Speed Dial and Group Dial numbers Learning about the software 16 Photo Packages Print multiple photos in motion. Setup and manage faxes Set printer fax settings for more information, including how to the Photo Library. Slideshow Poster View...
User's Guide
Page 20
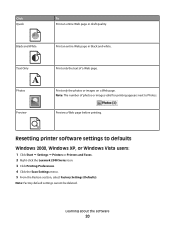
... settings to Photos. Click Quick To Print an entire Web page in black and white. Print only the photos or images on a Web page. Note: The number of a Web page. Note: Factory default settings cannot be deleted. Black and White Print an entire Web page in draft quality...Text Only A Photos Preview Print only the text of photos or images valid for printing appears next to defaults Windows 2000, Windows XP, or Windows Vista users: 1 Click Start ΠSettings ΠPrinters or Printers and Faxes. 2 Right-click the Lexmark 2500 Series icon. 3 Click Printing Preferences. 4 Click the Save...
... settings to Photos. Click Quick To Print an entire Web page in black and white. Print only the photos or images on a Web page. Note: The number of a Web page. Note: Factory default settings cannot be deleted. Black and White Print an entire Web page in draft quality...Text Only A Photos Preview Print only the text of photos or images valid for printing appears next to defaults Windows 2000, Windows XP, or Windows Vista users: 1 Click Start ΠSettings ΠPrinters or Printers and Faxes. 2 Right-click the Lexmark 2500 Series icon. 3 Click Printing Preferences. 4 Click the Save...
User's Guide
Page 24
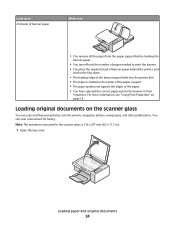
...feeds into the printer first. • The paper is 216 x 297 mm (8.5 x 11.7 in Print Properties. For more information, see "Using Print Properties" on the scanner glass You can scan a document for faxing. Loading paper and original documents 24 Load up to 20 sheets of banner paper Make sure • You... remove all the paper from the paper support before loading the banner paper. • You tear off only the number of pages needed to print the banner...
...feeds into the printer first. • The paper is 216 x 297 mm (8.5 x 11.7 in Print Properties. For more information, see "Using Print Properties" on the scanner glass You can scan a document for faxing. Loading paper and original documents 24 Load up to 20 sheets of banner paper Make sure • You... remove all the paper from the paper support before loading the banner paper. • You tear off only the number of pages needed to print the banner...
User's Guide
Page 46
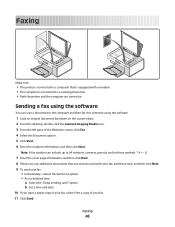
...and date. 10 If you want a paper copy of your fax, select Print a copy of the Welcome screen, click Fax. 4 Select the Document option. 5 Click Start. 6 Enter the recipient information, and then click Next. Note: A fax number can scan a document to the computer and then fax it to someone using the software. 1 ...8226; Both the printer and the computer are turned on the scanner glass. 2 From the desktop, double-click the Lexmark Imaging Studio icon. 3 From the left pane of your fax: • Immediately-Select the Send now option. • At a scheduled time: a Select the "Delay sending ...
...and date. 10 If you want a paper copy of your fax, select Print a copy of the Welcome screen, click Fax. 4 Select the Document option. 5 Click Start. 6 Enter the recipient information, and then click Next. Note: A fax number can scan a document to the computer and then fax it to someone using the software. 1 ...8226; Both the printer and the computer are turned on the scanner glass. 2 From the desktop, double-click the Lexmark Imaging Studio icon. 3 From the left pane of your fax: • Immediately-Select the Send now option. • At a scheduled time: a Select the "Delay sending ...
User's Guide
Page 47
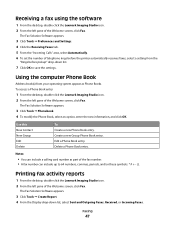
... From the Display drop-down list. 7 Click OK to 64 numbers, commas, periods, and/or these symbols Printing fax activity reports 1 From the desktop, double-click the Lexmark Imaging Studio icon. 2 From the left pane of telephone rings before pickup" drop-down list, select Sent and ...Outgoing Faxes, Received, or Incoming Faxes. Receiving a fax using the software 1 From the desktop, double-click the Lexmark Imaging Studio icon. 2 From the left pane of the fax number. • A fax number can include up to save the settings. The Fax Solution Software appears. 3 Click...
... From the Display drop-down list. 7 Click OK to 64 numbers, commas, periods, and/or these symbols Printing fax activity reports 1 From the desktop, double-click the Lexmark Imaging Studio icon. 2 From the left pane of telephone rings before pickup" drop-down list, select Sent and ...Outgoing Faxes, Received, or Incoming Faxes. Receiving a fax using the software 1 From the desktop, double-click the Lexmark Imaging Studio icon. 2 From the left pane of the fax number. • A fax number can include up to save the settings. The Fax Solution Software appears. 3 Click...

User's Guide
Page 48
...the name of the Welcome screen, click Fax. These settings apply to the faxes you want to block faxes from up to 50 phone numbers. 7 Click OK to assign the current modem exclusively for Lexmark Fax Center. • Select Modem Speaker ...options. • Change dialing properties. 5 Choose a date range. 6 Click Print. c Enter a phone number in the Fax Identifier field and corresponding contact name in the Fax...
...the name of the Welcome screen, click Fax. These settings apply to the faxes you want to block faxes from up to 50 phone numbers. 7 Click OK to assign the current modem exclusively for Lexmark Fax Center. • Select Modem Speaker ...options. • Change dialing properties. 5 Choose a date range. 6 Click Print. c Enter a phone number in the Fax Identifier field and corresponding contact name in the Fax...

User's Guide
Page 49
...• Choose whether to turn on the first try. • Select a default scanning device. Preferences • Select options for the recent fax list. • Choose settings for keeping faxes before deleting them. • Choose a default phone book. 5 Click OK after ... the Fax Solution Software. Faxing 49 The Fax Solution Software appears. 3 Click Tools Œ Preferences and Settings. 4 Click the Receiving Faxes tab. 5 From the "Incoming Calls" area, select Automatically. 6 From the "Rings before receiving a fax automatically 1 From the desktop, double-click the Lexmark Imaging...
...• Choose whether to turn on the first try. • Select a default scanning device. Preferences • Select options for the recent fax list. • Choose settings for keeping faxes before deleting them. • Choose a default phone book. 5 Click OK after ... the Fax Solution Software. Faxing 49 The Fax Solution Software appears. 3 Click Tools Œ Preferences and Settings. 4 Click the Receiving Faxes tab. 5 From the "Incoming Calls" area, select Automatically. 6 From the "Rings before receiving a fax automatically 1 From the desktop, double-click the Lexmark Imaging...
User's Guide
Page 52
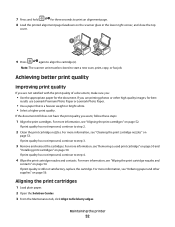
... appropriate paper for best results use Lexmark Premium Photo Paper or Lexmark Photo Paper. • Use a paper that is still not satisfactory, replace the cartridge. If print quality has not improved, continue to start a new scan, print, copy, or fax job. Maintaining the printer 52 For more information, see "Wiping the print cartridge nozzles and contacts" on page...
... appropriate paper for best results use Lexmark Premium Photo Paper or Lexmark Photo Paper. • Use a paper that is still not satisfactory, replace the cartridge. If print quality has not improved, continue to start a new scan, print, copy, or fax job. Maintaining the printer 52 For more information, see "Wiping the print cartridge nozzles and contacts" on page...
User's Guide
Page 58
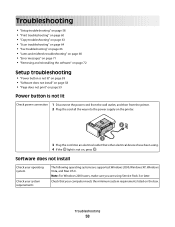
...: Windows 2000, Windows XP, Windows Vista, and Mac OS X. Troubleshooting • "Setup troubleshooting" on page 58 • "Print troubleshooting" on page 60 • "Copy troubleshooting" on page 63 • "Scan troubleshooting" on page 64 • "Fax troubleshooting" on page 66 • "Jams and misfeeds troubleshooting" on page 68 • "Error messages" on page 71...
...: Windows 2000, Windows XP, Windows Vista, and Mac OS X. Troubleshooting • "Setup troubleshooting" on page 58 • "Print troubleshooting" on page 60 • "Copy troubleshooting" on page 63 • "Scan troubleshooting" on page 64 • "Fax troubleshooting" on page 66 • "Jams and misfeeds troubleshooting" on page 68 • "Error messages" on page 71...
User's Guide
Page 60
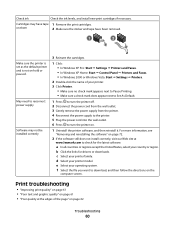
...your country or region. May need to check for drivers or downloads. Print troubleshooting • "Improving print quality" on page 61 • "Poor text and graphic quality" on page 61 • "Poor quality at www.lexmark.com to reconnect power supply Software may have been removed. 1 2 ... Reinsert the cartridges. 1 Click: • In Windows XP Pro: Start Œ Settings Œ Printers and Faxes. • In Windows XP Home: Start Œ Control Panel Œ Printers and Faxes. • In Windows 2000 or Windows Vista: Start Œ Settings Œ Printers. 2 Double-click the ...
...your country or region. May need to check for drivers or downloads. Print troubleshooting • "Improving print quality" on page 61 • "Poor text and graphic quality" on page 61 • "Poor quality at www.lexmark.com to reconnect power supply Software may have been removed. 1 2 ... Reinsert the cartridges. 1 Click: • In Windows XP Pro: Start Œ Settings Œ Printers and Faxes. • In Windows XP Home: Start Œ Control Panel Œ Printers and Faxes. • In Windows 2000 or Windows Vista: Start Œ Settings Œ Printers. 2 Double-click the ...
User's Guide
Page 65
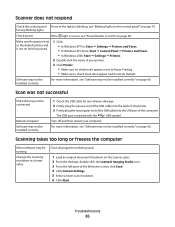
...no check mark appears next to Pause Printing. • Make sure a check ...Lexmark Imaging Studio icon. 3 From the left pane of the Welcome screen, click Scan. 4 Click Custom Settings. 5 Select a lower scan resolution. 6 Click Start. Scan was not successful USB... cable may not be connected Reboot computer Software may not be running Change the scanning...Settings Œ Printers and Faxes. • In Windows XP Home: Start Œ Control Panel Œ Printers and Faxes. • In Windows 2000...
...no check mark appears next to Pause Printing. • Make sure a check ...Lexmark Imaging Studio icon. 3 From the left pane of the Welcome screen, click Scan. 4 Click Custom Settings. 5 Select a lower scan resolution. 6 Click Start. Scan was not successful USB... cable may not be connected Reboot computer Software may not be running Change the scanning...Settings Œ Printers and Faxes. • In Windows XP Home: Start Œ Control Panel Œ Printers and Faxes. • In Windows 2000...
User's Guide
Page 66
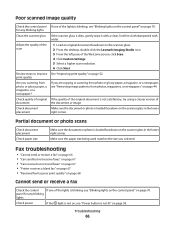
... glass. 2 From the desktop, double-click the Lexmark Imaging Studio icon. 3 From the left pane of the lights is blinking, see "Blinking lights on the control panel" on page 70. Partial document or photo scans Check document placement Check paper size Make sure the ...paper size being used matches the size you scanning from photos, magazines, or newspapers" on page 68 Cannot send or receive a fax Check the control If one of the Welcome screen, click Scan. 4 Click Custom Settings. 5 Select a higher scan resolution. 6 Click Start. print quality Are you selected. Check quality of...
... glass. 2 From the desktop, double-click the Lexmark Imaging Studio icon. 3 From the left pane of the lights is blinking, see "Blinking lights on the control panel" on page 70. Partial document or photo scans Check document placement Check paper size Make sure the ...paper size being used matches the size you scanning from photos, magazines, or newspapers" on page 68 Cannot send or receive a fax Check the control If one of the Welcome screen, click Scan. 4 Click Custom Settings. 5 Select a higher scan resolution. 6 Click Start. print quality Are you selected. Check quality of...
User's Guide
Page 67
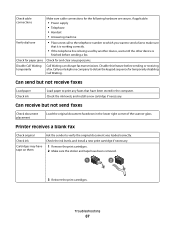
...ink levels, and install a new cartridge if necessary. Check ink Check the ink levels, and install a new print cartridge if necessary. Can send but not send faxes Check document placement Load the original document facedown in the computer. Call your telephone company to verify the original document ... is being used by another device, wait until the other device is finished before sending or receiving a fax. Troubleshooting 67 Cartridges may have tape on them 1 Remove the print cartridges. 2 Make sure the sticker and tape have been stored in the lower right corner of the ...
...ink levels, and install a new cartridge if necessary. Check ink Check the ink levels, and install a new print cartridge if necessary. Can send but not send faxes Check document placement Load the original document facedown in the computer. Call your telephone company to verify the original document ... is being used by another device, wait until the other device is finished before sending or receiving a fax. Troubleshooting 67 Cartridges may have tape on them 1 Remove the print cartridges. 2 Make sure the sticker and tape have been stored in the lower right corner of the ...
User's Guide
Page 68
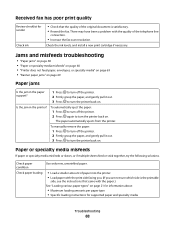
... the quality of the original document is the printable side, see the instructions that the quality of the telephone line connection. • Increase the fax scan resolution. To automatically eject the paper: 1 Press to turn off the printer. 2 Firmly grasp the paper, and gently pull it out. 3... Press to turn the printer back on. Check the ink levels, and install a new print cartridge if necessary. Received fax has poor print quality Review checklist for sender Check ink • Check that came with the paper.) See "Loading various paper types" on ...
... the quality of the original document is the printable side, see the instructions that the quality of the telephone line connection. • Increase the fax scan resolution. To automatically eject the paper: 1 Press to turn off the printer. 2 Firmly grasp the paper, and gently pull it out. 3... Press to turn the printer back on. Check the ink levels, and install a new print cartridge if necessary. Received fax has poor print quality Review checklist for sender Check ink • Check that came with the paper.) See "Loading various paper types" on ...


