User's Guide
Page 5
... jams 99 Chapter 26: Ordering supplies and maintenance items 102 Chapter 27: Replacing the print cartridge 103 Removing the old print cartridge 103 Installing the new print cartridge 105 Chapter 28: Cleaning the printer 109 Chapter 29: Replacing a staple cartridge 110 Chapter 30: Emptying the hole punch box 113 Chapter 31: Replacing the items in...
... jams 99 Chapter 26: Ordering supplies and maintenance items 102 Chapter 27: Replacing the print cartridge 103 Removing the old print cartridge 103 Installing the new print cartridge 105 Chapter 28: Cleaning the printer 109 Chapter 29: Replacing a staple cartridge 110 Chapter 30: Emptying the hole punch box 113 Chapter 31: Replacing the items in...
User's Guide
Page 47
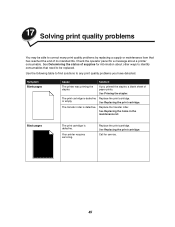
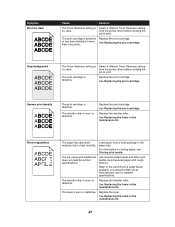
...has reached the end of paper prints. or empty. The transfer roller is defective. Black pages The print cartridge is defective. See Replacing the print cartridge. See Determining the status of supplies for service. 45 Use the following table to find solutions to any print... problems you primed the stapler, a blank sheet of its intended life. The print cartridge is defective Replace the print cartridge. See Replacing the print cartridge. Symptom Blank pages Cause Solution The printer was priming the stapler. If you have detected. See Replacing the items in the maintenance...
...has reached the end of paper prints. or empty. The transfer roller is defective. Black pages The print cartridge is defective. See Replacing the print cartridge. See Determining the status of supplies for service. 45 Use the following table to find solutions to any print... problems you primed the stapler, a blank sheet of its intended life. The print cartridge is defective Replace the print cartridge. See Replacing the print cartridge. Symptom Blank pages Cause Solution The printer was priming the stapler. If you have detected. See Replacing the items in the maintenance...
User's Guide
Page 48
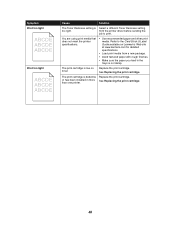
Replace the print cartridge. See Replacing the print cartridge. Refer to print. or has been installed in the trays is low on Lexmark's Web site at www.lexmark.com for detailed specifications. • Load print media from the printer driver before sending the job to the Card Stock & Label ...Guide available on toner. See Replacing the print cartridge 46 Symptom Print too light Print...
Replace the print cartridge. See Replacing the print cartridge. Refer to print. or has been installed in the trays is low on Lexmark's Web site at www.lexmark.com for detailed specifications. • Load print media from the printer driver before sending the job to the Card Stock & Label ...Guide available on toner. See Replacing the print cartridge 46 Symptom Print too light Print...
User's Guide
Page 49
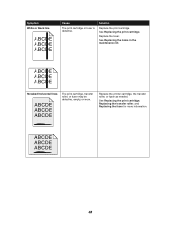
...roller. See Replacing the items in more than one printer. You are using print media that does not meet the printer specifications. See Replacing the print cartridge. The print cartridge is defective. See Replacing the print cartridge. See Replacing the items in the maintenance kit. ...kit. See Replacing the print cartridge. from a fresh package in the paper tray. For information on Lexmark's Web site at www.lexmark.com for detailed specifications. from the printer driver before sending the job to print. Replace the print cartridge. Use recommended paper and other ...
...roller. See Replacing the items in more than one printer. You are using print media that does not meet the printer specifications. See Replacing the print cartridge. The print cartridge is defective. See Replacing the print cartridge. See Replacing the items in the maintenance kit. ...kit. See Replacing the print cartridge. from a fresh package in the paper tray. For information on Lexmark's Web site at www.lexmark.com for detailed specifications. from the printer driver before sending the job to print. Replace the print cartridge. Use recommended paper and other ...
User's Guide
Page 50
Replace the fuser. Streaked horizontal lines The print cartridge, transfer roller, or fuser may be defective, empty, or worn. See Replacing the print cartridge. See Replacing the print cartridge, Replacing the transfer roller, and Replacing the fuser for more information. 48 Replace the printer cartridge, the transfer roller, or fuser as needed. Symptom White or black line Cause The print cartridge or fuser is defective. See Replacing the items in the maintenance kit. Solution Replace the print cartridge.
Replace the fuser. Streaked horizontal lines The print cartridge, transfer roller, or fuser may be defective, empty, or worn. See Replacing the print cartridge. See Replacing the print cartridge, Replacing the transfer roller, and Replacing the fuser for more information. 48 Replace the printer cartridge, the transfer roller, or fuser as needed. Symptom White or black line Cause The print cartridge or fuser is defective. See Replacing the items in the maintenance kit. Solution Replace the print cartridge.

User's Guide
Page 61
...application or rotate your print job using the printer driver to avoid stapled sets that are not stapled. The staple cartridge holder is empty. Insert a new staple cartridge. Clear the staple jam. The staple cartridge is Reinstall the stapler cartridge holder into the stapler. Staple priming fails. ... priming source tray specified in the Finishing Menu. Remove the stack of 20 lb paper. The stapler is Reinstall the staple cartridge holder. You are not properly positioned in the wrong corner of the paper in the staple job. See Staple Prime Src for...
...application or rotate your print job using the printer driver to avoid stapled sets that are not stapled. The staple cartridge holder is empty. Insert a new staple cartridge. Clear the staple jam. The staple cartridge is Reinstall the stapler cartridge holder into the stapler. Staple priming fails. ... priming source tray specified in the Finishing Menu. Remove the stack of 20 lb paper. The stapler is Reinstall the staple cartridge holder. You are not properly positioned in the wrong corner of the paper in the staple job. See Staple Prime Src for...

User's Guide
Page 73
If you are using the envelope feeder, you are written assuming you must remove it before opening the duplex unit door. Clearing jams from the printer Tray 1 and the print cartridge area Note: The following instructions are using the multipurpose feeder and the duplex unit. For instructions, see Removing the optional envelope feeder. 1 Open the multipurpose feeder. 2 Push up on the latch to release the duplex unit door (Door E). 3 Gently lower the door to the open position. 4 Pull up on handle to open the printer side door (Door A). 71
If you are using the envelope feeder, you are written assuming you must remove it before opening the duplex unit door. Clearing jams from the printer Tray 1 and the print cartridge area Note: The following instructions are using the multipurpose feeder and the duplex unit. For instructions, see Removing the optional envelope feeder. 1 Open the multipurpose feeder. 2 Push up on the latch to release the duplex unit door (Door E). 3 Gently lower the door to the open position. 4 Pull up on handle to open the printer side door (Door A). 71
User's Guide
Page 104
... you know it does the stapler can only staple 40 more information.) Ordering a print cartridge When the 88 Toner Low message appears, you bought your printer. If 120 V is time to determine the voltage of your printer. For 220 V, order a high-voltage maintenance kit. (See Replacing the items in your... area. You can also visit the Lexmark online store at the rear of the printer to replace the items in the maintenance kit: fuser, transfer roller, and pick rollers. Use part number 12L0252 to order a box of staple cartridges on hand before the Staples Low message appears because...
... you know it does the stapler can only staple 40 more information.) Ordering a print cartridge When the 88 Toner Low message appears, you bought your printer. If 120 V is time to determine the voltage of your printer. For 220 V, order a high-voltage maintenance kit. (See Replacing the items in your... area. You can also visit the Lexmark online store at the rear of the printer to replace the items in the maintenance kit: fuser, transfer roller, and pick rollers. Use part number 12L0252 to order a box of staple cartridges on hand before the Staples Low message appears because...
User's Guide
Page 105
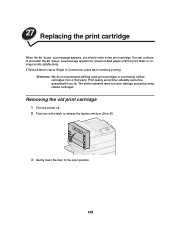
...guaranteed if you should order a new print cartridge. 27 Replacing the print cartridge When the 88 Toner Low message appears, you do not recommend refilling used print cartridges or purchasing refilled cartridges from a third party. Removing the old print cartridge 1 Turn the printer off. 2 Push up on the latch to... pages until the print fades or no longer prints satisfactorily. You can continue to the open position. 103 The printer warranty does not cover damage caused by using refilled cartridges. If Toner Alarm is set to Single or Continuous, press Go to continue printing.
...guaranteed if you should order a new print cartridge. 27 Replacing the print cartridge When the 88 Toner Low message appears, you do not recommend refilling used print cartridges or purchasing refilled cartridges from a third party. Removing the old print cartridge 1 Turn the printer off. 2 Push up on the latch to... pages until the print fades or no longer prints satisfactorily. You can continue to the open position. 103 The printer warranty does not cover damage caused by using refilled cartridges. If Toner Alarm is set to Single or Continuous, press Go to continue printing.

User's Guide
Page 106
Handle Latch 104 4 Pull up on the latch to release and slide the print cartridge out until you see the handle. Gently lower the door to open the printer side door (Door A). Note: You must open the printer side door since the print cartridge cannot be removed with just the printer front door opened. 6 Pull up on each side, pull open position. Handhold Door F 5 Using the handholds located on the handle to the open the printer front door (Door F).
Handle Latch 104 4 Pull up on the latch to release and slide the print cartridge out until you see the handle. Gently lower the door to open the printer side door (Door A). Note: You must open the printer side door since the print cartridge cannot be removed with just the printer front door opened. 6 Pull up on each side, pull open position. Handhold Door F 5 Using the handholds located on the handle to the open the printer front door (Door F).

User's Guide
Page 107
Save the bag. 2 Remove the tape and protective paper from the plastic bag. See Cleaning the printer. Protective paper Tape 105 7 Use the handle to pull the print cartridge straight out. 8 Set the print cartridge aside. 9 Clean the printer. Installing the new print cartridge 1 Remove the new cartridge from the top of the print cartridge.
Save the bag. 2 Remove the tape and protective paper from the plastic bag. See Cleaning the printer. Protective paper Tape 105 7 Use the handle to pull the print cartridge straight out. 8 Set the print cartridge aside. 9 Clean the printer. Installing the new print cartridge 1 Remove the new cartridge from the top of the print cartridge.

User's Guide
Page 109
5 Drop the handle back into place. 6 Push the print cartridge into the printer until the cartridge clicks into place. 7 Remove the tape from the end of the cartridge. 8 Close the printer side door (Door A). 9 Close the duplex unit door (Door E). 107
5 Drop the handle back into place. 6 Push the print cartridge into the printer until the cartridge clicks into place. 7 Remove the tape from the end of the cartridge. 8 Close the printer side door (Door A). 9 Close the duplex unit door (Door E). 107

User's Guide
Page 110
10 Hold both sides of the printer front door (Door F) and close it. 11 Turn the printer on. 12 Place the used print cartridge in the plastic bag you saved in step 1 on page 105. 13 Follow the instructions on the new print cartridge box to recycle the used print cartridge. 108
10 Hold both sides of the printer front door (Door F) and close it. 11 Turn the printer on. 12 Place the used print cartridge in the plastic bag you saved in step 1 on page 105. 13 Follow the instructions on the new print cartridge box to recycle the used print cartridge. 108
User's Guide
Page 111
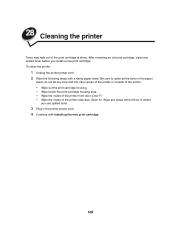
... damp paper towel. Wipe any areas behind Door A where you install a new print cartridge. 28 Cleaning the printer Toner may leak out of the printer. - Wipe below the print cartridge housing area. - Wipe out the print cartridge housing. - do not let any spilled toner before you see spilled toner. 3 Plug... in the paper towel; After removing an old print cartridge, clean any toner fall into other areas of the printer or outside of the print cartridge at times. To clean the printer: 1 Unplug the printer power cord. 2 Wipe the following areas with Installing the new print...
... damp paper towel. Wipe any areas behind Door A where you install a new print cartridge. 28 Cleaning the printer Toner may leak out of the printer. - Wipe below the print cartridge housing area. - Wipe out the print cartridge housing. - do not let any spilled toner before you see spilled toner. 3 Plug... in the paper towel; After removing an old print cartridge, clean any toner fall into other areas of the printer or outside of the print cartridge at times. To clean the printer: 1 Unplug the printer power cord. 2 Wipe the following areas with Installing the new print...
User's Guide
Page 138
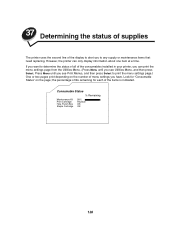
...or maintenance items that need replacing. Consumable Status % Remaining Maintenance Kit Print Cartridge Hole Punch Box Staple Cartridge 99% Replace OK OK 136 If you want to determine the status of all of the consumables installed in your printer, you can only display information about one item at a time. Look ...the percentage of life remaining for "Consumable Status" on the number of menu settings you have. 37 Determining the status of supplies The printer uses the second line of the display to alert you to print the menu settings page.) One or two pages print depending on the ...
...or maintenance items that need replacing. Consumable Status % Remaining Maintenance Kit Print Cartridge Hole Punch Box Staple Cartridge 99% Replace OK OK 136 If you want to determine the status of all of the consumables installed in your printer, you can only display information about one item at a time. Look ...the percentage of life remaining for "Consumable Status" on the number of menu settings you have. 37 Determining the status of supplies The printer uses the second line of the display to alert you to print the menu settings page.) One or two pages print depending on the ...

User's Guide
Page 140
... your country, contact the place where you bought your used printer cartridges in a worldwide recycling effort at no cost to Lexmark. Print quality and printer reliability cannot be guaranteed if you do. WARNING: Lexmark does not recommend refilling used printer cartridges or purchasing refilled cartridges from a third party. The printer warranty does not cover damage caused by using refilled...
... your country, contact the place where you bought your used printer cartridges in a worldwide recycling effort at no cost to Lexmark. Print quality and printer reliability cannot be guaranteed if you do. WARNING: Lexmark does not recommend refilling used printer cartridges or purchasing refilled cartridges from a third party. The printer warranty does not cover damage caused by using refilled...

User's Guide
Page 141
Make sure the staple priming source tray specified in the Finishing Menu has paper in it . The printer then ejects the page into the finisher, and attempts to the printer. 139 The printer pulls a sheet of staples. 3 Resend your stapled job does not staple, you must prime the ...then press Select. 2 Press Menu until you see Prime Stapler, and then press Select. appears on the display. This printer automatically primes the stapler after: • A new staple cartridge is installed. • A staple jam is requested. Priming Stapler appears on the display: - Press Go to the...
Make sure the staple priming source tray specified in the Finishing Menu has paper in it . The printer then ejects the page into the finisher, and attempts to the printer. 139 The printer pulls a sheet of staples. 3 Resend your stapled job does not staple, you must prime the ...then press Select. 2 Press Menu until you see Prime Stapler, and then press Select. appears on the display. This printer automatically primes the stapler after: • A new staple cartridge is installed. • A staple jam is requested. Priming Stapler appears on the display: - Press Go to the...

User's Guide
Page 216
... feed orientation. Selects paper from the specified tray. See also: Staple positions Staple Prime Src Purpose: To specify the paper source you want the printer to use when it primes the stapler. Values: Tray (Tray 1*) MP Feeder Selects paper from the multipurpose feeder. 214 Staples print jobs once ....) Values: Off* Auto Front Back Dual Does not staple print jobs. Automatically selects the best staple position for the Auto value. When a staple cartridge is replaced or a staple jam is cleared, the printer may need to prime the stapler by stapling a sheet of a print job.
... feed orientation. Selects paper from the specified tray. See also: Staple positions Staple Prime Src Purpose: To specify the paper source you want the printer to use when it primes the stapler. Values: Tray (Tray 1*) MP Feeder Selects paper from the multipurpose feeder. 214 Staples print jobs once ....) Values: Off* Auto Front Back Dual Does not staple print jobs. Automatically selects the best staple position for the Auto value. When a staple cartridge is replaced or a staple jam is cleared, the printer may need to prime the stapler by stapling a sheet of a print job.

User's Guide
Page 224
...Priming Stapler is displayed. Press Select to delete the job. Deletes the designated held job. Determines the number of copies for proper functioning after a staple cartridge is replaced or a staple jam is printing. See also: Staple Prime Src; First select your user name from the list on the display. Press Menu...of held jobs. The Waiting state occurs if an incomplete job is sent to scroll through the list of held jobs. Press Menu to the printer or an ASCII job, such as a print screen command, is cleared. Deletes all held jobs Print Buffer Purpose: To print any data stored ...
...Priming Stapler is displayed. Press Select to delete the job. Deletes the designated held job. Determines the number of copies for proper functioning after a staple cartridge is replaced or a staple jam is printing. See also: Staple Prime Src; First select your user name from the list on the display. Press Menu...of held jobs. The Waiting state occurs if an incomplete job is sent to scroll through the list of held jobs. Press Menu to the printer or an ASCII job, such as a print screen command, is cleared. Deletes all held jobs Print Buffer Purpose: To print any data stored ...
User's Guide
Page 234
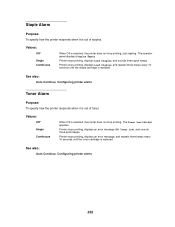
... Off* Single Continuous When Off is selected, the printer does not stop printing, just stapling. Printer stops printing, displays an error message, and repeats three beeps every 10 seconds until the staple cartridge is replaced. Printer stops printing, displays Load Staples, and repeats three ...beeps every 10 seconds until the toner cartridge is replaced. Printer stops printing, displays an error message (88 Toner Low), and ...
... Off* Single Continuous When Off is selected, the printer does not stop printing, just stapling. Printer stops printing, displays an error message, and repeats three beeps every 10 seconds until the staple cartridge is replaced. Printer stops printing, displays Load Staples, and repeats three ...beeps every 10 seconds until the toner cartridge is replaced. Printer stops printing, displays an error message (88 Toner Low), and ...


