
Setup Guide
Page 5
... 71 Step 12: Load print media 73 Loading trays 1, 2, and 3 74 Loading trays 4 and 5 80 Loading the multipurpose feeder 83 Loading the optional envelope feeder 86 Step 13: Attach cables 89 Network printing 89 Local printing 90 Step 14: Verify printer setup 92 Turning on the printer 92 Printing a network setup page 93 Printing...
... 71 Step 12: Load print media 73 Loading trays 1, 2, and 3 74 Loading trays 4 and 5 80 Loading the multipurpose feeder 83 Loading the optional envelope feeder 86 Step 13: Attach cables 89 Network printing 89 Local printing 90 Step 14: Verify printer setup 92 Turning on the printer 92 Printing a network setup page 93 Printing...
Setup Guide
Page 7
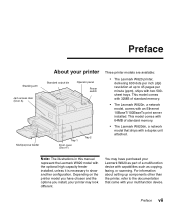
... access door (Door A) Multipurpose feeder About your printer Standard output bin Operator panel Power switch Tray 1 Front cover (Door F) Tray 2 Three printer models are available: • The Lexmark W820 printer, delivering 600 dots per minute (ppm), ships with two 500sheet trays. This model comes with 32MB of standard memory. • The Lexmark W820dn, a network model that came with your...
... access door (Door A) Multipurpose feeder About your printer Standard output bin Operator panel Power switch Tray 1 Front cover (Door F) Tray 2 Three printer models are available: • The Lexmark W820 printer, delivering 600 dots per minute (ppm), ships with two 500sheet trays. This model comes with 32MB of standard memory. • The Lexmark W820dn, a network model that came with your...
Setup Guide
Page 8
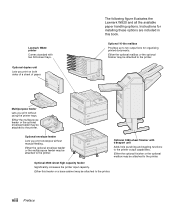
...feeder or a base cabinet may be attached to the printer. Optional envelope feeder Lets you print envelopes without using the printer trays. Either the optional finisher or the optional mailbox may be attached to the printer. viii Preface Either the optional mailbox or the optional finisher...attached to the printer. Optional 3250-sheet finisher with two 500-sheet trays. Either the optional envelope feeder or the multipurpose feeder may be attached to the printer. Optional duplex unit Lets you print without manual feeding. The following figure illustrates the Lexmark W820 and all...
...feeder or a base cabinet may be attached to the printer. Optional envelope feeder Lets you print envelopes without using the printer trays. Either the optional finisher or the optional mailbox may be attached to the printer. viii Preface Either the optional mailbox or the optional finisher...attached to the printer. Optional 3250-sheet finisher with two 500-sheet trays. Either the optional envelope feeder or the multipurpose feeder may be attached to the printer. Optional duplex unit Lets you print without manual feeding. The following figure illustrates the Lexmark W820 and all...
Setup Guide
Page 13
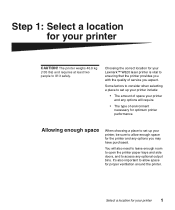
... to leave enough room to open the printer paper trays and side doors, and to lift it safely. Some factors to consider when selecting a place to set up your Lexmark™ W820 laser printer is vital to ensuring that the printer provides you with the quality of space your printer and any options you expect. It's also...
... to leave enough room to open the printer paper trays and side doors, and to lift it safely. Some factors to consider when selecting a place to set up your Lexmark™ W820 laser printer is vital to ensuring that the printer provides you with the quality of space your printer and any options you expect. It's also...
Setup Guide
Page 21
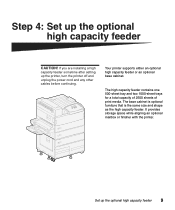
...feeder or an optional base cabinet. It provides storage space while aligning an optional mailbox or finisher with the printer. The high capacity feeder contains one 500-sheet tray and two 1000-sheet trays for a total capacity of 2500 sheets of print media. The base cabinet is optional furniture that is the... same size and shape as the high capacity feeder. Set up the printer, turn the printer off and unplug the power cord...
...feeder or an optional base cabinet. It provides storage space while aligning an optional mailbox or finisher with the printer. The high capacity feeder contains one 500-sheet tray and two 1000-sheet trays for a total capacity of 2500 sheets of print media. The base cabinet is optional furniture that is the... same size and shape as the high capacity feeder. Set up the printer, turn the printer off and unplug the power cord...

Setup Guide
Page 22
... from the bottom. To set up the optional high capacity feeder Be sure you remove the sheets of foam packing from the bottom of both trays before you have the following items: - 2500-sheet high capacity feeder or base cabinet - 2 locking clips - 2 thumbscrews - Warning! High ...capacity feeder Locking clips, thumbscrews, and tray labels Warning! Save the carton and packing materials in case you need to remove the foam packing and tape from its packing materials. Lift the ...
... from the bottom. To set up the optional high capacity feeder Be sure you remove the sheets of foam packing from the bottom of both trays before you have the following items: - 2500-sheet high capacity feeder or base cabinet - 2 locking clips - 2 thumbscrews - Warning! High ...capacity feeder Locking clips, thumbscrews, and tray labels Warning! Save the carton and packing materials in case you need to remove the foam packing and tape from its packing materials. Lift the ...
Setup Guide
Page 24
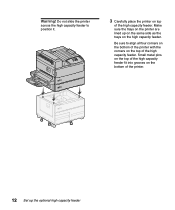
Be sure to position it. 3 Carefully place the printer on the top of the printer. 12 Set up on the same side as the trays on the printer are lined up the optional high capacity feeder Small metal pins on the top of the high capacity feeder fit into grooves on the bottom of the high capacity feeder. Make sure the trays on the high capacity feeder. Do not slide the printer across the high capacity feeder to align all four corners on the bottom of the printer with the corners on top of the high capacity feeder. Warning!
Be sure to position it. 3 Carefully place the printer on the top of the printer. 12 Set up on the same side as the trays on the printer are lined up the optional high capacity feeder Small metal pins on the top of the high capacity feeder fit into grooves on the bottom of the high capacity feeder. Make sure the trays on the high capacity feeder. Do not slide the printer across the high capacity feeder to align all four corners on the bottom of the printer with the corners on top of the high capacity feeder. Warning!

Setup Guide
Page 25
a Pull the tray out fully. Set up the optional high capacity feeder 13 c Gently pull the tray out. b Tilt the front of the tray upward. Attaching the locking clips The locking clips keep the printer and the high capacity feeder properly aligned, helping to prevent them from being separated accidently. 1 Remove tray 2.
a Pull the tray out fully. Set up the optional high capacity feeder 13 c Gently pull the tray out. b Tilt the front of the tray upward. Attaching the locking clips The locking clips keep the printer and the high capacity feeder properly aligned, helping to prevent them from being separated accidently. 1 Remove tray 2.

Setup Guide
Page 26
Note: If you are installing a base cabinet, open the cabinet door. 2 Open tray 3. 3 Attach the locking clips to the left and right sides of the trays. 4 Secure the locking clips using the thumbscrews. 14 Set up the optional high capacity feeder
Note: If you are installing a base cabinet, open the cabinet door. 2 Open tray 3. 3 Attach the locking clips to the left and right sides of the trays. 4 Secure the locking clips using the thumbscrews. 14 Set up the optional high capacity feeder

Setup Guide
Page 27
Set up the optional high capacity feeder 15 Note: If you are installing a base cabinet, close the cabinet door. 5 Close tray 3. 6 Reinsert tray 2.
Set up the optional high capacity feeder 15 Note: If you are installing a base cabinet, close the cabinet door. 5 Close tray 3. 6 Reinsert tray 2.
Setup Guide
Page 28
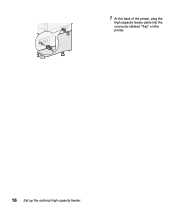
7 At the back of the printer, plug the high capacity feeder cable into the connector labeled "Tray" on the printer. 16 Set up the optional high capacity feeder
7 At the back of the printer, plug the high capacity feeder cable into the connector labeled "Tray" on the printer. 16 Set up the optional high capacity feeder

Setup Guide
Page 85
...• 25 transparencies • 15 sheets of 3500 sheets. Load print media 73 Step 12: Load print media Your Lexmark W820 has two standard trays that combine for the multipurpose feeder and optional envelope feeder. The following table lists page numbers where you have installed an ...optional high capacity feeder, its three trays can find loading instructions for the standard and optional trays, and for a total capacity of 1000 sheets. If you can hold an additional 2500 sheets, for a total printer capacity of labels or card stock 7¾, 10, DL...
...• 25 transparencies • 15 sheets of 3500 sheets. Load print media 73 Step 12: Load print media Your Lexmark W820 has two standard trays that combine for the multipurpose feeder and optional envelope feeder. The following table lists page numbers where you have installed an ...optional high capacity feeder, its three trays can find loading instructions for the standard and optional trays, and for a total capacity of 1000 sheets. If you can hold an additional 2500 sheets, for a total printer capacity of labels or card stock 7¾, 10, DL...

Setup Guide
Page 86
... until it stops. 74 Load print media Refer to the publications CD for that tray. If you load JIS B4, JIS B5, or universal size paper, make sure you turn auto-size sensing off and change the Paper Type settings .... Note: If you load print media other than plain paper in the optional high capacity feeder, can each hold 500 sheets of plain paper. Loading trays 1, 2, and 3 Trays 1 and 2, and tray 3 in trays 1, 2, or 3, make sure you change the Paper Size and Paper Type settings through the operator panel.
... until it stops. 74 Load print media Refer to the publications CD for that tray. If you load JIS B4, JIS B5, or universal size paper, make sure you turn auto-size sensing off and change the Paper Type settings .... Note: If you load print media other than plain paper in the optional high capacity feeder, can each hold 500 sheets of plain paper. Loading trays 1, 2, and 3 Trays 1 and 2, and tray 3 in trays 1, 2, or 3, make sure you change the Paper Size and Paper Type settings through the operator panel.

Setup Guide
Page 87
Note: Labels with print media size names are marked with a number. The major print media sizes are located on the back guide and slide the back guide toward the back of the tray. Load print media 75 2 Press down on the lever on the bottom of the printer. 3 Lift the side guide slightly and slide it to the right.
Note: Labels with print media size names are marked with a number. The major print media sizes are located on the back guide and slide the back guide toward the back of the tray. Load print media 75 2 Press down on the lever on the bottom of the printer. 3 Lift the side guide slightly and slide it to the right.

Setup Guide
Page 88
Do not load bent or wrinkled print media. Overfilling the tray may cause paper jams. 76 Load print media Straighten the edges of the stack on the back guide. Do not fold or crease the print media. Orientation icons Maximum stack height indicator Note: Do not exceed the maximum stack height indicated on a level surface. 5 Orient the stack of print media correctly for the size you are loading. 4 Flex the sheets back and forth to the icons on the front inside surface of the tray. Refer to loosen them, and then fan them.
Do not load bent or wrinkled print media. Overfilling the tray may cause paper jams. 76 Load print media Straighten the edges of the stack on the back guide. Do not fold or crease the print media. Orientation icons Maximum stack height indicator Note: Do not exceed the maximum stack height indicated on a level surface. 5 Orient the stack of print media correctly for the size you are loading. 4 Flex the sheets back and forth to the icons on the front inside surface of the tray. Refer to loosen them, and then fan them.

Setup Guide
Page 89
6 Place the print media against the front left corner of the tray. 7 Press down on the lever on the back guide and slide the guide toward the front of the tray until it lightly touches the stack of print media. Load print media 77
6 Place the print media against the front left corner of the tray. 7 Press down on the lever on the back guide and slide the guide toward the front of the tray until it lightly touches the stack of print media. Load print media 77

Setup Guide
Page 90
Paper size indicator window 78 Load print media b Insert the label in the window on the front left until it to the left side of the print media. Make sure the guide locks into place. 9 Install a paper size label in the slot on the tray: a Fold the label for your print media size so the correct size is showing. 8 Lift the side guide slightly and slide it lightly touches the side of the paper tray.
Paper size indicator window 78 Load print media b Insert the label in the window on the front left until it to the left side of the print media. Make sure the guide locks into place. 9 Install a paper size label in the slot on the tray: a Fold the label for your print media size so the correct size is showing. 8 Lift the side guide slightly and slide it lightly touches the side of the paper tray.

Setup Guide
Page 91
If the tray is not pushed completely into the printer. Load print media 79 10 Slide the tray all the way into the printer, text and images may print in the wrong position on the page, and the margins may appear incorrect, or you may receive an error message.
If the tray is not pushed completely into the printer. Load print media 79 10 Slide the tray all the way into the printer, text and images may print in the wrong position on the page, and the margins may appear incorrect, or you may receive an error message.

Setup Guide
Page 92
...but load the same way. Straighten the edges of A4, letter, or executive size paper. Note: Tray 4 and 5 are marked with a number. 3 Flex the sheets back and forth to the rear of tray 5. 1 Pull the tray toward you. 2 Slide the guide to loosen them, and then fan them. Do not load any ...print media other than paper in this section show loading of the tray. The illustrations in trays 4 and 5. Loading trays 4 and 5 Trays 4 and 5 each hold 1000 sheets of the stack on a level surface. 80 Load print media Do not fold or crease ...
...but load the same way. Straighten the edges of A4, letter, or executive size paper. Note: Tray 4 and 5 are marked with a number. 3 Flex the sheets back and forth to the rear of tray 5. 1 Pull the tray toward you. 2 Slide the guide to loosen them, and then fan them. Do not load any ...print media other than paper in this section show loading of the tray. The illustrations in trays 4 and 5. Loading trays 4 and 5 Trays 4 and 5 each hold 1000 sheets of the stack on a level surface. 80 Load print media Do not fold or crease ...

Setup Guide
Page 93
Refer to the icons on the guide. Maximum stack height indicator 4 Orient the stack of the tray. Do not load bent or wrinkled print media. Load print media 81 Overfilling the tray may cause paper jams. 5 Place the print media against the front left corner of print media correctly for the size you are loading. Orientation icons Note: Do not exceed the maximum stack height indicated on the front inside surface of the tray.
Refer to the icons on the guide. Maximum stack height indicator 4 Orient the stack of the tray. Do not load bent or wrinkled print media. Load print media 81 Overfilling the tray may cause paper jams. 5 Place the print media against the front left corner of print media correctly for the size you are loading. Orientation icons Note: Do not exceed the maximum stack height indicated on the front inside surface of the tray.


