
Setup Guide
Page 2
...later editions. You can purchase additional copies of Sun Microsystems, Inc. This printer is intended to be compatible with the use of other replacement parts. • Your product uses a laser, exercise CAUTION: Use of controls or adjustments or performance of operation in the... PURPOSE. Any functionally equivalent product, program, or service that discusses the guidelines for the use of Lexmark International, Inc., registered in the U. This means the printer recognizes PostScript 3 commands used . and other countries, contact your operating instructions that does not infringe ...
...later editions. You can purchase additional copies of Sun Microsystems, Inc. This printer is intended to be compatible with the use of other replacement parts. • Your product uses a laser, exercise CAUTION: Use of controls or adjustments or performance of operation in the... PURPOSE. Any functionally equivalent product, program, or service that discusses the guidelines for the use of Lexmark International, Inc., registered in the U. This means the printer recognizes PostScript 3 commands used . and other countries, contact your operating instructions that does not infringe ...
Setup Guide
Page 3
Table of contents Preface vii About your printer vii About this book ix Other sources of information x Step 1: Select a location for your printer 1 Allowing enough space 1 Considering environmental issues 4 Moving the printer 4 Step 2: Unpack the printer 5 Step 3: Install the multipurpose feeder 6 Step 4: Set up the optional high capacity feeder 9 Attaching a high capacity feeder or base cabinet 11 Step 5: Set up printer supplies 17 Installing the print cartridge 17 Preparing the fuser 20 Applying the operator panel overlay (non-English only) . . . . .22 iii
Table of contents Preface vii About your printer vii About this book ix Other sources of information x Step 1: Select a location for your printer 1 Allowing enough space 1 Considering environmental issues 4 Moving the printer 4 Step 2: Unpack the printer 5 Step 3: Install the multipurpose feeder 6 Step 4: Set up the optional high capacity feeder 9 Attaching a high capacity feeder or base cabinet 11 Step 5: Set up printer supplies 17 Installing the print cartridge 17 Preparing the fuser 20 Applying the operator panel overlay (non-English only) . . . . .22 iii
Setup Guide
Page 4
Step 6: Install memory and option cards 23 Accessing the printer system board 24 Installing memory cards 25 Installing an optional firmware card 28 Installing option cards 30 Reinstalling the system board 33 Step 7: Install the ... unit brackets 60 Attaching the finisher plate and guide rail 61 Installing the transport unit 62 Attaching the cables 66 Attaching the finisher to the printer 67 Attaching the output bins 69 iv
Step 6: Install memory and option cards 23 Accessing the printer system board 24 Installing memory cards 25 Installing an optional firmware card 28 Installing option cards 30 Reinstalling the system board 33 Step 7: Install the ... unit brackets 60 Attaching the finisher plate and guide rail 61 Installing the transport unit 62 Attaching the cables 66 Attaching the finisher to the printer 67 Attaching the output bins 69 iv
Setup Guide
Page 5
...printing 89 Local printing 90 Step 14: Verify printer setup 92 Turning on the printer 92 Printing a network setup page 93 Printing a menu settings page 93 Changing printer settings 94 Step 15: Configure for TCP/IP 97 Setting the printer IP address 97 Verifying the IP settings 98 ...Configuring for Pull Printing (ImageQuick 98 Step 16: Install printer drivers 99 Network printing 99 Local printing 102 Step ...
...printing 89 Local printing 90 Step 14: Verify printer setup 92 Turning on the printer 92 Printing a network setup page 93 Printing a menu settings page 93 Changing printer settings 94 Step 15: Configure for TCP/IP 97 Setting the printer IP address 97 Verifying the IP settings 98 ...Configuring for Pull Printing (ImageQuick 98 Step 16: Install printer drivers 99 Network printing 99 Local printing 102 Step ...
Setup Guide
Page 7
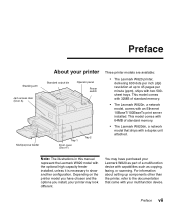
... pages per inch (dpi) resolution at up components other than the printer, refer to the documentation that ships with a duplex unit attached. This model comes with 32MB of standard memory. • The Lexmark W820dn, a network model that came with your multifunction device. For information... about setting up to show another configuration. You may look different. Depending on the printer model you install, your printer may have chosen and the options you ...
... pages per inch (dpi) resolution at up components other than the printer, refer to the documentation that ships with a duplex unit attached. This model comes with 32MB of standard memory. • The Lexmark W820dn, a network model that came with your multifunction device. For information... about setting up to show another configuration. You may look different. Depending on the printer model you install, your printer may have chosen and the options you ...
Setup Guide
Page 8
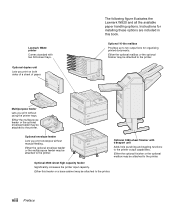
... capacity. viii Preface Either the optional envelope feeder or the multipurpose feeder may be attached to the printer. The following figure illustrates the Lexmark W820 and all the available paper handling options. Optional envelope feeder Lets you print on both sides of a sheet of paper. Either this book. Optional ...
... capacity. viii Preface Either the optional envelope feeder or the multipurpose feeder may be attached to the printer. The following figure illustrates the Lexmark W820 and all the available paper handling options. Optional envelope feeder Lets you print on both sides of a sheet of paper. Either this book. Optional ...
Setup Guide
Page 9
These appear in this book Note: See the safety information on the inside front cover before setting up your new Lexmark W820, Lexmark W820n, or Lexmark W820dn printer. A caution identifies something that might damage your printer. CAUTION! Conventions It may find useful. Warning! About this book. Preface ix A warning identifies something that might cause you to recognize...
These appear in this book Note: See the safety information on the inside front cover before setting up your new Lexmark W820, Lexmark W820n, or Lexmark W820dn printer. A caution identifies something that might damage your printer. CAUTION! Conventions It may find useful. Warning! About this book. Preface ix A warning identifies something that might cause you to recognize...
Setup Guide
Page 10
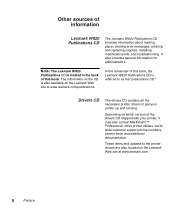
...this book. Depending on the Lexmark Web site at www.lexmark.com/publications. In the remainder of this book, the Lexmark W820 Publications CD is also available on the Lexmark Web site at www.lexmark.com. These items and updates to the printer drivers are also located on which... version of information Lexmark W820 Publications CD The Lexmark W820 Publications CD provides information about...
...this book. Depending on the Lexmark Web site at www.lexmark.com/publications. In the remainder of this book, the Lexmark W820 Publications CD is also available on the Lexmark Web site at www.lexmark.com. These items and updates to the printer drivers are also located on which... version of information Lexmark W820 Publications CD The Lexmark W820 Publications CD provides information about...
Setup Guide
Page 11
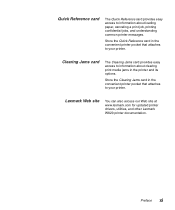
... You can also access our Web site at www.lexmark.com for updated printer drivers, utilities, and other Lexmark W820 printer documentation. Store the Clearing Jams card in the convenient printer pocket that attaches to your printer. Clearing Jams card The Clearing Jams card provides easy access to information about clearing print media jams in the...
... You can also access our Web site at www.lexmark.com for updated printer drivers, utilities, and other Lexmark W820 printer documentation. Store the Clearing Jams card in the convenient printer pocket that attaches to your printer. Clearing Jams card The Clearing Jams card provides easy access to information about clearing print media jams in the...
Setup Guide
Page 13
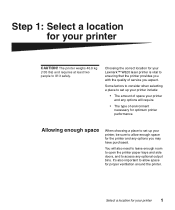
... a place to set up your printer include: • The amount of space your Lexmark™ W820 laser printer is vital to access any options you expect. You will require • The type of environment necessary for optimum printer performance Allowing enough space When choosing a place to set up your printer, be sure to allow space for...
... a place to set up your printer include: • The amount of space your Lexmark™ W820 laser printer is vital to access any options you expect. You will require • The type of environment necessary for optimum printer performance Allowing enough space When choosing a place to set up your printer, be sure to allow space for...

Setup Guide
Page 14
....) 364 mm (14 in.) (4120i6n0.)mm (1486i0n.m) m 1220 mm (48 in.) 200 mm (8 in.) 1(04834inm.)m 2 Select a location for your printer will require the same amount of space indicated in .) 1(04834inm.)m With a duplex unit and a high capacity feeder or base cabinet When selecting a location for... a printer with a high capacity feeder and duplex unit, make sure you install a base cabinet rather than a high capacity feeder, your printer If you have at least the amount of space indicated in the figure. 200 mm...
....) 364 mm (14 in.) (4120i6n0.)mm (1486i0n.m) m 1220 mm (48 in.) 200 mm (8 in.) 1(04834inm.)m 2 Select a location for your printer will require the same amount of space indicated in .) 1(04834inm.)m With a duplex unit and a high capacity feeder or base cabinet When selecting a location for... a printer with a high capacity feeder and duplex unit, make sure you install a base cabinet rather than a high capacity feeder, your printer If you have at least the amount of space indicated in the figure. 200 mm...
Setup Guide
Page 15
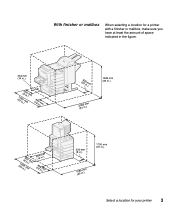
With finisher or mailbox When selecting a location for a printer with a finisher or mailbox, make sure you have at least the amount of space indicated in the figure. 364 mm (14 in.) (4120i6n0(.8)2m0inm0.)mm (1486i0n.m) m (26530inm.) m 1520 mm (60 in.) 2(08619inm.)m (41206in(08.)2mi0n0m.)mm 364 (14 mm in.) (1486i0n.m) m 200 mm (8 in.) 1700 mm (67 in.) 1(04834inm.)m Select a location for your printer 3
With finisher or mailbox When selecting a location for a printer with a finisher or mailbox, make sure you have at least the amount of space indicated in the figure. 364 mm (14 in.) (4120i6n0(.8)2m0inm0.)mm (1486i0n.m) m (26530inm.) m 1520 mm (60 in.) 2(08619inm.)m (41206in(08.)2mi0n0m.)mm 364 (14 mm in.) (1486i0n.m) m 200 mm (8 in.) 1700 mm (67 in.) 1(04834inm.)m Select a location for your printer 3
Setup Guide
Page 16
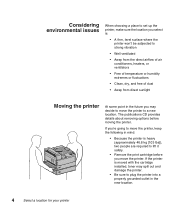
... details about removing options before you may decide to move the printer. Considering environmental issues When choosing a place to set up the printer, make sure the location you select is: • A firm, level surface where the printer won't be subjected to strong vibration • Well ventilated &#...fluctuations • Clean, dry, and free of dust • Away from direct sunlight Moving the printer At some point in the new location. 4 Select a location for your printer If the printer is heavy (approximately 46.8 kg [103 lbs]), two people are required to a new location. If...
... details about removing options before you may decide to move the printer. Considering environmental issues When choosing a place to set up the printer, make sure the location you select is: • A firm, level surface where the printer won't be subjected to strong vibration • Well ventilated &#...fluctuations • Clean, dry, and free of dust • Away from direct sunlight Moving the printer At some point in the new location. 4 Select a location for your printer If the printer is heavy (approximately 46.8 kg [103 lbs]), two people are required to a new location. If...
Setup Guide
Page 17
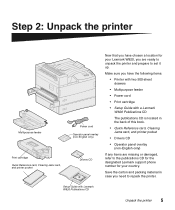
...) If any items are ready to unpack the printer and prepare to set it up. Make sure you have chosen a location for your Lexmark W820, you are missing or damaged, refer to the publications CD for the designated Lexmark support phone number for your country. Step 2: Unpack... the printer Multipurpose feeder Print cartridge Quick Reference card, Clearing Jams card, and printer pocket Power cord Operator panel overlay (non-English only) Drivers CD Now...
...) If any items are ready to unpack the printer and prepare to set it up. Make sure you have chosen a location for your Lexmark W820, you are missing or damaged, refer to the publications CD for the designated Lexmark support phone number for your country. Step 2: Unpack... the printer Multipurpose feeder Print cartridge Quick Reference card, Clearing Jams card, and printer pocket Power cord Operator panel overlay (non-English only) Drivers CD Now...
Setup Guide
Page 18
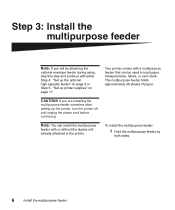
...Step 4: "Set up the optional high capacity feeder" on page 17. If you will be used to the printer. The multipurpose feeder holds approximately 35 sheets of paper. Your printer comes with or without the duplex unit already attached to load paper, transparencies, labels, or card stock. To ...6 Install the multipurpose feeder CAUTION! Step 3: Install the multipurpose feeder Note: If you are installing the multipurpose feeder sometime after setting up printer supplies" on page 9 or Step 5: "Set up the printer, turn the printer off and unplug the power cord before continuing.
...Step 4: "Set up the optional high capacity feeder" on page 17. If you will be used to the printer. The multipurpose feeder holds approximately 35 sheets of paper. Your printer comes with or without the duplex unit already attached to load paper, transparencies, labels, or card stock. To ...6 Install the multipurpose feeder CAUTION! Step 3: Install the multipurpose feeder Note: If you are installing the multipurpose feeder sometime after setting up printer supplies" on page 9 or Step 5: "Set up the printer, turn the printer off and unplug the power cord before continuing.
Setup Guide
Page 19
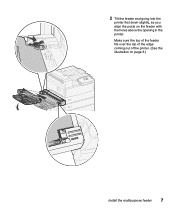
2 Tilt the feeder end going into the printer first down slightly, as you align the posts on page 8.) Install the multipurpose feeder 7 Make sure the top of the feeder fits over the top of the edge coming out of the printer. (See the illustration on the feeder with the holes above the opening in the printer.
2 Tilt the feeder end going into the printer first down slightly, as you align the posts on page 8.) Install the multipurpose feeder 7 Make sure the top of the feeder fits over the top of the edge coming out of the printer. (See the illustration on the feeder with the holes above the opening in the printer.
Setup Guide
Page 20
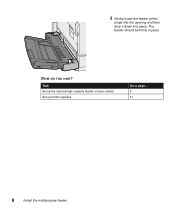
What do I do next? The feeder should be firmly in place. 3 Gently insert the feeder at this angle into the opening and then drop it down into place. Task Set up the optional high capacity feeder or base cabinet Set up printer supplies Go to page... 9 17 8 Install the multipurpose feeder
What do I do next? The feeder should be firmly in place. 3 Gently insert the feeder at this angle into the opening and then drop it down into place. Task Set up the optional high capacity feeder or base cabinet Set up printer supplies Go to page... 9 17 8 Install the multipurpose feeder
Setup Guide
Page 21
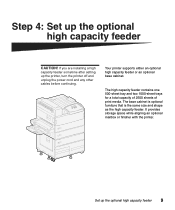
It provides storage space while aligning an optional mailbox or finisher with the printer. The high capacity feeder contains one 500-sheet tray and two 1000-sheet ...media. Set up the optional high capacity feeder CAUTION! Step 4: Set up the optional high capacity feeder 9 Your printer supports either an optional high capacity feeder or an optional base cabinet. The base cabinet is optional furniture that is .... If you are installing a high capacity feeder sometime after setting up the printer, turn the printer off and unplug the power cord and any other cables before continuing.
It provides storage space while aligning an optional mailbox or finisher with the printer. The high capacity feeder contains one 500-sheet tray and two 1000-sheet ...media. Set up the optional high capacity feeder CAUTION! Step 4: Set up the optional high capacity feeder 9 Your printer supports either an optional high capacity feeder or an optional base cabinet. The base cabinet is optional furniture that is .... If you are installing a high capacity feeder sometime after setting up the printer, turn the printer off and unplug the power cord and any other cables before continuing.
Setup Guide
Page 23
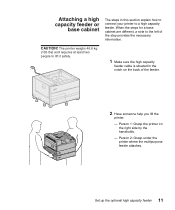
Person 1: Grasp the printer on the back of the step provides the necessary information. CAUTION! Set up the optional high capacity feeder 11 Attaching a high capacity feeder or base ... right side by the handholds. - When the steps for a base cabinet are different, a note to a high capacity feeder. Person 2: Grasp under the printer where the multipurpose feeder attaches. The printer weighs 46.8 kg (103 lbs) and requires at least two people to lift it safely. 1 Make sure the high capacity feeder cable...
Person 1: Grasp the printer on the back of the step provides the necessary information. CAUTION! Set up the optional high capacity feeder 11 Attaching a high capacity feeder or base ... right side by the handholds. - When the steps for a base cabinet are different, a note to a high capacity feeder. Person 2: Grasp under the printer where the multipurpose feeder attaches. The printer weighs 46.8 kg (103 lbs) and requires at least two people to lift it safely. 1 Make sure the high capacity feeder cable...
Setup Guide
Page 24
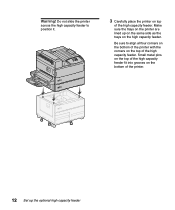
Be sure to position it. 3 Carefully place the printer on the top of the high capacity feeder. Do not slide the printer across the high capacity feeder to align all four corners on the bottom of the printer with the corners on top of the high capacity feeder. Small metal pins on the top of the high capacity feeder fit into grooves on the bottom of the printer. 12 Set up on the same side as the trays on the printer are lined up the optional high capacity feeder Make sure the trays on the high capacity feeder. Warning!
Be sure to position it. 3 Carefully place the printer on the top of the high capacity feeder. Do not slide the printer across the high capacity feeder to align all four corners on the bottom of the printer with the corners on top of the high capacity feeder. Small metal pins on the top of the high capacity feeder fit into grooves on the bottom of the printer. 12 Set up on the same side as the trays on the printer are lined up the optional high capacity feeder Make sure the trays on the high capacity feeder. Warning!

