Setup Guide
Page 10
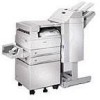
... the CD is located in the back of information Lexmark W820 Publications CD The Lexmark W820 Publications CD provides information about loading paper, clearing error messages, ordering and replacing supplies, installing maintenance kits, and troubleshooting. Drivers CD The drivers CD contains all the necessary printer drivers to get your printer, it may also contain MarkVision™ Professional, other...
... the CD is located in the back of information Lexmark W820 Publications CD The Lexmark W820 Publications CD provides information about loading paper, clearing error messages, ordering and replacing supplies, installing maintenance kits, and troubleshooting. Drivers CD The drivers CD contains all the necessary printer drivers to get your printer, it may also contain MarkVision™ Professional, other...
User's Guide
Page 5
... cartridge 103 Installing the new print cartridge 105 Chapter 28: Cleaning the printer 109 Chapter 29: Replacing a staple cartridge 110 Chapter 30: Emptying the hole punch box 113 Chapter 31: Replacing the items in the maintenance kit 115 Chapter 32: Replacing the fuser 116 Removing the old fuser 116 ...rollers 126 Installing new pick rollers 128 Closing up ...131 Chapter 35: Cleaning the wiper blade 132 Chapter 36: Resetting the maintenance page counter 135 Chapter 37: Determining the status of supplies 136 Chapter 38: Storing supplies 137 Chapter 39: Recycling used supplies 138 ...
... cartridge 103 Installing the new print cartridge 105 Chapter 28: Cleaning the printer 109 Chapter 29: Replacing a staple cartridge 110 Chapter 30: Emptying the hole punch box 113 Chapter 31: Replacing the items in the maintenance kit 115 Chapter 32: Replacing the fuser 116 Removing the old fuser 116 ...rollers 126 Installing new pick rollers 128 Closing up ...131 Chapter 35: Cleaning the wiper blade 132 Chapter 36: Resetting the maintenance page counter 135 Chapter 37: Determining the status of supplies 136 Chapter 38: Storing supplies 137 Chapter 39: Recycling used supplies 138 ...
User's Guide
Page 47
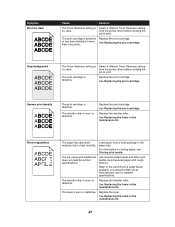
...of paper prints. Check the operator panel for service. 45 See Replacing the print cartridge. See Replacing the items in the maintenance kit. Your printer requires servicing. Use the following table to find solutions to be able to correct many print quality problems by replacing a supply or... maintenance item that has reached the end of supplies for information about a printer consumable. Black pages The print cartridge is defective Replace the print cartridge. See Determining the status ...
...of paper prints. Check the operator panel for service. 45 See Replacing the print cartridge. See Replacing the items in the maintenance kit. Your printer requires servicing. Use the following table to find solutions to be able to correct many print quality problems by replacing a supply or... maintenance item that has reached the end of supplies for information about a printer consumable. Black pages The print cartridge is defective Replace the print cartridge. See Determining the status ...
User's Guide
Page 49
... is Select a different Toner Darkness setting too dark. See Replacing the items in the maintenance kit. 47 For information on Lexmark's Web site at www.lexmark.com for detailed specifications. You are using print media that does not meet the printer specifications. Refer to high humidity. See Replacing the print cartridge. Replace the print cartridge...
... is Select a different Toner Darkness setting too dark. See Replacing the items in the maintenance kit. 47 For information on Lexmark's Web site at www.lexmark.com for detailed specifications. You are using print media that does not meet the printer specifications. Refer to high humidity. See Replacing the print cartridge. Replace the print cartridge...
User's Guide
Page 50
Replace the fuser. Replace the printer cartridge, the transfer roller, or fuser as needed. See Replacing the items in the maintenance kit. Streaked horizontal lines The print cartridge, transfer roller, or fuser may be defective, empty, or worn. See Replacing the print cartridge, Replacing the transfer roller, and Replacing the fuser for more information. 48 See Replacing the print cartridge. Symptom White or black line Cause The print cartridge or fuser is defective. Solution Replace the print cartridge.
Replace the fuser. Replace the printer cartridge, the transfer roller, or fuser as needed. See Replacing the items in the maintenance kit. Streaked horizontal lines The print cartridge, transfer roller, or fuser may be defective, empty, or worn. See Replacing the print cartridge, Replacing the transfer roller, and Replacing the fuser for more information. 48 See Replacing the print cartridge. Symptom White or black line Cause The print cartridge or fuser is defective. Solution Replace the print cartridge.
User's Guide
Page 52
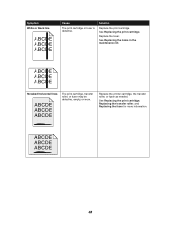
...are set the Paper Size to A4. Incorrect margins The guides in the tray. See Replacing the items in the maintenance kit. See Replacing the items in the maintenance kit. or worn. See Loading the trays for the print media size loaded in the tray to the proper positions for... For example, you handle the sheets. Skewed print Cause Solution The print cartridge is worn or defective. See Replacing the items in the maintenance kit. See Replacing the fuser. Move the guides in the tray. Move the guides in each tray. Replace the pick rollers. Call for ...
...are set the Paper Size to A4. Incorrect margins The guides in the tray. See Replacing the items in the maintenance kit. See Replacing the items in the maintenance kit. or worn. See Loading the trays for the print media size loaded in the tray to the proper positions for... For example, you handle the sheets. Skewed print Cause Solution The print cartridge is worn or defective. See Replacing the items in the maintenance kit. See Replacing the fuser. Move the guides in the tray. Move the guides in each tray. Replace the pick rollers. Call for ...
User's Guide
Page 53
... Replacing the print cartridge. Replace the print cartridge. See Replacing the items in the print cartridge. are worn. Ghost images Low toner level in the maintenance kit. Symptom Incorrect margins (continued) Cause The paper pick rollers are using . The print media curls badly once it prints and exits to for a different size...
... Replacing the print cartridge. Replace the print cartridge. See Replacing the items in the print cartridge. are worn. Ghost images Low toner level in the maintenance kit. Symptom Incorrect margins (continued) Cause The paper pick rollers are using . The print media curls badly once it prints and exits to for a different size...
User's Guide
Page 54
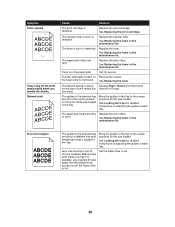
...original wrapper until you load does not exceed the maximum stack height indicated at www.lexmark.com for jams in the maintenance kit. Paper has absorbed moisture due to check for detailed specifications. The printer resumes printing. The guides in output options, see Solving mailbox problems or Solving finisher ... entire paper path, or you are using print media that does not meet the printer specifications. Use the following table to find solutions to the Card Stock & Label Guide available on Lexmark's Web site at the back of the tray or on the envelope feeder. For...
...original wrapper until you load does not exceed the maximum stack height indicated at www.lexmark.com for jams in the maintenance kit. Paper has absorbed moisture due to check for detailed specifications. The printer resumes printing. The guides in output options, see Solving mailbox problems or Solving finisher ... entire paper path, or you are using print media that does not meet the printer specifications. Use the following table to find solutions to the Card Stock & Label Guide available on Lexmark's Web site at the back of the tray or on the envelope feeder. For...

User's Guide
Page 62
Refer to the instruction sheet in the maintenance kit box. 60 To clear the message, remove the stack of paper exiting to perform the finishing functions requested by the print job because the bin ... bins. The wiper blade is dirty or installed incorrectly. The 287 Paper Jam Open Deflector G message displays after you install the finisher. Symptom Cause Solution A printer message indicates that all linked bins are full, but some bins are on stacks of paper from the bin.
Refer to the instruction sheet in the maintenance kit box. 60 To clear the message, remove the stack of paper exiting to perform the finishing functions requested by the print job because the bin ... bins. The wiper blade is dirty or installed incorrectly. The 287 Paper Jam Open Deflector G message displays after you install the finisher. Symptom Cause Solution A printer message indicates that all linked bins are full, but some bins are on stacks of paper from the bin.
User's Guide
Page 104
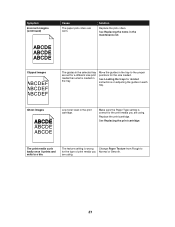
... the 88 Toner Low message appears, you bought your printer. You can also visit the Lexmark online store at 5% coverage. (See Replacing the print cartridge for more times. You can continue to order a box of staple cartridges on the tag, order a low-voltage maintenance kit. Its average yield is time to order supplies. Use...
... the 88 Toner Low message appears, you bought your printer. You can also visit the Lexmark online store at 5% coverage. (See Replacing the print cartridge for more times. You can continue to order a box of staple cartridges on the tag, order a low-voltage maintenance kit. Its average yield is time to order supplies. Use...
User's Guide
Page 117
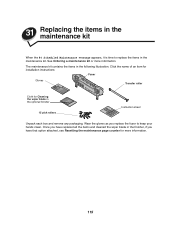
... all the items and cleaned the wiper blade in the finisher, if you replace the fuser to replace the items in the maintenance kit. The maintenance kit contains the items in the optional finisher 15 pick rollers Instruction sheet Unpack each box and remove any packaging. Click the name ...of an item for installation instructions: Fuser Gloves Transfer roller Cloth for more information. 31 Replacing the items in the maintenance kit When the 80 Scheduled Maintenance message appears, it is time to keep your hands clean. Once you have that option attached, see Resetting the...
... all the items and cleaned the wiper blade in the finisher, if you replace the fuser to replace the items in the maintenance kit. The maintenance kit contains the items in the optional finisher 15 pick rollers Instruction sheet Unpack each box and remove any packaging. Click the name ...of an item for installation instructions: Fuser Gloves Transfer roller Cloth for more information. 31 Replacing the items in the maintenance kit When the 80 Scheduled Maintenance message appears, it is time to keep your hands clean. Once you have that option attached, see Resetting the...
User's Guide
Page 118
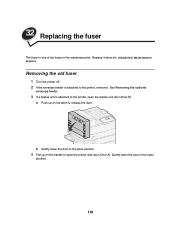
a Push up on the latch to release the door. Gently lower the door to the printer, open position. 116 32 Replacing the fuser The fuser is attached to open the printer side door (Door A). See Removing the optional envelope feeder. 3 If a duplex unit is attached to the open the duplex unit door (Door E). b Gently lower the door to the open position. 4 Pull up on the handle to the printer, remove it when 80 Scheduled Maintenance appears. Replace it . Removing the old fuser 1 Turn the printer off. 2 If the envelope feeder is one of the items in the maintenance kit.
a Push up on the latch to release the door. Gently lower the door to the printer, open position. 116 32 Replacing the fuser The fuser is attached to open the printer side door (Door A). See Removing the optional envelope feeder. 3 If a duplex unit is attached to the open the duplex unit door (Door E). b Gently lower the door to the open position. 4 Pull up on the handle to the printer, remove it when 80 Scheduled Maintenance appears. Replace it . Removing the old fuser 1 Turn the printer off. 2 If the envelope feeder is one of the items in the maintenance kit.
User's Guide
Page 124
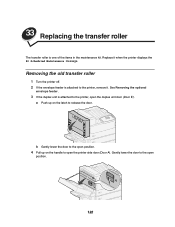
a Push up on the latch to the open the printer side door (Door A). Removing the old transfer roller 1 Turn the printer off. 2 If the envelope feeder is attached to the printer, open the duplex unit door (Door E). See Removing the optional envelope feeder. 3 If the duplex unit is attached ...door to the open position. 4 Pull up on the handle to the printer, remove it when the printer displays the 80 Scheduled Maintenance message. 33 Replacing the transfer roller The transfer roller is one of the items in the maintenance kit. Gently lower the door to release the door. Replace it .
a Push up on the latch to the open the printer side door (Door A). Removing the old transfer roller 1 Turn the printer off. 2 If the envelope feeder is attached to the printer, open the duplex unit door (Door E). See Removing the optional envelope feeder. 3 If the duplex unit is attached ...door to the open position. 4 Pull up on the handle to the printer, remove it when the printer displays the 80 Scheduled Maintenance message. 33 Replacing the transfer roller The transfer roller is one of the items in the maintenance kit. Gently lower the door to release the door. Replace it .
User's Guide
Page 128
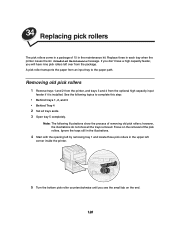
Focus on the end. 126 Replace three in each tray when the printer issues the 80 Scheduled Maintenance message. A pick roller transports the paper from an input tray to complete this step: • Behind trays 1, 2, and 3 • Behind Tray 4 2 Set all the trays ... you don't have a high capacity feeder, you will have nine pick rollers left corner inside the printer. 5 Turn the bottom pick roller counterclockwise until you see the small tab on the removal of 15 in the maintenance kit. Ignore the trays still in the illustrations. 4 Start with the opening left by removing tray...
Focus on the end. 126 Replace three in each tray when the printer issues the 80 Scheduled Maintenance message. A pick roller transports the paper from an input tray to complete this step: • Behind trays 1, 2, and 3 • Behind Tray 4 2 Set all the trays ... you don't have a high capacity feeder, you will have nine pick rollers left corner inside the printer. 5 Turn the bottom pick roller counterclockwise until you see the small tab on the removal of 15 in the maintenance kit. Ignore the trays still in the illustrations. 4 Start with the opening left by removing tray...

User's Guide
Page 134
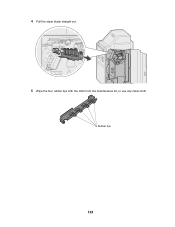
35 Cleaning the wiper blade Use the cloth in the maintenance kit or any clean cloth to clean the wiper blade in the finisher. To access the wiper blade: 1 Turn the printer off. 2 Open the finisher door (Door K). 3 While supporting the wiper blade, loosen the screw until the blade comes free from the pin. Pin 132
35 Cleaning the wiper blade Use the cloth in the maintenance kit or any clean cloth to clean the wiper blade in the finisher. To access the wiper blade: 1 Turn the printer off. 2 Open the finisher door (Door K). 3 While supporting the wiper blade, loosen the screw until the blade comes free from the pin. Pin 132
User's Guide
Page 135
Rubber tips 133 4 Pull the wiper blade straight out. 5 Wipe the four rubber tips with the cloth from the maintenance kit, or use any clean cloth.
Rubber tips 133 4 Pull the wiper blade straight out. 5 Wipe the four rubber tips with the cloth from the maintenance kit, or use any clean cloth.
User's Guide
Page 137
... then press Select. Activating Menu Changes briefly appears, followed by Performing Self Test. 36 Resetting the maintenance page counter After you replace all the items in the maintenance kit, reset the maintenance page counter: 1 Make sure the printer is reset and Resetting Maint Cnt Value briefly appears. 6 Press Menu until you see Reset Maint Cnt...
... then press Select. Activating Menu Changes briefly appears, followed by Performing Self Test. 36 Resetting the maintenance page counter After you replace all the items in the maintenance kit, reset the maintenance page counter: 1 Make sure the printer is reset and Resetting Maint Cnt Value briefly appears. 6 Press Menu until you see Reset Maint Cnt...
User's Guide
Page 138
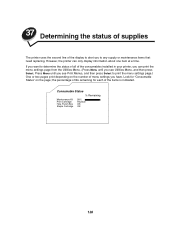
... to determine the status of all of the consumables installed in your printer, you can only display information about one item at a time. Look for each of the items is indicated. Press Menu until you have. Consumable Status % Remaining Maintenance Kit Print Cartridge Hole Punch Box Staple Cartridge 99% Replace OK OK 136... then press Select to print the menu settings page.) One or two pages print depending on the page; 37 Determining the status of supplies The printer uses the second line of the display to alert you see Utilities Menu, and then press Select. However, the...
... to determine the status of all of the consumables installed in your printer, you can only display information about one item at a time. Look for each of the items is indicated. Press Menu until you have. Consumable Status % Remaining Maintenance Kit Print Cartridge Hole Punch Box Staple Cartridge 99% Replace OK OK 136... then press Select to print the menu settings page.) One or two pages print depending on the page; 37 Determining the status of supplies The printer uses the second line of the display to alert you see Utilities Menu, and then press Select. However, the...
User's Guide
Page 287
... quality and paper feed problems. What you can do: Replace the maintenance items and reset the printer maintenance counter (if necessary). See also: Loading the trays LocalTalk What this message means: The printer requires replacement of the display in the maintenance kit; Replacing the transfer roller; Maintenance What this message means: A LocalTalk interface is the active communication...
... quality and paper feed problems. What you can do: Replace the maintenance items and reset the printer maintenance counter (if necessary). See also: Loading the trays LocalTalk What this message means: The printer requires replacement of the display in the maintenance kit; Replacing the transfer roller; Maintenance What this message means: A LocalTalk interface is the active communication...
User's Guide
Page 297
...Held Jobs. See also: Using the Print and Hold function 295 Replacing the items in a maintenance kit. Go/Stop? What this message means: The printer recognizes held jobs at this message means: The printer is resetting the counter that tracks wear on cycle. Resetting Maint Cnt Value What this time.... What you can do : • Press Go to restore held jobs from the hard disk to printer memory. • ...
...Held Jobs. See also: Using the Print and Hold function 295 Replacing the items in a maintenance kit. Go/Stop? What this message means: The printer recognizes held jobs at this message means: The printer is resetting the counter that tracks wear on cycle. Resetting Maint Cnt Value What this time.... What you can do : • Press Go to restore held jobs from the hard disk to printer memory. • ...


