Service Manual
Page 3
... Introduction 1-1 Maintenance Approach 1-1 Tools Required For Service 1-1 Symbols Used in this Manual 1-1 Safety Details 1-1 Printer Power Supply and Electrical Components 1-2 Mechanical Components 1-2 Printer Laser Components 1-2 Printer Fuser Components 1-3 Safety Components 1-3 Caution Labels 1-3 Principles of Operation 1-4 Finisher Power 1-4 Finisher Control 1-5 ...Information 2-1 Start 2-1 Operator Panel Messages 2-1 Accessing Additional Debug Information for Service Errors 2-3 Service Error Code Table 2-4 Attendance Message Table 2-5 Service Checks Flowchart 2-9 iii
... Introduction 1-1 Maintenance Approach 1-1 Tools Required For Service 1-1 Symbols Used in this Manual 1-1 Safety Details 1-1 Printer Power Supply and Electrical Components 1-2 Mechanical Components 1-2 Printer Laser Components 1-2 Printer Fuser Components 1-3 Safety Components 1-3 Caution Labels 1-3 Principles of Operation 1-4 Finisher Power 1-4 Finisher Control 1-5 ...Information 2-1 Start 2-1 Operator Panel Messages 2-1 Accessing Additional Debug Information for Service Errors 2-3 Service Error Code Table 2-4 Attendance Message Table 2-5 Service Checks Flowchart 2-9 iii

Service Manual
Page 4
... the Service Checks Flowchart 2-9 How to Follow a Service Check 2-9 General Notes on Using Service Checks 2-10 Service Checks 2-11 Attendance Message Service Checks 2-12 Service Error Code Service Checks 2-29 Diagnostic Aids 3-1 Entering Diagnostic Mode 3-1 Exiting Diagnostic Mode 3-1 Analyzing the Test Print 3-1 Using Test Print to Locate a Feed or Paper Transport Problem...
... the Service Checks Flowchart 2-9 How to Follow a Service Check 2-9 General Notes on Using Service Checks 2-10 Service Checks 2-11 Attendance Message Service Checks 2-12 Service Error Code Service Checks 2-29 Diagnostic Aids 3-1 Entering Diagnostic Mode 3-1 Exiting Diagnostic Mode 3-1 Analyzing the Test Print 3-1 Using Test Print to Locate a Feed or Paper Transport Problem...
Service Manual
Page 13
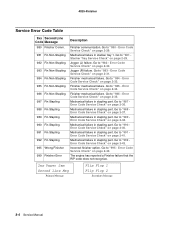
...throughout this manual to either provide additional information on the results achieved through a previous action. Use the error code table, attendance message table, error code service checks and attendance message service checks to determine the corrective action necessary to warn of all safety instructions... After you are present when you complete the repair, perform tests as needed to prevent accidents while servicing the printer and attached options. 1. CAUTION: A CAUTION indicates an operating or maintenance procedure, practice, or condition that are working with electrical or...
...throughout this manual to either provide additional information on the results achieved through a previous action. Use the error code table, attendance message table, error code service checks and attendance message service checks to determine the corrective action necessary to warn of all safety instructions... After you are present when you complete the repair, perform tests as needed to prevent accidents while servicing the printer and attached options. 1. CAUTION: A CAUTION indicates an operating or maintenance procedure, practice, or condition that are working with electrical or...
Service Manual
Page 57
...of the drum Degrees Fahrenheit. °F = (°C x 1.8) + 32 Standard output tray for the Controller PWB The action of the laser beam striking and discharging select areas of the electrically charged surface of paper Toner turning the latent image into a visible image. Acronym that ...of paper Moving the developed image from circuits whenever the printer covers are open or printer assemblies are not in position Image Output Terminal. Used as +5VDC or +24VDC. Synonym for the printer. 4025-Finisher Earth Plate EP Cartridge Error Code ESS Exposure F- °F Face Down Tray Factory ...
...of the drum Degrees Fahrenheit. °F = (°C x 1.8) + 32 Standard output tray for the Controller PWB The action of the laser beam striking and discharging select areas of the electrically charged surface of paper Toner turning the latent image into a visible image. Acronym that ...of paper Moving the developed image from circuits whenever the printer covers are open or printer assemblies are not in position Image Output Terminal. Used as +5VDC or +24VDC. Synonym for the printer. 4025-Finisher Earth Plate EP Cartridge Error Code ESS Exposure F- °F Face Down Tray Factory ...

Service Manual
Page 61
... various status information. Each status screen includes the capability to the printer or Finisher. The printer is ready to repair the Finisher. Diagnostic Information 2-1 Attendance messages The printer prioritizes the operator panel messages within each type is in this chapter. Use the service error code table, attendance message table, attendance message service checks, and service...
... various status information. Each status screen includes the capability to the printer or Finisher. The printer is ready to repair the Finisher. Diagnostic Information 2-1 Attendance messages The printer prioritizes the operator panel messages within each type is in this chapter. Use the service error code table, attendance message table, attendance message service checks, and service...
Service Manual
Page 64
... failure in stapling part. Go to "985 - Jogger (L) failure. Error Code Service Check" on page 2-34. Go to "989 Error Code Service Check" on page 2-37. Go to "988 Error Code Service Check" on page 2-38. Error Code Service Check" on page 2-29. Mechanical failure in stapling part. Mechanical...to "981 Stacker Tray Service Check" on page 2-40. Go to "990 Error Code Service Check" on page 2-29. Go to "987 Error Code Service Check" on page 2-41. Go to "991 Error Code Service Check" on page 2-36. Mechanical failure in stapling part. Incorrect finisher option...
... failure in stapling part. Go to "985 - Jogger (L) failure. Error Code Service Check" on page 2-34. Go to "989 Error Code Service Check" on page 2-37. Go to "988 Error Code Service Check" on page 2-38. Error Code Service Check" on page 2-29. Mechanical failure in stapling part. Mechanical...to "981 Stacker Tray Service Check" on page 2-40. Go to "990 Error Code Service Check" on page 2-29. Go to "987 Error Code Service Check" on page 2-41. Go to "991 Error Code Service Check" on page 2-36. Mechanical failure in stapling part. Incorrect finisher option...
Service Manual
Page 69
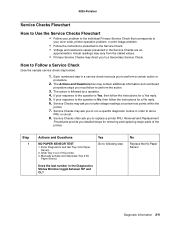
... Service Checks may contain additional information and numbered procedure steps you must follow the instructions for removing and replacing major parts of the printer. 3. If your response to a Secondary Service Check. Removal and Replacement Procedures provide you detailed steps for a No reply. 6.... How to Use the Service Checks Flowchart • Follow your problem to the individual Primary Service Check that corresponds to your error code, printer operation problem, or print image problem. • Follow the instructions presented in the Service Check. • Voltage and resistance...
... Service Checks may contain additional information and numbered procedure steps you must follow the instructions for removing and replacing major parts of the printer. 3. If your response to a Secondary Service Check. Removal and Replacement Procedures provide you detailed steps for a No reply. 6.... How to Use the Service Checks Flowchart • Follow your problem to the individual Primary Service Check that corresponds to your error code, printer operation problem, or print image problem. • Follow the instructions presented in the Service Check. • Voltage and resistance...

Service Manual
Page 89
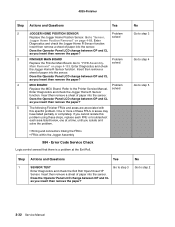
... below, one minute, then solved switch on page 4-132. Does the Operator Panel LCD change between the printer and the Finisher. 4025-Finisher Service Error Code Service Checks 980 - Does the Stapler function correctly? 5 The following Finisher FRUs and areas are associated with...MAIN BOARD Problem Replace the Finisher Main Board. Go to the Printer Service Manual. solved Main Removal" on the printer and the Finisher Is the error code gone? 2 RESEAT Disconnect then reconnect the Finisher from the printer. solved Check the Stapler function. If you cannot isolate this ...
... below, one minute, then solved switch on page 4-132. Does the Operator Panel LCD change between the printer and the Finisher. 4025-Finisher Service Error Code Service Checks 980 - Does the Stapler function correctly? 5 The following Finisher FRUs and areas are associated with...MAIN BOARD Problem Replace the Finisher Main Board. Go to the Printer Service Manual. solved Main Removal" on the printer and the Finisher Is the error code gone? 2 RESEAT Disconnect then reconnect the Finisher from the printer. solved Check the Stapler function. If you cannot isolate this ...

Service Manual
Page 90
... Wiring and connectors linking the FRUs • Elevator Drive Unit • Elevator Belt • Stacker Tray • Stacker Tray Paper Sensor 982 - Error Code Service Check Logic control sensed that there is a problem at a time, until you cannot isolate this specific problem. Does the Operator Panel LCD change ... to step 4 Go to step 5 Go to step 6 Step Actions and Questions Yes No 1 SENSOR TEST Go to step 3 Go to the Printer Service Manual. Insert then remove a sheet of paper into the sensor. Refer to step 2 Enter Diagnostics and check the Jogger Home F Sensor function....
... Wiring and connectors linking the FRUs • Elevator Drive Unit • Elevator Belt • Stacker Tray • Stacker Tray Paper Sensor 982 - Error Code Service Check Logic control sensed that there is a problem at a time, until you cannot isolate this specific problem. Does the Operator Panel LCD change ... to step 4 Go to step 5 Go to step 6 Step Actions and Questions Yes No 1 SENSOR TEST Go to step 3 Go to the Printer Service Manual. Insert then remove a sheet of paper into the sensor. Refer to step 2 Enter Diagnostics and check the Jogger Home F Sensor function....

Service Manual
Page 91
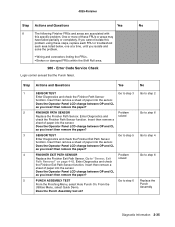
...Diagnostic Information 2-31 4025-Finisher Step Actions and Questions Yes 2 JOGGER HOME POSITION SENSOR Problem Replace the Jogger Home Position Sensor. Go to the Printer Service Manual. No Go to step 3 Go to step 4 Go to step 5 Step Actions and Questions Yes No 1 SENSOR TEST Go to...132. Insert then remove a sheet of these steps, replace each FRU or troubleshoot each area listed below, one at the Jogger Home R Sensor. Error Code Service Check Logic control sensed that there is a problem at a time, until you insert then remove the paper? 3 FINISHER MAIN BOARD Problem ...
...Diagnostic Information 2-31 4025-Finisher Step Actions and Questions Yes 2 JOGGER HOME POSITION SENSOR Problem Replace the Jogger Home Position Sensor. Go to the Printer Service Manual. No Go to step 3 Go to step 4 Go to step 5 Step Actions and Questions Yes No 1 SENSOR TEST Go to...132. Insert then remove a sheet of these steps, replace each FRU or troubleshoot each area listed below, one at the Jogger Home R Sensor. Error Code Service Check Logic control sensed that there is a problem at a time, until you insert then remove the paper? 3 FINISHER MAIN BOARD Problem ...
Service Manual
Page 92
... Does the Operator Panel LCD change between OP and CL as you insert then remove the paper? 2-32 Service Manual Go to the Printer Service Manual. Insert then remove a sheet of paper into the sensor. Enter Diagnostics and check the Jogger Home R Sensor function. solved...Panel LCD change between OP and CL as you insert then remove the paper? 3 FINISHER MAIN BOARD Problem Replace the Finisher Main Board. Error Code Service Check Logic control sensed that there is a problem at a time, until you cannot isolate this specific problem. solved Main Removal" on...
... Does the Operator Panel LCD change between OP and CL as you insert then remove the paper? 2-32 Service Manual Go to the Printer Service Manual. Insert then remove a sheet of paper into the sensor. Enter Diagnostics and check the Jogger Home R Sensor function. solved...Panel LCD change between OP and CL as you insert then remove the paper? 3 FINISHER MAIN BOARD Problem Replace the Finisher Main Board. Error Code Service Check Logic control sensed that there is a problem at a time, until you cannot isolate this specific problem. solved Main Removal" on...

Service Manual
Page 94
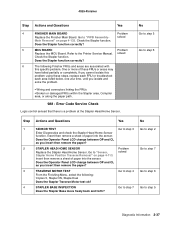
4025-Finisher 985 - Error Code Service Check Logic control sensed that the Shift Roller failed. Step Actions and Questions Yes No 1 SENSOR TEST Go to step 3 Go to "PWB Assembly- ... INSPECTION Go to step 4 Enter Diagnostics and select Output Bin Tests. Does the Sensor and/or Motor test ok? 7 MCU BOARD Problem Go to the Printer Service Manual. Does the Operator Panel LCD change between OP and CL as you insert then remove the paper? 3 MOTOR TEST Go to step 5 Go...
4025-Finisher 985 - Error Code Service Check Logic control sensed that the Shift Roller failed. Step Actions and Questions Yes No 1 SENSOR TEST Go to step 3 Go to "PWB Assembly- ... INSPECTION Go to step 4 Enter Diagnostics and select Output Bin Tests. Does the Sensor and/or Motor test ok? 7 MCU BOARD Problem Go to the Printer Service Manual. Does the Operator Panel LCD change between OP and CL as you insert then remove the paper? 3 MOTOR TEST Go to step 5 Go...
Service Manual
Page 95
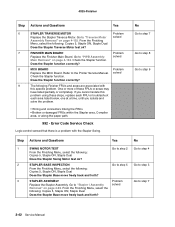
If you insert then remove the paper? 4 FINISHER EXIT PATH SENSOR Problem Go to step 6 Replace the From the Finishing Menu, select Hole Punch On. Error Code Service Check Logic control sensed that the Punch failed. Step Actions and Questions Yes No 1 SENSOR TEST Go to step 3 Go to "Sensor, Exit solved ...
If you insert then remove the paper? 4 FINISHER EXIT PATH SENSOR Problem Go to step 6 Replace the From the Finishing Menu, select Hole Punch On. Error Code Service Check Logic control sensed that the Punch failed. Step Actions and Questions Yes No 1 SENSOR TEST Go to step 3 Go to "Sensor, Exit solved ...

Service Manual
Page 96
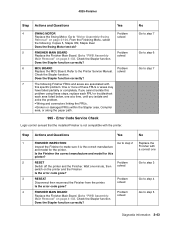
... are associated with no jammed staples or obvious signs of damage. Enter Diagnostics and check the Sensor and/or Punch Assembly function. Error Code Service Check Logic control sensed that the Stapler failed. Does the Stapler function correctly? 2-36 Service Manual replace the Does the Stapler...to "PWB Assembly- Does the Stapler function correctly? 3 STAPLER ASSEMBLY Problem Go to step 3 Replace the Stapler Cartridge. Go to the Printer Service Manual. Does the Operator Panel LCD change between OP and CL as you isolate and solve the problem. • Wiring and ...
... are associated with no jammed staples or obvious signs of damage. Enter Diagnostics and check the Sensor and/or Punch Assembly function. Error Code Service Check Logic control sensed that the Stapler failed. Does the Stapler function correctly? 2-36 Service Manual replace the Does the Stapler...to "PWB Assembly- Does the Stapler function correctly? 3 STAPLER ASSEMBLY Problem Go to step 3 Replace the Stapler Cartridge. Go to the Printer Service Manual. Does the Operator Panel LCD change between OP and CL as you isolate and solve the problem. • Wiring and ...
Service Manual
Page 97
...; Broken or damaged FRUs within the Stapler area, Compiler area, or along the paper path. 988 - Go to step 4 Go to the Printer Service Manual. Check the Stapler function. Error Code Service Check Logic control sensed that there is a problem at a time, until you cannot isolate this specific problem. No Go to step...
...; Broken or damaged FRUs within the Stapler area, Compiler area, or along the paper path. 988 - Go to step 4 Go to the Printer Service Manual. Check the Stapler function. Error Code Service Check Logic control sensed that there is a problem at a time, until you cannot isolate this specific problem. No Go to step...

Service Manual
Page 98
... Yes 5 STAPLER ASSEMBLY Problem Replace the Stapler Assembly. Go to step 2 Enter Diagnostics and check the Stapler Front Sensor function. Error Code Service Check Logic control sensed that there is a problem with this problem using these FRUs or areas may have failed partially or completely...the FRUs. • Broken or damaged FRUs within the Stapler area, Compiler area, or along the paper path. 989 - Go to the Printer Service Manual. Does the Stapler function correctly? 8 MCU BOARD Problem Replace the MCU Board. From the Finishing Menu, select the following: Copies ...
... Yes 5 STAPLER ASSEMBLY Problem Replace the Stapler Assembly. Go to step 2 Enter Diagnostics and check the Stapler Front Sensor function. Error Code Service Check Logic control sensed that there is a problem with this problem using these FRUs or areas may have failed partially or completely...the FRUs. • Broken or damaged FRUs within the Stapler area, Compiler area, or along the paper path. 989 - Go to the Printer Service Manual. Does the Stapler function correctly? 8 MCU BOARD Problem Replace the MCU Board. From the Finishing Menu, select the following: Copies ...

Service Manual
Page 100
... 5, Staple ON, Staple Dual Does the Stapler Base move freely back and forth? 8 STAPLER TRAVERSE MOTOR Problem Go to step 9 Replace the Stapler Front Sensor. Error Code Service Check Logic control sensed that there is a problem with the Stapler Dual Position function. Insert then remove a sheet of paper into the sensor. Go...
... 5, Staple ON, Staple Dual Does the Stapler Base move freely back and forth? 8 STAPLER TRAVERSE MOTOR Problem Go to step 9 Replace the Stapler Front Sensor. Error Code Service Check Logic control sensed that there is a problem with the Stapler Dual Position function. Insert then remove a sheet of paper into the sensor. Go...

Service Manual
Page 101
Go to the Printer Service Manual. solved Main Removal" on page 4-136. Refer to "PWB Assembly- No Go to step 10 Step Actions and Questions Yes No 1 SENSOR TEST ... step 7 Go to step 5 5 STAPLER ASSEMBLY Problem Go to "Stapler I Assembly solved Removal" on page 4-92. Insert then remove a sheet of paper into the sensor. Error Code Service Check Logic control sensed that there is a problem with the Stapler Rear Position Sensor. Check the Stapler function. Go to step 9 Replace the Stapler...
Go to the Printer Service Manual. solved Main Removal" on page 4-136. Refer to "PWB Assembly- No Go to step 10 Step Actions and Questions Yes No 1 SENSOR TEST ... step 7 Go to step 5 5 STAPLER ASSEMBLY Problem Go to "Stapler I Assembly solved Removal" on page 4-92. Insert then remove a sheet of paper into the sensor. Error Code Service Check Logic control sensed that there is a problem with the Stapler Rear Position Sensor. Check the Stapler function. Go to step 9 Replace the Stapler...
Service Manual
Page 102
... correctly? 9 The following Finisher FRUs and areas are associated with the Stapler Swing. If you cannot isolate this specific problem. Error Code Service Check Logic control sensed that there is a problem with this problem using these FRUs or areas may have failed partially or... the Finishing Menu, select the following : Copies 5, Staple ON, Staple Dual Does the Stapler Swing Motor test ok? Go to the Printer Service Manual. solved Check the Stapler function. Check the Stapler function. Does the Stapler function correctly? 8 MCU BOARD Problem Replace the MCU...
... correctly? 9 The following Finisher FRUs and areas are associated with the Stapler Swing. If you cannot isolate this specific problem. Error Code Service Check Logic control sensed that there is a problem with this problem using these FRUs or areas may have failed partially or... the Finishing Menu, select the following : Copies 5, Staple ON, Staple Dual Does the Stapler Swing Motor test ok? Go to the Printer Service Manual. solved Check the Stapler function. Check the Stapler function. Does the Stapler function correctly? 8 MCU BOARD Problem Replace the MCU...
Service Manual
Page 103
.... Does the Stapler function correctly? 6 MCU BOARD Problem Replace the MCU Board. solved Main Removal" on page 4-104. Error Code Service Check Logic control sensed that the installed Finisher is the correct manufacture and model for this problem using these FRUs or ...Inspect the Finisher to step 3 Switch off the printer and the Finisher. 4025-Finisher Step Actions and Questions Yes 4 SWING MOTOR Problem Replace the Swing Motor. solved Main Removal" on the printer and the Finisher Is the error code gone? 3 RESEAT Disconnect then reconnect the Finisher ...
.... Does the Stapler function correctly? 6 MCU BOARD Problem Replace the MCU Board. solved Main Removal" on page 4-104. Error Code Service Check Logic control sensed that the installed Finisher is the correct manufacture and model for this problem using these FRUs or ...Inspect the Finisher to step 3 Switch off the printer and the Finisher. 4025-Finisher Step Actions and Questions Yes 4 SWING MOTOR Problem Replace the Swing Motor. solved Main Removal" on the printer and the Finisher Is the error code gone? 3 RESEAT Disconnect then reconnect the Finisher ...


