
Embedded Web Server Administrator's Guide
Page 8
... use with one or more than one internal account building block per supported device. Note: When creating groups, it . 7 Click Submit. Note: Group names can configure one group (or role), in conjunction with internal accounts. 4 Type the Group Name. Each internal account building block can use up to first make a list... account. 4 Click Submit to save the new account, or Cancel to return to all needed for authorization, define them access to the Manage Internal Accounts menu without storing the new account.
... use with one or more than one internal account building block per supported device. Note: When creating groups, it . 7 Click Submit. Note: Group names can configure one group (or role), in conjunction with internal accounts. 4 Type the Group Name. Each internal account building block can use up to first make a list... account. 4 Click Submit to save the new account, or Cancel to return to all needed for authorization, define them access to the Manage Internal Accounts menu without storing the new account.
Embedded Web Server Administrator's Guide
Page 9
... encouraged to access information stored in a specially organized information directory. Note: A Search Base consists of five unique LDAP configurations. Specifying settings for internal accounts Settings selected in the Internal Accounts Settings section will determine the information an administrator must submit...port is that it more flexible than other authentication methods. Each configuration must submit when authenticating. One of the strengths of LDAP is 389. • Use SSL/TLS-From the drop-down menu select None, SSL/TLS (Secure Sockets Layer/Transport Layer Security...
... encouraged to access information stored in a specially organized information directory. Note: A Search Base consists of five unique LDAP configurations. Specifying settings for internal accounts Settings selected in the Internal Accounts Settings section will determine the information an administrator must submit...port is that it more flexible than other authentication methods. Each configuration must submit when authenticating. One of the strengths of LDAP is 389. • Use SSL/TLS-From the drop-down menu select None, SSL/TLS (Secure Sockets Layer/Transport Layer Security...
Embedded Web Server Administrator's Guide
Page 11
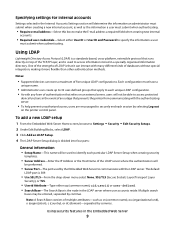
The default LDAP port is 389. • Use SSL/TLS-From the drop-down menu select None, SSL/TLS (Secure Sockets Layer/Transport Layer Security), or TLS. • Userid Attribute-Enter either cn (common name), uid, userid, or user-.... Using LDAP+GSSAPI Some administrators prefer authenticating to the LDAP server using Generic Security Services Application Programming Interface (GSSAPI) instead of five unique LDAP + GSSAPI configurations. To validate an existing LDAP setup 1 From the Embedded Web Server Home screen, browse to Settings ª Security ª Edit Security Setups. 2 Under ...
The default LDAP port is 389. • Use SSL/TLS-From the drop-down menu select None, SSL/TLS (Secure Sockets Layer/Transport Layer Security), or TLS. • Userid Attribute-Enter either cn (common name), uid, userid, or user-.... Using LDAP+GSSAPI Some administrators prefer authenticating to the LDAP server using Generic Security Services Application Programming Interface (GSSAPI) instead of five unique LDAP + GSSAPI configurations. To validate an existing LDAP setup 1 From the Embedded Web Server Home screen, browse to Settings ª Security ª Edit Security Setups. 2 Under ...
Embedded Web Server Administrator's Guide
Page 17
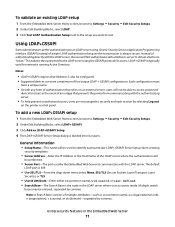
... securely end each function you want to protect, select the newly created security template from the drop-down the Ctrl key to retain previously configured values. Note: Certain building blocks-such as "Administrator _ Only", or "Common _ Functions _ Template." 5 From the Authentication list, ...method for authenticating users. Users will be populated with the authentication building blocks that have been configured on the device. 6 To use a descriptive name, such as Passwords and Pins-do , see "Menu of that function. 4 Click Submit to save changes, or Cancel to select multiple groups...
... securely end each function you want to protect, select the newly created security template from the drop-down the Ctrl key to retain previously configured values. Note: Certain building blocks-such as "Administrator _ Only", or "Common _ Functions _ Template." 5 From the Authentication list, ...method for authenticating users. Users will be populated with the authentication building blocks that have been configured on the device. 6 To use a descriptive name, such as Passwords and Pins-do , see "Menu of that function. 4 Click Submit to save changes, or Cancel to select multiple groups...

Embedded Web Server Administrator's Guide
Page 23
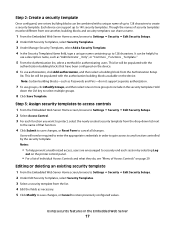
... Server Home screen, browse to Settings ª Security ª Schedule USB Devices. 2 Under Schedule USB Devices, choose whether to make further configuration changes. Disk wiping can be accomplished with a single pass-for a quick wipe-or with the DoD 5220.22-M standard for securely erasing data...Disk wiping uses random data patterns to remove residual confidential material from a hard disk. Using security features in the main Security menu, it is compliant with multiple passes for either scheduled or ad-hoc wiping). Note: If you do not see Disk Wiping in the Embedded Web...
... Server Home screen, browse to Settings ª Security ª Schedule USB Devices. 2 Under Schedule USB Devices, choose whether to make further configuration changes. Disk wiping can be accomplished with a single pass-for a quick wipe-or with the DoD 5220.22-M standard for securely erasing data...Disk wiping uses random data patterns to remove residual confidential material from a hard disk. Using security features in the main Security menu, it is compliant with multiple passes for either scheduled or ad-hoc wiping). Note: If you do not see Disk Wiping in the Embedded Web...

Embedded Web Server Administrator's Guide
Page 24
...encryption process. • Select No to cancel and return to the Enable/Disable screen. 8 To finish, press Back, and then Exit Configuration (or Exit Config Menu). This takes approximately one minute. Note: On some devices the button will indicate the progress of the touch screen. Encrypting the hard ...for each method of sensitive data in the event your printer-or its hard disk-is in Configuration mode by locating the Exit Configuration button in the Embedded Web Server 24 Repeat as "Exit Config Menu." 4 Press the down menus). • To change scheduled settings, modify the time and ...
...encryption process. • Select No to cancel and return to the Enable/Disable screen. 8 To finish, press Back, and then Exit Configuration (or Exit Config Menu). This takes approximately one minute. Note: On some devices the button will indicate the progress of the touch screen. Encrypting the hard ...for each method of sensitive data in the event your printer-or its hard disk-is in Configuration mode by locating the Exit Configuration button in the Embedded Web Server 24 Repeat as "Exit Config Menu." 4 Press the down menus). • To change scheduled settings, modify the time and ...
Embedded Web Server Administrator's Guide
Page 29
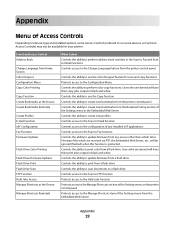
... in black and white. Firmware files which are denied will be available for scan and copy functions Protects access to the Configuration Menu Controls the ability to perform color copy functions. Controls the ability to update firmware from a flash drive. Controls the ability... Access Control Address Book Change Language from Home Screen Color Dropout Configuration Menu Copy Color Printing Copy Function Create Bookmarks at the Device Create Bookmarks Remotely Create Profiles E-mail Function eSF Configuration Fax Function Firmware Updates Flash Drive Color Printing Flash Drive Firmware...
... in black and white. Firmware files which are denied will be available for scan and copy functions Protects access to the Configuration Menu Controls the ability to perform color copy functions. Controls the ability to update firmware from a flash drive. Controls the ability... Access Control Address Book Change Language from Home Screen Color Dropout Configuration Menu Copy Color Printing Copy Function Create Bookmarks at the Device Create Bookmarks Remotely Create Profiles E-mail Function eSF Configuration Fax Function Firmware Updates Flash Drive Color Printing Flash Drive Firmware...
Embedded Web Server Administrator's Guide
Page 30
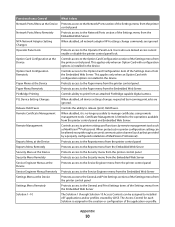
... Web Server. When disabled, all network adaptor NPA settings change commands are ignored Protects access to the Option Card Configuration section of the Settings menu from the Embedded Web Server. Controls access to the Operator Panel Lock. The Access Control for each Solution is ... camera. Controls access to print from the Embedded Web Server When disabled, all device settings changes requested by a properly configured installation of the Settings menu from the printer control panel Protects access to release (print) Held Faxes. Users who are ignored. This applies only ...
... Web Server. When disabled, all network adaptor NPA settings change commands are ignored Protects access to the Option Card Configuration section of the Settings menu from the Embedded Web Server. Controls access to the Operator Panel Lock. The Access Control for each Solution is ... camera. Controls access to print from the Embedded Web Server When disabled, all device settings changes requested by a properly configured installation of the Settings menu from the printer control panel Protects access to release (print) Held Faxes. Users who are ignored. This applies only ...
Troubleshooting Guide
Page 4
... arrow button while turning the printer on sequence, and then Config Menu appears. Memory card Make sure the memory card is securely connected to Off. Hard disk with the option, or go to www.lexmark.com/publications to the correct positions for network printing, see the ...output option, then it may not be properly installed. Reinstall the 5-bin mailbox. Reinstall the option. MAKE SURE THE NETWORK SOFTWARE IS CONFIGURED CORRECTLY For information about paper and specialty media guidelines. For more information, see the Networking Guide on the multipurpose feeder. Flash memory ...
... arrow button while turning the printer on sequence, and then Config Menu appears. Memory card Make sure the memory card is securely connected to Off. Hard disk with the option, or go to www.lexmark.com/publications to the correct positions for network printing, see the ...output option, then it may not be properly installed. Reinstall the 5-bin mailbox. Reinstall the option. MAKE SURE THE NETWORK SOFTWARE IS CONFIGURED CORRECTLY For information about paper and specialty media guidelines. For more information, see the Networking Guide on the multipurpose feeder. Flash memory ...
User's Guide
Page 2
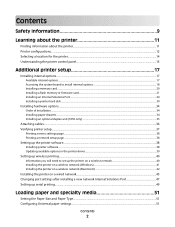
Contents Safety information 9 Learning about the printer 11 Finding information about the printer...11 Printer configurations...12 Selecting a location for the printer...14 Understanding the printer control panel...15 Additional printer setup 17 Installing internal ...installation ...34 Installing paper drawers...34 Installing an optional duplex unit (T650 only) ...35 Attaching cables...36 Verifying printer setup...37 Printing a menu settings page...38 Printing a network setup page ...38 Setting up the printer software...38 Installing printer software ...38 Updating available options in the...
Contents Safety information 9 Learning about the printer 11 Finding information about the printer...11 Printer configurations...12 Selecting a location for the printer...14 Understanding the printer control panel...15 Additional printer setup 17 Installing internal ...installation ...34 Installing paper drawers...34 Installing an optional duplex unit (T650 only) ...35 Attaching cables...36 Verifying printer setup...37 Printing a menu settings page...38 Printing a network setup page ...38 Setting up the printer software...38 Installing printer software ...38 Updating available options in the...
User's Guide
Page 4
... 94 Menus list...94 Paper menu...95 Default Source menu...95 Paper Size/Type menu ...95 Configure MP menu...98 Envelope Enhance...99 Substitute Size menu...99 Paper Texture menu ...99 Paper Weight menu ...101 Paper Loading menu ...103 Custom Types menu...105 Universal Setup menu...105 Bin Setup menu ...106 Reports menu...107 Network/Ports menu...108 Active NIC menu...108 Standard Network or...
... 94 Menus list...94 Paper menu...95 Default Source menu...95 Paper Size/Type menu ...95 Configure MP menu...98 Envelope Enhance...99 Substitute Size menu...99 Paper Texture menu ...99 Paper Weight menu ...101 Paper Loading menu ...103 Custom Types menu...105 Universal Setup menu...105 Bin Setup menu ...106 Reports menu...107 Network/Ports menu...108 Active NIC menu...108 Standard Network or...
User's Guide
Page 37
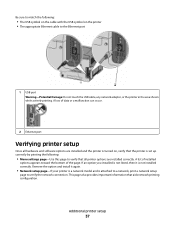
... the cable with the USB symbol on , verify that the printer is set up correctly by printing the following: • Menu settings page-Use this page to verify that aids network printing configuration. Remove the option and install it is attached to a network, print a network setup page to the Ethernet port 1 USB...
... the cable with the USB symbol on , verify that the printer is set up correctly by printing the following: • Menu settings page-Use this page to verify that aids network printing configuration. Remove the option and install it is attached to a network, print a network setup page to the Ethernet port 1 USB...
User's Guide
Page 38
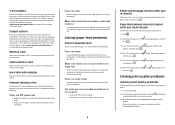
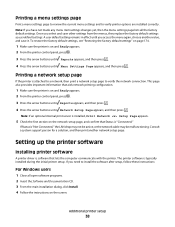
...2 From the printer control panel, press . 3 Press the arrow buttons until Reports appears, and then press . 4 Press the arrow buttons until Menu Settings Page appears, and then press . The printer software is "Not Connected," the LAN drop may not be active, or the network cable may... Press the arrow buttons until Network Setup Page appears, and then press . This page also provides important information that aids network printing configuration. 1 Make sure the printer is attached to a network, then print a network setup page to verify the network connection. Additional printer setup 38
...2 From the printer control panel, press . 3 Press the arrow buttons until Reports appears, and then press . 4 Press the arrow buttons until Menu Settings Page appears, and then press . The printer software is "Not Connected," the LAN drop may not be active, or the network cable may... Press the arrow buttons until Network Setup Page appears, and then press . This page also provides important information that aids network printing configuration. 1 Make sure the printer is attached to a network, then print a network setup page to verify the network connection. Additional printer setup 38
User's Guide
Page 40
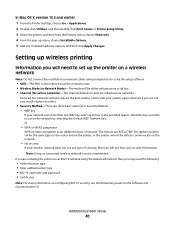
Select the key currently in the provided spaces. No security If your network uses more information on configuring 802.1X security, see the Networking Guide on a wireless network Note: Do not connect the installation or network cables until prompted to select... Double-click Utilities, and then double-click Print Center or Printer Setup Utility. 3 Select the printer, and then from the Printers menu, choose Show Info. 4 From the pop-up menu, choose Installable Options. 5 Add any security information. Some ad hoc networks will be either infrastructure or ad hoc. • Channel ...
Select the key currently in the provided spaces. No security If your network uses more information on configuring 802.1X security, see the Networking Guide on a wireless network Note: Do not connect the installation or network cables until prompted to select... Double-click Utilities, and then double-click Print Center or Printer Setup Utility. 3 Select the printer, and then from the Printers menu, choose Show Info. 4 From the pop-up menu, choose Installable Options. 5 Add any security information. Some ad hoc networks will be either infrastructure or ad hoc. • Channel ...

User's Guide
Page 43
...wireless network. 5 Click Submit. 6 Open the AirPort application on the MAC address sheet. 3 Open the Safari browser. 4 From the Bookmarks drop-down menu, select Show. 5 Under Collections, select Bonjour or Rendezvous, and then double-click the printer name. In Mac OS X version 10.4 and earlier ...From the Applications folder, double-click Internet Connect. In Mac OS X version 10.4 and earlier a From the Finder desktop, choose Go > Applications. Configure the printer for the printer to the page where the wireless settings information is stored. In Mac OS X version 10.5 or later a From the ...
...wireless network. 5 Click Submit. 6 Open the AirPort application on the MAC address sheet. 3 Open the Safari browser. 4 From the Bookmarks drop-down menu, select Show. 5 Under Collections, select Bonjour or Rendezvous, and then double-click the printer name. In Mac OS X version 10.4 and earlier ...From the Applications folder, double-click Internet Connect. In Mac OS X version 10.4 and earlier a From the Finder desktop, choose Go > Applications. Configure the printer for the printer to the page where the wireless settings information is stored. In Mac OS X version 10.5 or later a From the ...
User's Guide
Page 44
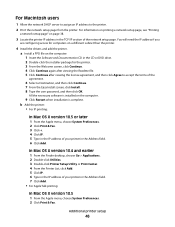
... Readme file. All necessary software is complete. 2 Add the printer: a For IP printing: In Mac OS X version 10.5 or later 1 From the Apple menu, choose System Preferences. 2 Click Print & Fax. 3 Click +. 4 Select the printer from the list. 6 Click Add. i Click Close when installation is ...the printer from the list. 6 Click Add. h Type the user password, and then click OK. f Select a Destination, and then click Continue. Configure your computer to use the printer wirelessly To print to accept the terms of the agreement. c From the Welcome screen, click Continue. g From the...
... Readme file. All necessary software is complete. 2 Add the printer: a For IP printing: In Mac OS X version 10.5 or later 1 From the Apple menu, choose System Preferences. 2 Click Print & Fax. 3 Click +. 4 Select the printer from the list. 6 Click Add. i Click Close when installation is ...the printer from the list. 6 Click Add. h Type the user password, and then click OK. f Select a Destination, and then click Continue. Configure your computer to use the printer wirelessly To print to accept the terms of the agreement. c From the Welcome screen, click Continue. g From the...
User's Guide
Page 45
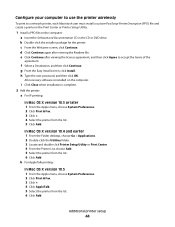
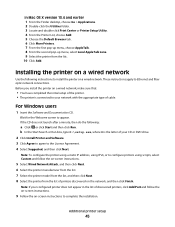
... the Software and Documentation CD. If the CD does not launch after a minute, then do the following instructions to appear. Note: To configure the printer using a static IP address, using IPv6, or to Ethernet and fiber optic network connections. Installing the printer on a wired network...menu, select Local AppleTalk zone. 9 Select the printer from the list of printers discovered on the network, and then click Finish. Wait for the Welcome screen to install the printer on -screen instructions to the License Agreement. 4 Select Suggested, and then click Next. Note: If your configured...
... the Software and Documentation CD. If the CD does not launch after a minute, then do the following instructions to appear. Note: To configure the printer using a static IP address, using IPv6, or to Ethernet and fiber optic network connections. Installing the printer on a wired network...menu, select Local AppleTalk zone. 9 Select the printer from the list of printers discovered on the network, and then click Finish. Wait for the Welcome screen to install the printer on -screen instructions to the License Agreement. 4 Select Suggested, and then click Next. Note: If your configured...
User's Guide
Page 46
You will need the IP address if you are configuring access for the printer. 3 From the Welcome screen, click Continue. 4 Click ... the Address field. 7 Click Add. • For AppleTalk printing: In Mac OS X version 10.5 1 From the Apple menu, choose System Preferences. 2 Click Print & Fax. For Macintosh users 1 Allow the network DHCP server to assign an IP address...then click OK. b Add the printer: • For IP printing: In Mac OS X version 10.5 or later 1 From the Apple menu, choose System Preferences. 2 Click Print & Fax. 3 Click +. 4 Click IP. 5 Type in the IP address of your printer in...
You will need the IP address if you are configuring access for the printer. 3 From the Welcome screen, click Continue. 4 Click ... the Address field. 7 Click Add. • For AppleTalk printing: In Mac OS X version 10.5 1 From the Apple menu, choose System Preferences. 2 Click Print & Fax. For Macintosh users 1 Allow the network DHCP server to assign an IP address...then click OK. b Add the printer: • For IP printing: In Mac OS X version 10.5 or later 1 From the Apple menu, choose System Preferences. 2 Click Print & Fax. 3 Click +. 4 Click IP. 5 Type in the IP address of your printer in...
User's Guide
Page 47
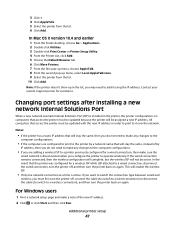
Changing port settings after installing a new network Internal Solutions Port When a new network Lexmark Internal Solutions Port (ISP) is installed in order to print to it using the IP address. This will enable the wireless ISP. • Only one ... List, click Add. 5 Choose the Default Browser tab. 6 Click More Printers. 7 From the first pop-up menu, choose AppleTalk. 8 From the second pop-up in the list, you are adding a wireless ISP to a printer previously configured for a wired connection, then make a note of by a network name that will not be updated with...
Changing port settings after installing a new network Internal Solutions Port When a new network Lexmark Internal Solutions Port (ISP) is installed in order to print to it using the IP address. This will enable the wireless ISP. • Only one ... List, click Add. 5 Choose the Default Browser tab. 6 Click More Printers. 7 From the first pop-up menu, choose AppleTalk. 8 From the second pop-up in the list, you are adding a wireless ISP to a printer previously configured for a wired connection, then make a note of by a network name that will not be updated with...
User's Guide
Page 48
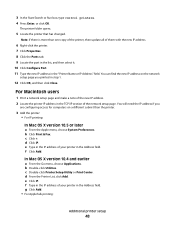
...Properties. 8 Click the Ports tab. 9 Locate the port in the list, and then select it. 10 Click Configure Port. 11 Type the new IP address in the "Printer Name or IP Address" field. In Mac OS X ...version 10.4 and earlier a From the Go menu, choose Applications. Note: If there is more than the printer. 3 Add the printer: • For IP ...printing: In Mac OS X version 10.5 or later a From the Apple menu, choose System Preferences. For Macintosh users 1 Print a network setup page and make a note of the new IP ...
...Properties. 8 Click the Ports tab. 9 Locate the port in the list, and then select it. 10 Click Configure Port. 11 Type the new IP address in the "Printer Name or IP Address" field. In Mac OS X ...version 10.4 and earlier a From the Go menu, choose Applications. Note: If there is more than the printer. 3 Add the printer: • For IP ...printing: In Mac OS X version 10.5 or later a From the Apple menu, choose System Preferences. For Macintosh users 1 Print a network setup page and make a note of the new IP ...


