
Setup Guide
Page 20
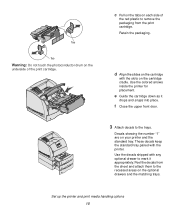
Tab Tab Warning: Do not touch the photoconductor drum on the underside of the red plastic to remove the packaging from the sheet and attach them to the trays. Use the colored arrows ...
Tab Tab Warning: Do not touch the photoconductor drum on the underside of the red plastic to remove the packaging from the sheet and attach them to the trays. Use the colored arrows ...
User's Reference
Page 88
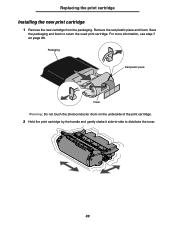
Save the packaging and foam to distribute the toner. 88 Packaging Red plastic piece Foam Warning: Do not touch the photoconductor drum on page 89. Remove the red plastic piece and foam. For more information, see step 7 on the underside of the print cartridge. 2 Hold the print cartridge by the handle and gently shake it side-to-side to return the used print cartridge. Replacing the print cartridge Installing the new print cartridge 1 Remove the new cartridge from the packaging.
Save the packaging and foam to distribute the toner. 88 Packaging Red plastic piece Foam Warning: Do not touch the photoconductor drum on page 89. Remove the red plastic piece and foam. For more information, see step 7 on the underside of the print cartridge. 2 Hold the print cartridge by the handle and gently shake it side-to-side to return the used print cartridge. Replacing the print cartridge Installing the new print cartridge 1 Remove the new cartridge from the packaging.
User's Reference
Page 125
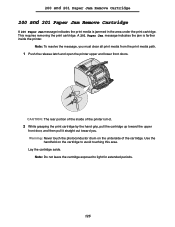
... Paper Jam message indicates the jam is farther inside of the printer is jammed in the area under the print cartridge. Warning: Never touch the photoconductor drum on the cartridge to light for extended periods. 125 CAUTION: The rear portion of the cartridge. Use the handhold on the underside of the...
... Paper Jam message indicates the jam is farther inside of the printer is jammed in the area under the print cartridge. Warning: Never touch the photoconductor drum on the cartridge to light for extended periods. 125 CAUTION: The rear portion of the cartridge. Use the handhold on the underside of the...

User's Reference
Page 142
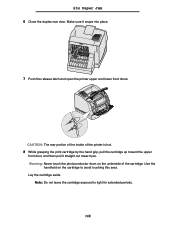
... avoid touching this area. Note: The print media may be covered with unfused toner, which can stain garments and skin. 142 Warning: Never touch the photoconductor drum on the cartridge to light for extended periods. 3 Gently push the feed roller release lever toward the back of the cartridge. 23x Paper Jam...
... avoid touching this area. Note: The print media may be covered with unfused toner, which can stain garments and skin. 142 Warning: Never touch the photoconductor drum on the cartridge to light for extended periods. 3 Gently push the feed roller release lever toward the back of the cartridge. 23x Paper Jam...
User's Reference
Page 148
...: The rear portion of the inside of the cartridge. Note: Do not leave the cartridge exposed to avoid touching this area. Warning: Never touch the photoconductor drum on the cartridge to light for extended periods. 148
...: The rear portion of the inside of the cartridge. Note: Do not leave the cartridge exposed to avoid touching this area. Warning: Never touch the photoconductor drum on the cartridge to light for extended periods. 148

User's Reference
Page 155
... print media now. Note: The print media may be covered with unfused toner, which can stain garments and skin. 155 Warning: Do not touch the photoconductor drum on the cartridge to avoid touching this area. b Slide the tray all the way into the printer. If you do not see the leading...
... print media now. Note: The print media may be covered with unfused toner, which can stain garments and skin. 155 Warning: Do not touch the photoconductor drum on the cartridge to avoid touching this area. b Slide the tray all the way into the printer. If you do not see the leading...

Technical Reference
Page 175
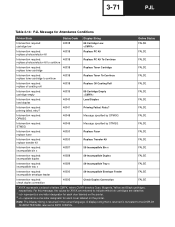
... Coating Roll Missing 30 XXXX1 Print Unit Missing FALSE FALSE Intervention required: insert hole punch box 40010 Insert Hole Punch Box FALSE Intervention required: insert photoconductor cartridge 40010 Insert PC Cartridge FALSE Intervention required: printer upper door open 40021 Cover Open or Close Top Covers or Insert Cartridge or Close Door...
... Coating Roll Missing 30 XXXX1 Print Unit Missing FALSE FALSE Intervention required: insert hole punch box 40010 Insert Hole Punch Box FALSE Intervention required: insert photoconductor cartridge 40010 Insert PC Cartridge FALSE Intervention required: printer upper door open 40021 Cover Open or Close Top Covers or Insert Cartridge or Close Door...
Technical Reference
Page 179
... Printer State Status Code Display String Online Status Intervention required: cartridge low 40038 88 Cartridge Low FALSE Intervention required: replace photoconductor kit 40038 Replace PC Kit FALSE Intervention required: 40038 replace photoconductor kit to continue Replace PC Kit To Continue FALSE Intervention required: replace toner cartridge 40038 Replace Toner Cartridge FALSE Intervention...
... Printer State Status Code Display String Online Status Intervention required: cartridge low 40038 88 Cartridge Low FALSE Intervention required: replace photoconductor kit 40038 Replace PC Kit FALSE Intervention required: 40038 replace photoconductor kit to continue Replace PC Kit To Continue FALSE Intervention required: replace toner cartridge 40038 Replace Toner Cartridge FALSE Intervention...
Technical Reference
Page 337
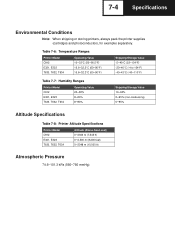
...Specifications Environmental Conditions Note: When shipping or storing printers, always pack the printer supplies (cartridges and photoconductors, for example) separately. Table 7-6: Temperature Ranges Printer Model C912 E321, E323 T630, T632, T634 Operating Value 10-33°C (50-90.5°F) 15.6-32.2°C (60-90°...20-40°C (-4 to 104°F) -40-43°C (-40-110°F) Table 7-7: Humidity Ranges Printer Model C912 E321, E323 T630, T632, T634 Operating Value 20-80% 8-80% 8-80% Shipping/Storage Value 10-90% 8-95% (non-condensing) 5-95% Altitude Specifications Table 7-8: ...
...Specifications Environmental Conditions Note: When shipping or storing printers, always pack the printer supplies (cartridges and photoconductors, for example) separately. Table 7-6: Temperature Ranges Printer Model C912 E321, E323 T630, T632, T634 Operating Value 10-33°C (50-90.5°F) 15.6-32.2°C (60-90°...20-40°C (-4 to 104°F) -40-43°C (-40-110°F) Table 7-7: Humidity Ranges Printer Model C912 E321, E323 T630, T632, T634 Operating Value 20-80% 8-80% 8-80% Shipping/Storage Value 10-90% 8-95% (non-condensing) 5-95% Altitude Specifications Table 7-8: ...

Service Manual
Page 33
... Crystal Display Light-Emitting Diode Low Voltage Power Supply Multipurpose feeder Masked Read Only Memory Microswitch Nonvolatile Random Access Memory Original Equipment Manufacturer Optical Sensor Photoconductor Picture element Power-On Reset Power-On Self Test Pulse Width Modulation Raster Imaging Processor Read Only Memory Synchronous Dynamic Random Access Memory Single Inline...
... Crystal Display Light-Emitting Diode Low Voltage Power Supply Multipurpose feeder Masked Read Only Memory Microswitch Nonvolatile Random Access Memory Original Equipment Manufacturer Optical Sensor Photoconductor Picture element Power-On Reset Power-On Self Test Pulse Width Modulation Raster Imaging Processor Read Only Memory Synchronous Dynamic Random Access Memory Single Inline...

Service Manual
Page 113
... roll bushing is interlocked through the front top cover interlock switch. If incorrect, replace the cable assembly. Check the PC drum contact on the entire photoconductor drum. The printer is correctly installed in toner development on the right side frame for damage, PC drum contact wear or contamination. If incorrect, replace...
... roll bushing is interlocked through the front top cover interlock switch. If incorrect, replace the cable assembly. Check the PC drum contact on the entire photoconductor drum. The printer is correctly installed in toner development on the right side frame for damage, PC drum contact wear or contamination. If incorrect, replace...

Service Manual
Page 114
...for loose or foreign material that are not bent, corroded, or damaged. Check the high voltage contacts to ensure they are stuck to the photoconductor, charge roll, or transfer roll. This can also be caused by a problem in the main drive gearbox assembly, alignment assembly, any pieces... the print cartridge for correct operation. Replace the main drive gearbox assembly. Blurred print can be caused by the motor pinion gear on the photoconductor. Print quality-evenly spaced horizontal lines or marks FRU 1 Lines spaced 3.19 mm (.126 inch) apart 2 Lines spaced 22.32 mm(.882...
...for loose or foreign material that are not bent, corroded, or damaged. Check the high voltage contacts to ensure they are stuck to the photoconductor, charge roll, or transfer roll. This can also be caused by a problem in the main drive gearbox assembly, alignment assembly, any pieces... the print cartridge for correct operation. Replace the main drive gearbox assembly. Blurred print can be caused by the motor pinion gear on the photoconductor. Print quality-evenly spaced horizontal lines or marks FRU 1 Lines spaced 3.19 mm (.126 inch) apart 2 Lines spaced 22.32 mm(.882...
Service Manual
Page 117
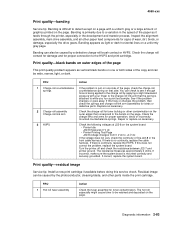
... problem, replace the system board. The hot roll especially might cause toner to the bands on a uniformly gray page. Banding can be caused by the photoconductor, cleaning blade, and other parts inside the print cartridge. See if the problem changes or goes away. Check the charge links and arms for binds...
... problem, replace the system board. The hot roll especially might cause toner to the bands on a uniformly gray page. Banding can be caused by the photoconductor, cleaning blade, and other parts inside the print cartridge. See if the problem changes or goes away. Check the charge links and arms for binds...


