Setup Guide (1.4 MB)
Page 5
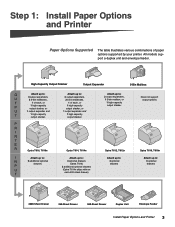
... : 3 output expanders, U 2 5-bin mailboxes, T 1 of paper options supported by your printer. Step 1: Install Paper Options and Printer Paper Options Supported The table illustrates various combinations of each , or 1 high-capacity output stacker, or 1 output expander and 1 high-capacity output stacker. All models support a duplex unit and envelope feeder. P R I N T E R Optra T616, T616n I Attach up to: N 3 additional optional...
... : 3 output expanders, U 2 5-bin mailboxes, T 1 of paper options supported by your printer. Step 1: Install Paper Options and Printer Paper Options Supported The table illustrates various combinations of each , or 1 high-capacity output stacker, or 1 output expander and 1 high-capacity output stacker. All models support a duplex unit and envelope feeder. P R I N T E R Optra T616, T616n I Attach up to: N 3 additional optional...

Setup Guide (1.4 MB)
Page 6
It gives your printer added capacity by letting you have purchased. 4 Install Paper Options and Printer Installing the 2000-Sheet Drawer Optra T label (colored triangle) Your printer supports one 2000-sheet drawer. The 2000-sheet drawer is packaged with a User's Guide that contains detailed instructions for installation, setup and use, including loading paper and removing paper jams. When you have finished installing the 2000-sheet drawer, install any drawers or a duplex unit that you load up to four reams (approximately 2,000 sheets) of 20 lb paper.
It gives your printer added capacity by letting you have purchased. 4 Install Paper Options and Printer Installing the 2000-Sheet Drawer Optra T label (colored triangle) Your printer supports one 2000-sheet drawer. The 2000-sheet drawer is packaged with a User's Guide that contains detailed instructions for installation, setup and use, including loading paper and removing paper jams. When you have finished installing the 2000-sheet drawer, install any drawers or a duplex unit that you load up to four reams (approximately 2,000 sheets) of 20 lb paper.
Setup Guide (1.4 MB)
Page 7
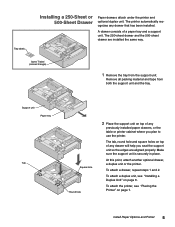
... point, attach another optional drawer, a duplex unit or the printer. A drawer consists of any drawer that has been installed. To attach a drawer, repeat steps 1 and 2. Optra T label (colored triangle) 1 Remove the tray from both the support unit and the tray. Make sure the support unit is securely in place. Tray labels Installing a 250-Sheet...
... point, attach another optional drawer, a duplex unit or the printer. A drawer consists of any drawer that has been installed. To attach a drawer, repeat steps 1 and 2. Optra T label (colored triangle) 1 Remove the tray from both the support unit and the tray. Make sure the support unit is securely in place. Tray labels Installing a 250-Sheet...
Setup Guide (1.4 MB)
Page 9
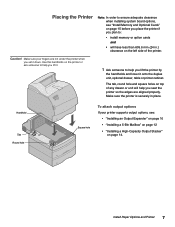
... hole and square holes on top of the printer. Caution! Make sure your printer supports output options, see "Install Memory and Optional Cards" on page 15 before you place the printer if you lift the printer by the handholds and lower it down. Placing the Printer Note: In order to : • install...lift it. 1 Ask someone to help you seat the printer so the edges are not under the printer when you set it onto the duplex unit, optional drawer, table or printer cabinet. Install Paper Options and Printer 7 Make sure the printer is securely in .) clearance on the left side of any...
... hole and square holes on top of the printer. Caution! Make sure your printer supports output options, see "Install Memory and Optional Cards" on page 15 before you place the printer if you lift the printer by the handholds and lower it down. Placing the Printer Note: In order to : • install...lift it. 1 Ask someone to help you seat the printer so the edges are not under the printer when you set it onto the duplex unit, optional drawer, table or printer cabinet. Install Paper Options and Printer 7 Make sure the printer is securely in .) clearance on the left side of any...

Setup Guide (1.4 MB)
Page 16
...and open the lower front door of the printer. 2 Lift open the envelope feeder connector door. 3 Align the tabs on the envelope feeder with installation instructions. Optra T label (colored triangle) Installing the Envelope Feeder Optra T label (colored triangle) The envelope ...printer more compact. It can be removed when you are not using the envelope feeder. The envelope feeder tilts downward at a slight angle when it is packaged with the slots on using it snaps into place. Installing a High-Capacity Output Stacker Optra T printer models T616(n), T614(n) and T612(n) support...
...and open the lower front door of the printer. 2 Lift open the envelope feeder connector door. 3 Align the tabs on the envelope feeder with installation instructions. Optra T label (colored triangle) Installing the Envelope Feeder Optra T label (colored triangle) The envelope ...printer more compact. It can be removed when you are not using the envelope feeder. The envelope feeder tilts downward at a slight angle when it is packaged with the slots on using it snaps into place. Installing a High-Capacity Output Stacker Optra T printer models T616(n), T614(n) and T612(n) support...
Setup Guide (1.4 MB)
Page 22
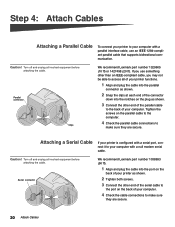
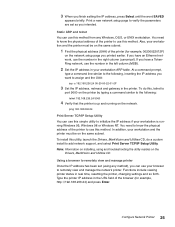
...off and unplug all involved equipment before attaching the cable. Serial connector We recommend Lexmark part number 1038693 (50 ft). 1 Align and plug the cable into the port on the back of your printer as shown. 2 Tighten both screws. 3 Connect the other end of the serial... attaching the cable. Parallel connector Clips We recommend Lexmark part number 1329605 (10 ft) or 1427498 (20 ft). Caution! If you use an IEEE 1284-compliant parallel cable that supports bidirectional communication. Attaching a Serial Cable If your printer is configured with a parallel interface cable, use ...
...off and unplug all involved equipment before attaching the cable. Serial connector We recommend Lexmark part number 1038693 (50 ft). 1 Align and plug the cable into the port on the back of your printer as shown. 2 Tighten both screws. 3 Connect the other end of the serial... attaching the cable. Parallel connector Clips We recommend Lexmark part number 1329605 (10 ft) or 1427498 (20 ft). Caution! If you use an IEEE 1284-compliant parallel cable that supports bidirectional communication. Attaching a Serial Cable If your printer is configured with a parallel interface cable, use ...
Setup Guide (1.4 MB)
Page 27
... install to add network support, and select Print Server TCP/IP Setup Utility. ping 192.168.236.24 Print Server TCP/IP Setup Utility You can use the number in the left column (MSB). 2 Set the IP address in your workstation ARP table. Type the printer IP address in real ...the parameters are set (using any Windows, OS/2, or UNIX workstation. At a command prompt, type a command line similar to use the number in the printer. You need to know the physical address of the browser (for example, 00200022012F) on the Drivers, MarkVision and Utilities CD. Using a browser to remotely...
... install to add network support, and select Print Server TCP/IP Setup Utility. ping 192.168.236.24 Print Server TCP/IP Setup Utility You can use the number in the left column (MSB). 2 Set the IP address in your workstation ARP table. Type the printer IP address in real ...the parameters are set (using any Windows, OS/2, or UNIX workstation. At a command prompt, type a command line similar to use the number in the printer. You need to know the physical address of the browser (for example, 00200022012F) on the Drivers, MarkVision and Utilities CD. Using a browser to remotely...
Setup Guide (1.4 MB)
Page 28
... is necessary to send a print job including FTP, TFTP, LPR/LPD, point-topoint (LexIP), and various queue-based methods. c Select Lexmark Network Port, then click New Port. Print to a queue on a Windows NT server This section explains the setup for queue-based printing where.... (Hint: Start, Settings, Printers, Add Printer.) 26 Configure Network Printer Note: If you are many ways to establish the link between the printer and the queue. Do this queue. d Share the queue. 3 Set up your printer setup process. To use Network Plug and Print to add network support, and select TCP/IP.) 2...
... is necessary to send a print job including FTP, TFTP, LPR/LPD, point-topoint (LexIP), and various queue-based methods. c Select Lexmark Network Port, then click New Port. Print to a queue on a Windows NT server This section explains the setup for queue-based printing where.... (Hint: Start, Settings, Printers, Add Printer.) 26 Configure Network Printer Note: If you are many ways to establish the link between the printer and the queue. Do this queue. d Share the queue. 3 Set up your printer setup process. To use Network Plug and Print to add network support, and select TCP/IP.) 2...
Setup Guide (1.4 MB)
Page 29
...MarkVision and Utilities CD for the initial setup. This gives you access to the Lexmark Network Printer Monitor later. d Select any Windows 95, Windows 98 or Windows NT workstation directly to a Lexmark printer located anywhere on the workstation. A list of LPT1, LPT2, LPT3 or LPT4...Hint: Do a custom install to add network support, and select TCP/IP.) 2 Create a printer object on the screen until it . Configure Network Printer 27 a Select the newly created printer object in the box labeled Print to associate with the physical printer. Windows NT: Click File, Properties, Ports...
...MarkVision and Utilities CD for the initial setup. This gives you access to the Lexmark Network Printer Monitor later. d Select any Windows 95, Windows 98 or Windows NT workstation directly to a Lexmark printer located anywhere on the workstation. A list of LPT1, LPT2, LPT3 or LPT4...Hint: Do a custom install to add network support, and select TCP/IP.) 2 Create a printer object on the screen until it . Configure Network Printer 27 a Select the newly created printer object in the box labeled Print to associate with the physical printer. Windows NT: Click File, Properties, Ports...
Setup Guide (1.4 MB)
Page 30
... Gateway. Non-NDPS (queue-based) The easiest way to configure the printer for the software. (Hint: Do a custom install to add network support, and select NetWare.) 2 Launch MarkVision. MarkVision automatically creates all support files and installation procedures from the Lexmark Web site (www.lexmark.com) or from a Windows 95 or Windows 98 workstation running either...
... Gateway. Non-NDPS (queue-based) The easiest way to configure the printer for the software. (Hint: Do a custom install to add network support, and select NetWare.) 2 Launch MarkVision. MarkVision automatically creates all support files and installation procedures from the Lexmark Web site (www.lexmark.com) or from a Windows 95 or Windows 98 workstation running either...

Setup Guide (1.4 MB)
Page 33
... warranty alternatives and the nearest Lexmark authorized servicer in good working order. The replacement may be a new or repaired item. Statement of original purchase as shown on the purchase receipt. For customers outside the U.S. Optra T Laser Printers This Statement of extended warranty ...this product does not function as "Remarketer." For further explanation of this product to Lexmark's official published specifications, and • Is in your printer. Free remote technical support is used parts, which it prepaid and suitably packaged to present the feature or ...
... warranty alternatives and the nearest Lexmark authorized servicer in good working order. The replacement may be a new or repaired item. Statement of original purchase as shown on the purchase receipt. For customers outside the U.S. Optra T Laser Printers This Statement of extended warranty ...this product does not function as "Remarketer." For further explanation of this product to Lexmark's official published specifications, and • Is in your printer. Free remote technical support is used parts, which it prepaid and suitably packaged to present the feature or ...


