
User's Guide (2 MB)
Page 2
... about choosing the correct print material. • MarkVision™ Printer Utility to open documents containing information about Lexmark printers. Access our site on the World Wide Web for updated printer drivers, utilities, and documentation: www.lexmark.com User's Guide 2 Other sources of information Drivers, MarkVision and Utilities CD Lexmark Web site In addition to open documents providing details...
... about choosing the correct print material. • MarkVision™ Printer Utility to open documents containing information about Lexmark printers. Access our site on the World Wide Web for updated printer drivers, utilities, and documentation: www.lexmark.com User's Guide 2 Other sources of information Drivers, MarkVision and Utilities CD Lexmark Web site In addition to open documents providing details...
User's Guide (2 MB)
Page 5
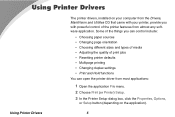
... printing • Changing duplex settings • Print and Hold functions You can open the printer driver from almost any software application. Using Printer Drivers Using Printer Drivers The printer drivers, installed on your computer from the Drivers, MarkVision and Utilities CD that came with your printer, provide you can control include: • Choosing paper sources • Changing page orientation •...
... printing • Changing duplex settings • Print and Hold functions You can open the printer driver from almost any software application. Using Printer Drivers Using Printer Drivers The printer drivers, installed on your computer from the Drivers, MarkVision and Utilities CD that came with your printer, provide you can control include: • Choosing paper sources • Changing page orientation •...
User's Guide (2 MB)
Page 6
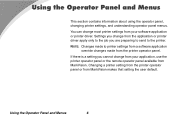
... from a software application override changes made from MarkVision makes that setting the user default. Changing a printer setting from the printer operator panel or from the printer operator panel. Settings you change from the application or printer driver apply only to the printer. Using the Operator Panel and Menus 6 You can change from your application, use the...
... from a software application override changes made from MarkVision makes that setting the user default. Changing a printer setting from the printer operator panel or from the printer operator panel. Settings you change from the application or printer driver apply only to the printer. Using the Operator Panel and Menus 6 You can change from your application, use the...
User's Guide (2 MB)
Page 18
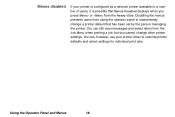
Menus disabled If your printer is configured as a network printer available to a number of users, it is possible that Menus Disabled displays when you press Menu> or
Menus disabled If your printer is configured as a network printer available to a number of users, it is possible that Menus Disabled displays when you press Menu> or

User's Guide (2 MB)
Page 20
... print material you use . Always print samples on the Drivers, MarkVision and Utilities CD. NOTE: If you use a paper size not listed, select the next larger size. Choosing Print Materials Print materials The print quality and feed reliability you get with the printer and options can select from the PAPER SIZE menu...
... print material you use . Always print samples on the Drivers, MarkVision and Utilities CD. NOTE: If you use a paper size not listed, select the next larger size. Choosing Print Materials Print materials The print quality and feed reliability you get with the printer and options can select from the PAPER SIZE menu...
User's Guide (2 MB)
Page 26
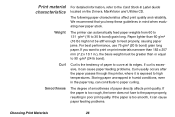
The printer can automatically feed paper weights from 60 to 131 g/m2 (16 to feed properly, causing paper jams. For best performance, use 75 g/m2 (20 lb ... quality. If the paper is too smooth, it is excessive, it can cause paper feeding problems. Curl usually occurs after the paper passes through the printer, where it can contribute to the Card Stock & Label Guide located on print materials narrower than or equal to curve at its edges. We recommend...
The printer can automatically feed paper weights from 60 to 131 g/m2 (16 to feed properly, causing paper jams. For best performance, use 75 g/m2 (20 lb ... quality. If the paper is too smooth, it is excessive, it can cause paper feeding problems. Curl usually occurs after the paper passes through the printer, where it can contribute to the Card Stock & Label Guide located on print materials narrower than or equal to curve at its edges. We recommend...
User's Guide (2 MB)
Page 36
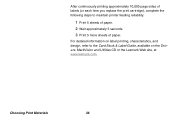
After continuously printing approximately 10,000 page sides of paper. For detailed information on label printing, characteristics, and design, refer to maintain printer feeding reliability: 1 Print 5 sheets of paper. 2 Wait approximately 5 seconds. 3 Print 5 more sheets of labels (or each time you replace the print cartridge), complete the following steps to the Card Stock & Label Guide, available on the Drivers, MarkVision and Utilities CD or the Lexmark Web site, at www.lexmark.com. Choosing Print Materials 36
After continuously printing approximately 10,000 page sides of paper. For detailed information on label printing, characteristics, and design, refer to maintain printer feeding reliability: 1 Print 5 sheets of paper. 2 Wait approximately 5 seconds. 3 Print 5 more sheets of labels (or each time you replace the print cartridge), complete the following steps to the Card Stock & Label Guide, available on the Drivers, MarkVision and Utilities CD or the Lexmark Web site, at www.lexmark.com. Choosing Print Materials 36

User's Guide (2 MB)
Page 38
For more sheets of paper. 2 Wait approximately 5 seconds. 3 Print 5 more information, refer to maintain printer feeding reliability: 1 Print 5 sheets of paper. After printing approximately 10,000 page sides of card stock (or each time you replace the print cartridge), complete the following steps to the Card Stock & Label Guide, available on the Drivers, MarkVision and Utilities CD or the Lexmark Web site, at www.lexmark.com. Choosing Print Materials 38
For more sheets of paper. 2 Wait approximately 5 seconds. 3 Print 5 more information, refer to maintain printer feeding reliability: 1 Print 5 sheets of paper. After printing approximately 10,000 page sides of card stock (or each time you replace the print cartridge), complete the following steps to the Card Stock & Label Guide, available on the Drivers, MarkVision and Utilities CD or the Lexmark Web site, at www.lexmark.com. Choosing Print Materials 38

User's Guide (2 MB)
Page 39
... (414oF), depending on the Drivers, MarkVision and Utilities CD. Transparencies can print directly on the transparencies you handle transparencies. Use only transparencies that heat transparencies to determine whether your transparencies are usable with laser printers that are considering before buying ... should be fed automatically from the multipurpose feeder and all printer models. Always print samples on transparencies designed for all standard and optional trays, except the 2000-sheet drawer, for use in laser printers. Fingerprints on the transparency used.
... (414oF), depending on the Drivers, MarkVision and Utilities CD. Transparencies can print directly on the transparencies you handle transparencies. Use only transparencies that heat transparencies to determine whether your transparencies are usable with laser printers that are considering before buying ... should be fed automatically from the multipurpose feeder and all printer models. Always print samples on transparencies designed for all standard and optional trays, except the 2000-sheet drawer, for use in laser printers. Fingerprints on the transparency used.

User's Guide (2 MB)
Page 106
We recommend a minimum of 8MB available printer memory. You can specify in the driver that you want to retrieve it immediately. When sending a job to the printer, you can use the operator panel menus to identify which held jobs, go to the printer and use this function to: • Request extra copies of held job...
We recommend a minimum of 8MB available printer memory. You can specify in the driver that you want to retrieve it immediately. When sending a job to the printer, you can use the operator panel menus to identify which held jobs, go to the printer and use this function to: • Request extra copies of held job...

User's Guide (2 MB)
Page 107
...specify what you sent the job. If you select Confidential Job, you must enter the personal identification number (PIN) you specified in the driver when you want to the printer. Use caution when selecting this option. From either the Confidential Job or the Held Jobs menu items, you have five choices: •... select Delete All Jobs from the Held Jobs menu item, you will delete all Repeat Print, Reserve Print, and Verify Print jobs stored in printer memory, whether they are stored in your network group sent to do with one or more information. Using the Print and Hold Function 107 See...
...specify what you sent the job. If you select Confidential Job, you must enter the personal identification number (PIN) you specified in the driver when you want to the printer. Use caution when selecting this option. From either the Confidential Job or the Held Jobs menu items, you have five choices: •... select Delete All Jobs from the Held Jobs menu item, you will delete all Repeat Print, Reserve Print, and Verify Print jobs stored in printer memory, whether they are stored in your network group sent to do with one or more information. Using the Print and Hold Function 107 See...

User's Guide (2 MB)
Page 112
...additional copies stored in memory. When you select Confidential Job from the driver. This ensures that the job does not print until you enter the same four-digit PIN from the printer operator panel and choose to the printer, you can print the job. The PIN must be four digits...=____ Using the Print and Hold Function 112 Verify print If you send a Verify Print job, the printer prints one copy and holds the remaining copies you requested from the driver in printer memory until you are printed, the Verify Print job is satisfactory before printing the remaining copies. See "...
...additional copies stored in memory. When you select Confidential Job from the driver. This ensures that the job does not print until you enter the same four-digit PIN from the printer operator panel and choose to the printer, you can print the job. The PIN must be four digits...=____ Using the Print and Hold Function 112 Verify print If you send a Verify Print job, the printer prints one copy and holds the remaining copies you requested from the driver in printer memory until you are printed, the Verify Print job is satisfactory before printing the remaining copies. See "...

User's Guide (2 MB)
Page 115
... problem. • Your printer driver settings are correct. For all other printer problems, refer to the Administrator's Guide or contact your printer has a problem, first make sure that: • The printer power cord is plugged into the printer and a properly grounded electrical outlet. • The printer power switch is on. ...or breaker. • Other electrical equipment plugged into the outlet is working. • You try turning the printer off, then wait for about 10 seconds, and turn the printer on. Solving Printer Problems 115 Solving Printer Problems When your administrator.
... problem. • Your printer driver settings are correct. For all other printer problems, refer to the Administrator's Guide or contact your printer has a problem, first make sure that: • The printer power cord is plugged into the printer and a properly grounded electrical outlet. • The printer power switch is on. ...or breaker. • Other electrical equipment plugged into the outlet is working. • You try turning the printer off, then wait for about 10 seconds, and turn the printer on. Solving Printer Problems 115 Solving Printer Problems When your administrator.
Setup Guide (1.4 MB)
Page 24
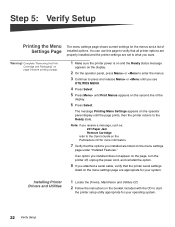
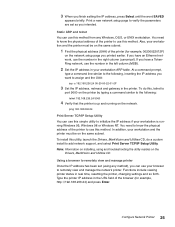
.... 8 If you want. You can use this page to start the printer setup utility appropriate for the menus and a list of the display. 6 Press Select. Installing Printer Drivers and Utilities 1 Locate the Drivers, MarkVision and Utilities CD. 2 Follow the instructions in the booklet included with... the CD to verify that the printer serial settings listed on the second line of installed options. Step...
.... 8 If you want. You can use this page to start the printer setup utility appropriate for the menus and a list of the display. 6 Press Select. Installing Printer Drivers and Utilities 1 Locate the Drivers, MarkVision and Utilities CD. 2 Follow the instructions in the booklet included with... the CD to verify that the printer serial settings listed on the second line of installed options. Step...
Setup Guide (1.4 MB)
Page 26
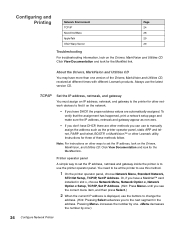
... to manually assign the address such as the printer operator panel, static ARP and telnet, RARP and telnet, BOOTP, or MarkVision™ or other network devices to be at different times with different Lexmark products. About the Drivers, MarkVision and Utilities CD You may have more...for three of the Drivers, MarkVision and Utilities CD, received at the printer to use to use the latest version CD. Printer operator panel A simple way to set the IP address, look for other Lexmark utility. Instructions for the MarkNet link. Always use the printer operator panel. Pressing...
... to manually assign the address such as the printer operator panel, static ARP and telnet, RARP and telnet, BOOTP, or MarkVision™ or other network devices to be at different times with different Lexmark products. About the Drivers, MarkVision and Utilities CD You may have more...for three of the Drivers, MarkVision and Utilities CD, received at the printer to use to use the latest version CD. Printer operator panel A simple way to set the IP address, look for other Lexmark utility. Instructions for the MarkNet link. Always use the printer operator panel. Pressing...
Setup Guide (1.4 MB)
Page 27
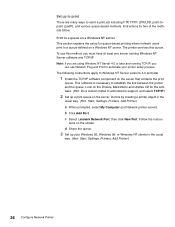
...You can use this method from any method), you want to the following : telnet 192.168.236.24 9000 4 Verify that the printer is running on the Drivers, MarkVision and Utilities CD. Using a browser to add network support, and select Print Server TCP/IP Setup Utility. To do this ...utility, launch the Drivers, MarkVision and Utilities CD, do a custom install to remotely view and manage printer Once the IP address has been set as you finish setting the IP address, press Select until the ...
...You can use this method from any method), you want to the following : telnet 192.168.236.24 9000 4 Verify that the printer is running on the Drivers, MarkVision and Utilities CD. Using a browser to add network support, and select Print Server TCP/IP Setup Utility. To do this ...utility, launch the Drivers, MarkVision and Utilities CD, do a custom install to remotely view and manage printer Once the IP address has been set as you finish setting the IP address, press Select until the ...
Setup Guide (1.4 MB)
Page 28
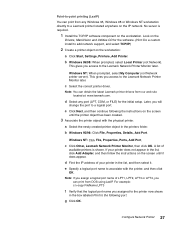
c Select Lexmark Network Port, then click New Port. Follow the instruc- The printer services this by creating a printer object in the usual way. (Hint: Start, Settings, Printers, Add Printer.) 26 Configure Network Printer Look on the Drivers, MarkVision and Utilities CD for the software. (Hint: Do a custom install to ...your Windows 95, Windows 98, or Windows NT clients in the usual way. (Hint: Start, Settings, Printers, Add Printer.) a When prompted, select My Computer (not Network printer server). b Click Add Port. Set up to print There are using Windows NT Server 4.0 or later ...
c Select Lexmark Network Port, then click New Port. Follow the instruc- The printer services this by creating a printer object in the usual way. (Hint: Start, Settings, Printers, Add Printer.) 26 Configure Network Printer Look on the Drivers, MarkVision and Utilities CD for the software. (Hint: Do a custom install to ...your Windows 95, Windows 98, or Windows NT clients in the usual way. (Hint: Start, Settings, Printers, Add Printer.) a When prompted, select My Computer (not Network printer server). b Click Add Port. Set up to print There are using Windows NT Server 4.0 or later ...
Setup Guide (1.4 MB)
Page 29
...: Click File, Properties, Ports, Add Port. This gives you can obtain the latest Lexmark printer drivers from our web site located at: www.lexmark.com. b Windows 95/98: Click File, Properties, Details, Add Port. No server is shown. c Click Other, Lexmark Network Printer Monitor, then click OK. Point-to-point printing (LexIP) You can print from...
...: Click File, Properties, Ports, Add Port. This gives you can obtain the latest Lexmark printer drivers from our web site located at: www.lexmark.com. b Windows 95/98: Click File, Properties, Details, Add Port. No server is shown. c Click Other, Lexmark Network Printer Monitor, then click OK. Point-to-point printing (LexIP) You can print from...
Setup Guide (1.4 MB)
Page 30
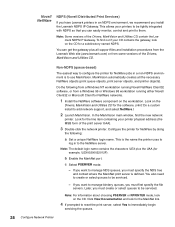
... or Windows 98 workstation running Novell NetWare Client32 software, or from some versions of the Drivers, MarkVision and Utilities CD. This allows your printer physical address (the MSB form of the Drivers, MarkVision and Utilities CD, contain the Lexmark NDPS IP Gateway. c Select PSERVER mode. - If you want to be tightly integrated with NDPS...
... or Windows 98 workstation running Novell NetWare Client32 software, or from some versions of the Drivers, MarkVision and Utilities CD. This allows your printer physical address (the MSB form of the Drivers, MarkVision and Utilities CD, contain the Lexmark NDPS IP Gateway. c Select PSERVER mode. - If you want to be tightly integrated with NDPS...
Setup Guide (1.4 MB)
Page 31
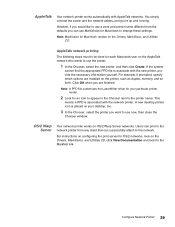
...system cannot find the appropriate PPD file to the network. Note: A PPD file customizes the LaserWriter driver for your desktop, too. 3 In the Chooser, select the printer you can print to the network printer from the defaults you want to use MarkVision for an icon to appear in the Chooser next ...to the printer name. Users can use now, then close the Chooser window. This means a PPD is placed on the Drivers, MarkVision, and Utilities CD. Click OK when you 're up and running. For instructions ...
...system cannot find the appropriate PPD file to the network. Note: A PPD file customizes the LaserWriter driver for your desktop, too. 3 In the Chooser, select the printer you can print to the network printer from the defaults you want to use MarkVision for an icon to appear in the Chooser next ...to the printer name. Users can use now, then close the Chooser window. This means a PPD is placed on the Drivers, MarkVision, and Utilities CD. Click OK when you 're up and running. For instructions ...

