Setup Guide (1.4 MB)
Page 4
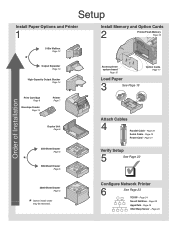
...OS/2 Warp Server - Setup Install Paper Options and Printer 1 Install Memory and Option Cards 2 Printer/Flash Memory Page 16 5-Bin Mailbox Page 12 * Output Expander Page 10 High-Capacity Output Stacker Page 14 Print Cartridge Page 9 Envelope Feeder Page 14 Printer Page 7 Duplex Unit Page 6 250-Sheet Drawer... Page 5 * 500-Sheet Drawer Page 5 Access printer system board Page 15 Load Paper 3 See Page 19 Option Cards Page ...
...OS/2 Warp Server - Setup Install Paper Options and Printer 1 Install Memory and Option Cards 2 Printer/Flash Memory Page 16 5-Bin Mailbox Page 12 * Output Expander Page 10 High-Capacity Output Stacker Page 14 Print Cartridge Page 9 Envelope Feeder Page 14 Printer Page 7 Duplex Unit Page 6 250-Sheet Drawer... Page 5 * 500-Sheet Drawer Page 5 Access printer system board Page 15 Load Paper 3 See Page 19 Option Cards Page ...
Setup Guide (1.4 MB)
Page 11
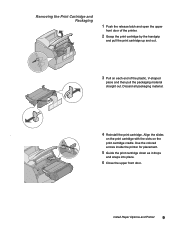
... the slots on each end of the printer. 2 Grasp the print cartridge by the handgrip and pull the print cartridge up and out. 3 Pull on the print cartridge cradle. Discard all packaging material. . 4 Reinstall the print cartridge. Use the colored arrows inside the printer for placement. 5 Guide the print cartridge down as it drops and snaps into...
... the slots on each end of the printer. 2 Grasp the print cartridge by the handgrip and pull the print cartridge up and out. 3 Pull on the print cartridge cradle. Discard all packaging material. . 4 Reinstall the print cartridge. Use the colored arrows inside the printer for placement. 5 Guide the print cartridge down as it drops and snaps into...
Setup Guide (1.4 MB)
Page 24
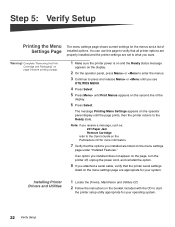
You can use this page to verify that all printer options are properly installed and the printer settings are appropriate for your system. Complete "Removing the Print Cartridge and Packaging" on page 9 before printing a page. 1 Make sure the printer power is on and the Ready status message appears ... shows current settings for more information. 7 Verify that the printer serial settings listed on the menu settings page under "Installed Features." Note: If you receive a message, such as: 201 Paper Jam Remove Cartridge refer to what you installed are listed on the menu settings...
You can use this page to verify that all printer options are properly installed and the printer settings are appropriate for your system. Complete "Removing the Print Cartridge and Packaging" on page 9 before printing a page. 1 Make sure the printer power is on and the Ready status message appears ... shows current settings for more information. 7 Verify that the printer serial settings listed on the menu settings page under "Installed Features." Note: If you receive a message, such as: 201 Paper Jam Remove Cartridge refer to what you installed are listed on the menu settings...
Setup Guide (1.4 MB)
Page 34
... set forth in the following paragraph. You may also have installed a maintenance kit as toner cartridges, inkjet cartridges, and ribbons) • use of other economic consequential damages. Lexmark's liability for actual damages from state to the limit set forth in this Statement of Limited ... or tangible personal property for which vary from any cause whatsoever will be liable for any claim concerning performance or nonperformance of Lexmark or a Remarketer for the product that caused the damages. Warranty service does not include repair of failures caused by: •...
... set forth in the following paragraph. You may also have installed a maintenance kit as toner cartridges, inkjet cartridges, and ribbons) • use of other economic consequential damages. Lexmark's liability for actual damages from state to the limit set forth in this Statement of Limited ... or tangible personal property for which vary from any cause whatsoever will be liable for any claim concerning performance or nonperformance of Lexmark or a Remarketer for the product that caused the damages. Warranty service does not include repair of failures caused by: •...


