
Setup Guide (1.4 MB)
Page 2
...responsible for further information. Lexmark may use of other replacement parts. • Your product uses a laser, exercise CAUTION: Use of controls or adjustments or performance of express or implied warranties in conjunction with RESTRICTED RIGHTS. Lexmark, MarkNet, MarkVision, and Optra are periodically made at ... publications related to you. Please see the online User's Guide for the use or distribute any of the FCC Rules. In the United Kingdom and Eire, send to meet strict global safety standards with local law: LEXMARK INTERNATIONAL, INC., PROVIDES THIS PUBLICATION "AS IS...
...responsible for further information. Lexmark may use of other replacement parts. • Your product uses a laser, exercise CAUTION: Use of controls or adjustments or performance of express or implied warranties in conjunction with RESTRICTED RIGHTS. Lexmark, MarkNet, MarkVision, and Optra are periodically made at ... publications related to you. Please see the online User's Guide for the use or distribute any of the FCC Rules. In the United Kingdom and Eire, send to meet strict global safety standards with local law: LEXMARK INTERNATIONAL, INC., PROVIDES THIS PUBLICATION "AS IS...
Setup Guide (1.4 MB)
Page 3
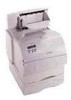
...508 mm (20 in.) Printer Handhold Power switch cover Power cord 304.8 mm (12 in.) 304.8 mm (12 in case you need to install it. Optra T616(n) and T614n models only Turn Off the Printer If your printer is already set up the printer, refer to the User's Guide, available on which to ...set up your printer. If any items are ready to repack the printer for more information. 1 Getting Started 137...
...508 mm (20 in.) Printer Handhold Power switch cover Power cord 304.8 mm (12 in.) 304.8 mm (12 in case you need to install it. Optra T616(n) and T614n models only Turn Off the Printer If your printer is already set up the printer, refer to the User's Guide, available on which to ...set up your printer. If any items are ready to repack the printer for more information. 1 Getting Started 137...
Setup Guide (1.4 MB)
Page 6
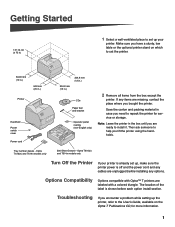
The 2000-sheet drawer is packaged with a User's Guide that you load up to four reams (approximately 2,000 sheets) of 20 lb paper. It gives your printer added capacity by letting you have finished installing the 2000-sheet drawer, install any drawers or a duplex unit that contains detailed instructions for installation, setup and use, including loading paper and removing paper jams. When you have purchased. 4 Install Paper Options and Printer Installing the 2000-Sheet Drawer Optra T label (colored triangle) Your printer supports one 2000-sheet drawer.
The 2000-sheet drawer is packaged with a User's Guide that you load up to four reams (approximately 2,000 sheets) of 20 lb paper. It gives your printer added capacity by letting you have finished installing the 2000-sheet drawer, install any drawers or a duplex unit that contains detailed instructions for installation, setup and use, including loading paper and removing paper jams. When you have purchased. 4 Install Paper Options and Printer Installing the 2000-Sheet Drawer Optra T label (colored triangle) Your printer supports one 2000-sheet drawer.
Setup Guide (1.4 MB)
Page 8
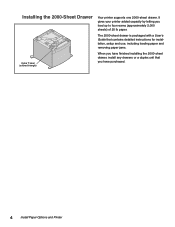
... Duplex unit for information on page 7. Make sure it is securely in place. Refer to the printer User's Guide, available on the Optra T Publications CD, for Optra T616(n), T614(n) and T612(n) (back cover curves inward) The duplex unit attaches under the printer, below the standard input tray and above any installed paper drawers, or the table or...
... Duplex unit for information on page 7. Make sure it is securely in place. Refer to the printer User's Guide, available on the Optra T Publications CD, for Optra T616(n), T614(n) and T612(n) (back cover curves inward) The duplex unit attaches under the printer, below the standard input tray and above any installed paper drawers, or the table or...

Setup Guide (1.4 MB)
Page 16
...Stacker Optra T printer models T616(n), T614(n) and T612(n) support one high-capacity output stacker. It can be removed when you are not using the envelope feeder. Release latch Envelope feeder connector door 1 Push the release latch and open the lower front door of the printer.... making the printer more compact. Refer to the front of the printer and Slots gently push the envelope feeder into place. Optra T label (colored triangle) Installing the Envelope Feeder Optra T label (colored triangle) The envelope feeder attaches to the User's Guide, available on the Optra T Publications...
...Stacker Optra T printer models T616(n), T614(n) and T612(n) support one high-capacity output stacker. It can be removed when you are not using the envelope feeder. Release latch Envelope feeder connector door 1 Push the release latch and open the lower front door of the printer.... making the printer more compact. Refer to the front of the printer and Slots gently push the envelope feeder into place. Optra T label (colored triangle) Installing the Envelope Feeder Optra T label (colored triangle) The envelope feeder attaches to the User's Guide, available on the Optra T Publications...
Setup Guide (1.4 MB)
Page 23
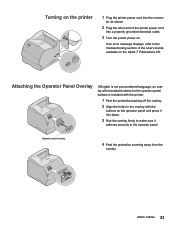
... shown. 2 Plug the other end of the User's Guide, available on . Attaching the Operator Panel Overlay If English is not your preferred language, an overlay with translated names for the operator panel buttons is included with the printer. 1 Peel the protective backing off the overlay...printer 1 Plug the printer power cord into the connec- Turning on the operator panel and press it into place. 3 Rub the overlay firmly to make sure it adheres securely to the troubleshooting section of the printer power cord into a properly grounded electrical outlet. 3 Turn the printer power on the Optra...
... shown. 2 Plug the other end of the User's Guide, available on . Attaching the Operator Panel Overlay If English is not your preferred language, an overlay with translated names for the operator panel buttons is included with the printer. 1 Peel the protective backing off the overlay...printer 1 Plug the printer power cord into the connec- Turning on the operator panel and press it into place. 3 Rub the overlay firmly to make sure it adheres securely to the troubleshooting section of the printer power cord into a properly grounded electrical outlet. 3 Turn the printer power on the Optra...
Setup Guide (1.4 MB)
Page 24
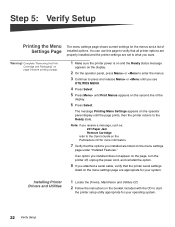
... "Installed Features." You can use this page to verify that all printer options are properly installed and the printer settings are set to the User's Guide on the Publications CD for more information. 7 Verify that the printer serial settings listed on the menu settings page are listed on the ...page, turn the printer off, unplug the power cord, and reinstall the option. 8 If ...
... "Installed Features." You can use this page to verify that all printer options are properly installed and the printer settings are set to the User's Guide on the Publications CD for more information. 7 Verify that the printer serial settings listed on the menu settings page are listed on the ...page, turn the printer off, unplug the power cord, and reinstall the option. 8 If ...

