
User's Guide (2 MB)
Page 2
... the World Wide Web for updated printer drivers, utilities, and documentation: www.lexmark.com User's Guide 2 Other sources of information Drivers, MarkVision and Utilities CD Lexmark Web site In addition to open documents providing details about the MarkVision printer management software. • MarkNet™ Print Servers to printer drivers and utilities, the Drivers, MarkVision and Utilities CD includes information...
... the World Wide Web for updated printer drivers, utilities, and documentation: www.lexmark.com User's Guide 2 Other sources of information Drivers, MarkVision and Utilities CD Lexmark Web site In addition to open documents providing details about the MarkVision printer management software. • MarkNet™ Print Servers to printer drivers and utilities, the Drivers, MarkVision and Utilities CD includes information...
User's Guide (2 MB)
Page 5
Using Printer Drivers Using Printer Drivers The printer drivers, installed on the application). 5 Some of the things you with powerful control of print jobs • Resetting printer defaults • Multipage printing • Changing duplex settings &#...printer features from most applications: 1 Open the application File menu. 2 Choose Print (or Printer) Setup. 3 In the Printer Setup dialog box, click the Properties, Options, or Setup button (depending on your computer from the Drivers, MarkVision and Utilities CD that came with your printer, provide you can open the printer driver...
Using Printer Drivers Using Printer Drivers The printer drivers, installed on the application). 5 Some of the things you with powerful control of print jobs • Resetting printer defaults • Multipage printing • Changing duplex settings &#...printer features from most applications: 1 Open the application File menu. 2 Choose Print (or Printer) Setup. 3 In the Printer Setup dialog box, click the Properties, Options, or Setup button (depending on your computer from the Drivers, MarkVision and Utilities CD that came with your printer, provide you can open the printer driver...
User's Guide (2 MB)
Page 6
... made from MarkVision makes that setting the user default. Changing a printer setting from the printer operator panel or from the printer operator panel. Settings you change from the application or printer driver apply only to the printer. If there is a setting you are preparing to send to... the job you cannot change most printer settings from your application, use the printer operator panel or the remote operator panel available from your software application or printer driver. You can change from MarkVision. Using the Operator Panel and Menus...
... made from MarkVision makes that setting the user default. Changing a printer setting from the printer operator panel or from the printer operator panel. Settings you change from the application or printer driver apply only to the printer. If there is a setting you are preparing to send to... the job you cannot change most printer settings from your application, use the printer operator panel or the remote operator panel available from your software application or printer driver. You can change from MarkVision. Using the Operator Panel and Menus...
User's Guide (2 MB)
Page 18
Menus disabled If your printer is configured as a network printer available to a number of users, it is possible that Menus Disabled displays when you press Menu> or
Menus disabled If your printer is configured as a network printer available to a number of users, it is possible that Menus Disabled displays when you press Menu> or

User's Guide (2 MB)
Page 20
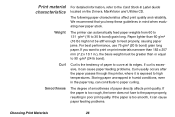
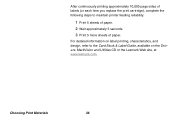
Guidelines are considering before buying large quantities. Choosing Print Materials 20 NOTE: If you can vary with the printer and options can select from the PAPER SIZE menu and supported weights. Paper specifications The following tables give information on standard and optional paper ... materials The print quality and feed reliability you get with the type and size of print material you are provided in this section for your printer model, including the paper sizes you use . For information card stock and labels, refer to the Card Stock & Labels Guide, located on the print...
Guidelines are considering before buying large quantities. Choosing Print Materials 20 NOTE: If you can vary with the printer and options can select from the PAPER SIZE menu and supported weights. Paper specifications The following tables give information on standard and optional paper ... materials The print quality and feed reliability you get with the type and size of print material you are provided in this section for your printer model, including the paper sizes you use . For information card stock and labels, refer to the Card Stock & Labels Guide, located on the print...
User's Guide (2 MB)
Page 26
...long paper. Curl is too rough, the toner does not fuse to high temperatures. The degree of smoothness of paper to paper curling. The printer can contribute to curve at its edges. The following paper characteristics affect print quality and reliability. If the paper is the tendency of paper directly... the basis weight must be greater than 60 g/m2 (16 lb) might not be stiff enough to the Card Stock & Label Guide located on the Drivers, MarkVision and Utilities CD. We recommend that you want to print on print materials narrower than 182 x 257 mm (7.2 x 10.1 in mind when ...
...long paper. Curl is too rough, the toner does not fuse to high temperatures. The degree of smoothness of paper to paper curling. The printer can contribute to curve at its edges. The following paper characteristics affect print quality and reliability. If the paper is the tendency of paper directly... the basis weight must be greater than 60 g/m2 (16 lb) might not be stiff enough to the Card Stock & Label Guide located on the Drivers, MarkVision and Utilities CD. We recommend that you want to print on print materials narrower than 182 x 257 mm (7.2 x 10.1 in mind when ...
User's Guide (2 MB)
Page 36
After continuously printing approximately 10,000 page sides of labels (or each time you replace the print cartridge), complete the following steps to the Card Stock & Label Guide, available on label printing, characteristics, and design, refer to maintain printer feeding reliability: 1 Print 5 sheets of paper. 2 Wait approximately 5 seconds. 3 Print 5 more sheets of paper. For detailed information on the Drivers, MarkVision and Utilities CD or the Lexmark Web site, at www.lexmark.com. Choosing Print Materials 36
After continuously printing approximately 10,000 page sides of labels (or each time you replace the print cartridge), complete the following steps to the Card Stock & Label Guide, available on label printing, characteristics, and design, refer to maintain printer feeding reliability: 1 Print 5 sheets of paper. 2 Wait approximately 5 seconds. 3 Print 5 more sheets of paper. For detailed information on the Drivers, MarkVision and Utilities CD or the Lexmark Web site, at www.lexmark.com. Choosing Print Materials 36

User's Guide (2 MB)
Page 38
After printing approximately 10,000 page sides of paper. Choosing Print Materials 38 For more information, refer to maintain printer feeding reliability: 1 Print 5 sheets of paper. 2 Wait approximately 5 seconds. 3 Print 5 more sheets of card stock (or each time you replace the print cartridge), complete the following steps to the Card Stock & Label Guide, available on the Drivers, MarkVision and Utilities CD or the Lexmark Web site, at www.lexmark.com.
After printing approximately 10,000 page sides of paper. Choosing Print Materials 38 For more information, refer to maintain printer feeding reliability: 1 Print 5 sheets of paper. 2 Wait approximately 5 seconds. 3 Print 5 more sheets of card stock (or each time you replace the print cartridge), complete the following steps to the Card Stock & Label Guide, available on the Drivers, MarkVision and Utilities CD or the Lexmark Web site, at www.lexmark.com.
User's Guide (2 MB)
Page 39
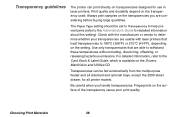
...can print directly on transparencies designed for all standard and optional trays, except the 2000-sheet drawer, for use in laser printers. Fingerprints on the transparency used. Print quality and durability depend on the surface of the transparency cause poor print quality....information, refer to 180oC (356oF) or 212oC (414oF), depending on the setting. Check with laser printers that heat transparencies to the Card Stock & Label Guide, which is available on the Drivers, MarkVision and Utilities CD. Always print samples on the transparencies you handle transparencies. Use only ...
...can print directly on transparencies designed for all standard and optional trays, except the 2000-sheet drawer, for use in laser printers. Fingerprints on the transparency used. Print quality and durability depend on the surface of the transparency cause poor print quality....information, refer to 180oC (356oF) or 212oC (414oF), depending on the setting. Check with laser printers that heat transparencies to the Card Stock & Label Guide, which is available on the Drivers, MarkVision and Utilities CD. Always print samples on the transparencies you handle transparencies. Use only ...

User's Guide (2 MB)
Page 106
... can use the operator panel menus to identify which held jobs, go to the printer and use this function to: • Request extra copies of held job you want the printer to hold the job in the driver that you are ready to print the job, you must go to the page indicated.... You can specify in memory and not print it . Using the Print and Hold Function NOTE: Print and Hold functions require a minimum of 16MB available printer memory and a hard disk. For more information about each of the four types of a job at a later time. • Delay printing a job. • Verify one...
... can use the operator panel menus to identify which held jobs, go to the printer and use this function to: • Request extra copies of held job you want the printer to hold the job in the driver that you are ready to print the job, you must go to the page indicated.... You can specify in memory and not print it . Using the Print and Hold Function NOTE: Print and Hold functions require a minimum of 16MB available printer memory and a hard disk. For more information about each of the four types of a job at a later time. • Delay printing a job. • Verify one...

User's Guide (2 MB)
Page 107
From the Job Menu, you can use the printer operator panel to specify what you want to do with one or more...you select Confidential Job, you must enter the personal identification number (PIN) you specified in your network group sent to the printer. From either the Confidential Job or the Held Jobs menu items, you have five choices: • Print all jobs &#...menu item, you will delete all Repeat Print, Reserve Print, and Verify Print jobs stored in printer memory, whether they are stored in printer memory, you can select either Confidential Job or Held Jobs (Repeat Print, Reserve Print, and ...
From the Job Menu, you can use the printer operator panel to specify what you want to do with one or more...you select Confidential Job, you must enter the personal identification number (PIN) you specified in your network group sent to the printer. From either the Confidential Job or the Held Jobs menu items, you have five choices: • Print all jobs &#...menu item, you will delete all Repeat Print, Reserve Print, and Verify Print jobs stored in printer memory, whether they are stored in printer memory, you can select either Confidential Job or Held Jobs (Repeat Print, Reserve Print, and ...

User's Guide (2 MB)
Page 112
... held in memory. When you need help printing the additional copies stored in printer memory until you are printed, the Verify Print job is deleted from the driver. Verify print If you send a Verify Print job, the printer prints one else using the numbers 1-6. This ensures that the job does not...the first copy to see if it , and no one copy and holds the remaining copies you requested from the driver in printer memory. NOTE: Once all copies are there to the printer, you enter the same four-digit PIN from the Job Menu, the following prompt displays: Enter PIN: =____ ...
... held in memory. When you need help printing the additional copies stored in printer memory until you are printed, the Verify Print job is deleted from the driver. Verify print If you send a Verify Print job, the printer prints one else using the numbers 1-6. This ensures that the job does not...the first copy to see if it , and no one copy and holds the remaining copies you requested from the driver in printer memory. NOTE: Once all copies are there to the printer, you enter the same four-digit PIN from the Job Menu, the following prompt displays: Enter PIN: =____ ...

User's Guide (2 MB)
Page 115
... fixes the problem. • Your printer driver settings are correct. Solving Printer Problems 115 For all other printer problems, refer to the Administrator's Guide or contact your printer has a problem, first make sure that: • The printer power cord is plugged into the printer and a properly grounded electrical outlet. • The printer power switch is on. • The...
... fixes the problem. • Your printer driver settings are correct. Solving Printer Problems 115 For all other printer problems, refer to the Administrator's Guide or contact your printer has a problem, first make sure that: • The printer power cord is plugged into the printer and a properly grounded electrical outlet. • The printer power switch is on. • The...

Administrator's Guide (1.4 MB)
Page 2
... Servers to printer drivers and utilities, the Drivers, MarkVision and Utilities CD includes information about configuring MarkNet print servers. Other sources of information Drivers, MarkVision and Utilities CD In addition to open documents containing information about Lexmark printers. Lexmark Web site Access our site on the World Wide Web for updated printer drivers, utilities, and documentation: www.lexmark.com Administrator...
... Servers to printer drivers and utilities, the Drivers, MarkVision and Utilities CD includes information about configuring MarkNet print servers. Other sources of information Drivers, MarkVision and Utilities CD In addition to open documents containing information about Lexmark printers. Lexmark Web site Access our site on the World Wide Web for updated printer drivers, utilities, and documentation: www.lexmark.com Administrator...

Administrator's Guide (1.4 MB)
Page 28
... as specified by the Copies setting. Select Collation from the printer operator panel or from the printer driver. This requires additional time since the printer must recognize this printer feature and not send the job to the printer multiple times. This saves processing time for the printer and for Copies. For best results, select Collated in the...
... as specified by the Copies setting. Select Collation from the printer operator panel or from the printer driver. This requires additional time since the printer must recognize this printer feature and not send the job to the printer multiple times. This saves processing time for the printer and for Copies. For best results, select Collated in the...

Administrator's Guide (1.4 MB)
Page 38
...name in this field. When a valid PIN is called timesheet, the operator panel may choose to another name in your driver. Note: CONFIDENTIAL JOB does not display until you send the job. You can change this field to : Print All ...All Jobs DELETE A JOB Note: Only confidential jobs associated with the entered PIN display. Printing is delayed until the printer has processed at least one or both of the fields is empty, the name was not defined by the application ... to the User's Guide for more details. Username is your software application or printer driver to the job.
...name in this field. When a valid PIN is called timesheet, the operator panel may choose to another name in your driver. Note: CONFIDENTIAL JOB does not display until you send the job. You can change this field to : Print All ...All Jobs DELETE A JOB Note: Only confidential jobs associated with the entered PIN display. Printing is delayed until the printer has processed at least one or both of the fields is empty, the name was not defined by the application ... to the User's Guide for more details. Username is your software application or printer driver to the job.

Administrator's Guide (1.4 MB)
Page 41
...Menu item HELD JOBS (continued) *Factory default Values Username is based on the username field in printer memory for printing at a later time. You can change this field to another name in the driver before printing the other copies. Jobname contains the file title name defined by selecting Print All ... to process additional jobs or when the number of Repeat Jobs stored exceeds the value of the fields is unsatisfactory, select DELETE A JOB from printer memory. If the job is empty, the name was not defined by the application. When you select HELD JOBS, you create a Reserve Print...
...Menu item HELD JOBS (continued) *Factory default Values Username is based on the username field in printer memory for printing at a later time. You can change this field to another name in the driver before printing the other copies. Jobname contains the file title name defined by selecting Print All ... to process additional jobs or when the number of Repeat Jobs stored exceeds the value of the fields is unsatisfactory, select DELETE A JOB from printer memory. If the job is empty, the name was not defined by the application. When you select HELD JOBS, you create a Reserve Print...

Administrator's Guide (1.4 MB)
Page 59
...Select VIEW FACTORY DEF to view the factory default values assigned to a paper source. Refer to the Technical Reference for your printer to work with printer drivers or applications that use the factory default paper source assignments. PCL Emul Menu (continued) Menu item TRAY RENUMBER (continued) Auto...to the User's Guide for information on available paper sources for more information about assigning source numbers. Select None if you configure your printer. In the Restore Defaults menu item, select Yes to return all tray assignments to request a given input source. Select Off to use...
...Select VIEW FACTORY DEF to view the factory default values assigned to a paper source. Refer to the Technical Reference for your printer to work with printer drivers or applications that use the factory default paper source assignments. PCL Emul Menu (continued) Menu item TRAY RENUMBER (continued) Auto...to the User's Guide for information on available paper sources for more information about assigning source numbers. Select None if you configure your printer. In the Restore Defaults menu item, select Yes to return all tray assignments to request a given input source. Select Off to use...

Administrator's Guide (1.4 MB)
Page 73
... stored on page 112. or Refer to Off, print jobs are supplied by the specific network card. The job is turned on the Drivers, MarkVision and Utilities CD for this menu item are not buffered. The Job Buffering menu item only displays if the installed hard disk is...) Menu item Values Job Buffering Off* On Job Buffering lets you delay processing of a print job. Note: Changing the Job Buffering setting automatically resets the printer. STD NET SETUP Values for more details. NETWORK x SETUP * Factory default Using the Operator Panel and Menus 73 See "61 Defective Disk" on a...
... stored on page 112. or Refer to Off, print jobs are supplied by the specific network card. The job is turned on the Drivers, MarkVision and Utilities CD for this menu item are not buffered. The Job Buffering menu item only displays if the installed hard disk is...) Menu item Values Job Buffering Off* On Job Buffering lets you delay processing of a print job. Note: Changing the Job Buffering setting automatically resets the printer. STD NET SETUP Values for more details. NETWORK x SETUP * Factory default Using the Operator Panel and Menus 73 See "61 Defective Disk" on a...
Administrator's Guide (1.4 MB)
Page 112
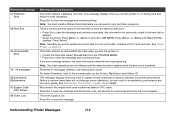
... that was sent. • Press Go to clear the message and continue printing. There is deleted. • Reset the printer. Note: You must install a different hard disk before you turn the printer on, or during hard disk format or write operations. Press Menu> or or Attendance message 61 Defective Disk 62 Disk... Full 63 Unformatted Disk 70 - 79 messages 80 Scheduled Maintenance 81 Engine Code CRC Failure 88 Toner Low Meaning and required action The printer detects a defective hard disk. Press Go to clear the message and continue processing.
... that was sent. • Press Go to clear the message and continue printing. There is deleted. • Reset the printer. Note: You must install a different hard disk before you turn the printer on, or during hard disk format or write operations. Press Menu> or or Attendance message 61 Defective Disk 62 Disk... Full 63 Unformatted Disk 70 - 79 messages 80 Scheduled Maintenance 81 Engine Code CRC Failure 88 Toner Low Meaning and required action The printer detects a defective hard disk. Press Go to clear the message and continue processing.

