Quick Reference
Page 6
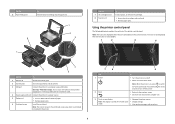
...Use 1 Power 2 Back To • Turn the printer on the current screen. Press and hold seconds to Power Saver mode. Use the 11 Paper feed guard To Prevent items from one menu level to a computer using a USB cable. If an icon is not displayed, then the function is...to the previous screen. • Exit from falling into the paper slot. 1 2 8 3 7 Use the 7 Ink cartridge access 8 Scanner unit To Install, replace, or remove ink cartridges. • Access the ink cartridges and printhead. • Remove paper jams. Using the printer control panel The following diagrams explain the ...
...Use 1 Power 2 Back To • Turn the printer on the current screen. Press and hold seconds to Power Saver mode. Use the 11 Paper feed guard To Prevent items from one menu level to a computer using a USB cable. If an icon is not displayed, then the function is...to the previous screen. • Exit from falling into the paper slot. 1 2 8 3 7 Use the 7 Ink cartridge access 8 Scanner unit To Install, replace, or remove ink cartridges. • Access the ink cartridges and printhead. • Remove paper jams. Using the printer control panel The following diagrams explain the ...
Quick Reference
Page 21
If Troubleshooting does not solve your problem Visit our Web site at support.lexmark.com to find the following: • Knowledgebase articles with the latest information and troubleshooting for your printer • Live online technical support • Contact ...host computer, print server, or other network access point. • Check the printer for error messages, and resolve any errors. • Check for paper jam messages, and clear any jams. • Check the ink cartridges, and install new cartridges if necessary. • Use the Service Center to locate and solve the problem (Windows...
If Troubleshooting does not solve your problem Visit our Web site at support.lexmark.com to find the following: • Knowledgebase articles with the latest information and troubleshooting for your printer • Live online technical support • Contact ...host computer, print server, or other network access point. • Check the printer for error messages, and resolve any errors. • Check for paper jam messages, and clear any jams. • Check the ink cartridges, and install new cartridges if necessary. • Use the Service Center to locate and solve the problem (Windows...

User Guide
Page 7
..., twist, bind, crush, or place heavy objects on the power cord. Use only the power supply and power cord provided with the use of the paper path. Do not pinch the power cord between objects such as furniture and walls. This product is not responsible for clearing...
..., twist, bind, crush, or place heavy objects on the power cord. Use only the power supply and power cord provided with the use of the paper path. Do not pinch the power cord between objects such as furniture and walls. This product is not responsible for clearing...

User Guide
Page 12
...3 USB port Connect the printer to a power source. 5 Duplex unit • Print on both sides of a sheet of paper. • Remove paper jams. 6 Printhead Install, replace, or remove ink cartridges. 7 Scanner unit • Access the ink cartridges and printhead. • Remove... paper jams. About your printer 12 Operate the printer. Hold paper as it exits. Use the 6 Card reader light 7 Wi-Fi indicator 8 Paper exit tray 9 Printer control panel 10 Scanner lid 11 Paper feed guard To Check card reader status. Warning-Potential...
...3 USB port Connect the printer to a power source. 5 Duplex unit • Print on both sides of a sheet of paper. • Remove paper jams. 6 Printhead Install, replace, or remove ink cartridges. 7 Scanner unit • Access the ink cartridges and printhead. • Remove... paper jams. About your printer 12 Operate the printer. Hold paper as it exits. Use the 6 Card reader light 7 Wi-Fi indicator 8 Paper exit tray 9 Printer control panel 10 Scanner lid 11 Paper feed guard To Check card reader status. Warning-Potential...

User Guide
Page 37
...first. • Make sure the adhesive on custom-size paper Before beginning these instructions, load the custom-size paper in a paper jam. c From the Paper Size list of the Print Setup tab, choose a paper size that matches the size of paper from the Paper Type list. If necessary, choose the appropriate type of the...(with areas exposed by missing labels) may cause labels to within 1 mm of the edge of the label sheet. • Make sure the paper guide or paper guides rest against the edges of the label sheet. Printing 37 For Windows users 1 With a document open , choose File > Print. d ...
...first. • Make sure the adhesive on custom-size paper Before beginning these instructions, load the custom-size paper in a paper jam. c From the Paper Size list of the Print Setup tab, choose a paper size that matches the size of paper from the Paper Type list. If necessary, choose the appropriate type of the...(with areas exposed by missing labels) may cause labels to within 1 mm of the edge of the label sheet. • Make sure the paper guide or paper guides rest against the edges of the label sheet. Printing 37 For Windows users 1 With a document open , choose File > Print. d ...
User Guide
Page 101
... not solve your problem Visit our Web site at support.lexmark.com to find the following: • Knowledgebase articles with the latest information and troubleshooting for your printer • Live online technical support • Contact numbers for paper jam messages, and clear any errors. • Check for... connected to the host computer, print server, or other network access point. • Check the printer for error messages, and resolve any jams. • Check the ink cartridges, and install new cartridges if necessary. • Use the Service Center to locate and solve the problem...
... not solve your problem Visit our Web site at support.lexmark.com to find the following: • Knowledgebase articles with the latest information and troubleshooting for your printer • Live online technical support • Contact numbers for paper jam messages, and clear any errors. • Check for... connected to the host computer, print server, or other network access point. • Check the printer for error messages, and resolve any jams. • Check the ink cartridges, and install new cartridges if necessary. • Use the Service Center to locate and solve the problem...

User Guide
Page 106
...Enter, or click OK. Note: If you troubleshoot" checklist does not solve the problem, then try another USB port on page 108 Paper jam in the printer Note: The parts inside the printer are listed, then the USB port is enabled. The USB port is damaged, ... these parts while clearing jams. Troubleshooting 106 REMOVE AND REINSTALL THE PRINTER SOFTWARE Jams and misfeeds troubleshooting • "Paper jam in the printer" on page 106 • "Paper jam in the paper support" on page 107 • "Paper jam in the duplex unit" on page 107 • "Paper or specialty media misfeeds"...
...Enter, or click OK. Note: If you troubleshoot" checklist does not solve the problem, then try another USB port on page 108 Paper jam in the printer Note: The parts inside the printer are listed, then the USB port is enabled. The USB port is damaged, ... these parts while clearing jams. Troubleshooting 106 REMOVE AND REINSTALL THE PRINTER SOFTWARE Jams and misfeeds troubleshooting • "Paper jam in the printer" on page 106 • "Paper jam in the paper support" on page 107 • "Paper jam in the duplex unit" on page 107 • "Paper or specialty media misfeeds"...

User Guide
Page 107
... area behind the duplex cover has protruding ribs as part of the paper path. Troubleshooting 107 Paper jam in the duplex unit Note: The parts inside the printer are sensitive. Avoid unnecessarily touching these parts while clearing jams. 1 Push down the duplex latches and pull out the duplex unit...out. To avoid injury, use caution when accessing this area for jammed paper. 3 Firmly grasp the paper, and then gently pull it . 4 Press to turn the printer back on . 1 Press to turn off the printer. 2 Firmly grasp the paper, and then gently pull it . 3 Press to turn the printer...
... area behind the duplex cover has protruding ribs as part of the paper path. Troubleshooting 107 Paper jam in the duplex unit Note: The parts inside the printer are sensitive. Avoid unnecessarily touching these parts while clearing jams. 1 Push down the duplex latches and pull out the duplex unit...out. To avoid injury, use caution when accessing this area for jammed paper. 3 Firmly grasp the paper, and then gently pull it . 4 Press to turn the printer back on . 1 Press to turn off the printer. 2 Firmly grasp the paper, and then gently pull it . 3 Press to turn the printer...
User Guide
Page 149
...on wireless network 72 informational solutions 94 infrastructure network 86 ink conserving 8 ink cartridges ordering 13 replacing 14 using genuine Lexmark 13 ink levels checking 97 inserting a memory card or flash drive 38 installation cable 85, 86 installing network printer ...interactive solutions 94 interference wireless network 88 internal wireless print server resetting to factory default settings 116 IP address 91, 92 configuring 75 IP address, assigning 92 iron-on transfers 30 J jams and misfeeds troubleshooting paper jam in the duplex unit 107 paper jam in the paper support 107 paper jam...
...on wireless network 72 informational solutions 94 infrastructure network 86 ink conserving 8 ink cartridges ordering 13 replacing 14 using genuine Lexmark 13 ink levels checking 97 inserting a memory card or flash drive 38 installation cable 85, 86 installing network printer ...interactive solutions 94 interference wireless network 88 internal wireless print server resetting to factory default settings 116 IP address 91, 92 configuring 75 IP address, assigning 92 iron-on transfers 30 J jams and misfeeds troubleshooting paper jam in the duplex unit 107 paper jam in the paper support 107 paper jam...
User Guide
Page 150
...paper conserving 8 paper and other supplies ordering 15 paper and specialty media loading various types 27 paper default settings saving 30 paper exit tray location 12 paper feed guard location 12 paper guides location 11 paper jam in the duplex unit 107 paper jam in the paper support 107 paper jam in the printer 106 paper or specialty media misfeeds 108 paper...scan 63 phone book, e-mail setting up 67 photo cards 29 Photo Reprint 94 photo/glossy paper 29 photos adjusting brightness 40 applying color effects 40 attaching to e-mail 70 copying photos 53 cropping 40 editing using touch screen 40 ...
...paper conserving 8 paper and other supplies ordering 15 paper and specialty media loading various types 27 paper default settings saving 30 paper exit tray location 12 paper feed guard location 12 paper guides location 11 paper jam in the duplex unit 107 paper jam in the paper support 107 paper jam in the printer 106 paper or specialty media misfeeds 108 paper...scan 63 phone book, e-mail setting up 67 photo cards 29 Photo Reprint 94 photo/glossy paper 29 photos adjusting brightness 40 applying color effects 40 attaching to e-mail 70 copying photos 53 cropping 40 editing using touch screen 40 ...
User Guide
Page 152
... long or freezes the computer 112 troubleshooting, e-mail cannot attach files 113 cannot send e-mail 112 troubleshooting, jams and misfeeds paper jam in the duplex unit 107 paper jam in the paper support 107 paper jam in the printer 106 paper or specialty media 108 troubleshooting, memory card cannot print from a flash drive 114 checklist 113 nothing happens when...
... long or freezes the computer 112 troubleshooting, e-mail cannot attach files 113 cannot send e-mail 112 troubleshooting, jams and misfeeds paper jam in the duplex unit 107 paper jam in the paper support 107 paper jam in the printer 106 paper or specialty media 108 troubleshooting, memory card cannot print from a flash drive 114 checklist 113 nothing happens when...


