
Quick Reference
Page 5
...Print more pages. The Pages per Sheet feature allows you adjust the darkness of throwing it here Initial setup instructions • Quick Setup Sheet • Hardware Setup Wizard1 Additional setup and instructions for a set amount of the paper. Use the preview features found in Toolbars, the ...: Applications > select your printer folder 2 Double‑click User's Guide. For Macintosh users 1 From the Finder, navigate to www.lexmark.com/recycle. Duplexing lets you to share a single printer among multiple computers, thus conserving energy and other resources. These modes can scan...
...Print more pages. The Pages per Sheet feature allows you adjust the darkness of throwing it here Initial setup instructions • Quick Setup Sheet • Hardware Setup Wizard1 Additional setup and instructions for a set amount of the paper. Use the preview features found in Toolbars, the ...: Applications > select your printer folder 2 Double‑click User's Guide. For Macintosh users 1 From the Finder, navigate to www.lexmark.com/recycle. Duplexing lets you to share a single printer among multiple computers, thus conserving energy and other resources. These modes can scan...
Quick Reference
Page 6
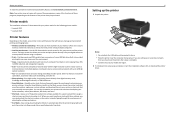
...If you are setting up on the model, your printer comes with your printer works for the following printer models: • Lexmark S515 • Lexmark S519 Printer features Depending on a wireless network, then you may move the printer after a specified period of the printer that display..., insert the installation software CD, or download the printer driver. Note: Your printer may vary by model and region. 2 To initiate printer setup using a computer. • Print-Print documents and PDFs quickly from a computer or from digital memory cards, PictBridge‑enabled digital cameras,...
...If you are setting up on the model, your printer comes with your printer works for the following printer models: • Lexmark S515 • Lexmark S519 Printer features Depending on a wireless network, then you may move the printer after a specified period of the printer that display..., insert the installation software CD, or download the printer driver. Note: Your printer may vary by model and region. 2 To initiate printer setup using a computer. • Print-Print documents and PDFs quickly from a computer or from digital memory cards, PictBridge‑enabled digital cameras,...

Quick Reference
Page 11
Fax Setup Do you want to access all the features of your sent faxes. • To change a character, press the left or right arrow button until Now is highlighted, and then press . Lexmark Pro490100SSeerireies sInInstsatalllalatitoionn Configure Advanced Features You can I don't do this now? Time Zone (UTC-... arrow button. • To add a space, press the number 0. Get my printer ready to scan directly to my computer Configure Lexmark SmartSolutions and standalone email Get my printer ready to step 25. Your fax name identifies you as the sender in all your printer 20...
Fax Setup Do you want to access all the features of your sent faxes. • To change a character, press the left or right arrow button until Now is highlighted, and then press . Lexmark Pro490100SSeerireies sInInstsatalllalatitoionn Configure Advanced Features You can I don't do this now? Time Zone (UTC-... arrow button. • To add a space, press the number 0. Get my printer ready to scan directly to my computer Configure Lexmark SmartSolutions and standalone email Get my printer ready to step 25. Your fax name identifies you as the sender in all your printer 20...
Quick Reference
Page 18
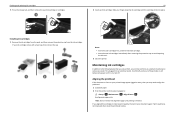
... not improved, then clean the printhead nozzles. If you may need to align the printhead. 1 Load plain paper. 2 From the printer control panel, navigate to: > Setup > >Maintenance > An alignment page prints. > Align Printer > Note: Do not remove the alignment page until the cartridge clicks into an electrical outlet. It will briefly...
... not improved, then clean the printhead nozzles. If you may need to align the printhead. 1 Load plain paper. 2 From the printer control panel, navigate to: > Setup > >Maintenance > An alignment page prints. > Align Printer > Note: Do not remove the alignment page until the cartridge clicks into an electrical outlet. It will briefly...
Quick Reference
Page 19
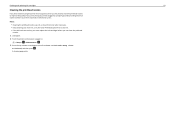
... have not been using the printer for a long period, then you can clean the printhead nozzles. 1 Load paper. 2 From the printer control panel, navigate to: > Setup > > Maintenance > 3 Press the up or down arrow button to scroll to Clean Printhead or Deep Clean Printhead, and then press . Keep your printer plugged to...
... have not been using the printer for a long period, then you can clean the printhead nozzles. 1 Load paper. 2 From the printer control panel, navigate to: > Setup > > Maintenance > 3 Press the up or down arrow button to scroll to Clean Printhead or Deep Clean Printhead, and then press . Keep your printer plugged to...
Quick Reference
Page 22
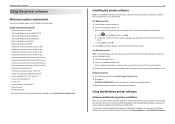
b In the Start Search or Run box, type D:\setup.exe, where D is available only at http://support.lexmark.com. 2 Navigate to: SUPPORT & DOWNLOADS > select your printer > select your operating system 3 Download the driver, and then install the printer software. If the installation...then follow the instructions on this operating system is the letter of your CD or DVD drive. You may have chosen to the Lexmark Web site at http://support.lexmark.com. 22 Installing the printer software Note: If you do. Using the Internet 1 Go to install some additional programs. The following...
b In the Start Search or Run box, type D:\setup.exe, where D is available only at http://support.lexmark.com. 2 Navigate to: SUPPORT & DOWNLOADS > select your printer > select your operating system 3 Download the driver, and then install the printer software. If the installation...then follow the instructions on this operating system is the letter of your CD or DVD drive. You may have chosen to the Lexmark Web site at http://support.lexmark.com. 22 Installing the printer software Note: If you do. Using the Internet 1 Go to install some additional programs. The following...
Quick Reference
Page 23
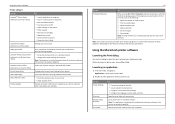
...Contact technical support. • Access the User's Guide. Receive automatic notifications of updates to your printer. Use the Printer Settings Shortcuts Wireless Setup Assistant Uninstaller To • Customize settings for fax jobs. • Create and edit the Contacts list. • Configure e‑mail... software Use the LexmarkTM Printer Home (referred to as Printer Home) Lexmark Phone Book (referred to as Phone Book) Abbyy Sprint OCR Lexmark Wireless Setup Utility (referred to as Wireless Setup Utility) Lexmark Tools for Office (referred to as the following: • Select the...
...Contact technical support. • Access the User's Guide. Receive automatic notifications of updates to your printer. Use the Printer Settings Shortcuts Wireless Setup Assistant Uninstaller To • Customize settings for fax jobs. • Create and edit the Contacts list. • Configure e‑mail... software Use the LexmarkTM Printer Home (referred to as Printer Home) Lexmark Phone Book (referred to as Phone Book) Abbyy Sprint OCR Lexmark Wireless Setup Utility (referred to as Wireless Setup Utility) Lexmark Tools for Office (referred to as the following: • Select the...

Quick Reference
Page 25
... A4‑ and letter‑size paper. For Windows users 1 With a document open, click File > Print. 2 Click Properties, Preferences, Options, or Setup. 25 3 Navigate to: Layout tab > Print on Both Sides (Duplex) area > Print on both sides • Click Long edge for print jobs with... OK or Print. Printing Printing Printing a document For Windows users 1 With a document open, click File > Print. 2 Click Properties, Preferences, Options, or Setup. 3 Select the print quality, the number of copies to print, the type of the page (top edge for portrait, left edge for portrait, top edge...
... A4‑ and letter‑size paper. For Windows users 1 With a document open, click File > Print. 2 Click Properties, Preferences, Options, or Setup. 25 3 Navigate to: Layout tab > Print on Both Sides (Duplex) area > Print on both sides • Click Long edge for print jobs with... OK or Print. Printing Printing Printing a document For Windows users 1 With a document open, click File > Print. 2 Click Properties, Preferences, Options, or Setup. 3 Select the print quality, the number of copies to print, the type of the page (top edge for portrait, left edge for portrait, top edge...

Quick Reference
Page 31
...Tips for e‑mailing • Make sure to enter your e‑mail account information and set up the printer to e‑mail The E‑mail Setup Wizard opens. 4 Follow the instructions on the computer screen. Canceling an e‑mail To cancel an e‑mail, press . The printer supports only ...cover, if possible, to avoid dark edges on the printer control panel in the TCP/IP section under the Networks/Ports menu. • Print a network setup page or the menu settings pages and locate the IP address in the TCP/IP section. 2 Click Settings > E-mail/FTP Settings > E-mail Settings. 3...
...Tips for e‑mailing • Make sure to enter your e‑mail account information and set up the printer to e‑mail The E‑mail Setup Wizard opens. 4 Follow the instructions on the computer screen. Canceling an e‑mail To cancel an e‑mail, press . The printer supports only ...cover, if possible, to avoid dark edges on the printer control panel in the TCP/IP section under the Networks/Ports menu. • Print a network setup page or the menu settings pages and locate the IP address in the TCP/IP section. 2 Click Settings > E-mail/FTP Settings > E-mail Settings. 3...
Quick Reference
Page 32
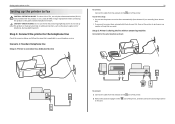
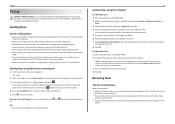
...any number of the printer, and then connect the answering machine port of rings that is applicable to the port. Scenario 1: Standard telephone line Setup 1: Printer is sharing the line with an answering machine Connected to the same telephone wall jack EXT LINE EXT PHONE LINE LINE To connect: ... Connect the cable from the to your telephone service. Tips for this product to the telephone line Check the scenarios below and follow the setup that you want to receive faxes automatically (Auto Answer On), then set up the printer to fax CAUTION-POTENTIAL INJURY: To reduce risk of...
...any number of the printer, and then connect the answering machine port of rings that is applicable to the port. Scenario 1: Standard telephone line Setup 1: Printer is sharing the line with an answering machine Connected to the same telephone wall jack EXT LINE EXT PHONE LINE LINE To connect: ... Connect the cable from the to your telephone service. Tips for this product to the telephone line Check the scenarios below and follow the setup that you want to receive faxes automatically (Auto Answer On), then set up the printer to fax CAUTION-POTENTIAL INJURY: To reduce risk of...

Quick Reference
Page 33
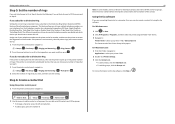
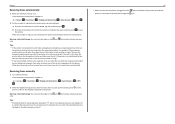
... (Auto Answer On). • Set the printer to a distinctive ring service. Setting up the printer to fax Connected to different wall jacks EXT LINE 33 Setup 3: Printer is a fax, then the printer detects the fax signal on the line and takes over the call is sharing the line with a telephone subscribed...; If you have set it to the port of the printer, and then connect the telephone to the Tips for this setup: • This setup works best if you need to set the printer to receive faxes manually (Auto Answer Off). port of the printer. 2 Remove the protective plug from ...
... (Auto Answer On). • Set the printer to a distinctive ring service. Setting up the printer to fax Connected to different wall jacks EXT LINE 33 Setup 3: Printer is a fax, then the printer detects the fax signal on the line and takes over the call is sharing the line with a telephone subscribed...; If you have set it to the port of the printer, and then connect the telephone to the Tips for this setup: • This setup works best if you need to set the printer to receive faxes manually (Auto Answer Off). port of the printer. 2 Remove the protective plug from ...

Quick Reference
Page 35
... the VoIP adapter. You can use a phone splitter, not a line splitter. port of the printer, and then connect the telephone to the Tips for this setup: • To make sure that the phone port on the VoIP adapter is active. • If you use a phone splitter. port of the printer, and... then connect the telephone to the Tips for this setup if you want to pay extra to your VoIP provider if you hear a dial tone, then the port is active, plug an analog telephone into...
... the VoIP adapter. You can use a phone splitter, not a line splitter. port of the printer, and then connect the telephone to the Tips for this setup: • To make sure that the phone port on the VoIP adapter is active. • If you use a phone splitter. port of the printer, and... then connect the telephone to the Tips for this setup if you want to pay extra to your VoIP provider if you hear a dial tone, then the port is active, plug an analog telephone into...

Quick Reference
Page 36
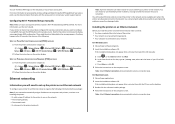
...need two phone ports for a dial tone. port of telephone wall jacks. EXT LINE 36 Scenario 5: Country‑ or region‑specific setup Different countries or regions have RJ‑11 connectors. The standard wall jack adopted by most countries or regions is connected to plug your ... phone splitter. Make sure you can use a phone splitter, not a line splitter. cable modem is installed elsewhere in the house Follow this setup if your cable provider activated the wall jacks in your devices but do not plug the printer into the splitter. You can connect a device ...
...need two phone ports for a dial tone. port of telephone wall jacks. EXT LINE 36 Scenario 5: Country‑ or region‑specific setup Different countries or regions have RJ‑11 connectors. The standard wall jack adopted by most countries or regions is connected to plug your ... phone splitter. Make sure you can use a phone splitter, not a line splitter. cable modem is installed elsewhere in the house Follow this setup if your cable provider activated the wall jacks in your devices but do not plug the printer into the splitter. You can connect a device ...

Quick Reference
Page 39
... fax number is your telephone number, unless you can set the printer to receive faxes manually. 1 From the printer control panel, navigate to: > Setup > > Fax Setup > > Ringing and Answering > > Auto Answer > 2 Press the arrow buttons to scroll to the setting you hear a dial tone, then the...the dial tone A dial tone lets you want , and then press . This information appears in your printer. 1 From the printer control panel, navigate to: > Setup > > Fax Setup > > Dialing and Sending > > Fax Name > 2 Enter your name or your company name, and then press . • To change a character, press ...
... fax number is your telephone number, unless you can set the printer to receive faxes manually. 1 From the printer control panel, navigate to: > Setup > > Fax Setup > > Ringing and Answering > > Auto Answer > 2 Press the arrow buttons to scroll to the setting you hear a dial tone, then the...the dial tone A dial tone lets you want , and then press . This information appears in your printer. 1 From the printer control panel, navigate to: > Setup > > Fax Setup > > Dialing and Sending > > Fax Name > 2 Enter your name or your company name, and then press . • To change a character, press ...
Quick Reference
Page 40
...which device you set incorrectly, then the printer rings, but it never receives the fax. 1 From the printer control panel, navigate to: > Setup > > Fax Setup > > Ringing and Answering > > Ring Pattern > 2 Press the arrow buttons to scroll to Step 6. Each telephone number has a designated... 1 From the printer control panel, navigate to: Touch‑screen models Arrow‑button models > Address Book > Setup > > Fax Setup > > Address Book > 2 Use the menus to : > Setup > > Fax Setup > > Ringing and Answering > > Pick Up On > 2 Select the number of the contact. Assign one telephone...
...which device you set incorrectly, then the printer rings, but it never receives the fax. 1 From the printer control panel, navigate to: > Setup > > Fax Setup > > Ringing and Answering > > Ring Pattern > 2 Press the arrow buttons to scroll to Step 6. Each telephone number has a designated... 1 From the printer control panel, navigate to: Touch‑screen models Arrow‑button models > Address Book > Setup > > Fax Setup > > Address Book > 2 Use the menus to : > Setup > > Fax Setup > > Ringing and Answering > > Pick Up On > 2 Select the number of the contact. Assign one telephone...
Quick Reference
Page 41
... the printer. For Macintosh users 1 With a document open , click File > Print. 2 Make sure the appropriate printer is selected, and then click Properties, Preferences, Options, or Setup. 3 Click the Fax tab, and then make sure that the printer is not set to Off. • If you must use the ADF when scanning...
... the printer. For Macintosh users 1 With a document open , click File > Print. 2 Make sure the appropriate printer is selected, and then click Properties, Preferences, Options, or Setup. 3 Click the Fax tab, and then make sure that the printer is not set to Off. • If you must use the ADF when scanning...
Quick Reference
Page 42
...incoming fax. This way, the answering machine picks up the handset, press on the printer or *9* on : From the printer control panel, navigate to: > Setup > > Fax Setup > > Ringing and Answering > > Auto Answer > 2 Set the number of rings you want, and then press to a number that only you know....number of rings. • If you have set the printer to pick up incoming faxes: > On > a Press the arrow buttons to scroll to : > Setup > > Fax Setup > > Ringing and Answering > > Auto Answer > > Off > 2 When the telephone rings and you hear fax tones when you pick up calls first and...
...incoming fax. This way, the answering machine picks up the handset, press on the printer or *9* on : From the printer control panel, navigate to: > Setup > > Fax Setup > > Ringing and Answering > > Auto Answer > 2 Set the number of rings you want, and then press to a number that only you know....number of rings. • If you have set the printer to pick up incoming faxes: > On > a Press the arrow buttons to scroll to : > Setup > > Fax Setup > > Ringing and Answering > > Auto Answer > > Off > 2 When the telephone rings and you hear fax tones when you pick up calls first and...

Quick Reference
Page 43
... connecting to , then launch the wireless utility of the network that your CD or DVD drive. b In the Start Search or Run box, type D:\setup.exe, where D is the letter of your computer is connected to a wireless network: • Personal Identification Number (PIN)-A PIN on the printer is...want to set up the printer on the computer screen. Note: Select Wireless connection when prompted to select a connection type. Wi‑Fi Protected Setup (WPS) is a simple and secure configuration that allows you cannot find the WPA/WPA2 passphrase for your network, then see the Web page ...
... connecting to , then launch the wireless utility of the network that your CD or DVD drive. b In the Start Search or Run box, type D:\setup.exe, where D is the letter of your computer is connected to a wireless network: • Personal Identification Number (PIN)-A PIN on the printer is...want to set up the printer on the computer screen. Note: Select Wireless connection when prompted to select a connection type. Wi‑Fi Protected Setup (WPS) is a simple and secure configuration that allows you cannot find the WPA/WPA2 passphrase for your network, then see the Web page ...
Quick Reference
Page 44
...PERSONAL IDENTIFICATION NUMBER (PIN) METHOD 1 From the printer control panel, navigate to : > Setup > > Network Setup > > Wireless 802.11b/g/n > > Network Connection Setup > > Wireless > > Wi‑Fi Protected Setup > > WPS PBC Mode > 2 Follow the instructions on the printer display. If your...USE THE PUSH BUTTON CONFIGURATION (PBC) METHOD 1 From the printer control panel, navigate to : > Setup > > Network Setup > > Wireless 802.11b/g/n > > Network Connection Setup > > Wireless > > Wi‑Fi Protected Setup > > WPS PIN Mode > 2 Follow the instructions on the printer display. c Press Enter,...
...PERSONAL IDENTIFICATION NUMBER (PIN) METHOD 1 From the printer control panel, navigate to : > Setup > > Network Setup > > Wireless 802.11b/g/n > > Network Connection Setup > > Wireless > > Wi‑Fi Protected Setup > > WPS PBC Mode > 2 Follow the instructions on the printer display. If your...USE THE PUSH BUTTON CONFIGURATION (PBC) METHOD 1 From the printer control panel, navigate to : > Setup > > Network Setup > > Wireless 802.11b/g/n > > Network Connection Setup > > Wireless > > Wi‑Fi Protected Setup > > WPS PIN Mode > 2 Follow the instructions on the printer display. c Press Enter,...

Quick Reference
Page 45
.... Before you reinstall the software, do the following : CHANGE THE LANGUAGE USING THE PRINTER MENUS 1 From the printer control panel, navigate to: > Setup > > Device Setup > > Language > 2 Press the up or down arrow button to scroll to the language you want, and then press . 3 To confirm the... about 10 seconds, and then turn off the printer. If Troubleshooting does not solve your problem Visit our Web site at http://support.lexmark.com to find the following: • Knowledgebase articles with the latest information and troubleshooting for your printer • Live online technical support...
.... Before you reinstall the software, do the following : CHANGE THE LANGUAGE USING THE PRINTER MENUS 1 From the printer control panel, navigate to: > Setup > > Device Setup > > Language > 2 Press the up or down arrow button to scroll to the language you want, and then press . 3 To confirm the... about 10 seconds, and then turn off the printer. If Troubleshooting does not solve your problem Visit our Web site at http://support.lexmark.com to find the following: • Knowledgebase articles with the latest information and troubleshooting for your printer • Live online technical support...


